#include<iostream>
using namespace std;

//抽象类
//抽象cpu类
class CPU
{
public:
   virtual void calcuate()=0;
};
//抽象显卡类
class VideoCard
{
public:
   virtual void display()=0;
};
//抽象内存条类
class Memory
{
public:
  virtual void storage()=0;

};

//电脑类
class Computer
{
public:
  //构造函数
  Computer(CPU *cpu, VideoCard *vc, Memory *mem)
  {
   m_cpu = cpu;
   m_vc = vc;
   m_mem = mem;
  }
  //什么行为,提供变量工作的函数
  void work()
  {
    m_cpu->calcuate();
    m_vc->display();
    m_mem->storage();
  }
  ~Computer()
{
  if(m_cpu!=NULL)
  {
    delete m_cpu;
    m_cpu =NULL;
  }
if(m_vc!=NULL)
  {
    delete m_vc;
    m_vc =NULL;
  }
if(m_mem!=NULL)
  {
    delete m_mem;
    m_mem =NULL;
  }

}

private:
// 这个类先写private
   CPU *m_cpu;     //定义一个CPU的指针
   VideoCard *m_vc;
   Memory *m_mem;


};

//具体厂商
//intel厂商
class IntelCPU : public CPU
{
public:
   virtual void calcuate()
   {
    cout<<"Intel的CPU开始计算了!"<<endl;
   }

};

class IntelVideoCard: public VideoCard
{
public:
   virtual void display()
   {
    cout<<"Intel的显卡开始计算了!"<<endl;
   }
};

class IntelMemory: public Memory
{
public:
   virtual void storage()
   {
    cout<<"Intel的存储开始计算了!"<<endl;
   }
};

// lenovo
class LenovoCPU : public CPU
{
public:
   virtual void calcuate()
   {
    cout<<"Intel的CPU开始计算了!"<<endl;
   }

};

class LenovoVideoCard: public VideoCard
{
public:
   virtual void display()
   {
    cout<<"Intel的显卡开始计算了!"<<endl;
   }
};

class LenovoMemory: public Memory
{
public:
   virtual void storage()
   {
    cout<<"Intel的存储开始计算了!"<<endl;
   }
};


void test01()
{
    //第一台电脑零件
    //new返回的是同类型的指针
    //int *p= new int  或int[10]
    CPU *IntelCpu = new IntelCPU;
    VideoCard * IntelCard = new IntelVideoCard;
    Memory *IntelMem = new IntelMemory;
//创建第一台电脑
    Computer * computer1= new Computer(IntelCpu,IntelCard,IntelMem);
    computer1->work();
    delete computer1;
    //method1  继续释放new的
    // 放在析构中
    // delete IntelCPU;
    // delete IntelCard;
    // delete IntelMem;
//创建第二台
    cout<<"创建第二胎"<<endl;
    CPU *LenovoCpu = new LenovoCPU;
    VideoCard * LenovoCard = new LenovoVideoCard;
    Memory *LenovoMem = new LenovoMemory;
    //或者直接new
    // Computer *computer2 = new Computer( new LenovoCPU,new LenovoVideoCard,new LenovoMemory);
    Computer * computer2 = new Computer(LenovoCpu,LenovoCard,LenovoMem);
    computer2->work();
    delete computer2;

}
int main()
{
  test01();
//   system("pause");
  return 0;
}


cpu还没给m_cpu时,
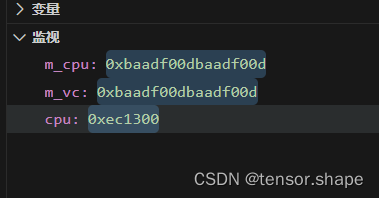
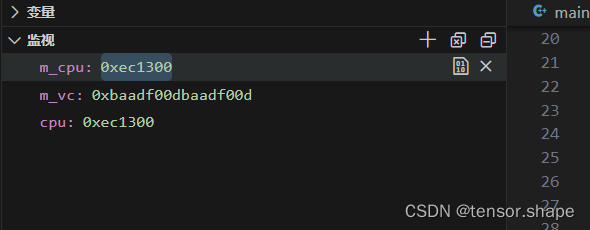


析构其它的new
二、
// #include<iostream>
// using namespace std;

// //抽象类
// //抽象cpu类
// class CPU
// {
// public:
//    virtual void calcuate()=0;
// };
// //抽象显卡类
// class VideoCard
// {
// public:
//    virtual void display()=0;
// };
// //抽象内存条类
// class Memory
// {
// public:
//   virtual void storage()=0;

// };

// //电脑类
// class Computer
// {
// public:
//   //构造函数
//   Computer(CPU *cpu, VideoCard *vc, Memory *mem)
//   {
//    m_cpu = cpu;
//    m_vc = vc;
//    m_mem = mem;
//   }
//   //什么行为,提供变量工作的函数
//   void work()
//   {
//     m_cpu->calcuate();
//     m_vc->display();
//     m_mem->storage();
//   }
//   ~Computer()
// {
//   if(m_cpu!=NULL)
//   {
//     delete m_cpu;
//     m_cpu =NULL;
//   }
// if(m_vc!=NULL)
//   {
//     delete m_vc;
//     m_vc =NULL;
//   }
// if(m_mem!=NULL)
//   {
//     delete m_mem;
//     m_mem =NULL;
//   }

// }

// private:
// // 这个类先写private
//    CPU *m_cpu;     //定义一个CPU的指针
//    VideoCard *m_vc;
//    Memory *m_mem;


// };

// //具体厂商
// //intel厂商
// class IntelCPU : public CPU
// {
// public:
//    virtual void calcuate()
//    {
//     cout<<"Intel的CPU开始计算了!"<<endl;
//    }

// };

// class IntelVideoCard: public VideoCard
// {
// public:
//    virtual void display()
//    {
//     cout<<"Intel的显卡开始计算了!"<<endl;
//    }
// };

// class IntelMemory: public Memory
// {
// public:
//    virtual void storage()
//    {
//     cout<<"Intel的存储开始计算了!"<<endl;
//    }
// };

// // lenovo
// class LenovoCPU : public CPU
// {
// public:
//    virtual void calcuate()
//    {
//     cout<<"Intel的CPU开始计算了!"<<endl;
//    }

// };

// class LenovoVideoCard: public VideoCard
// {
// public:
//    virtual void display()
//    {
//     cout<<"Intel的显卡开始计算了!"<<endl;
//    }
// };

// class LenovoMemory: public Memory
// {
// public:
//    virtual void storage()
//    {
//     cout<<"Intel的存储开始计算了!"<<endl;
//    }
// };


// void test01()
// {
//     //第一台电脑零件
//     //new返回的是同类型的指针
//     //int *p= new int  或int[10]
//     CPU *IntelCpu = new IntelCPU;
//     VideoCard * IntelCard = new IntelVideoCard;
//     Memory *IntelMem = new IntelMemory;
// //创建第一台电脑
//     Computer * computer1= new Computer(IntelCpu,IntelCard,IntelMem);
//     computer1->work();
//     delete computer1;
//     //method1  继续释放new的
//     // 放在析构中
//     // delete IntelCPU;
//     // delete IntelCard;
//     // delete IntelMem;
// //创建第二台
//     cout<<"创建第二胎"<<endl;
//     CPU *LenovoCpu = new LenovoCPU;
//     VideoCard * LenovoCard = new LenovoVideoCard;
//     Memory *LenovoMem = new LenovoMemory;
//     //或者直接new
//     // Computer *computer2 = new Computer( new LenovoCPU,new LenovoVideoCard,new LenovoMemory);
//     Computer * computer2 = new Computer(LenovoCpu,LenovoCard,LenovoMem);
//     computer2->work();
//     delete computer2;

// }
// int main()
// {
//   test01();
// //   system("pause");
//   return 0;
// }


#include<iostream>
using namespace std;

class base
{

public:
// 无参构造
   base()
   {
	cout<<"父类构造"<<endl;
   }

   ~base()
   {
    cout<<"父类析构"<<endl;

   }

};
class son :public base
{
public:
	son()
	{
		cout<<"儿子构造"<<endl;
	}

  ~son()
   {
    cout<<"儿子析构"<<endl;

   }


};


int main()
{
   son x;
   return 0;
}
输出结果:
父类构造
儿子构造
儿子析构
父类析构
debug信息
Breakpoint 1, main () at /mnt/workspace/test/test.cpp:208
208     {
(gdb) s
209        son x;
(gdb)
son::son (this=0x7ffea3799fe7) at /mnt/workspace/test/test.cpp:193
193             {
(gdb)
base::base (this=0x7ffea3799fe7) at /mnt/workspace/test/test.cpp:179
179             cout<<"父类构造"<<endl;
(gdb)
父类构造
180        }
(gdb)
son::son (this=0x7ffea3799fe7) at /mnt/workspace/test/test.cpp:194
194                     cout<<"儿子构造"<<endl;
(gdb)
儿子构造
195             }
(gdb)
main () at /mnt/workspace/test/test.cpp:210
210        return 0;
(gdb)
211     }
(gdb)
son::~son (this=0x7ffea3799fe7, __in_chrg=<optimized out>) at /mnt/workspace/test/test.cpp:199
199         cout<<"儿子析构"<<endl;
(gdb)
儿子析构
201        }
(gdb)
base::~base (this=0x7ffea3799fe7, __in_chrg=<optimized out>) at /mnt/workspace/test/test.cpp:184
184         cout<<"父类析构"<<endl;
(gdb)
父类析构
186        }
(gdb)
#include
using namespace std;
class base
{
public:
virtual void sample()=0;
};
class son :public base
{
public:
virtual void sample()
{
cout<<“快得很”<<endl;
}
};
int main()
{
   son x;
   //调用方法才有输出
   x.sample();


   son *p = new son;
   p->sample();
   delete p;
   return 0;
}
输出两次,
快得很
快得很
3)
#include<iostream>
using namespace std;

class base
{
public:
 base(int &m,int &n)
 {
  m1=m;
  n1=n;

 }
 void prit()
 {

   cout<<"m:"<<m1<<"n:"<<n1<<endl;

 }
  // virtual void sample()=0;
  void  fun(){}
private:
  int m1;
  int n1;
};


class son :public base
{
public:
  virtual void sample()
  {
   cout<<"快得很"<<endl;
  }


};


int main()
{
  //  son x;
  //  //调用方法才有输出
  //  x.sample();
  int c=10;
  int b =20;
  //抽象类不能直接直接实例化
  base a(c,b);
  a.prit();
抽象类不能直接直接实例化,去掉虚幻书,加上fun的一个空定义