# 前置知识
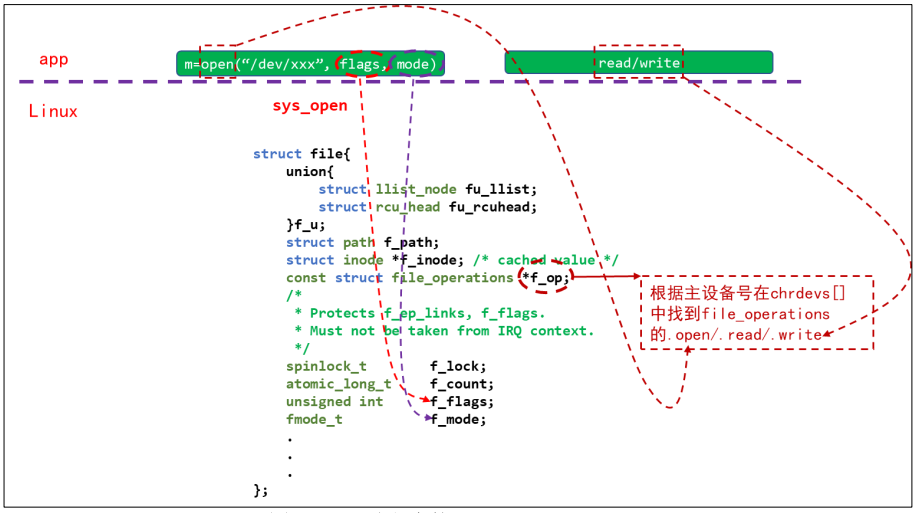
APP 打开文件时,可以得到一个整数,这个整数被称为文件句柄。对于 APP的每一个文件句柄,在内核里面都有一个“ struct file”与之对应。
- 使用open函数时,用户态调用 API 触发异常进入内核
- 内核识别异常后,取出异常值,从而调用sys_call_table[__NR_open],sys_call_table就是一个数组,其值为typedef void (*sys_call_ptr_t)(void)类型的函数指针,内容大致如下:
__SYSCALL_COMMON(0, sys_read, sys_read)
__SYSCALL_COMMON(1, sys_write, sys_write)
__SYSCALL_COMMON(2, sys_open, sys_open)
__SYSCALL_COMMON(3, sys_close, sys_close)
__SYSCALL_COMMON(5, sys_newfstat, sys_newfstat)
...
...
...- 最后调用sys_open函数,sys_open函数定义如下:
SYSCALL_DEFINE3(open, const char __user *, filename, int, flags, int, mode)
{
	long ret;

	if (force_o_largefile())
		flags |= O_LARGEFILE;

	ret = do_sys_open(AT_FDCWD, filename, flags, mode);
	/* avoid REGPARM breakage on x86: */
	asmlinkage_protect(3, ret, filename, flags, mode);
	return ret;
}- 在sys_open函数里面,又调用了 de_sys_open 函数,定义如下:
long do_sys_open(int dfd, const char __user *filename, int flags, int mode)
{
	char *tmp = getname(filename);
	int fd = PTR_ERR(tmp);

	if (!IS_ERR(tmp)) {
		fd = get_unused_fd_flags(flags);        /* 获取未使用的函数句柄 */
		if (fd >= 0) {
			struct file *f = do_filp_open(dfd, tmp, flags, mode, 0);    /* 打开文件,得到file结构体 */
			if (IS_ERR(f)) {
				put_unused_fd(fd);
				fd = PTR_ERR(f);
			} else {
				fsnotify_open(f);
				fd_install(fd, f);    /* 在当前进程里面记录下来 */
			}
		}
		putname(tmp);
	}
	return fd;
}通过以上过程,就绑定了文件句柄fd与file结构体,后续操作文件句柄fd,实际上就是操作文件结构体file,文件结构体file如下,在结构体中,有f_op,里面包含了读写等对文件的操作;有f_flags,这就是使用open函数时的打开模式;有f_pos,这就是使用读写函数时,指向文件的位置,整体情况如下图:

# 驱动编写流程
从上述可以得出,当我们使用open、write、read、close等函数操作驱动时,最终调用的是最底层file_operations结构体中的open、write、read、close函数。那么将这些函数完善,并且上报到系统,就是编写驱动程序。

#include <linux/module.h>
#include <asm/uaccess.h>
#include <linux/fs.h>
#include <linux/errno.h>
#include <linux/miscdevice.h>
#include <linux/kernel.h>
#include <linux/major.h>
#include <linux/mutex.h>
#include <linux/proc_fs.h>
#include <linux/seq_file.h>
#include <linux/stat.h>
#include <linux/init.h>
#include <linux/device.h>
#include <linux/tty.h>
#include <linux/kmod.h>
#include <linux/gfp.h>

#define __CHRDEV_REGION_

#define MIN(a, b) (a < b ? a : b)

#define DEVICE_DRIVER_NAME      "test_drv"      /* 设备驱动名称 */
#define DEVICE_DRIVER_CNT       1               /* 设备号个数 */

static char kernal_buffer[1024];

typedef struct {
    dev_t devid;			    /* 设备号 	 */
    int major;                  /* 主设备号 */
    int minor;				    /* 次设备号   */

    struct cdev cdev;		    /* cdev 	*/
    char class_name[20];        /* 类名称 */
    struct class *class;		/* 类 */
    struct device *device;	    /* 设备 */
}test_drv_Typedef;

static test_drv_Typedef test_driver = {
    .devid = 0,
    .major = 0,
    .minor = 0,
    .class_name = "test_class",
    .class = NULL,
    .device = NULL
};

static int test_drv_open(struct inode *node, struct file *fle)
{
    printk("test_drv_open\r\n");

    return 0;
}

static int test_drv_release(struct inode *node, struct file *fle)
{
    printk("test_drv_open\r\n");

    return 0;
}

static ssize_t test_drv_write(struct file *fle, const char __user *buf, size_t size, loff_t *offest)
{
    ssize_t err;

    printk("test_drv_write\r\n");

    err = copy_from_user(kernal_buffer, buf, MIN(sizeof(kernal_buffer), size));

    return err;
}

static ssize_t test_drv_read(struct file *fle, char __user *buf, size_t size, loff_t *offest)
{
    ssize_t err;

    printk("test_drv_read\r\n");

    err = copy_to_user(buf, kernal_buffer, MIN(sizeof(kernal_buffer), size));

    return err;
}

/* 2. 编写 file_operations 结构体 */
static const struct file_operations test_drv_op = {
    .owner = THIS_MODULE,
    .open = test_drv_open,
    .release = test_drv_release,
    .write = test_drv_write,
    .read = test_drv_read,
};

/* 3. 编写字符设备驱动模块加载 */
/* 3.1 创建设备号、注册字符设备驱动 */
/* 3.2 创建一个class类型的对象 */
/* 3.3 生成设备节点并导出到用户空间 */
static int __init test_drv_init(void)
{
    int ret = 0;

    printk("test_drv_init\r\n");

    /* 创建设备号 */
#ifndef __CHRDEV_REGION_
    /* 静态和动态注册两种方法,主要是通过判断给定的主设备号是否为0来进行区别 */
    test_driver.major = register_chrdev(0, DEVICE_DRIVER_NAME, &test_drv_op);
    test_driver.devid = MKDEV(test_driver.major, test_driver.minor);
#else
    if(test_driver.major)   /* 静态注册 */
    {
        test_driver.devid = MKDEV(test_driver.major, test_driver.minor);
        ret = register_chrdev_region(test_driver.devid, DEVICE_DRIVER_CNT, DEVICE_DRIVER_NAME);
        if(ret < 0)
        {
            printk("register_chrdev_region fail\r\n");
            goto _err_out_regchrdev;
        }
    }
    else    /* 动态注册 */
    {
        ret = alloc_chrdev_region(&test_driver.devid, 0, DEVICE_DRIVER_CNT, DEVICE_DRIVER_NAME);
        if(ret < 0)
        {
            printk("alloc_chrdev_region fail\r\n");
            goto _err_out_regchrdev;
        }

        test_driver.major = MAJOR(test_driver.devid);
        test_driver.minor = MINOR(test_driver.devid);
    }

    /* 初始化cdev */
    test_driver.cdev.owner = THIS_MODULE;
    cdev_init(&test_driver.cdev, &test_drv_op);

    /* 添加一个cdev */
    cdev_add(&test_driver.cdev, test_driver.devid, DEVICE_DRIVER_CNT);
#endif

    test_driver.class = class_create(THIS_MODULE, test_driver.class_name);
    if (IS_ERR(test_driver.class))
    {
        printk("class_create fail\r\n");
        ret = PTR_ERR(test_driver.class);
        goto _err_out_class_crate;
	}

    test_driver.device = device_create(test_driver.class, NULL, test_driver.devid, NULL, DEVICE_DRIVER_NAME);
    if(IS_ERR(test_driver.device))
    {
        printk("device_create fail\r\n");
        ret = PTR_ERR(test_driver.device);
        goto _err_out_device_create;
    }

    return 0;

_err_out_device_create:
    class_destroy(test_driver.class);
_err_out_class_crate:
#ifndef __CHRDEV_REGION_
    unregister_chrdev(test_driver.devid, DEVICE_DRIVER_NAME);
#else
    unregister_chrdev_region(test_driver.devid, DEVICE_DRIVER_CNT);
    cdev_del(&test_driver.cdev);
_err_out_regchrdev:
#endif
    return ret;
}

/* 4. 编写字符设备驱动模块卸载*/
/* 4.1 摧毁设备 */
/* 4.2 摧毁类 */
/* 4.3 卸载字符设备驱动 */
static void __exit test_drv_exit(void)
{
    printk("test_drv_exit\r\n");

    device_destroy(test_driver.class, test_driver.devid);
    class_destroy(test_driver.class);
#ifndef __CHRDEV_REGION_
    unregister_chrdev(test_driver.major, DEVICE_DRIVER_NAME);
#else
    unregister_chrdev_region(test_driver.devid, DEVICE_DRIVER_CNT);
    cdev_del(&test_driver.cdev);
#endif
}

/* 5. 指定驱动出入口 */
module_init(test_drv_init);
module_exit(test_drv_exit);

/* 6. 完善驱动信息 */
MODULE_LICENSE("GPL");  //添加模块 LICENSE 信息
MODULE_AUTHOR("JYW"); //添加模块作者信息步骤1:确定主设备号和次设备号
设备号的组成:
为了方便管理, Linux 中每个设备都有一个设备号,设备号由主设备号和次设备号两部分组成,主设备号表示某一个具体的驱动,次设备号表示使用这个驱动的各个设备,Linux 提供了一个名为 dev_t 的数据类型表示设备号, dev_t 定义在文件 include/linux/types.h 里面,定义如下:
typedef __u32 __kernel_dev_t;
typedef __kernel_dev_t		dev_t;
dev_t 其实就是 unsigned int 类型,是一个 32 位的数据类型。这 32 位的数据构成了主设备号和次设备号两部分,其中高 12 位为主设备号, 低 20 位为次设备号
设备号的操作函数:
/* 从 dev_t 中获取主设备号 */
#define MAJOR(dev)	((unsigned int) ((dev) >> MINORBITS))

/* 从 dev_t 中获取次设备号 */
#define MINOR(dev)	((unsigned int) ((dev) & MINORMASK))

/* 给定的主设备号和次设备号的值组合成 dev_t 类型的设备号 */
#define MKDEV(ma,mi)	(((ma) << MINORBITS) | (mi))
步骤2:编写 file_operations 结构体
file_operations 的结构体就是 Linux 内核驱动操作函数集合,内容如下所示:
struct file_operations {
	struct module *owner;															/* 拥有该结构体的模块的指针,一般设置为 THIS_MODULE */
	loff_t (*llseek) (struct file *, loff_t, int);									/* 修改文件当前的读写位置 */
	ssize_t (*read) (struct file *, char __user *, size_t, loff_t *);				/* 读取设备文件 */
	ssize_t (*write) (struct file *, const char __user *, size_t, loff_t *);		/* 向设备文件写入(发送)数据 */
	ssize_t (*read_iter) (struct kiocb *, struct iov_iter *);
	ssize_t (*write_iter) (struct kiocb *, struct iov_iter *);
	int (*iterate) (struct file *, struct dir_context *);
	unsigned int (*poll) (struct file *, struct poll_table_struct *);				/* 轮询函数,用于查询设备是否可以进行非阻塞的读写 */
	long (*unlocked_ioctl) (struct file *, unsigned int, unsigned long);			/* 提供对于设备的控制功能,与应用程序中的 ioctl 函数对应 */
	long (*compat_ioctl) (struct file *, unsigned int, unsigned long);				/* 与unlocked_ioctl 函数功能一样 */
	int (*mmap) (struct file *, struct vm_area_struct *);							/* 将设备的内存映射到进程空间中(也就是用户空间) */
	int (*mremap)(struct file *, struct vm_area_struct *);
	int (*open) (struct inode *, struct file *);									/* 打开设备文件 */
	int (*flush) (struct file *, fl_owner_t id);
	int (*release) (struct inode *, struct file *);									/* 释放(关闭)设备文件 */
	int (*fsync) (struct file *, loff_t, loff_t, int datasync);						/* 刷新待处理的数据,用于将缓冲区中的数据刷新到磁盘中 */
	int (*aio_fsync) (struct kiocb *, int datasync);								/* 与 fasync 函数的功能类似,只是 aio_fsync 是异步刷新待处理的数据 */
	int (*fasync) (int, struct file *, int);
	int (*lock) (struct file *, int, struct file_lock *);
	ssize_t (*sendpage) (struct file *, struct page *, int, size_t, loff_t *, int);
	unsigned long (*get_unmapped_area)(struct file *, unsigned long, unsigned long, unsigned long, unsigned long);
	int (*check_flags)(int);
	int (*flock) (struct file *, int, struct file_lock *);
	ssize_t (*splice_write)(struct pipe_inode_info *, struct file *, loff_t *, size_t, unsigned int);
	ssize_t (*splice_read)(struct file *, loff_t *, struct pipe_inode_info *, size_t, unsigned int);
	int (*setlease)(struct file *, long, struct file_lock **, void **);
	long (*fallocate)(struct file *file, int mode, loff_t offset,
			  loff_t len);
	void (*show_fdinfo)(struct seq_file *m, struct file *f);
#ifndef CONFIG_MMU
	unsigned (*mmap_capabilities)(struct file *);
#endif
};
常用函数介绍:
/*
* @description : 打开设备
* @param – : 传递给驱动的 inode
* @param - : 设备文件, file 结构体有个叫做 private_data 的成员变量
* 一般在 open 的时候将 private_data 指向设备结构体。
* @return : 0 成功;其他 失败
*/
int (*open) (struct inode *, struct file *);
/*
* @description : 关闭/释放设备
* @param - : 要关闭的设备文件(文件描述符)
* @return : 0 成功;其他 失败
*/
int (*release) (struct inode *, struct file *); /*
* @description : 向设备写数据
* @param - : 设备文件,表示打开的文件描述符
* @param - : 要写给设备写入的数据
* @param - : 要写入的数据长度
* @param - : 相对于文件首地址的偏移
* @return : 写入的字节数,如果为负值,表示写入失败
*/
ssize_t (*write) (struct file *, const char __user *, size_t, loff_t *);/*
* @description : 从设备读取数据
* @param - : 要打开的设备文件(文件描述符)
* @param - : 返回给用户空间的数据缓冲区
* @param - : 要读取的数据长度
* @param - : 相对于文件首地址的偏移
* @return : 读取的字节数,如果为负值,表示读取失败
*/
ssize_t (*read) (struct file *, char __user *, size_t, loff_t *);unsigned long copy_from_user(void *to, const void __user *from, unsigned long n)
unsigned long copy_to_user(void *to, const void __user *from, unsigned long n)以下是对参数进行讲解:
- struct inode
/*
* 内核使用inode结构体在内核内部表示一个文件。因此,它与表示一个已经打开的文件描述符的结构体(file
* 文件结构)是不同的,我们可以使用多个file 文件结构表示同一个文件的多个文件描述符,但此时,所有这
* 些file文件结构全部都必须只能指向一个inode结构体
*/
struct inode {
	umode_t			i_mode;
	unsigned short		i_opflags;
	kuid_t			i_uid;				/* inode拥有者id   */
	kgid_t			i_gid;				/* inode所属群组id  */
	unsigned int		i_flags;

#ifdef CONFIG_FS_POSIX_ACL
	struct posix_acl	*i_acl;
	struct posix_acl	*i_default_acl;
#endif

	const struct inode_operations	*i_op;
	struct super_block	*i_sb;
	struct address_space	*i_mapping;

#ifdef CONFIG_SECURITY
	void			*i_security;
#endif

	/* Stat data, not accessed from path walking */
	unsigned long		i_ino;
	/*
	 * Filesystems may only read i_nlink directly.  They shall use the
	 * following functions for modification:
	 *
	 *    (set|clear|inc|drop)_nlink
	 *    inode_(inc|dec)_link_count
	 */
	union {
		const unsigned int i_nlink;
		unsigned int __i_nlink;
	};
	dev_t			i_rdev;			/* 若是设备文件,表示记录设备的设备号 */
	loff_t			i_size;			/* inode所代表大少  */
	struct timespec		i_atime;	/* inode最近一次的存取时间   */
	struct timespec		i_mtime;	/* inode最近一次修改时间  */
	struct timespec		i_ctime;	/* inode的生成时间 */
	spinlock_t		i_lock;	/* i_blocks, i_bytes, maybe i_size */
	unsigned short          i_bytes;
	unsigned int		i_blkbits;
	blkcnt_t		i_blocks;

#ifdef __NEED_I_SIZE_ORDERED
	seqcount_t		i_size_seqcount;
#endif

	/* Misc */
	unsigned long		i_state;
	struct mutex		i_mutex;

	unsigned long		dirtied_when;	/* jiffies of first dirtying */
	unsigned long		dirtied_time_when;

	struct hlist_node	i_hash;
	struct list_head	i_wb_list;	/* backing dev IO list */
	struct list_head	i_lru;		/* inode LRU list */
	struct list_head	i_sb_list;
	union {
		struct hlist_head	i_dentry;
		struct rcu_head		i_rcu;
	};
	u64			i_version;
	atomic_t		i_count;
	atomic_t		i_dio_count;
	atomic_t		i_writecount;
#ifdef CONFIG_IMA
	atomic_t		i_readcount; /* struct files open RO */
#endif
	const struct file_operations	*i_fop;	/* former ->i_op->default_file_ops */
	struct file_lock_context	*i_flctx;
	struct address_space	i_data;
	struct list_head	i_devices;
	union {
		struct pipe_inode_info	*i_pipe;
		struct block_device	*i_bdev;
		struct cdev		*i_cdev;		/* 若是字符设备,对应的为cdev结构  */
	};

	__u32			i_generation;

#ifdef CONFIG_FSNOTIFY
	__u32			i_fsnotify_mask; /* all events this inode cares about */
	struct hlist_head	i_fsnotify_marks;
#endif

	void			*i_private; /* fs or device private pointer */
};

/* 内核函数从inode中提取设备号 */

/* 提取主设备号 */
static inline unsigned imajor(const struct inode *inode){  return MAJOR(inode->i_rdev);
}
/* 提取次设备号 */
static inline unsigned iminor(const struct inode *inode)
{
  return MINOR(inode->i_rdev);
}
- struct file
/*
* file结构体指示一个已经打开的文件(设备对应于设备文件),其实系统中的每个打开的文件在内核空间都有
* 一个相应的struct file结构体,它由内核在打开文件时创建,并传递给在文件上进行操作的任何函数,直至文
* 件被关闭。如果文件被关闭,内核就会释放相应的数据结构
*/
struct file {
	union {
		struct llist_node	fu_llist;
		struct rcu_head 	fu_rcuhead;
	} f_u;
	struct path		f_path;
	struct inode		*f_inode;	/* cached value */
	const struct file_operations	*f_op;	/*   与文件相关的各种操作 */

	/*
	 * Protects f_ep_links, f_flags.
	 * Must not be taken from IRQ context.
	 */
	spinlock_t		f_lock;
	atomic_long_t		f_count;
	unsigned int 		f_flags;		/* 文件标志,如 O_RDONLY ,  O_NONBLOCK 以及 O_SYNC  */
	fmode_t			f_mode;				/* 此文件模式通过 FMODE_READ ,  FMODE_WRITE 识别了文件为可读的,可写的,或者是二者 */
	struct mutex		f_pos_lock;
	loff_t			f_pos;				/*  当前读写文件的位置 */
	struct fown_struct	f_owner;
	const struct cred	*f_cred;
	struct file_ra_state	f_ra;

	u64			f_version;
#ifdef CONFIG_SECURITY
	void			*f_security;
#endif
	/* needed for tty driver, and maybe others */
	void			*private_data;		/*  在驱动调用open方法之前,open系统调用设置此指针为NULL值。你可以很自由的将其做为你自己需要的一些数据域或者不管它 */

#ifdef CONFIG_EPOLL
	/* Used by fs/eventpoll.c to link all the hooks to this file */
	struct list_head	f_ep_links;
	struct list_head	f_tfile_llink;
#endif /* #ifdef CONFIG_EPOLL */
	struct address_space	*f_mapping;
} __attribute__((aligned(4)));	/* lest something weird decides that 2 is OK */
步骤3: 编写字符设备驱动模块加载
步骤3.1:创建并注册设备号
- register_chrdev
/**
 * register_chrdev() - create and register a cdev occupying a range of minors
 * @major: major device number or 0 for dynamic allocation
 * @name: name of this range of devices
 * @fops: file operations associated with this devices
 *
 * If @major == 0 this functions will dynamically allocate a major and return
 * its number.
 *
 * If @major > 0 this function will attempt to reserve a device with the given
 * major number and will return zero on success.
 *
 * Returns a -ve errno on failure.
 *
 * The name of this device has nothing to do with the name of the device in
 * /dev. It only helps to keep track of the different owners of devices. If
 * your module name has only one type of devices it's ok to use e.g. the name
 * of the module here.
 */
static inline int register_chrdev(unsigned int major, const char *name, const struct file_operations *fops)

/**
 * unregister_chrdev - unregister and destroy a cdev
 * @major: major device number
 * @name: name of this range of devices
 *
 * Unregister and destroy the cdev occupying the region described by
 * @major, @baseminor and @count.  This function undoes what
 * register_chrdev() did.
 */
static inline void unregister_chrdev(unsigned int major, const char *name)- register_chrdev_region/alloc_chrdev_region + cdev
/**
 * register_chrdev_region() - register a range of device numbers
 * @from: the first in the desired range of device numbers; must include
 *        the major number.
 * @count: the number of consecutive device numbers required
 * @name: the name of the device or driver.
 *
 * Return value is zero on success, a negative error code on failure.
 */
int register_chrdev_region(dev_t from, unsigned count, const char *name)

/**
 * alloc_chrdev_region() - register a range of char device numbers
 * @dev: output parameter for first assigned number
 * @baseminor: first of the requested range of minor numbers
 * @count: the number of minor numbers required
 * @name: the name of the associated device or driver
 *
 * Allocates a range of char device numbers.  The major number will be
 * chosen dynamically, and returned (along with the first minor number)
 * in @dev.  Returns zero or a negative error code.
 */
int alloc_chrdev_region(dev_t *dev, unsigned baseminor, unsigned count, const char *name)

/**
 * unregister_chrdev_region() - return a range of device numbers
 * @from: the first in the range of numbers to unregister
 * @count: the number of device numbers to unregister
 *
 * This function will unregister a range of @count device numbers,
 * starting with @from.  The caller should normally be the one who
 * allocated those numbers in the first place...
 */
void unregister_chrdev_region(dev_t from, unsigned count)

/**
 * cdev_alloc() - allocate a cdev structure
 *
 * Allocates and returns a cdev structure, or NULL on failure.
 */
struct cdev *cdev_alloc(void)

/**
 * cdev_init() - initialize a cdev structure
 * @cdev: the structure to initialize
 * @fops: the file_operations for this device
 *
 * Initializes @cdev, remembering @fops, making it ready to add to the
 * system with cdev_add().
 */
void cdev_init(struct cdev *cdev, const struct file_operations *fops)

/**
 * cdev_add() - add a char device to the system
 * @p: the cdev structure for the device
 * @dev: the first device number for which this device is responsible
 * @count: the number of consecutive minor numbers corresponding to this
 *         device
 *
 * cdev_add() adds the device represented by @p to the system, making it
 * live immediately.  A negative error code is returned on failure.
 */
int cdev_add(struct cdev *p, dev_t dev, unsigned count)

/**
 * cdev_del() - remove a cdev from the system
 * @p: the cdev structure to be removed
 *
 * cdev_del() removes @p from the system, possibly freeing the structure
 * itself.
 */
void cdev_del(struct cdev *p)
步骤3.2:创建一个class类型的对象
/* This is a #define to keep the compiler from merging different
 * instances of the __key variable */
#define class_create(owner, name)		\
({						\
	static struct lock_class_key __key;	\
	__class_create(owner, name, &__key);	\
})

/**
 * class_create - create a struct class structure
 * @owner: pointer to the module that is to "own" this struct class
 * @name: pointer to a string for the name of this class.
 * @key: the lock_class_key for this class; used by mutex lock debugging
 *
 * This is used to create a struct class pointer that can then be used
 * in calls to device_create().
 *
 * Returns &struct class pointer on success, or ERR_PTR() on error.
 *
 * Note, the pointer created here is to be destroyed when finished by
 * making a call to class_destroy().
 */
struct class *__class_create(struct module *owner, const char *name, struct lock_class_key *key)

/**
 * class_destroy - destroys a struct class structure
 * @cls: pointer to the struct class that is to be destroyed
 *
 * Note, the pointer to be destroyed must have been created with a call
 * to class_create().
 */
void class_destroy(struct class *cls)
步骤3.3:生成设备节点并导出到用户空间
/**
 * device_create- 创建设备
 * @class: 该设备依附的类
 * @parent: 父设备
 * @devt: 设备号(此处的设备号为主次设备号)
 * @drvdata:私有数据
 * @fmt:设备名
 * return:创建的设备指针
*/
struct device *device_create(struct class *class, struct device *parent, dev_t devt, void *drvdata, const char *fmt, ...)


/**
 * device_create- 销毁设备
 * @class: 该设备依附的类
 * @devt: 设备号(此处的设备号为主次设备号)
*/
void device_destroy(struct class *class, dev_t devt)
步骤4: 编写字符设备驱动模块卸载
查看步骤3
步骤5:指定驱动出入口
/**
 * module_init() - driver initialization entry point
 * @x: function to be run at kernel boot time or module insertion
 *
 * module_init() will either be called during do_initcalls() (if
 * builtin) or at module insertion time (if a module).  There can only
 * be one per module.
 */
#define module_init(x)	__initcall(x);

/**
 * module_exit() - driver exit entry point
 * @x: function to be run when driver is removed
 *
 * module_exit() will wrap the driver clean-up code
 * with cleanup_module() when used with rmmod when
 * the driver is a module.  If the driver is statically
 * compiled into the kernel, module_exit() has no effect.
 * There can only be one per module.
 */
#define module_exit(x)	__exitcall(x);
步骤6:完善驱动信息
/*
 * The following license idents are currently accepted as indicating free
 * software modules
 *
 *	"GPL"				[GNU Public License v2 or later]
 *	"GPL v2"			[GNU Public License v2]
 *	"GPL and additional rights"	[GNU Public License v2 rights and more]
 *	"Dual BSD/GPL"			[GNU Public License v2
 *					 or BSD license choice]
 *	"Dual MIT/GPL"			[GNU Public License v2
 *					 or MIT license choice]
 *	"Dual MPL/GPL"			[GNU Public License v2
 *					 or Mozilla license choice]
 *
 * The following other idents are available
 *
 *	"Proprietary"			[Non free products]
 *
 * There are dual licensed components, but when running with Linux it is the
 * GPL that is relevant so this is a non issue. Similarly LGPL linked with GPL
 * is a GPL combined work.
 *
 * This exists for several reasons
 * 1.	So modinfo can show license info for users wanting to vet their setup
 *	is free
 * 2.	So the community can ignore bug reports including proprietary modules
 * 3.	So vendors can do likewise based on their own policies
 */
#define MODULE_LICENSE(_license) MODULE_INFO(license, _license)

/*
 * Author(s), use "Name <email>" or just "Name", for multiple
 * authors use multiple MODULE_AUTHOR() statements/lines.
 */
#define MODULE_AUTHOR(_author) MODULE_INFO(author, _author)

/* What your module does. */
#define MODULE_DESCRIPTION(_description) MODULE_INFO(description, _description)
# 补充知识
1. 加载和卸载驱动模块
- 加载模块
驱动编译完成以后扩展名为.ko,有两种命令可以加载驱动模块: insmod和 modprobe,其中insmod 命令不能解决模块的依赖关系,比如 drv.ko 依赖 first.ko 这个模块,就必须先使用insmod 命令加载 first.ko 这个模块,然后再加载 drv.ko 这个模块。但是 modprobe 就不会存在这个问题, modprobe 会分析模块的依赖关系,然后会将所有的依赖模块都加载到内核中,因此modprobe 命令相比 insmod 要智能一些。 modprobe 命令主要智能在提供了模块的依赖性分析、错误检查、错误报告等功能,modprobe 命令默认会去/lib/modules/<kernel-version>目录中查找模块,比如本书使用的 Linux kernel 的版本号为 4.1.15,因此 modprobe 命令默认会到/lib/modules/4.1.15 这个目录中查找相应的驱动模块,一般自己制作的根文件系统中是不会有这个目录的,所以需要自己手动创建
insmod drv.ko
modprobe drv.ko
- 卸载模块
驱动模块的卸载使用命令“rmmod”即可,也可以使用“modprobe -r”命令卸载驱动
rmmod drv.ko
modprobe -r drv.ko
- 查看模块
输入“lsmod”命令即可查看当前系统中存在的模块
2. 查看驱动设备
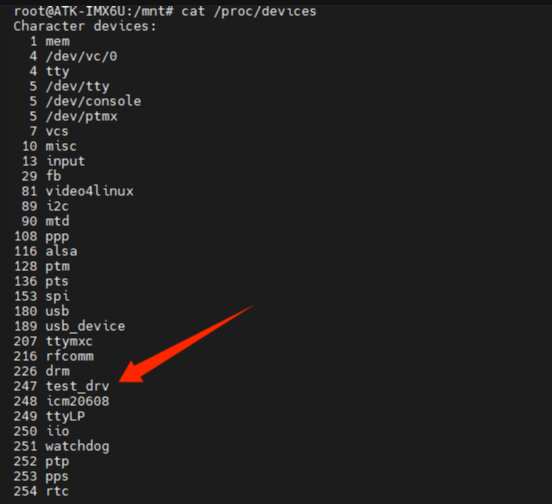
- 使用 cat /proc/devices 可以查看当前已经被使用掉的设备号
- 使用 ls /sys/class/ 查看类

- 使用 ls /sys/class/test_class/ -l 查看设备

3. 查看日志信息
- printk
printk 运行在内核态。在内核中想要向控制台输出或显示一些内容,必须使用printk 这个函数。不同之处在于, printk 可以根据日志级别对消息进行分类,一共有 8 个消息级别,这 8 个消息级别定义在文件 include/linux/kern_levels.h 里面,定义如下:
#define KERN_SOH "\001"
#define KERN_EMERG KERN_SOH "0" /* 紧急事件,一般是内核崩溃 */
#define KERN_ALERT KERN_SOH "1" /* 必须立即采取行动 */
#define KERN_CRIT KERN_SOH "2" /* 临界条件,比如严重的软件或硬件错误*/
#define KERN_ERR KERN_SOH "3" /* 错误状态,一般设备驱动程序中使用
KERN_ERR 报告硬件错误 */
#define KERN_WARNING KERN_SOH "4" /* 警告信息,不会对系统造成严重影响 */
#define KERN_NOTICE KERN_SOH "5" /* 有必要进行提示的一些信息 */
#define KERN_INFO KERN_SOH "6" /* 提示性的信息 */
#define KERN_DEBUG KERN_SOH "7" /* 调试信息 */
一共定义了 8 个级别,其中 0 的优先级最高, 7 的优先级最低。如果要设置消息级别,参考如下示例:printk(KERN_EMERG "gsmi: Log Shutdown Reason\n");用 printk 的 时 候 不 显 式 的 设 置 消 息 级 别 , 那 么 printk 将 会 采 用 默 认 级 别MESSAGE_LOGLEVEL_DEFAULT, MESSAGE_LOGLEVEL_DEFAULT 默认为 4
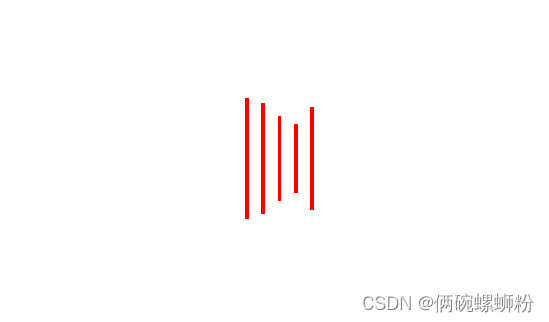
printk等级
使用 # cat /proc/sys/kernel/printk 指令查看printk等级
![]()
四个数字分表代表:DEFAULT_CONSOLE_LOGLEVEL(控制台输出等级)、DEFAULT_MESSAGE_LOGLEVEL(默认消息等级)、MINIMUM_CONSOLE_LOGLEVEL(最低输出等级)、DEFAULT_CONSOLE_LOGLEVEL(默认控制台输出等级)
当 printk() 中的消息日志级别小于当前控制台日志级别(CONSOLE_LOGLEVEL_DEFAULT)时,printk 的信息就会在控制台上显示,如果我们用 printk 的 时 候 不 显 式 的 设 置 消 息 级 别,即printk使用MESSAGE_LOGLEVEL_DEFAULT(级别为4),此时当前控制台日志级别为CONSOLE_LOGLEVEL_DEFAULT(级别为7),所示直接使用 printk 输出的信息是可以显示在控制台上的。
- 查看日志
第一种是使用dmesg命令打印。第二种是通过cat /proc/kmsg来打印