配置Wi-Fi终端定位示例
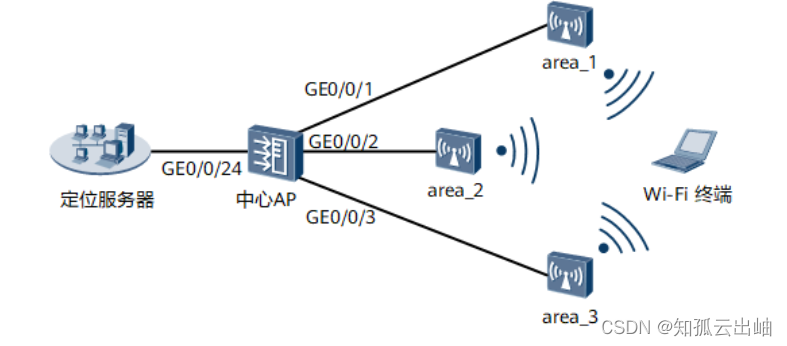
组网图形
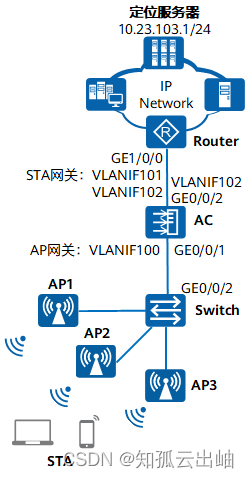
图1 配置Wi-Fi终端定位示例组网图
操作步骤
- 配置AC和定位服务器通信
# 配置Router,创建VLAN102,加入接口GE1/0/0,配置VLANIF102接口和AC互通。
<span style="color:#333333"><span style="background-color:#dddddd"><Router> <strong id="ZH-CN_TASK_0180396988__zh-cn_task_0176912529_zh-cn_task_0176912517_b191016524190923">system-view</strong>
[Router] <strong id="ZH-CN_TASK_0180396988__zh-cn_task_0176912529_zh-cn_task_0176912517_b347023258190923">vlan 102</strong>
[Router-vlan102] <strong id="ZH-CN_TASK_0180396988__zh-cn_task_0176912529_zh-cn_task_0176912517_b1439372694190923">quit</strong>
[Router] <strong id="ZH-CN_TASK_0180396988__zh-cn_task_0176912529_zh-cn_task_0176912517_b447971466190923">interface gigabitethernet 1/0/0</strong>
[Router-GigabitEthernet1/0/0] <strong id="ZH-CN_TASK_0180396988__zh-cn_task_0176912529_zh-cn_task_0176912517_b1935121937190923">port trunk allow-pass vlan 102</strong>
[Router-GigabitEthernet1/0/0] <strong id="ZH-CN_TASK_0180396988__zh-cn_task_0176912529_zh-cn_task_0176912517_b1489412603190923">quit</strong>
[Router] <strong id="ZH-CN_TASK_0180396988__zh-cn_task_0176912529_zh-cn_task_0176912517_b1656049436190923">interface vlanif 102</strong>
[Router-Vlanif102] <strong id="ZH-CN_TASK_0180396988__zh-cn_task_0176912529_zh-cn_task_0176912517_b1416658579190923">ip address 10.23.102.1 24</strong></span></span>
# 配置AC,创建VLAN102,加入接口GE0/0/2,配置VLANIF102接口和Router互通。<span style="color:#333333"><span style="background-color:#dddddd"><AC> <strong id="ZH-CN_TASK_0180396988__zh-cn_task_0176912529_zh-cn_task_0176912517_b26419010190923">system-view</strong> [AC] <strong id="ZH-CN_TASK_0180396988__zh-cn_task_0176912529_zh-cn_task_0176912517_b1209299162190923">vlan 102</strong> [AC-vlan102] <strong id="ZH-CN_TASK_0180396988__zh-cn_task_0176912529_zh-cn_task_0176912517_b2004018172190923">quit</strong> [AC] <strong id="ZH-CN_TASK_0180396988__zh-cn_task_0176912529_zh-cn_task_0176912517_b1156981544190923">interface gigabitethernet 0/0/2</strong> [AC-GigabitEthernet0/0/2] <strong id="ZH-CN_TASK_0180396988__zh-cn_task_0176912529_zh-cn_task_0176912517_b704003148190923">port trunk allow-pass vlan 102</strong> [AC-GigabitEthernet0/0/2] <strong id="ZH-CN_TASK_0180396988__zh-cn_task_0176912529_zh-cn_task_0176912517_b1011159129190923">quit</strong> [AC] <strong id="ZH-CN_TASK_0180396988__zh-cn_task_0176912529_zh-cn_task_0176912517_b984608724190923">interface vlanif 102</strong> [AC-Vlanif102] <strong id="ZH-CN_TASK_0180396988__zh-cn_task_0176912529_zh-cn_task_0176912517_b287892828190923">ip address 10.23.102.2 24</strong> [AC-Vlanif102] <strong id="ZH-CN_TASK_0180396988__zh-cn_task_0176912529_zh-cn_task_0176912517_b125798053190923">quit</strong></span></span># 在AC上创建一条到定位服务器的静态路由,下一跳指向Router。<span style="color:#333333"><span style="background-color:#dddddd">[AC] <strong id="ZH-CN_TASK_0180396988__zh-cn_task_0176912529_zh-cn_task_0176912517_b701234983190923">ip route-static 10.23.103.1 32 10.23.102.1</strong></span></span># 在AC上执行ping操作,目的地址是定位服务器,可以ping通表示网络正常互通。<span style="color:#333333"><span style="background-color:#dddddd">[AC] <strong id="ZH-CN_TASK_0180396988__zh-cn_task_0176912529_zh-cn_task_0176912517_b649554249190923">ping 10.23.103.1</strong> PING 10.23.102.2: 56 data bytes, press CTRL_C to break <strong id="ZH-CN_TASK_0180396988__zh-cn_task_0176912529_zh-cn_task_0176912517_b1285908568190923"> Reply from 10.23.103.1: bytes=56 Sequence=1 ttl=255 time=1 ms</strong></span></span> - 配置AC设备与定位服务器通信
# 配置AC的SNMP协议版本。
<span style="color:#333333"><span style="background-color:#dddddd">[AC] <strong id="ZH-CN_TASK_0180396988__zh-cn_task_0176912529_b1376051217190923">snmp-agent sys-info version v2c</strong></span></span># 配置读团体名为public123,写团体名为private123。
<span style="color:#333333"><span style="background-color:#dddddd">[AC] <strong id="ZH-CN_TASK_0180396988__zh-cn_task_0176912529_b1761148086190923">snmp-agent community read public123</strong> [AC] <strong id="ZH-CN_TASK_0180396988__zh-cn_task_0176912529_b2051267976190923">snmp-agent community write private123</strong></span></span> - 在AC上查看WLAN网络的基本配置
检查项
命令
数据
查看AP所属的AP组
display ap all
AP组:ap-group1
AP name:AP1,AP2,AP3,...
查看AP组引用的模板
display ap-group name xxx
射频0:- 2G射频模板:wlan-radio-2g
- 定位模板:空
射频1:- 5G射频模板:wlan-radio-5g
- 定位模板:空
查看2G射频模板下引用的模板
display radio-2g-profile name xxx
空口扫描模板:wlan-air-scan
查看5G射频模板下引用的模板
display radio-5g-profile name xxx
空口扫描模板:wlan-air-scan
- 如果AP组和单个AP下都有配置,则单个AP下的配置优先生效。
- 对于新创建的模板,用户配置完成后,需要将此模板引用到AP或者AP组,才能最终生效。
- 在AC上配置空口扫描功能
# 进入空口扫描模板“wlan-air-scan”,配置空口扫描信道集合。默认情况下,空口扫描信道集合是当前国家码支持的所有信道。
<span style="color:#333333"><span style="background-color:#dddddd">[AC] <strong id="ZH-CN_TASK_0180396988__zh-cn_task_0176912529_zh-cn_task_0176912521_zh-cn_task_0176912517_b702514320190923">wlan</strong>
[AC-wlan-view] <strong id="ZH-CN_TASK_0180396988__zh-cn_task_0176912529_zh-cn_task_0176912521_zh-cn_task_0176912517_b236705687190923">air-scan-profile name wlan-air-scan</strong>
[AC-wlan-air-scan-prof-wlan-air-scan] <strong id="ZH-CN_TASK_0180396988__zh-cn_task_0176912529_zh-cn_task_0176912521_zh-cn_task_0176912517_b1913475979190923">scan-channel-set country-channel</strong>
[AC-wlan-air-scan-prof-wlan-air-scan] <strong id="ZH-CN_TASK_0180396988__zh-cn_task_0176912529_zh-cn_task_0176912521_zh-cn_task_0176912517_b1341643916190923">quit</strong></span></span>
# 进入2G射频模板“wlan-radio-2g”,引用空口扫描模板。<span style="color:#333333"><span style="background-color:#dddddd">[AC-wlan-view] <strong id="ZH-CN_TASK_0180396988__zh-cn_task_0176912529_zh-cn_task_0176912521_zh-cn_task_0176912517_b359558505190923">radio-2g-profile name wlan-radio-2g</strong> [AC-wlan-radio-2g-prof-wlan-radio-2g] <strong id="ZH-CN_TASK_0180396988__zh-cn_task_0176912529_zh-cn_task_0176912521_zh-cn_task_0176912517_b39705825190923">air-scan-profile wlan-air-scan</strong> [AC-wlan-radio-2g-prof-wlan-radio-2g] <strong id="ZH-CN_TASK_0180396988__zh-cn_task_0176912529_zh-cn_task_0176912521_zh-cn_task_0176912517_b1486369221190923">quit</strong></span></span># 进入5G射频模板“wlan-radio-5g”,引用空口扫描模板。<span style="color:#333333"><span style="background-color:#dddddd">[AC-wlan-view] <strong id="ZH-CN_TASK_0180396988__zh-cn_task_0176912529_zh-cn_task_0176912521_b789917254190923">radio-5g-profile name wlan-radio-5g</strong> [AC-wlan-radio-5g-prof-wlan-radio-5g] <strong id="ZH-CN_TASK_0180396988__zh-cn_task_0176912529_zh-cn_task_0176912521_b464040935190923">air-scan-profile wlan-air-scan</strong> [AC-wlan-radio-5g-prof-wlan-radio-5g] <strong id="ZH-CN_TASK_0180396988__zh-cn_task_0176912529_zh-cn_task_0176912521_b434563655190923">quit</strong></span></span># 进入AP组“ap-group1”,引用射频模板。<span style="color:#333333"><span style="background-color:#dddddd">[AC-wlan-view] <strong id="ZH-CN_TASK_0180396988__zh-cn_task_0176912529_zh-cn_task_0176912521_b2037363949190923">ap-group name ap-group1</strong> [AC-wlan-ap-group-ap-group1] <strong id="ZH-CN_TASK_0180396988__zh-cn_task_0176912529_zh-cn_task_0176912521_b242000456190923">radio-2g-profile wlan-radio-2g radio 0</strong> Warning: This action may cause service interruption. Continue?[Y/N]<strong id="ZH-CN_TASK_0180396988__zh-cn_task_0176912529_zh-cn_task_0176912521_zh-cn_task_0175818418_b1384307436190906">y</strong> [AC-wlan-ap-group-ap-group1] <strong id="ZH-CN_TASK_0180396988__zh-cn_task_0176912529_zh-cn_task_0176912521_b849555722190923">radio-5g-profile wlan-radio-5g radio 1</strong> Warning: This action may cause service interruption. Continue?[Y/N]<strong id="ZH-CN_TASK_0180396988__zh-cn_task_0176912529_zh-cn_task_0176912521_zh-cn_task_0175818418_b1384307436190906_1">y</strong> [AC-wlan-ap-group-ap-group1] <strong id="ZH-CN_TASK_0180396988__zh-cn_task_0176912529_zh-cn_task_0176912521_b80833075190923">quit</strong></span></span> - 配置Wi-Fi终端定位功能
# 创建名为“wlan-location”的定位模板,开启Wi-Fi终端定位功能,并配置定位信息上报的目的地和端口号。
<span style="color:#333333"><span style="background-color:#dddddd">[AC-wlan-view] <strong id="ZH-CN_TASK_0180396988__zh-cn_task_0176912529_b1791974705190923">location-profile name wlan-location</strong>
[AC-wlan-location-prof-wlan-location] <strong id="ZH-CN_TASK_0180396988__zh-cn_task_0176912529_b723432737190923">private mu-enable</strong>
[AC-wlan-location-prof-wlan-location] <strong id="ZH-CN_TASK_0180396988__zh-cn_task_0176912529_b702913779190923">private server ip-address 10.23.103.1 port 32180 via-ac ac-port 10001</strong>
[AC-wlan-location-prof-wlan-location] <strong id="ZH-CN_TASK_0180396988__zh-cn_task_0176912529_b1867212363127">source ip-address</strong> <strong id="ZH-CN_TASK_0180396988__zh-cn_task_0176912529_b197651833161215">10.23.102.2</strong>
[AC-wlan-location-prof-wlan-location] <strong id="ZH-CN_TASK_0180396988__zh-cn_task_0176912529_b980591243190923">quit</strong></span></span>
# 进入AP组“ap-group1”,引用定位模板。<span style="color:#333333"><span style="background-color:#dddddd">[AC-wlan-view] <strong id="ZH-CN_TASK_0180396988__zh-cn_task_0176912529_b2071797707190923">ap-group name ap-group1</strong> [AC-wlan-ap-group-ap-group1] <strong id="ZH-CN_TASK_0180396988__zh-cn_task_0176912529_b1977115280190923">location-profile wlan-location radio all</strong> Warning: This action may cause service interruption. Continue?[Y/N]<strong id="ZH-CN_TASK_0180396988__zh-cn_task_0176912529_zh-cn_task_0175818418_b1384307436190906">y</strong> [AC-wlan-ap-group-ap-group1] <strong id="ZH-CN_TASK_0180396988__zh-cn_task_0176912529_b1655682885190923">quit</strong></span></span> - 配置定位服务器,并验证配置结果
联系厂商获取相应文档后参考操作,本文档不描述具体操作步骤。
配置文件
-
<span style="color:#333333"><span style="background-color:#dddddd">#
vlan batch 100 to 102
#
interface Vlanif102
 ip address 10.23.102.2 255.255.255.0
#
interface GigabitEthernet0/0/2
 port link-type trunk
 port trunk allow-pass vlan 101 to 102
#
ip route-static 10.23.103.1 255.255.255.255 10.23.102.1
#
 snmp-agent local-engineid 800007DB030200000000E0
 snmp-agent community read %^%#sP6,%Hno.$v[Lf#fiyP(eKm4)vNP*Q"mA~'$XjP4r}XXU4f%'&y>D`/1.5\Clr]I5mUJ46!a7'9p#*o2%^%#
 snmp-agent community write %^%#/.U;L9&iwS.dF15y]J"N\XU='K:YkWj/O.)=6W$3q{M1J4.<X"\h{a:p)c\;TBL\=qn=u+7YR~L/#`V>%^%#
 snmp-agent sys-info version v2c
 snmp-agent
#
wlan
 location-profile name wlan-location
  private mu-enable
  private server ip-address 10.23.103.1 port 32180 via-ac ac-port 10001
  source ip-address 10.23.102.2
 air-scan-profile name wlan-air-scan
 radio-2g-profile name wlan-radio-2g
  air-scan-profile wlan-air-scan
 radio-5g-profile name wlan-radio-5g
  air-scan-profile wlan-air-scan
 ap-group name ap-group1
  location-profile wlan-location radio all
  radio 0
   radio-2g-profile wlan-radio-2g
   vap-profile wlan-net wlan 1
  radio 1
   radio-5g-profile wlan-radio-5g
   vap-profile wlan-net wlan 1
#
return</span></span>