在本教程中,您将学习如何创建 Cesium 应用程序,用您自己的 3D 模型替换真实城市中的建筑物。您可以使用它来可视化拟建建筑的影响,及如何改变天际线?从特定楼层或房间看到的景色会是什么样子?
我们将介绍如何:
在网络上设置并部署您的 Cesium 应用程序。
添加全球 3D 建筑物、地形和图像的基础图层。
隐藏单个建筑物并用您自己的 3D 模型替换它们。
开始之前
我们将从 Cesium ion(一个用于流式传输和托管 3D 内容的开放平台)获取全球卫星图像、3D 建筑物和地形。
如果您还没有免费的Cesium ion帐户,请注册一个。
登录后:
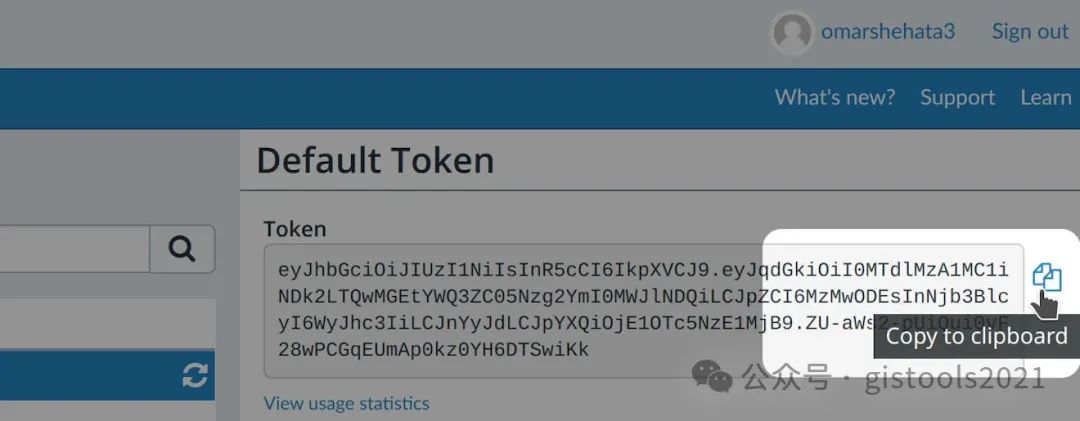
转到您的 访问令牌 选项卡。
请注意默认令牌旁边的复制按钮。我们将在下一步中使用此令牌。
1 设置你的Cesium应用程序
我们将使用 CesiumJS(一个开源 JavaScript 引擎)创建我们的应用程序。我们将使用 Glitch(一个在线 IDE)来托管我们的应用程序。
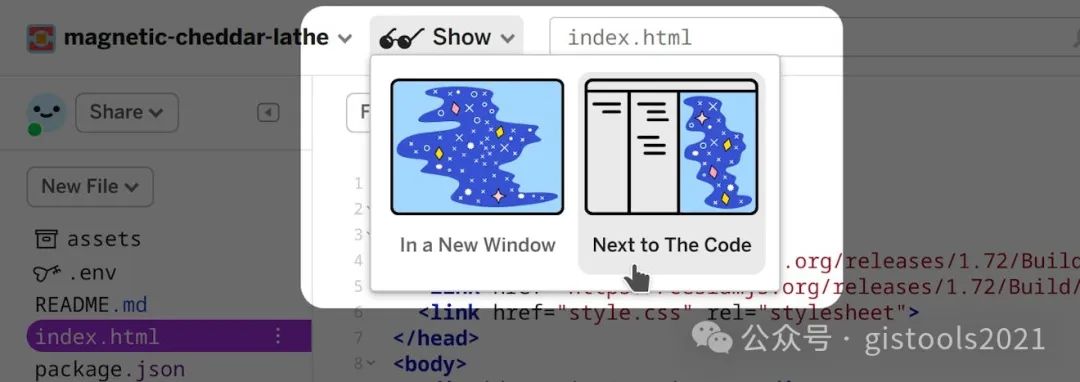
1 使用我们组合的基本模板创建一个新的 Glitch 项目。
2单击 左侧面板中的index.html以查看应用程序的代码。
3替换 为您的令牌页面your_token_here 中的访问令牌 。
4单击 顶部的 “显示”并选择“代码旁边”来运行应用程序。
到目前为止,index.html中的代码 做了三件事:
导入 CesiumJS 库。JavaScript 和 CSS 文件在这两行中加载:
<script src="https://cesium.com/downloads/cesiumjs/releases/1.115/Build/Cesium/Cesium.js"></script><link href="https://cesium.com/downloads/cesiumjs/releases/1.115/Build/Cesium/Widgets/widgets.css" rel="stylesheet">
为场景添加一个 HTML 容器:
<div id="cesiumContainer"></div>。用 ; 初始化查看器
const viewer = new Cesium.Viewer('cesiumContainer')。
现在,您的浏览器中运行了一个基本的 CesiumJS 应用程序,其中包含来自 Cesium ion 的全球卫星图像。
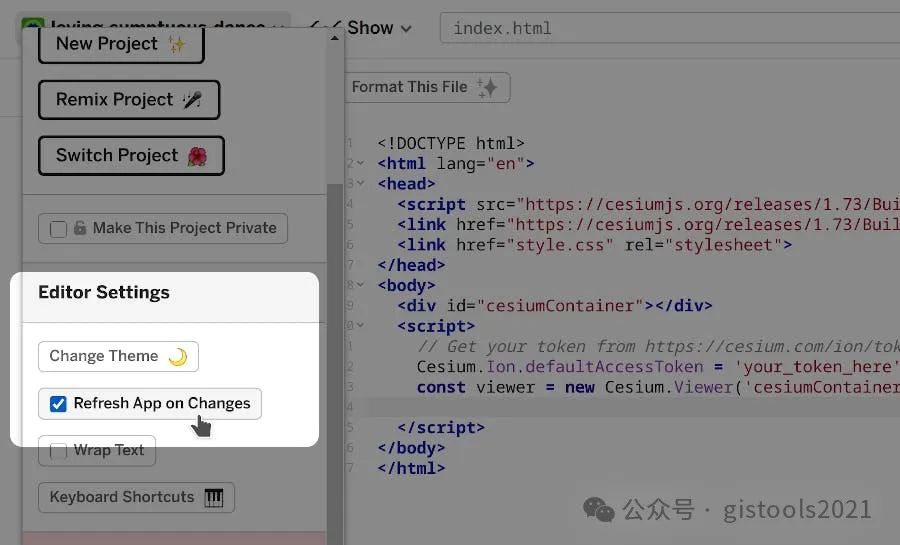
配置自动刷新
每次代码更改时,Glitch 都会自动刷新页面。您可以通过单击左上角的项目名称并取消选中此框来切换此选项:
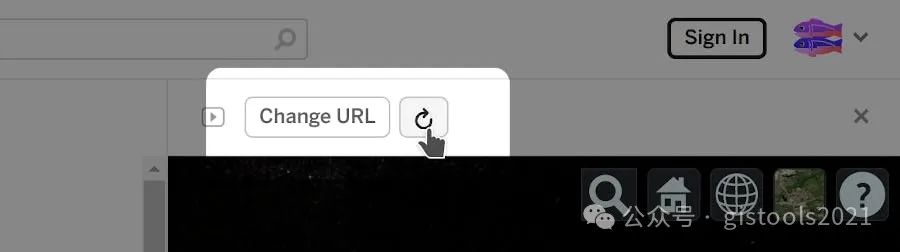
使用应用程序窗口顶部的刷新按钮重新运行应用程序:
2添加Cesium OSM建筑物和Cesium世界地形
Cesium OSM Buildings是一个全球基础层,拥有来自 OpenStreetMap 数据的超过 3.5 亿座建筑物。它被用作 3D Tiles,这是由 Cesium 创建的开放标准,可以将 3D 内容流式传输到任何兼容的客户端。
让我们添加这些图层,然后将摄像机移动到我们虚构的新建筑将位于的城市 - 美国科罗拉多州丹佛市。
1将index.html中的 JavaScript 代码替换 为以下代码,保留之前的访问令牌行。
2单击并拖动以移动相机。按住 CTRL 键的同时拖动可倾斜。
3单击任何建筑物以查看其元数据。
// Keep your Cesium.Ion.defaultAccessToken = 'your_token_here' line above.// STEP 2 CODE// Initialize the viewer with Cesium World Terrain.const viewer = new Cesium.Viewer('cesiumContainer', {terrain: Cesium.Terrain.fromWorldTerrain(),});// Fly the camera to Denver, Colorado at the given longitude, latitude, and height.viewer.camera.flyTo({destination: Cesium.Cartesian3.fromDegrees(-104.9965, 39.74248, 4000)});// Add Cesium OSM Buildings.const buildingsTileset = await Cesium.createOsmBuildingsAsync();viewer.scene.primitives.add(buildingsTileset);
此时,完整的index.html将如下所示(访问令牌除外)。在后续步骤中,您将在标记内的现有代码下方添加新代码。
<!DOCTYPE html><html lang="en"><head><script src="https://cesium.com/downloads/cesiumjs/releases/1.115/Build/Cesium/Cesium.js"></script><link href="https://cesium.com/downloads/cesiumjs/releases/1.115/Build/Cesium/Widgets/widgets.css" rel="stylesheet"><link href="style.css" rel="stylesheet"></head><body><div id="cesiumContainer"></div><script type="module">// Your access token can be found at: https://ion.cesium.com/tokens.// Replace `your_access_token` with your Cesium ion access token.Cesium.Ion.defaultAccessToken = 'your_access_token';// Keep your Cesium.Ion.defaultAccessToken = 'your_token_here' line above.// STEP 2 CODE// Initialize the viewer with Cesium World Terrain.const viewer = new Cesium.Viewer('cesiumContainer', {terrain: Cesium.Terrain.fromWorldTerrain(),});// Fly the camera to Denver, Colorado at the given longitude, latitude, and height.viewer.camera.flyTo({destination: Cesium.Cartesian3.fromDegrees(-104.9965, 39.74248, 4000)});// Add Cesium OSM Buildings.const buildingsTileset = await Cesium.createOsmBuildingsAsync();viewer.scene.primitives.add(buildingsTileset);</script></body></html>
Cesium OSM Buildings 被固定在全球高分辨率 3D 地形层Cesium World Terrain上。这使得它非常适合需要精确建筑高度的应用,例如洪水分析工具。
3确定新建筑面积
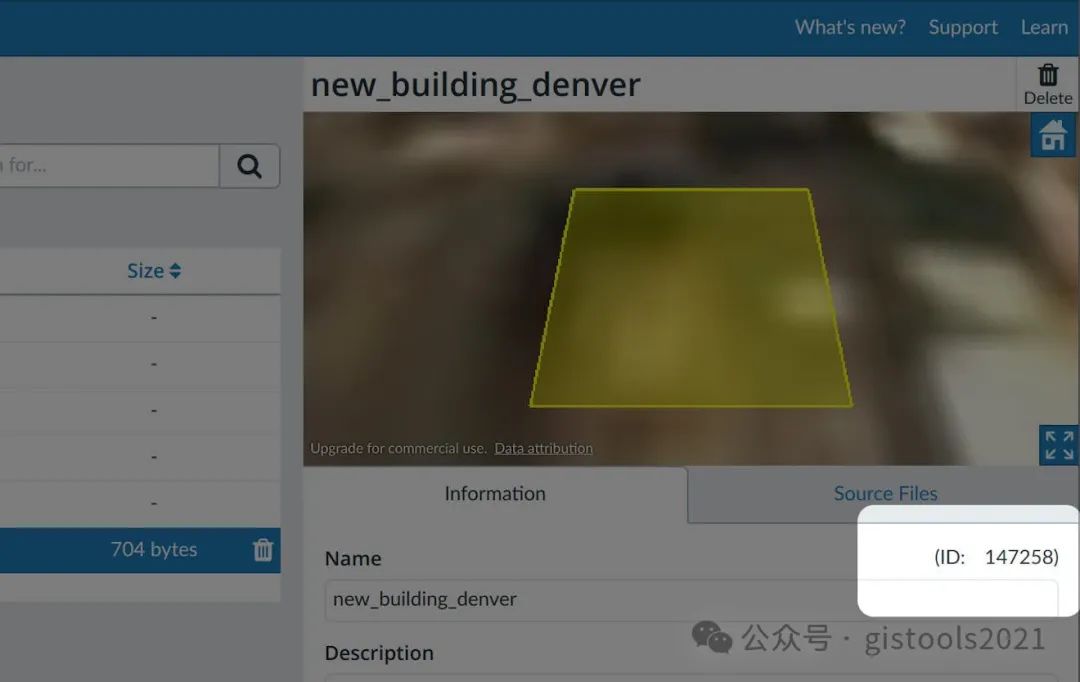
在添加新建筑物之前,让我们添加一个 GeoJSON 文件来标记它的占地面积。这将向我们展示哪些现有建筑物需要拆除。
1下载 GeoJSON 文件。
2将 GeoJSON 文件拖放到 Cesium ion 仪表板中。
3按 UPLOAD。
4上传后,记下预览窗口下的3D对象 ID。
1在index.html中添加以下代码。
替换
your_asset_id为您的3D对象ID。ID 是一个数字,因此不需要引号。
// STEP 3 CODEasync function addBuildingGeoJSON() {// Load the GeoJSON file from Cesium ion.const geoJSONURL = await Cesium.IonResource.fromAssetId(your_asset_id);// Create the geometry from the GeoJSON, and clamp it to the ground.const geoJSON = await Cesium.GeoJsonDataSource.load(geoJSONURL, { clampToGround: true });// Add it to the scene.const dataSource = await viewer.dataSources.add(geoJSON);// By default, polygons in CesiumJS will be draped over all 3D content in the scene.// Modify the polygons so that this draping only applies to the terrain, not 3D buildings.for (const entity of dataSource.entities.values) {entity.polygon.classificationType = Cesium.ClassificationType.TERRAIN;}// Move the camera so that the polygon is in view.viewer.flyTo(dataSource);}addBuildingGeoJSON();
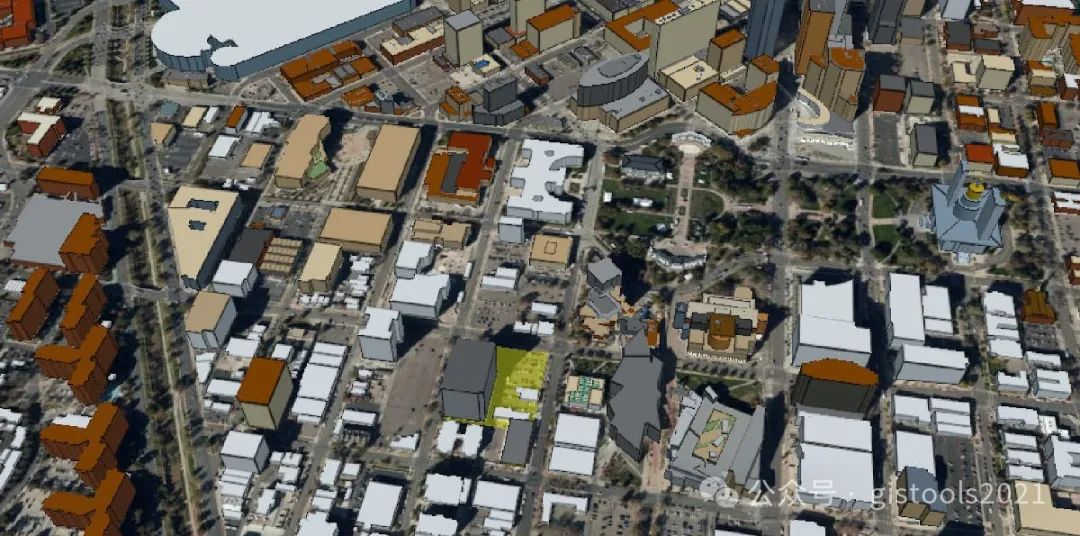
您现在会在地面上看到建筑物的足迹。使用鼠标滚轮放大或右键单击并拖动以仔细查看。
5隐藏现场现有的3D建筑物
现在我们已经确定了新建筑的去向,我们可以看到当前有哪些建筑。我们将使用 3D Tiles 样式语言 来隐藏它们。
在上面的足迹中,我们可以看到我们新拟建建筑的场地上有六栋建筑——一栋大型建筑和五栋小得多的建筑。
1添加以下代码。它隐藏了所有较小的 3D 建筑物。
// STEP 4 CODE// Hide individual buildings in this area using 3D Tiles Styling language.buildingsTileset.style = new Cesium.Cesium3DTileStyle({// Create a style rule to control each building's "show" property.show: {conditions : [// Any building that has this elementId will have `show = false`.['${elementId} === 332469316', false],['${elementId} === 332469317', false],['${elementId} === 235368665', false],['${elementId} === 530288180', false],['${elementId} === 530288179', false],// If a building does not have one of these elementIds, set `show = true`.[true, true]]},// Set the default color style for this particular 3D Tileset.// For any building that has a `cesium#color` property, use that color, otherwise make it white.color: "Boolean(${feature['cesium#color']}) ? color(${feature['cesium#color']}) : color('#ffffff')"});
2扩展此代码以隐藏剩余的 3D 建筑。
单击建筑物即可找到其
elementId。添加另一行,例如:
['${elementId} === large_building_elementId', false],.
6上传并定位新建筑
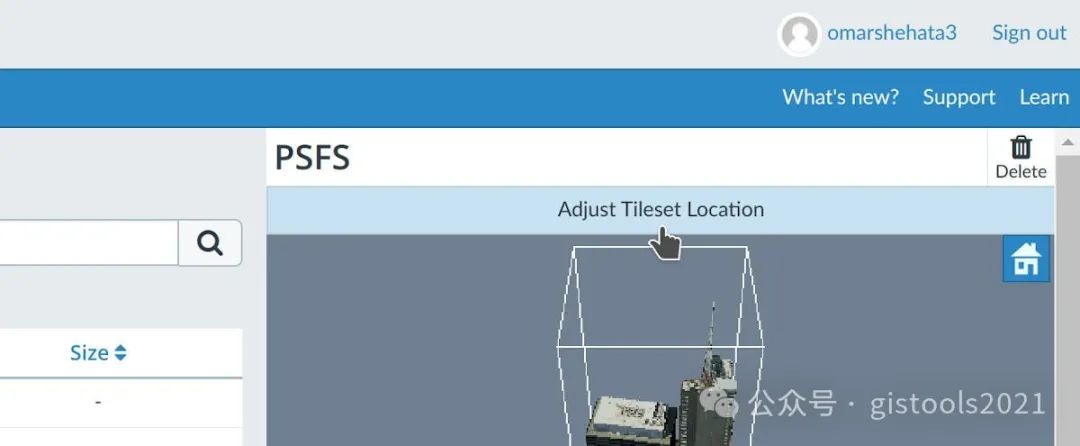
让我们上传建议的建筑模型。
1下载此 glTF 模型。
2将其拖放到 Cesium ion 仪表板中。
3选择 3D 模型(平铺为 3D 平铺) 并按 UPLOAD。
4平铺完成后,单击 资源预览窗口顶部的“调整平铺集位置”按钮。
5在搜索框中 输入建筑物的地址 1250 Cherokee Street ,然后单击NEXT。
6使用查看器上的控件,直观地定位并旋转建筑物,使其与下方的卫星图像对齐。您的最终设置应约为:
经度:-104.9909
纬度: 39.73579
身高:1577
标题:-8
7按SAVE。
7将新建筑添加到场景中
现在让我们将新建筑添加到场景中。
1在资源预览窗口下获取我们刚刚地理定位的建筑模型的3D对象 ID。
2在index.html 中添加以下代码。
替换
your_asset_id为您的3D对象 ID。
// STEP 6 CODE// Add the 3D Tileset you created from your Cesium ion account.const newBuildingTileset = await Cesium.Cesium3DTileset.fromIonAssetId(your_asset_id);viewer.scene.primitives.add(newBuildingTileset);// Move the camera to the new building.viewer.flyTo(newBuildingTileset);
8添加一个按钮来切换新建筑
1在 index.html中,将按钮添加到 <body> 标记内的上方 <script>。
<button id="toggle-building">Toggle new building</button>2style 在标签内 添加以下 CSS 标签head 。
<style type="text/css">#toggle-building { z-index: 1; position: fixed; top: 5px; left: 5px; }</style>
3在index.html中添加以下JavaScript
// STEP 7 CODE// Toggle the tileset's show property when the button is clicked.document.querySelector('#toggle-building').onclick = function() {newBuildingTileset.show = !newBuildingTileset.show;};
9考虑建筑物对周围环境的影响
现在您可以比较有和没有这座新建筑的场景!丹佛的全景山景非常珍贵。这座建筑如何影响其他地点(例如科罗拉多州议会大厦)的景观?
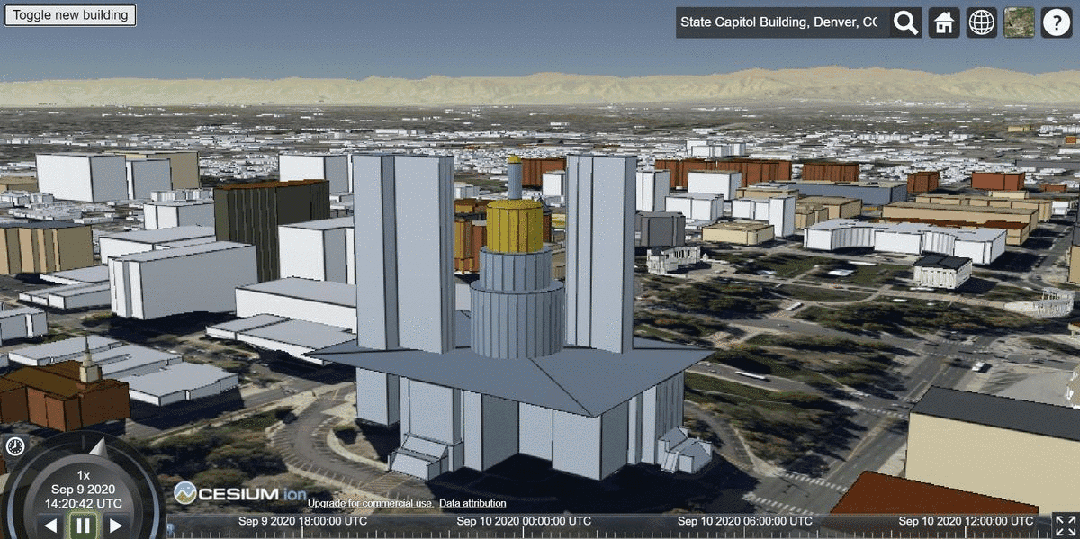
对科罗拉多州议会大厦景观的影响。
要重现此效果,请搜索State Capitol Building, Denver, CO, USA并调整相机。
我们甚至可以探索国会大厦入口处的景色将如何变化。

从更接近地面的角度对视野的影响。
完整教程源码
这是此应用程序的完整源代码,带有 your_token_here 和 your_asset_id 占位符
<!DOCTYPE html><html lang="en"><head><script src="https://cesium.com/downloads/cesiumjs/releases/1.115/Build/Cesium/Cesium.js"></script><link href="https://cesium.com/downloads/cesiumjs/releases/1.115/Build/Cesium/Widgets/widgets.css" rel="stylesheet"><link href="style.css" rel="stylesheet"><style type="text/css">#toggle-building { z-index: 1; position: fixed; top: 5px; left: 5px; }</style></head><body type="module"><div id="cesiumContainer"></div><button id="toggle-building">Toggle new building</button><script>// Your access token can be found at: https://ion.cesium.com/tokens.// Replace `your_access_token` with your Cesium ion access token.Cesium.Ion.defaultAccessToken = 'your_access_token';// Keep your Cesium.Ion.defaultAccessToken = 'your_token_here' line from above.// STEP 2 CODE// Initialize the viewer with Cesium World Terrain.const viewer = new Cesium.Viewer('cesiumContainer', {terrain: Cesium.Terrain.fromWorldTerrain(),});// Fly the camera to Denver, Colorado at the given longitude, latitude, and height./* viewer.camera.flyTo({destination: Cesium.Cartesian3.fromDegrees(-104.9965, 39.74248, 4000)}); */// Add Cesium OSM Buildings.const buildingsTileset = await Cesium.createOsmBuildingsAsync();viewer.scene.primitives.add(buildingsTileset);// STEP 3 CODEasync function addBuildingGeoJSON() {// Load the GeoJSON file from Cesium ion.const geoJSONURL = await Cesium.IonResource.fromAssetId(your_asset_id);// Create the geometry from the GeoJSON, and clamp it to the ground.const geoJSON = await Cesium.GeoJsonDataSource.load(geoJSONURL, { clampToGround: true });// Add it to the scene.const dataSource = await viewer.dataSources.add(geoJSON);// By default, polygons in CesiumJS will be draped over all 3D content in the scene.// Modify the polygons so that this draping only applies to the terrain, not 3D buildings.for (const entity of dataSource.entities.values) {entity.polygon.classificationType = Cesium.ClassificationType.TERRAIN;}// Move the camera so that the polygon is in view.// viewer.flyTo(dataSource);}addBuildingGeoJSON();// STEP 4 CODE// Hide individual buildings in this area using 3D Tiles Styling language.buildingsTileset.style = new Cesium.Cesium3DTileStyle({// Create a style rule to control each building's "show" property.show: {conditions : [// Any building that has this elementId will have `show = false`.['${elementId} === 532245203', false],['${elementId} === 332469316', false],['${elementId} === 332469317', false],['${elementId} === 235368665', false],['${elementId} === 530288180', false],['${elementId} === 530288179', false],// If a building does not have one of these elementIds, set `show = true`.[true, true]]},// Set the default color style for this particular 3D Tileset.// For any building that has a `cesium#color` property, use that color, otherwise make it white.color: "Boolean(${feature['cesium#color']}) ? color(${feature['cesium#color']}) : color('#ffffff')"});// STEP 6 CODE// Add the 3D Tileset you created from your Cesium ion account.const newBuildingTileset = await Cesium.Cesium3DTileset.fromIonAssetId(your_asset_id);viewer.scene.primitives.add(newBuildingTileset);// Move the camera to the new building.viewer.flyTo(newBuildingTileset);// STEP 7 CODE// Toggle the tileset's show property when the button is clicked.document.querySelector('#toggle-building').onclick = function() {newBuildingTileset.show = !newBuildingTileset.show;};</script></body></html>