📢📢📢📣📣📣
哈喽!大家好,我是【IT邦德】,江湖人称jeames007,10余年DBA及大数据工作经验
一位上进心十足的【大数据领域博主】!😜😜😜
中国DBA联盟(ACDU)成员,目前服务于工业互联网
擅长主流Oracle、MySQL、PG、高斯及Greenplum运维开发,备份恢复,安装迁移,性能优化、故障应急处理等。
✨ 如果有对【数据库】感兴趣的【小可爱】,欢迎关注【IT邦德】💞💞💞
❤️❤️❤️感谢各位大可爱小可爱!❤️❤️❤️
PostgreSQL16的部署方式可以基于Linux,也可以在Window上部署,作为目前最火的关系型数据库,安装部署是第一步,本文详细介绍了PostgreSQL16基于Linux8操作系统的3种部署方式,并附带了避坑指南,希望带领大家开启PG的学习之路
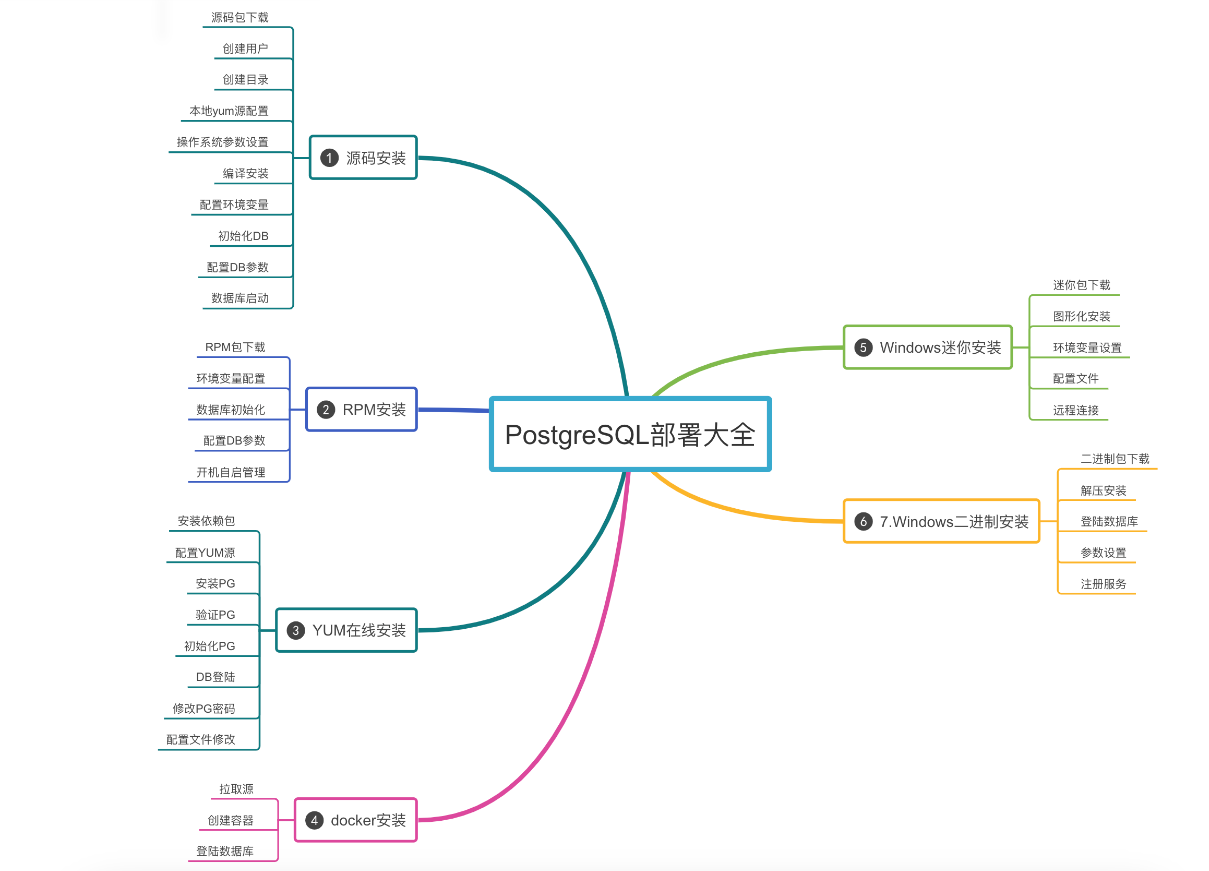
📣 1.源码安装
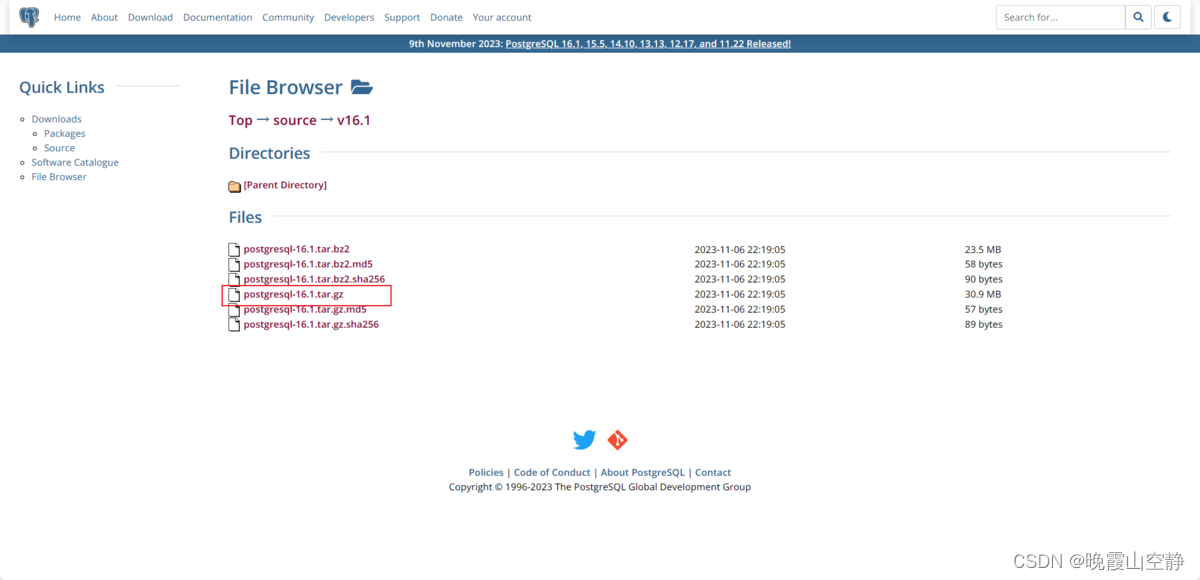
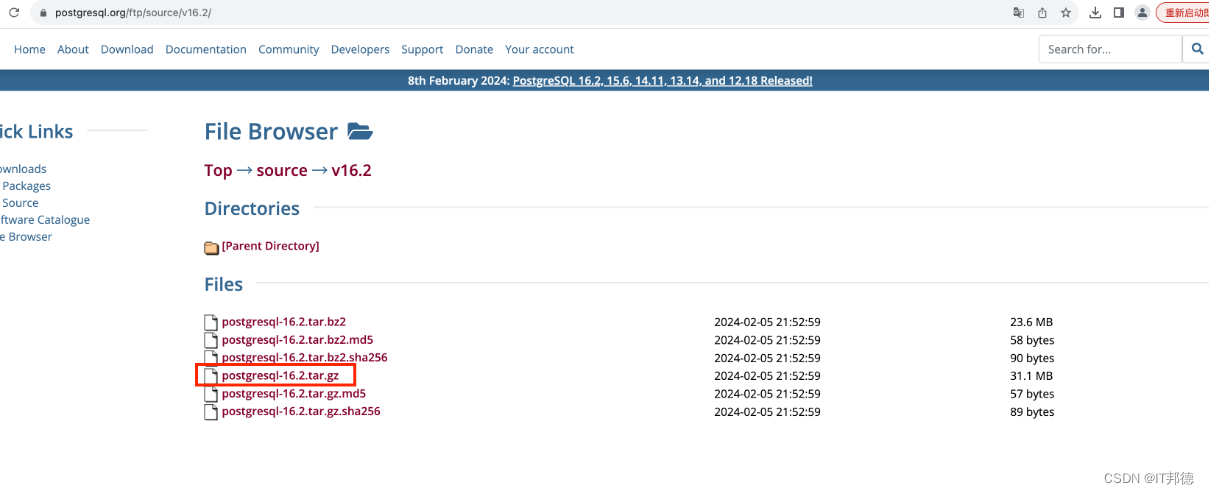
✨ 1.1 源码包下载
官网下载安装包
https://www.postgresql.org/ftp/source/
✨ 1.2 创建用户
[root@rhel8 ~]# groupadd -g 60000 postgres
[root@rhel8 ~]# useradd -u 60000 -g postgres postgres
[root@rhel8 ~]# echo “postgres” | passwd --stdin postgres

✨ 1.3 创建目录
[root@rhel8 ~]# mkdir -p /pgccc/{pgdata,archive,scripts,backup,pgsql-16,soft}
[root@rhel8 ~]# chown -R postgres:postgres /pgccc
[root@rhel8 ~]# chmod -R 775 /pgccc
✨ 1.4 本地yum源配置
1.创建挂载路径
[root@rhel8 ~]# mkdir -p /mnt/cdrom

2.挂载系统镜像光盘到指定目录
#因为光盘的格式通常是iso9660,意思是/dev/sr0挂载在/mnt/cdrom目录上
[root@rhel8 ~]# mount -t iso9660 /dev/sr0 /mnt/cdrom
mount: /mnt/cdrom: WARNING: device write-protected, mounted read-only.

3.修改yum源配置文件
编辑rhel8-local.repo文件
[root@rhel8 ~]# cd /etc/yum.repos.d
[root@rhel8 yum.repos.d]# vi rhel8-local.repo
[localREPO]
name=localhost8
baseurl=file:///mnt/cdrom/BaseOS
enable=1
gpgcheck=0

[localREPO_APP]
name=localhost8_app
baseurl=file:///mnt/cdrom/AppStream
enable=1
gpgcheck=0

4.配置好后重建本地缓存
yum clean all
yum makecache
yum repolist

安装依赖包
yum install -y openssl openssl-devel pam pam-devel libxml2 libxml2-devel \
libxslt libxslt-devel perl perl-devel python-devel perl-ExtUtils-Embed \
readline readline-devel bzip2 zlib zlib-devel \
gettext gettext-devel bison flex gcc gcc-c++ \
boost-devel gmp* mpfr* libevent* libpython3.6m

yum install libicu-devel -y
yum install zlib-devel -y
✨ 1.5 操作系统参数设置
--关闭防火墙
systemctl stop firewalld
systemctl disable firewalld
systemctl status firewalld

--关闭安全服务
临时关闭:
setenforce 0

永久关闭:
sed -i 's/SELINUX=enforcing/SELINUX=disabled/g' /etc/selinux/config

查看是否成功关闭:
getenforce
cat /etc/selinux/config


--资源限制
vi /etc/security/limits.conf
soft    nofile   65535
hard    nofile   65535
soft    nproc   65535
hard    nproc   65535
✨ 1.6 编译安装
[root@rhel8 ~]# cp /opt/postgresql-16.2.tar.gz /pgccc/soft
[root@rhel8 ~]# chown -R postgres:postgres /pgccc/soft
[root@rhel8 ~]# chmod -R 775 /pgccc/soft
[root@rhel8 ~]# su - postgres
[postgres@rhel8 ~]$ cd /pgccc/soft/
[postgres@rhel8 soft]$ tar zxvf postgresql-16.2.tar.gz
–配置预编译
[postgres@rhel8 postgresql-16.2]$ ./configure --prefix=/pgccc/pgsql-16 --without-readline
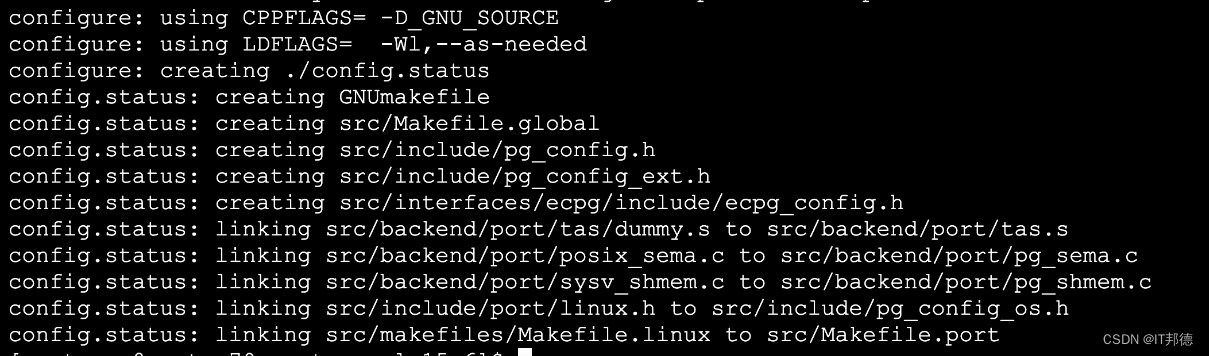
–编译及安装
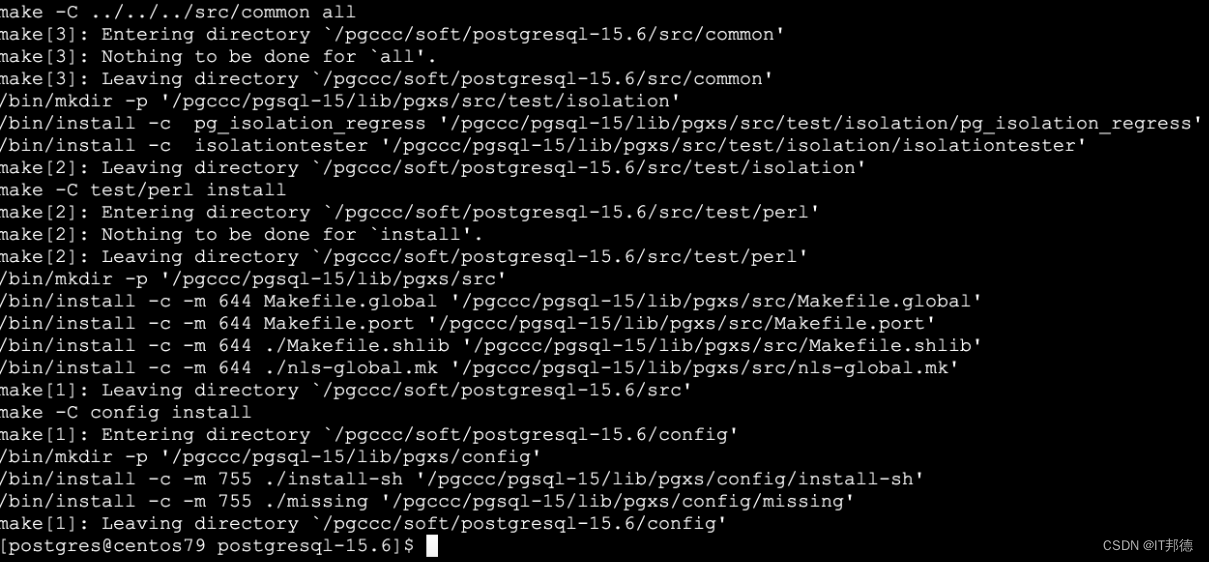
[postgres@rhel8 postgresql-16.2]$ make -j 4 && make install
#编译及安装正常,则输出结尾如下
✨ 1.7 配置环境变量
cat >> ~/.bash_profile <<"EOF"
export LANG=en_US.UTF-8
export PS1="[\u@\h \W]\$ "
export PGPORT=5432
export PGDATA=/pgccc/pgdata
export PGHOME=/pgccc/pgsql-16
export PATH=$PGHOME/bin:$PATH:.
export PGUSER=postgres
export PGDATABASE=postgres
EOF

[postgres@rhel8 ]$ source  /.bash_profile
✨ 1.8 初始化DB
[root@rhel8 ~]# su - postgres
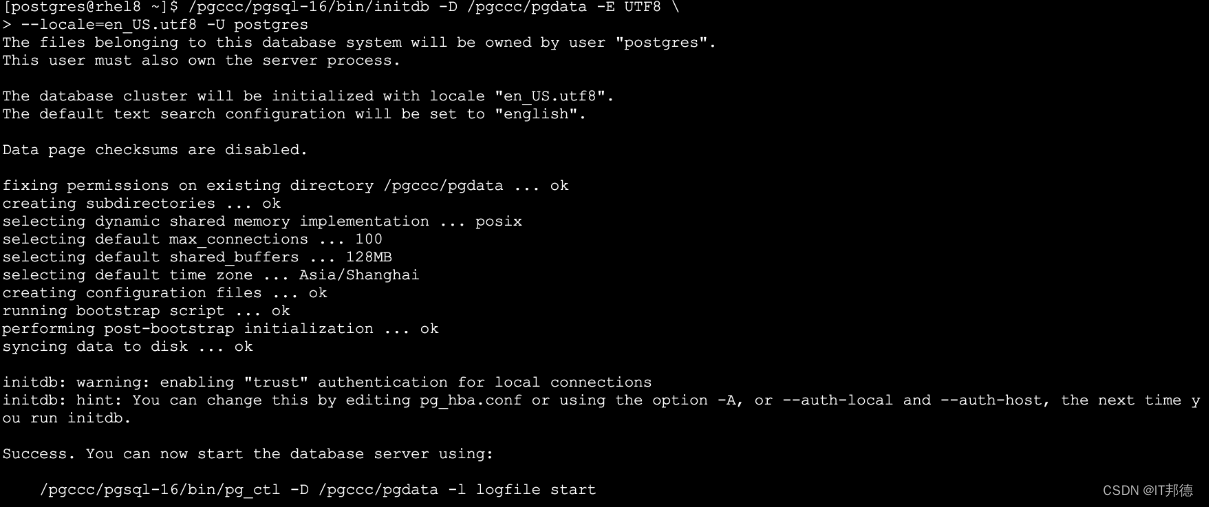
[postgres@rhel8 ~]# /pgccc/pgsql-16/bin/initdb -D /pgccc/pgdata -E UTF8
–locale=en_US.utf8 -U postgres
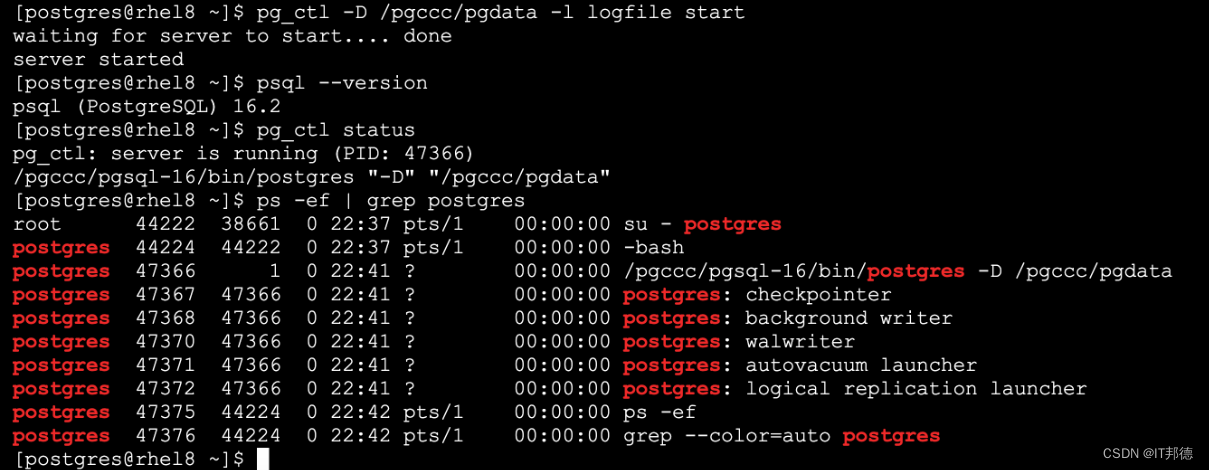
[postgres@rhel8 ~]$ pg_ctl -D /pgccc/pgdata -l logfile start
✨ 1.9 配置DB参数
两个参数文件:
cat >> /pgccc/pgdata/postgresql.conf <<"EOF"
listen_addresses = '*'
port=5432
#unix_socket_directories='/pgccc/pgdata'
logging_collector = on
log_directory = 'pg_log'
log_filename = 'postgresql-%a.log'
log_truncate_on_rotation = on
EOF

cat > /pgccc/pgdata/pg_hba.conf << EOF
# TYPE  DATABASE    USER    ADDRESS       METHOD
local     all       all                    trust
host      all       all   127.0.0.1/32     trust
host      all       all    0.0.0.0/0      md5
host   replication  all    0.0.0.0/0      md5
local  replication  all                    trust
EOF
✨ 1.10 数据库启动
[root@rhel8 ~]# su - postgres
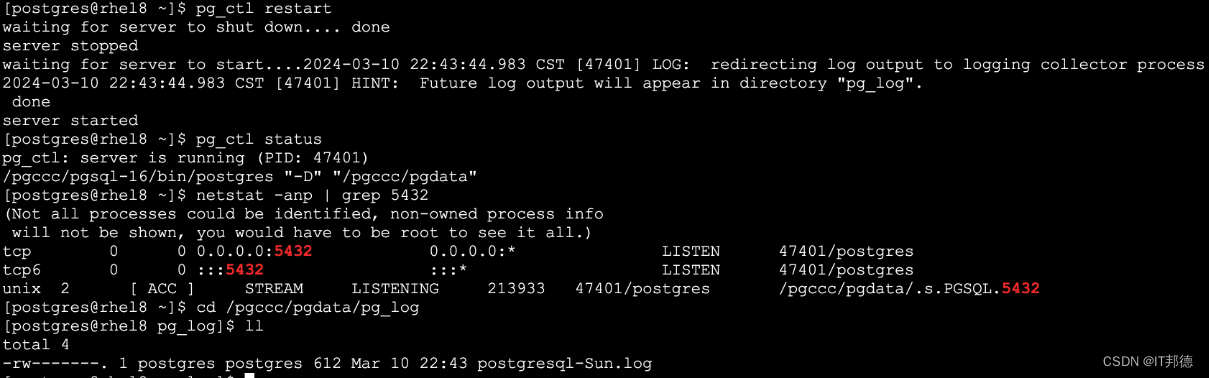
[postgres@rhel8 ~]$ pg_ctl restart
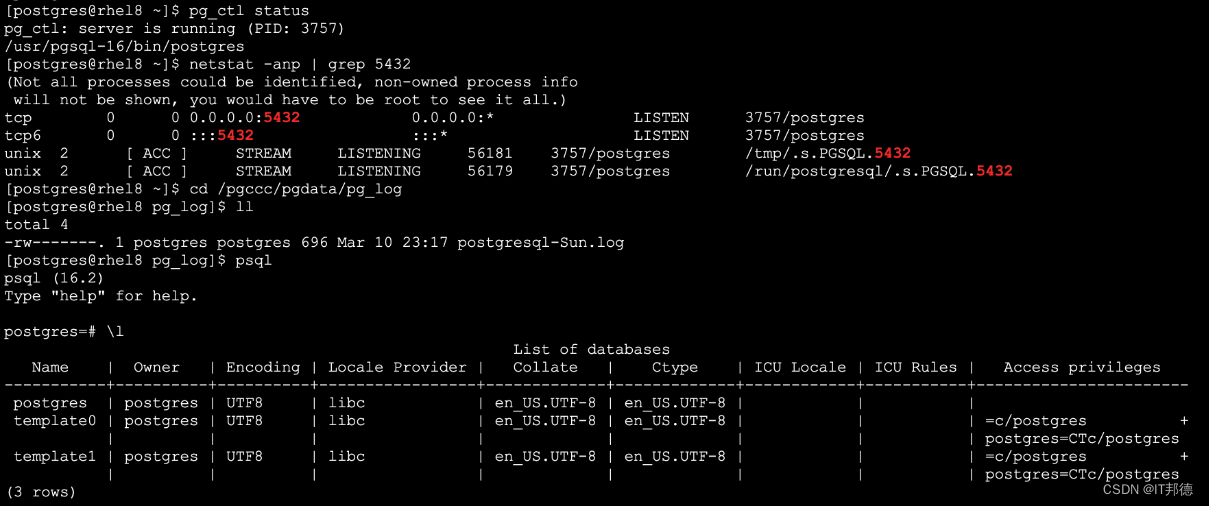
[postgres@rhel8 ~]$ pg_ctl status
[postgres@rhel8 ~]$ netstat -anp | grep 5432
[postgres@rhel8 ~]$ cd /pgccc/pgdata/pg_log --日志文件
📣 2.RPM离线安装PG
✨ 2.1 RPM包下载
https://ftp.postgresql.org/pub/repos/yum/16/redhat/rhel-8.1-x86_64/
数据库lib库
postgresql16-libs-16.2-1PGDG.rhel8.x86_64.rpm
客户端安装包
postgresql16-16.2-1PGDG.rhel8.x86_64.rpm
数据库主程序
postgresql16-server-16.2-1PGDG.rhel8.x86_64.rpm
下载libzstd依赖包,高于1.4.0版本
https://rpmfind.net/linux/rpm2html/search.php
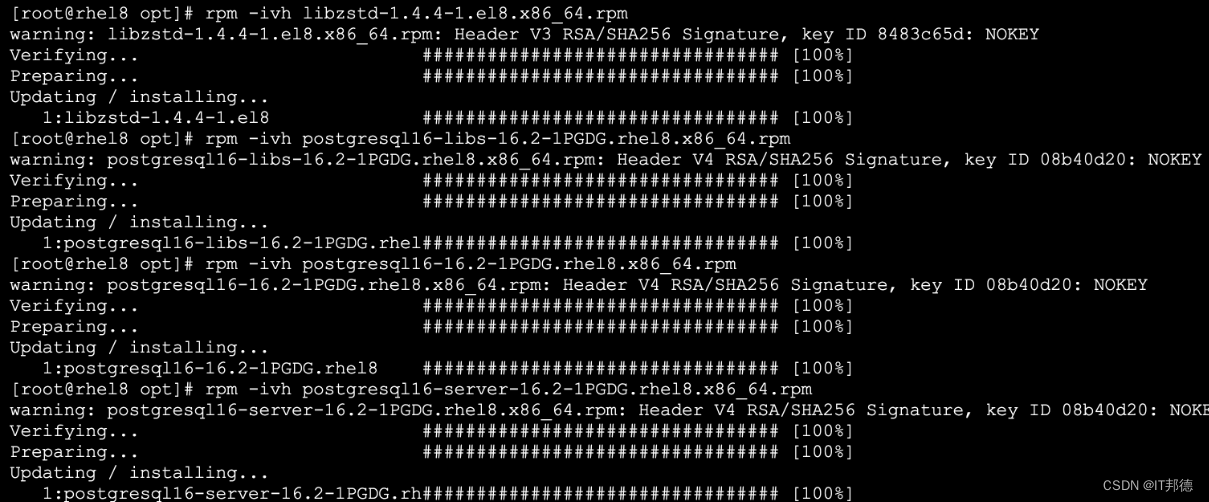
rpm -ivh libzstd-1.4.4-1.el8.x86_64.rpm
rpm -ivh postgresql16-libs-16.2-1PGDG.rhel8.x86_64.rpm
rpm -ivh postgresql16-16.2-1PGDG.rhel8.x86_64.rpm
rpm -ivh postgresql16-server-16.2-1PGDG.rhel8.x86_64.rpm
✨ 2.2 环境变量配置
[root@rhel8 ~]# su - postgres

cat >> ~/.bash_profile <<"EOF"
export LANG=en_US.UTF-8
export PS1="[\u@\h \W]\$ "
export PGPORT=5432
export PGDATA=/pgccc/pgdata
export PGHOME=/usr/pgsql-16
export PATH=$PGHOME/bin:$PATH:.
export PGUSER=postgres
export PGDATABASE=postgres
EOF

[postgres@rhel8 ]$ source  ~/.bash_profile
✨ 2.3 数据库初始化
mkdir -p /pgccc/{pgdata,archive,scripts,backup,pgsql-16,soft}
chown -R postgres:postgres /pgccc
chmod -R 775 /pgccc
su - postgres
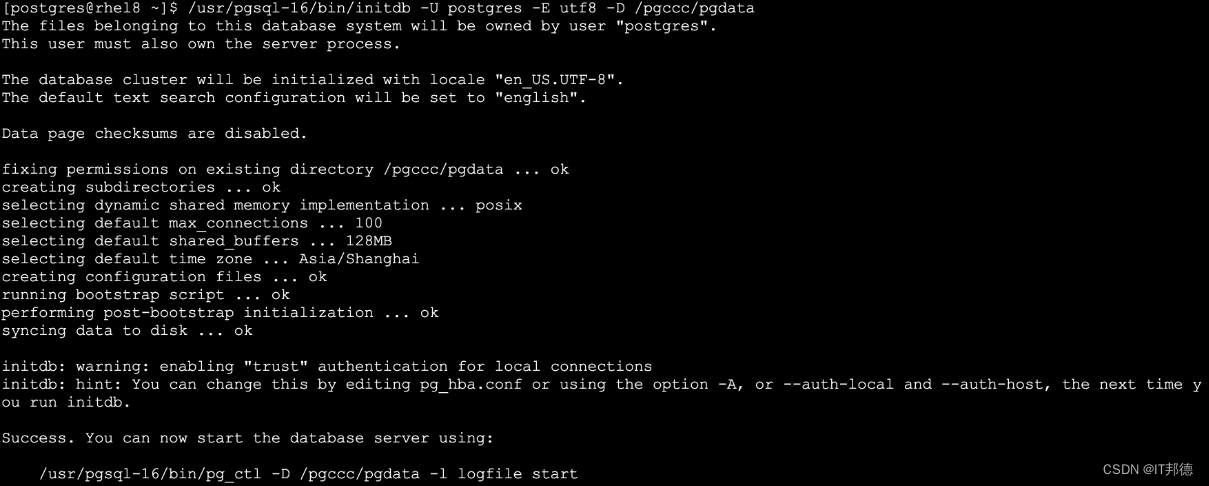
/usr/pgsql-16/bin/initdb -U postgres -E utf8 -D /pgccc/pgdata
✨ 2.4 配置DB参数
两个参数文件:
/pgccc/pgdata/postgresql.conf
/pgccc/pgdata/pg_hba.conf
cat >> /pgccc/pgdata/postgresql.conf <<"EOF"
listen_addresses = '*'
port=5432
logging_collector = on
log_directory = 'pg_log'
log_filename = 'postgresql-%a.log'
log_truncate_on_rotation = on
EOF

cat > /pgccc/pgdata/pg_hba.conf << EOF
# TYPE  DATABASE    USER    ADDRESS       METHOD
local     all       all                    trust
host      all       all   127.0.0.1/32     trust
host      all       all    0.0.0.0/0      md5
host   replication  all    0.0.0.0/0      md5
local  replication  all                    trust
EOF
#启动
[root@rhel8 ~]# su - postgres
[postgres@rhel8 ~]$ pg_ctl restart
[postgres@rhel8 ~]$ pg_ctl status
[postgres@rhel8 ~]$ netstat -anp | grep 5432
[postgres@rhel8 ~]$ cd /pgccc/pgdata/pg_log --日志文件
📣 3.YUM在线安装
✨ 3.1 安装依赖包
curl -o /etc/yum.repos.d/CentOS-Base.repo https://mirrors.aliyun.com/repo/Centos-8.repo
yum install -y cmake make gcc zlib gcc-c++ perl readline readline-devel
yum install -y zlib-devel perl python36 tcl openssl ncurses-devel openldap pam
yum install -y zlib libicu
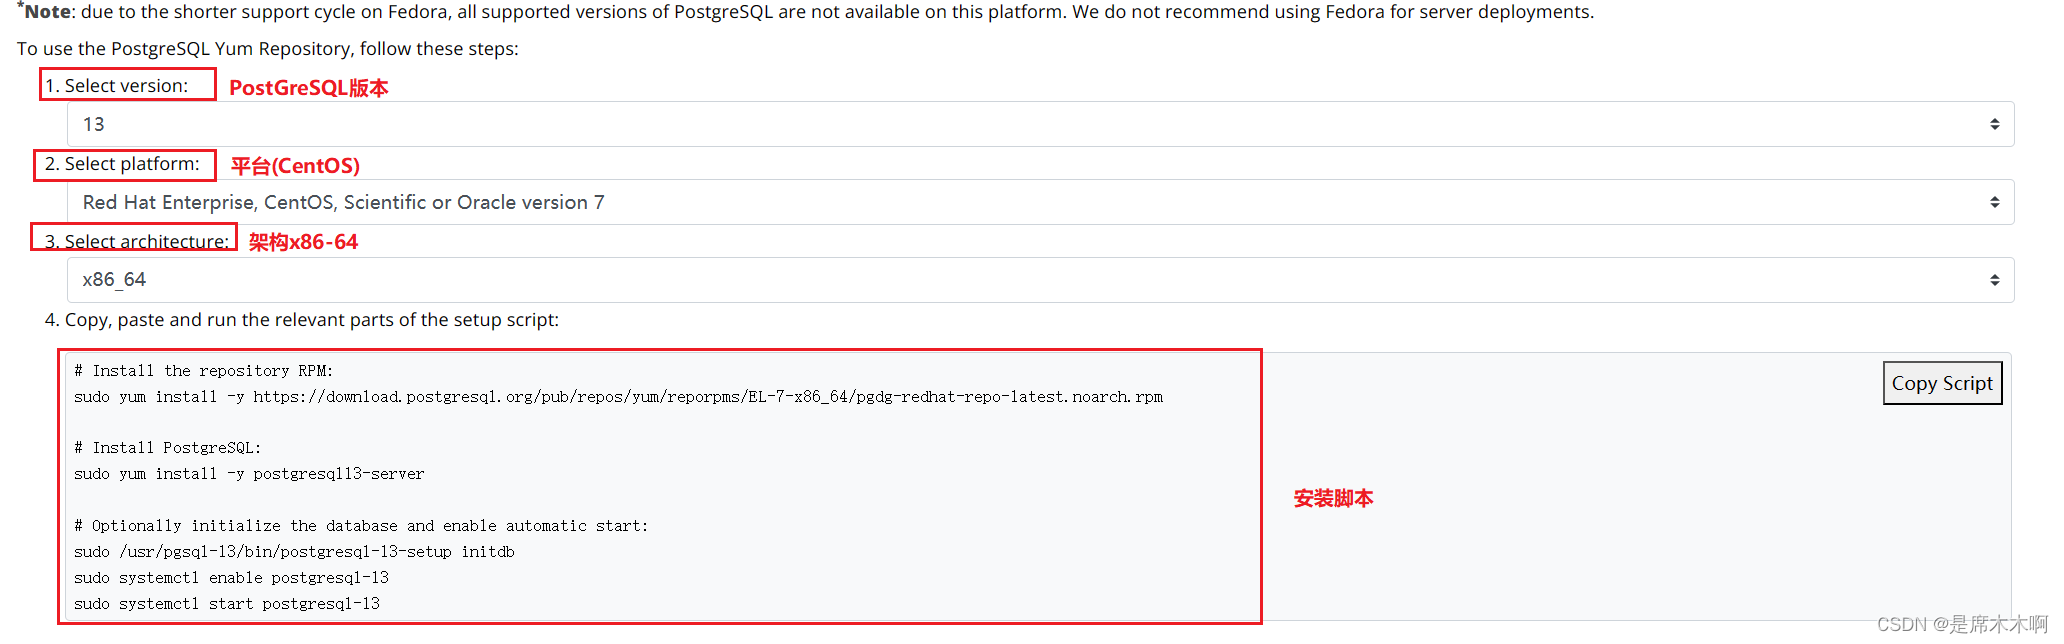
✨ 3.2 配置YUM源
sudo dnf install -y \
https://download.postgresql.org/pub/repos/yum/reporpms/EL-8-x86_64/pgdg-redhat-repo-latest.noarch.rpm
✨ 3.3 确认版本
dnf update
yum repolist all | grep pgdg
yum repolist enabled | grep pgdg

✨ 3.4 安装PG
离线安装
rpm -ivh libzstd-1.4.4-1.el8.x86_64.rpm
yum install -y postgresql16 postgresql16-server
#环境变量
–root下操作
echo “export PATH=/usr/pgsql-16/bin:$PATH” >> /etc/profile
✨ 3.5 初始化PG
/usr/pgsql-16/bin/postgresql-16-setup initdb
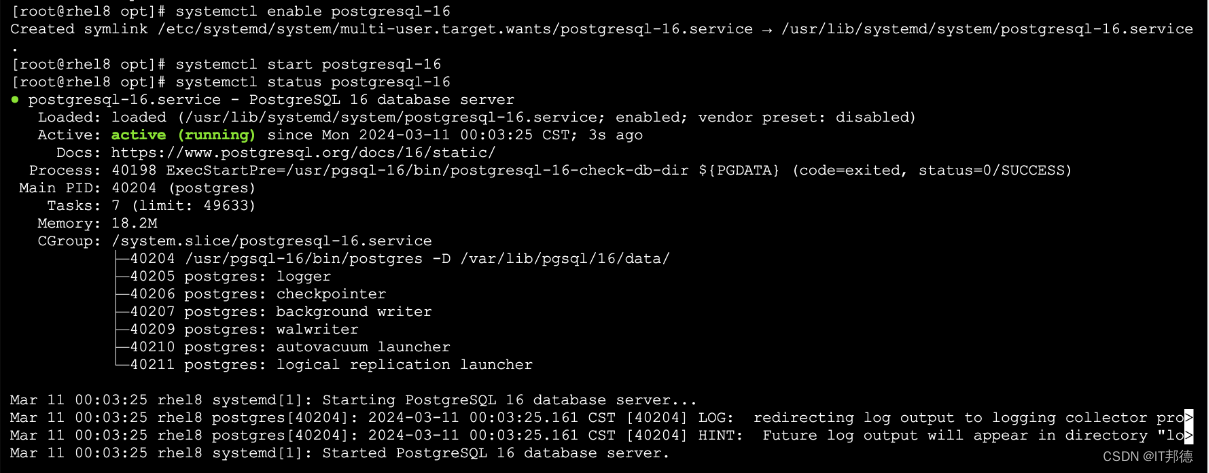
systemctl enable postgresql-16
systemctl start postgresql-16
systemctl status postgresql-16
✨ 3.6 DB登陆
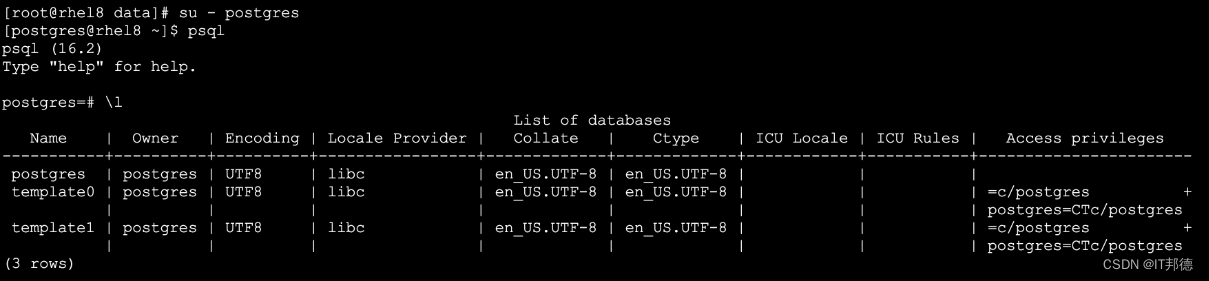
su - postgres
[postgres@rhel8 ~]$ psql
postgres=# \l
✨ 3.7 配置文件修改
cat >> /var/lib/pgsql/16/data/postgresql.conf <<"EOF"
listen_addresses = '*'
port=5432
#unix_socket_directories='/var/lib/pgsql/16/data'
logging_collector = on
log_directory = 'pg_log'
log_filename = 'postgresql-%a.log'
log_truncate_on_rotation = on
EOF

##黑名单配置
cat << EOF > /var/lib/pgsql/16/data/pg_hba.conf
# TYPE  DATABASE    USER    ADDRESS       METHOD
local     all       all                    trust
host      all       all   127.0.0.1/32     trust
host      all       all    0.0.0.0/0      md5
host   replication  all    0.0.0.0/0      md5
local  replication  all                    trust
EOF
systemctl restart postgresql-16 --重启
systemctl status postgresql-16 --查看状态
4.总结
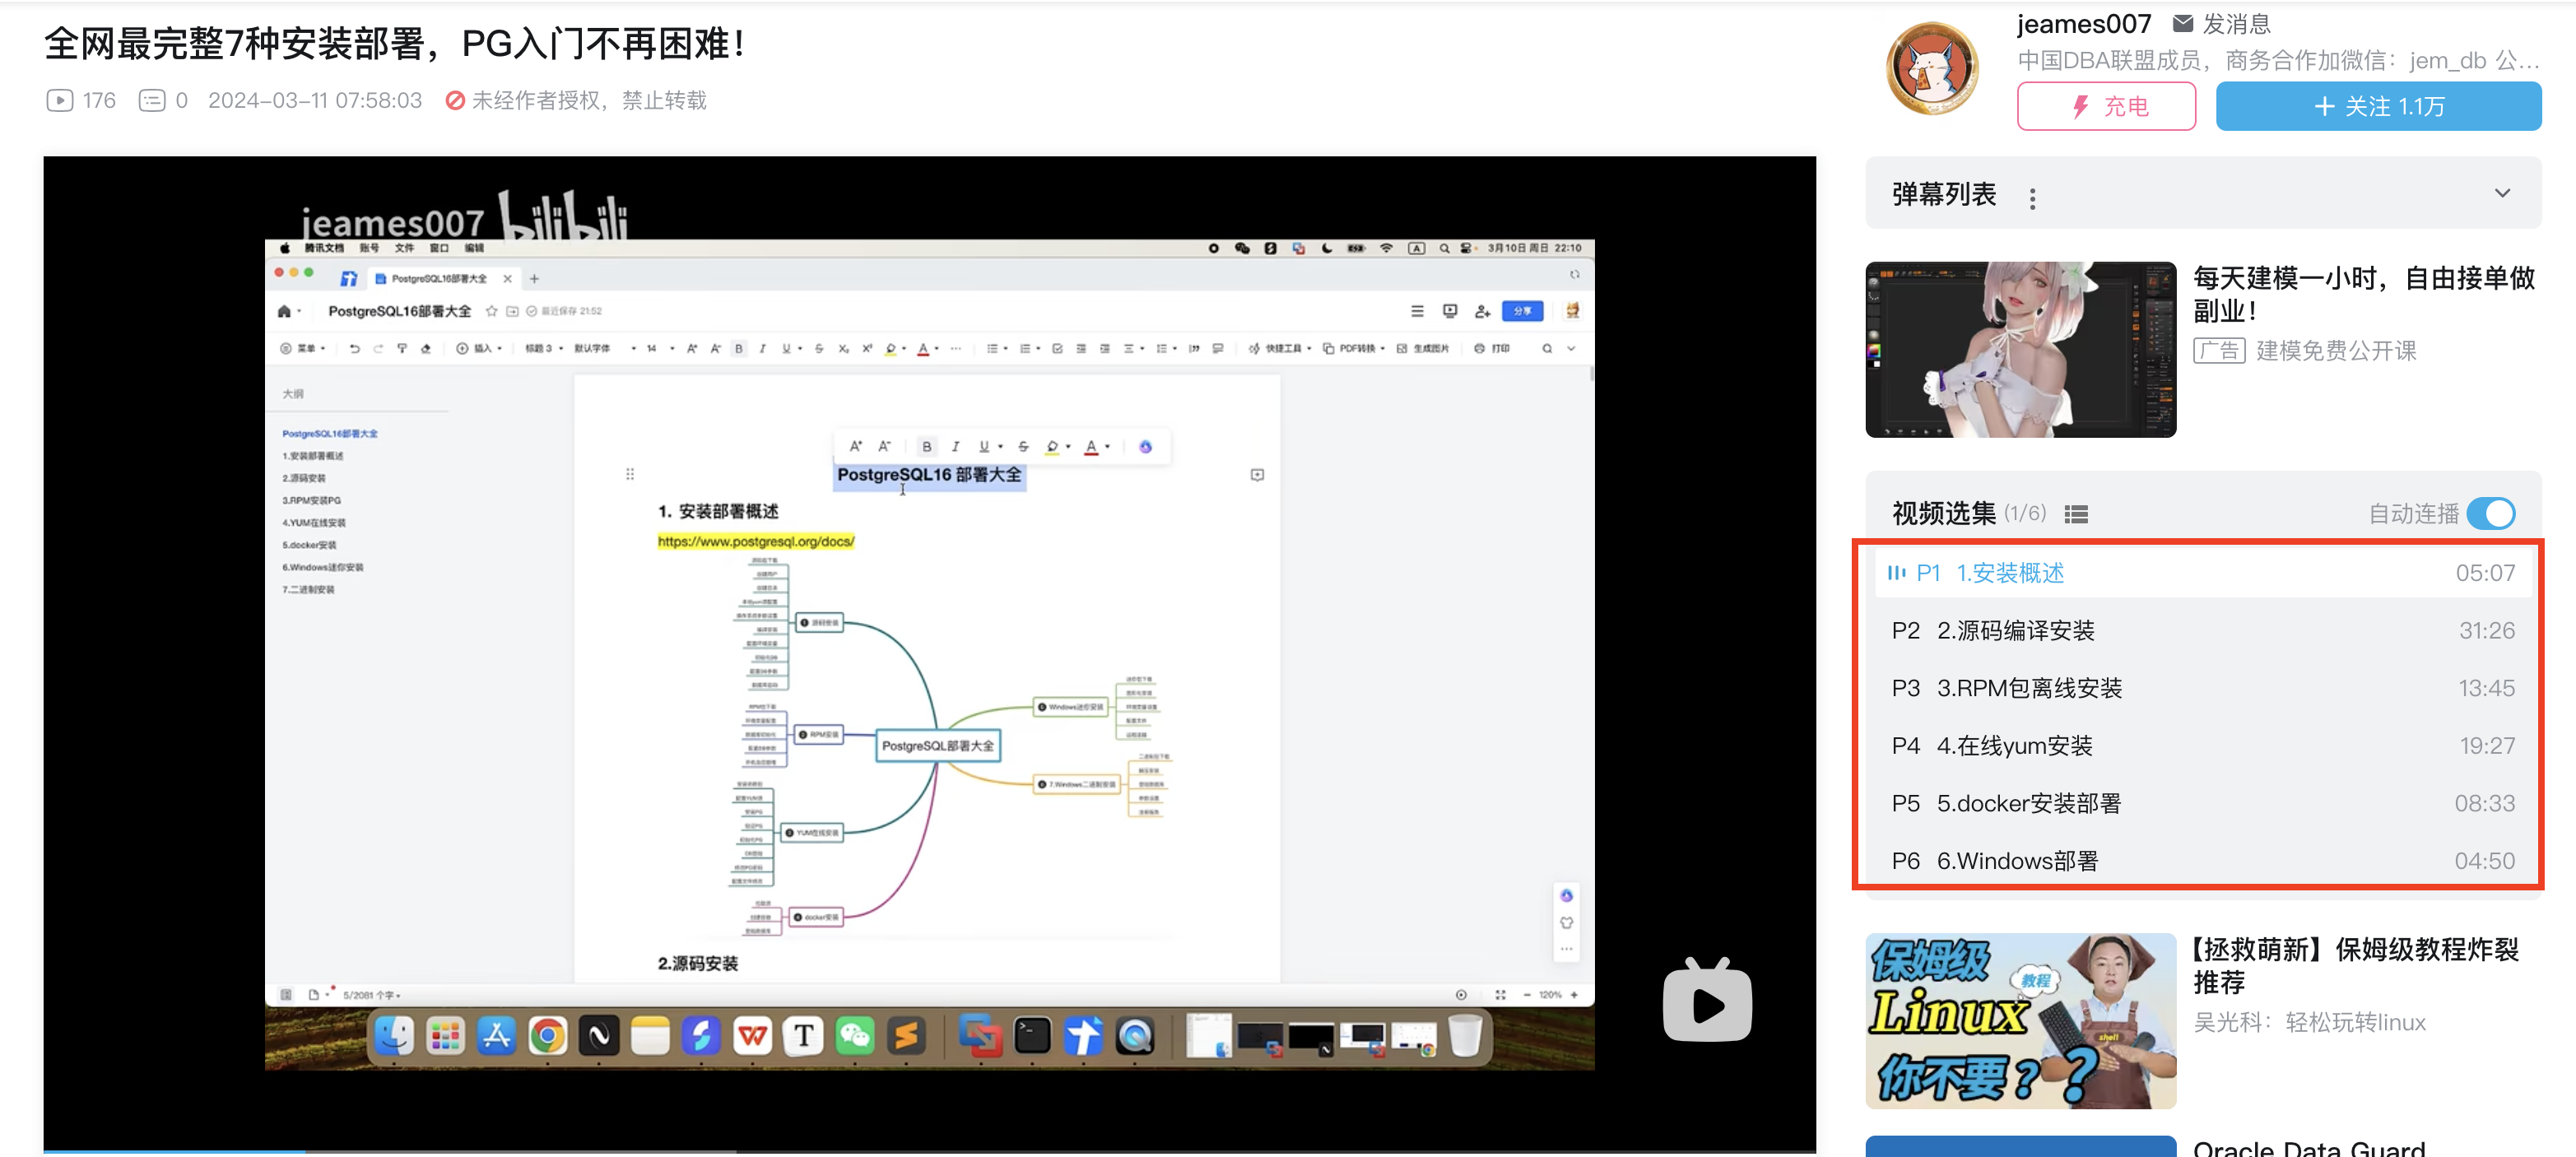
安装部署是关键,只有环境才能更好的训练,以上内容我已经在B站制作了详细视频
B站直播间:
https://www.bilibili.com/video/BV1yj421Z7iJ