目录
一、背景与环境
1. 背景
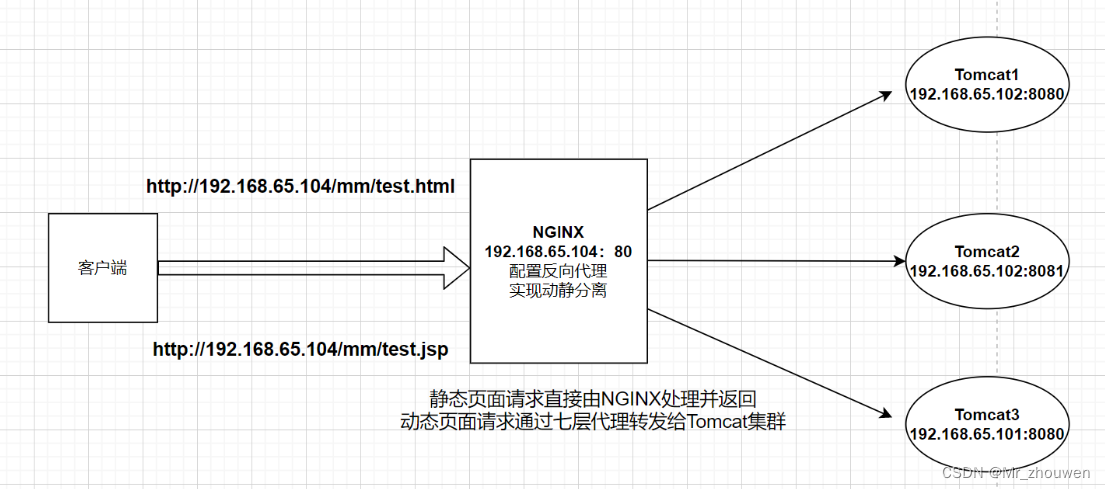
在一个Web应用程序中,通常会将动态内容(由Tomcat处理)与静态内容(如图片、CSS、JavaScript文件等)分开处理,以提高性能和扩展性。Nginx可以作为反向代理服务器,将动态请求转发给Tomcat服务器处理,同时直接提供静态内容,实现负载均衡和动静分离。下面将以相关案例进一步介绍。
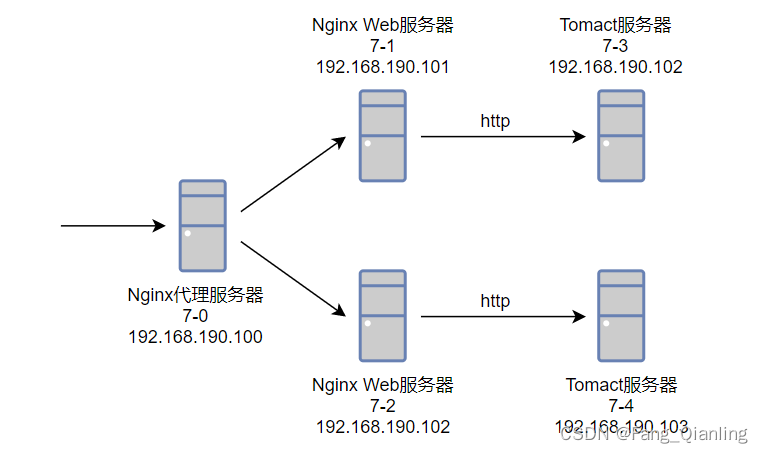
2. 环境图示
3. 目标
① 7-0 基于反向代理,负载均衡可以调度到 7-1 和 7-2
② 7-1 和7-2 动静分离,自身处理静态资源,动态资源交给 7-3 和 7-4
③ 最终客户端访问代理服务器 7-0 实现负载均衡与动静分离
二、操作过程
1. 第一层
① 关闭所有机器防火墙
[root@localhost ~]# systemctl stop firewalld.service
[root@localhost ~]# setenforce 0
② 7-0,7-1,7-2 yum安装nginx
[root@localhost ~]# yum install epel-release.noarch -y
[root@localhost ~]# yum install nginx -y
③ 修改 7-0 代理服务器配置
[root@localhost ~]# vim /etc/nginx/nginx.conf
 18         upstream web {
 19         server 192.168.190.101;
 20         server 192.168.190.102;
 21         }

 49         location / {
 50         proxy_pass http://web;
 51         }
[root@localhost ~]# nginx -t
[root@localhost ~]# systemctl start nginx.service
[root@localhost ~]# nginx -s reload
④ 分别修改 7-1,7-2 nginx主目录web文件,并开启nginx服务
192.168.190.101:
[root@localhost ~]# vim /usr/share/nginx/html/index.html
7-1
[root@localhost ~]# systemctl start nginx.service

192.168.190.102:
[root@localhost ~]# vim /usr/share/nginx/html/index.html
7-2
[root@localhost ~]# systemctl start nginx.service
⑤ 访问代理服务器 7-0
[root@localhost ~]# curl 192.168.190.100
7-2
[root@localhost ~]# curl 192.168.190.100
7-1
[root@localhost ~]# curl 192.168.190.100
7-1
[root@localhost ~]# curl 192.168.190.100
7-2
2. 第二层
① 分别修改 7-1,7-2 web服务器配置文件
[root@localhost ~]# vim /etc/nginx/nginx.conf
 29         upstream tomcat {
 30         server 192.168.190.103:8080;
 31         server 192.168.190.104:8080;
 32         }

 48         location ~* \.jsp$ {
 49         proxy_pass http://tomcat;
 50         }
 51
 52         location ~* \.html$ {
 53         root         /usr/share/nginx/html;
 54         }
[root@localhost ~]# nginx -t
[root@localhost ~]# nginx -s reload
② 7-3,7-4 分别安装tomcat
[root@localhost ~]# yum install tomcat -y
③ 7-3,7-4 分别新建tomcat服务项目文件
192.168.190.103,7-3:
[root@localhost ~]# cd /usr/share/tomcat/webapps
[root@localhost webapps]# mkdir test
[root@localhost webapps]# echo 7-3 > test/index.jsp
[root@localhost webapps]# systemctl start tomcat

192.168.190.104,7-4
[root@localhost ~]# cd /usr/share/tomcat/webapps
[root@localhost webapps]# mkdir test
[root@localhost webapps]# echo 7-4 > test/index.jsp
[root@localhost webapps]# systemctl start tomcat
④ 访问代理访问 7-0 查看负载均衡与动静分离
[root@localhost ~]# curl 192.168.190.100/test/index.jsp
7-4
[root@localhost ~]# curl 192.168.190.100/test/index.jsp
7-3
[root@localhost ~]# curl 192.168.190.100/test/index.jsp
7-3
[root@localhost ~]# curl 192.168.190.100/test/index.jsp
7-4
[root@localhost ~]# curl 192.168.190.100/test/index.j