系统文件I/O
注:学习本次内容之前,最好先对C语言文件操作有所了解
本章思维导图:
 注:思维导图对应的
.xmind文件和.png文件都已同步导入至资源,可供免费查阅
在以前学习的C语言中,我们可以通过fwrite和fread等各种库函数对系统文件进行读写操作。同时也应该注意到,C语言作为一种用户级语言,其可以利用库函数对系统的底层数据进行各种操作,这个过程中一定会经过操作系统的处理,因此我们可以确定C语言有关文件操作的库函数一定封装了系统调用。
今天我们就要来学习有关文件操作的系统调用及其背后的细节
文章目录
1. 文件操作
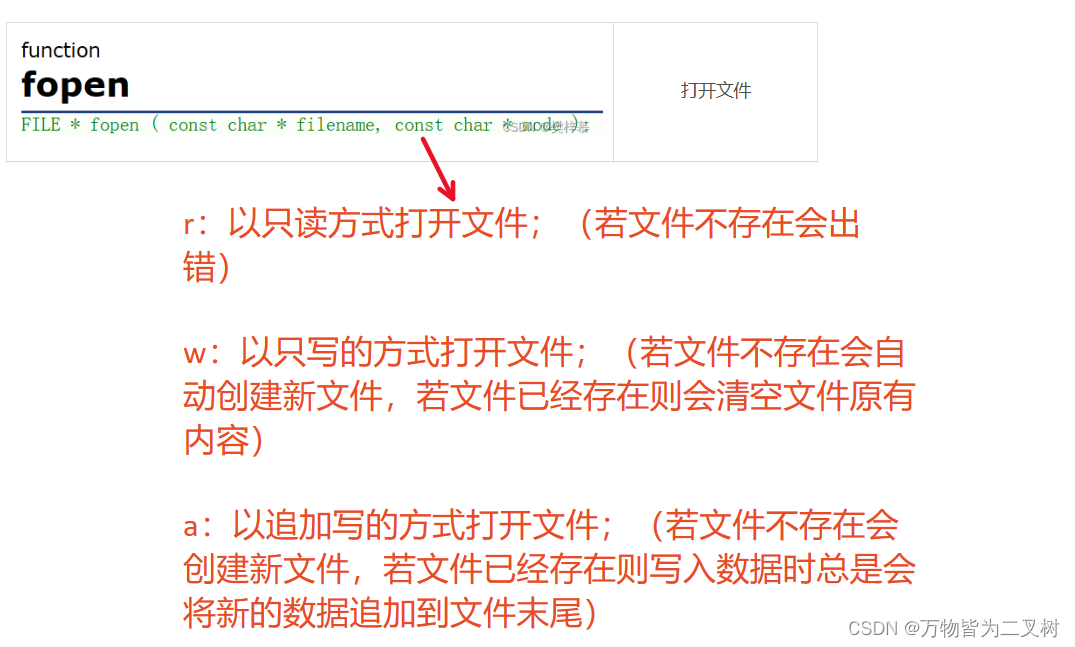
1.1 打开文件
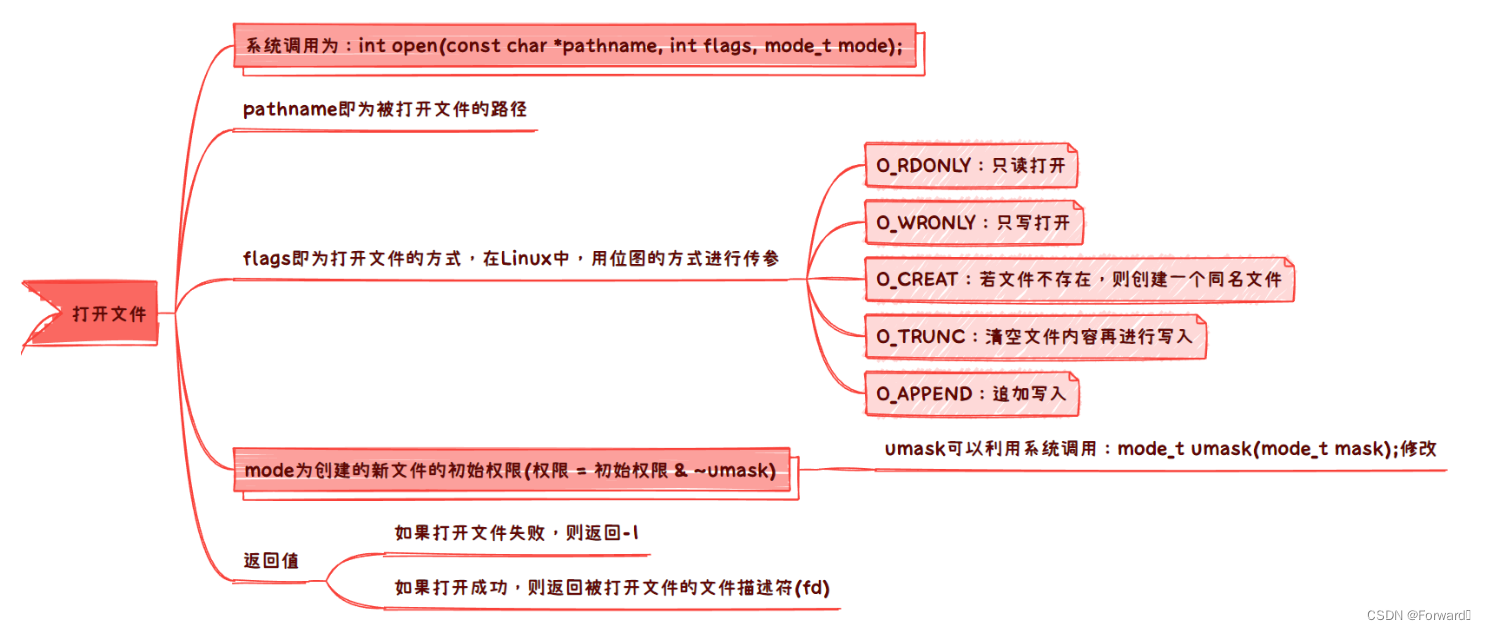
打开文件的系统调用为:
int open(const char *pathname, int flags);
int open(const char *pathname, int flags, mode_t mode);
需要包含头文件:
#include <sys/types.h>
#include <sys/stat.h>
#include <fcntl.h>
接下来我们来分析这个函数:
参数pathname
这个参数和C语言
fopen的第一个参数类似。即为被打开文件的路径,可以使用绝对路径表示,也可以用相对路径表示
返回值
- 打开成功,返回被打开文件的文件描述符
fd- 打开失败,返回-1
由于C语言的库函数
fopen一定封装了系统调用open,而C语言fopen的返回值为结构体FILE,而open的返回值为整形fd,因此我们可以确定,C语言的文件结构体FILE一定封装了文件描述符fd
参数flags
和C语言的
fopen不同,这里传入的是一个整形参数,实际上,这里是以位图的方式进行传参何为位图?
- 例如对于一个32位的int类型数据,我们并不会将它的32个bit位看成一个整体,而是将每一位(或者某几位)bit位都赋予其意义
- 这样,一个32位的int类型的数据就可以用不同的bit位来表示不同的含义,从而实现不同的功能。这在进程控制中讲进程等待的参数
status中有所提及例如:
/*
用位图的方式实现用一个int型变量来控制打印不同的结果
*/

#include <stdio.h>

#define ONE 1
#define TWO (1 << 1)
#define THREE (1 << 2)
#define FOUR (1 << 3)

void Print(int flags)
{

  if (flags & ONE)
    printf("1 ");
  if (flags & TWO)
    printf("2 ");
  if (flags & THREE)
    printf("3 ");
  if (flags & FOUR)
    printf("4 ");
}

int main()
{

  int flag1 = ONE | TWO | THREE | FOUR;
  int flag2 = ONE | FOUR;

  Print(flag1);
  printf("\n");
  Print(flag2);
  printf("\n");

  return 0;
}
output:
1 2 3 4
1 4
在Linux中,也有类似上面
ONE TWO的宏常量:
O_RDONLY:以只读的方式打开文件O_WRONLY:以只写的方式打开文件O_APPEND:文件以追加的方式打开O_CREAT:如果文件不存在,将会在当前路径创建一个同名文件O_TRUNC:如果文件存在并以写的方式打开,那会先清空文件再进行写入我们来举几个例子:
int fd = open("log.txt", O_WRONLY | O_CREAT | O_TRUNC);	//只写方式打开文件,先清空再写入,如果没有该文件就创建

int fd = open("log.txt", O_WRONLY | O_CREAT | O_APPEND); //追加方式打开文件,如果没有该文件就创建

int fd = open("log.txt", O_RDONLY);		//以只读的方式打开
参数mode
如果我们的参数
flags带有O_CREAT选项,那么当被打开的文件不存在时,就会创建一个同名文件但是,当我们用命令
ll查看文件时,却是这样的:
可以发现,新创建文件的权限是一个随机值,因此就需要参数
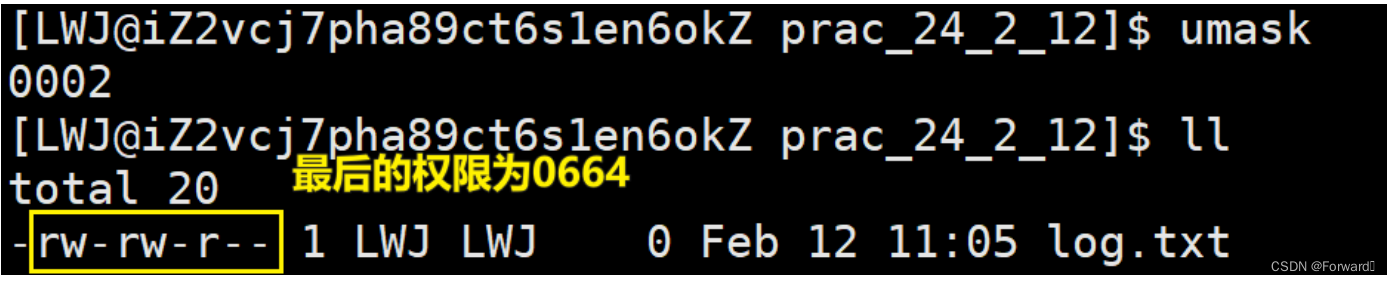
mode进行确定需要注意,参数
mode是被创建文件的初始权限,而文件的权限为:权限 = 初始权限 & ~umask。例如:int fd = open("log.txt", O_WRONLY | O_CREAT, 0666);
此外,我们也可以利用系统调用
umask来修改创建文件时的umask值mode_t umask(mode_t mask);需要注意,这个系统调用并不会实际修改系统的
umask,只是会临时改变创建文件时的umask

1.2 关闭文件
需要包含头文件:<unistd.h>
系统调用为:
int close(int fd);
fd即为被关闭文件的文件描述符- 成功关闭,返回0;关闭失败,返回-1
1.3 读写文件
需要包含头文件<unistd.h>
1.3.1 向文件写入
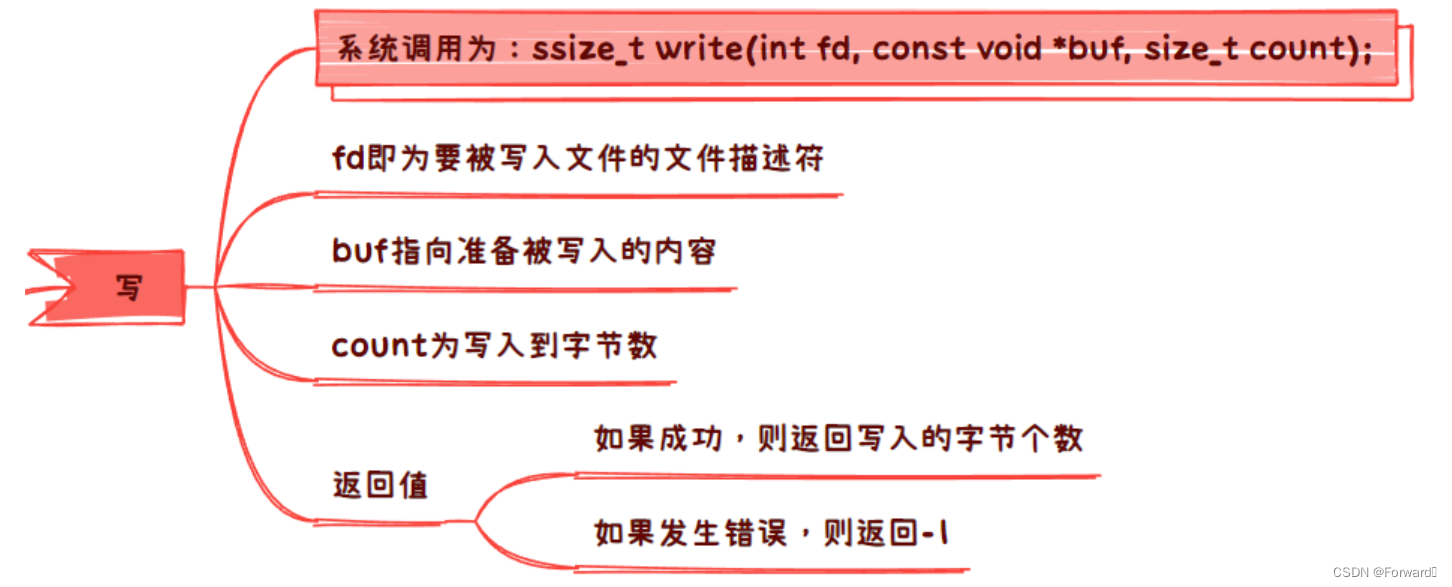
系统调用为:
ssize_t write(int fd, const void *buf, size_t count);
fd即为被写入文件的文件描述符buf即为准备被写入的内容count即为写入的字节数如果写入成功,则返回写入的字节数
如果写入失败,则返回-1
例如:
#include <stdio.h>
#include <sys/types.h>
#include <sys/stat.h>
#include <fcntl.h>
#include <unistd.h>
#include <string.h>

#define SIZE 1024

int main()
{

  //以只写的方式打开文件,如果文件不存在就创建,先清空文件再写入
  //被创建文件的权限为0666
  umask(0000);
  int fd = open("log.txt", O_WRONLY | O_CREAT | O_TRUNC, 0666);
  if (fd == -1)
  {

    perror("open");
    return 1;
  }

  //向文件写入
  char buf[SIZE] = "hello world\n";
  write(fd, buf, strlen(buf));

  close(fd);

  return 0;
}
cat log.txt
hello world
1.3.2 读取文件

系统调用为:
ssize_t read(int fd, void *buf, size_t count);
fd即为被读取文件的文件描述符buf指向的空间将存放被读取的数据count即为读取的字节数- 读取成功,返回读取的字节数;读取失败,返回-1
例如:
cat log.txt
hello world
#include <stdio.h>
#include <sys/types.h>
#include <sys/stat.h>
#include <fcntl.h>
#include <unistd.h>
#include <string.h>

#define SIZE 1024

int main()
{

  umask(0000);
  int fd = open("log.txt", O_RDONLY);
  if (fd == -1)
  {

    perror("open");
    return 1;
  }

  char buf[SIZE] = {
   0};
  read(fd, buf, SIZE);
  printf("%s", buf);

  close(fd);

  return 0;
}
output:
hello world
2. 文件描述符fd
肯定有小伙伴会好奇,文件描述符fd究竟是什么,有什么作用?现在就让我们来一探究竟
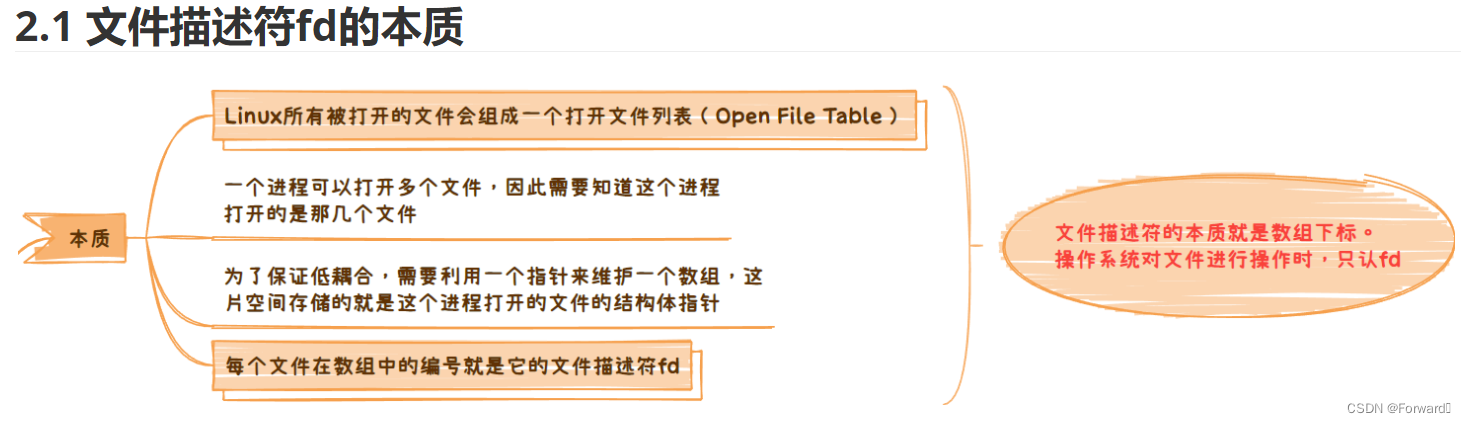
2.1 文件描述符fd的本质
我们不妨先多打开几个文件来看看他们的文件描述符都是什么:
#include <stdio.h>
#include <sys/types.h>
#include <sys/stat.h>
#include <fcntl.h>

int main()
{


  int fd1 = open("log1.txt", O_CREAT);
  int fd2 = open("log2.txt", O_CREAT);
  int fd3 = open("log3.txt", O_CREAT);
  int fd4 = open("log4.txt", O_CREAT);
  int fd5 = open("log5.txt", O_CREAT);

  printf("%d %d %d %d %d\n", fd1, fd2, fd3, fd4, fd5);

  return 0;
}
output:
3 4 5 6 7
同时,我们应该也清楚,C语言会默认打开三个标准文件流,分别是:
stdin:标准输入流stdout:标准输出流stderr:标准错误流
它们同时也是三个文件,即FILE类型, 我们前面说过FILE结构体会封装文件描述符fd,因此我们可以进行查看:
#include <stdio.h>
#include <sys/types.h>
#include <sys/stat.h>
#include <fcntl.h>

int main()
{


  int fd1 = open("log1.txt", O_CREAT);
  int fd2 = open("log2.txt", O_CREAT);
  int fd3 = open("log3.txt", O_CREAT);
  int fd4 = open("log4.txt", O_CREAT);
  int fd5 = open("log5.txt", O_CREAT);

  //FILE结构体的整形_fileno就是其文件描述符fd
  printf("%d %d %d\n", stdin->_fileno, stdout->_fileno, stderr->_fileno);
  printf("%d %d %d %d %d\n", fd1, fd2, fd3, fd4, fd5);

  return 0;
}
output:
0 1 2
3 4 5 6 7
可以看出,如果我们连续打开多个文件,那么这些文件的文件描述符就是连续的数字,那么文件描述符fd的本质是什么呢?
这里先给出结论:文件描述符的本质实际就是数组的下标
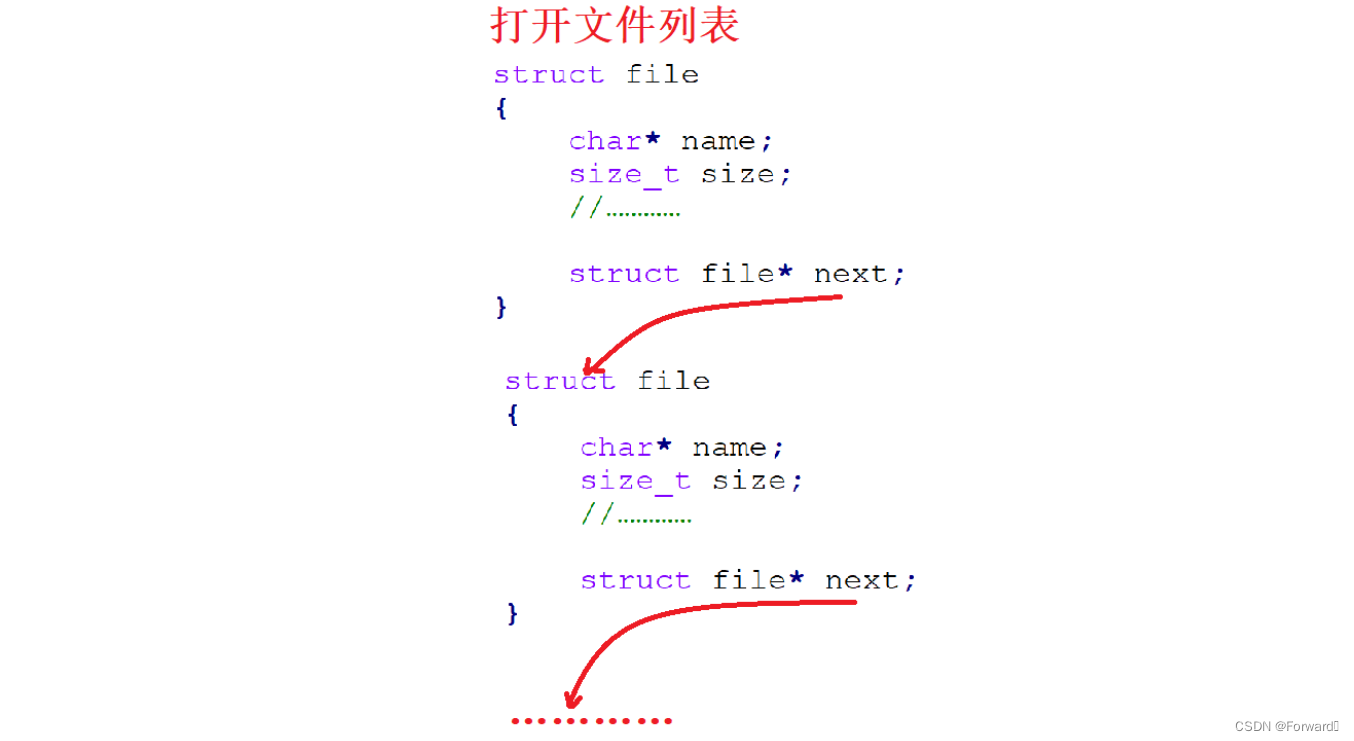
首先,CPU只会和内存中的数据进行交互,因此每一个被打开的文件都会先加载到内存中。操作系统也需要对这些文件进行管理,即“先描述,再组织”,每一个被打开文件的属性都会存入
file结构体,这些file结构体会共同组成一个打开文件列表:
文件是被其所属的进程打开,一个进程可以打开多个文件,但打开文件列表的文件并不一定是同一个进程打开,因此每个进程就需要知道它打开的是哪几个文件
为了达到程序低耦合高内聚的要求,进程的
task_struct结构体中会封装一个结构体指针struct files_struct* files,这个指针指向的结构体中有一个数组struct file* fd_array[],其存储的就是这个进程打开文件的结构体file的地址
fd所代表的就是每个文件对应的结构体
file指针在数组fd_array所对应的下标
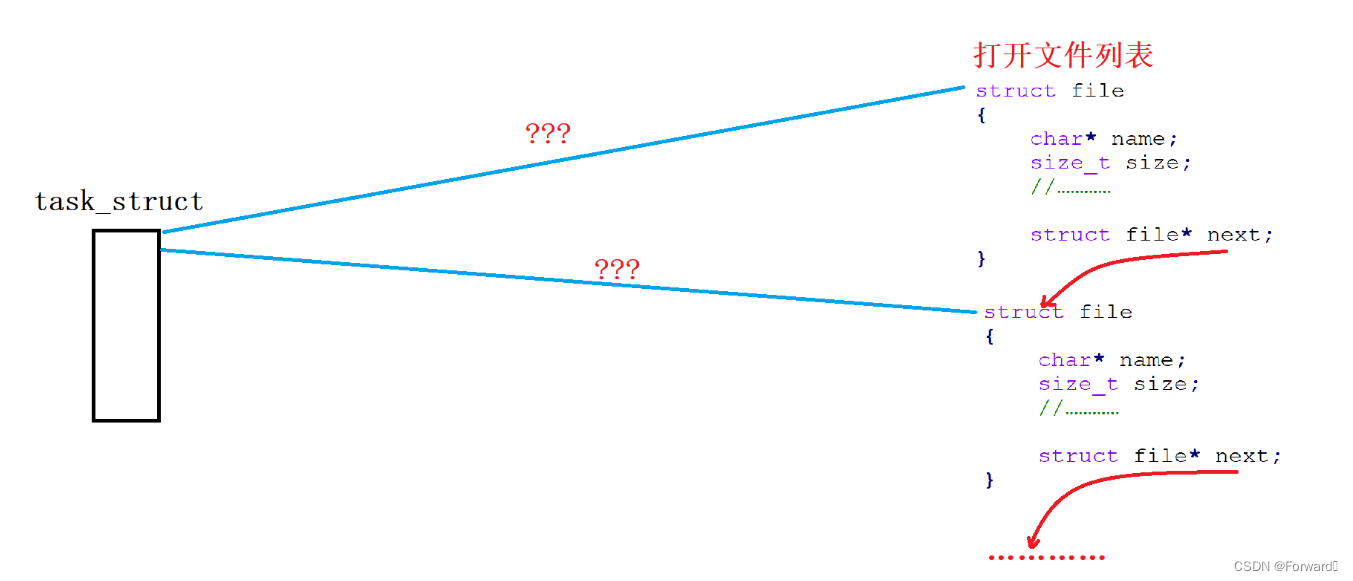
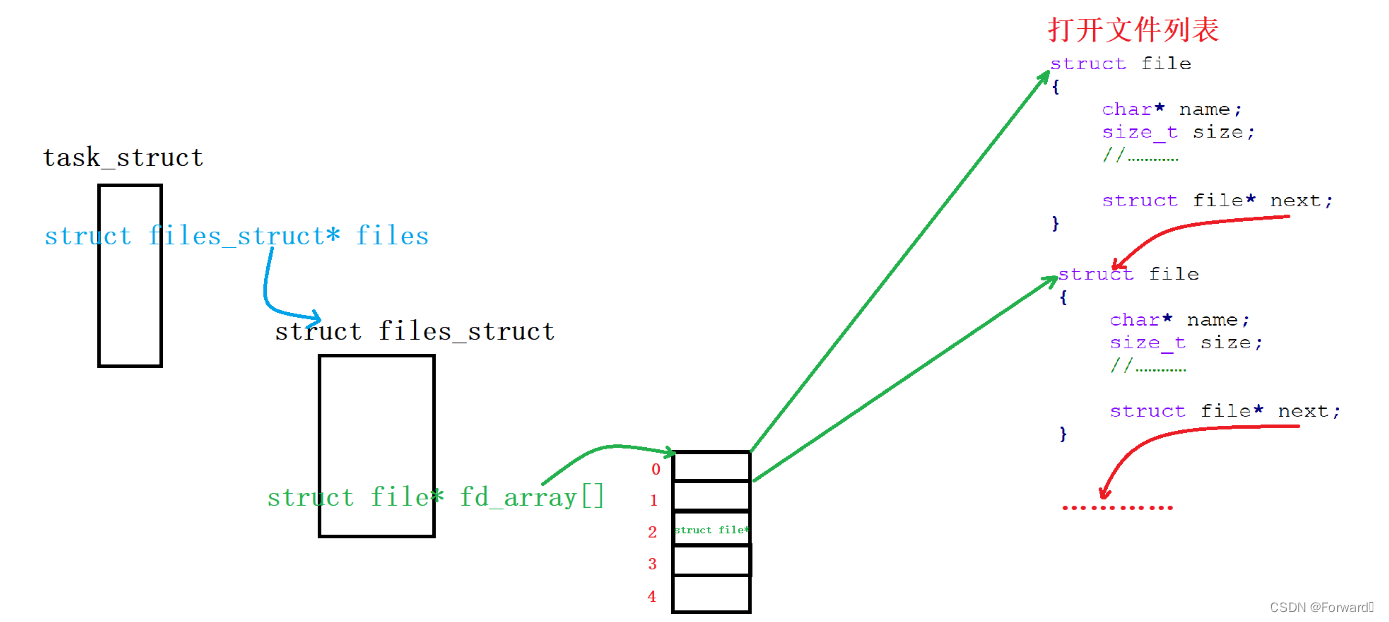
知道了上述的关系后,我们就清楚:一个进程要对其文件进行读写操作,只需要知道这个文件的文件描述符fd就可以了。因为我们可以通过这样的关系找到该文件的内容属性:task_struct -> files_struct -> fd_array -> fd -> file
2.2 fd的分配规则

文件描述符fd的分配规则为:
最小的没有被使用的数组下标,会分配给最新打开的文件
我们来举例说明:
#include <stdio.h>
#include <sys/types.h>
#include <sys/stat.h>
#include <fcntl.h>
#include <unistd.h>
int main()
{

  printf("stdin->_fileno = %d\n", stdin->_fileno);
  close(stdin->_fileno);

  int fd = open("log.txt", O_RDONLY);
  printf("log.txt->fd = %d\n", fd);

  return 0;
}
output:
stdin->_fileno = 0
log.txt->fd = 0
可以发现,我们将标准输入关闭之后,在打开一个文件log.txt标准输入对应的文件描述符fd(0)就成了文件log.txt的文件描述符
再结合我们上面所提及的:进程对文件的操作只认文件的文件描述符fd,因此我们可以认为,上面的操作中,log.txt成为了新的标准输入,从而做到了常说的“输入重定向”
可以进行演示:
cat log.txt
123456
#include <stdio.h>
#include <sys/types.h>
#include <sys/stat.h>
#include <fcntl.h>
#include <unistd.h>
int main()
{

  //关闭标准输入
  printf("stdin->_fileno = %d\n", stdin->_fileno);
  close(stdin->_fileno);

  //打开文件log.txt,log.txt成了新的标准输入
  int fd = open("log.txt", O_RDONLY);
  printf("log.txt->fd = %d\n", fd);

  //a读取的就是log.txt文件的内容
  int a = 0;
  scanf("%d", &a);
  printf("a = %d\n", a);

  return 0;
}
output:
stdin->_fileno = 0
log.txt->fd = 0
a = 123456
标准输出也是同理,我们可以用类似的方式来实现输出重定向或追加重定向:
#include <stdio.h>
#include <sys/types.h>
#include <sys/stat.h>
#include <fcntl.h>
#include <unistd.h>
int main()
{

  //关闭标准输出
  printf("stdout->_fileno = %d\n", stdout->_fileno);
  close(stdout->_fileno);

  //新打开的文件log.txt成了标准输出
  int fd = open("log.txt", O_WRONLY | O_CREAT | O_TRUNC);
  printf("log.txt->fd = %d\n", fd);		//输出到标准输出,即文件log.txt中

  printf("hello world\n");	//输出到标准输出,即文件log.txt中

  return 0;
}
output:
stdout->_fileno = 1
cat log.txt
log.txt->fd = 1
hello world
2.3 重定向系统调用
用上面这种“先关闭标准流再打开新的文件”这种方式来实现重定向着实有些繁琐,因此系统提供给了我们一个接口:
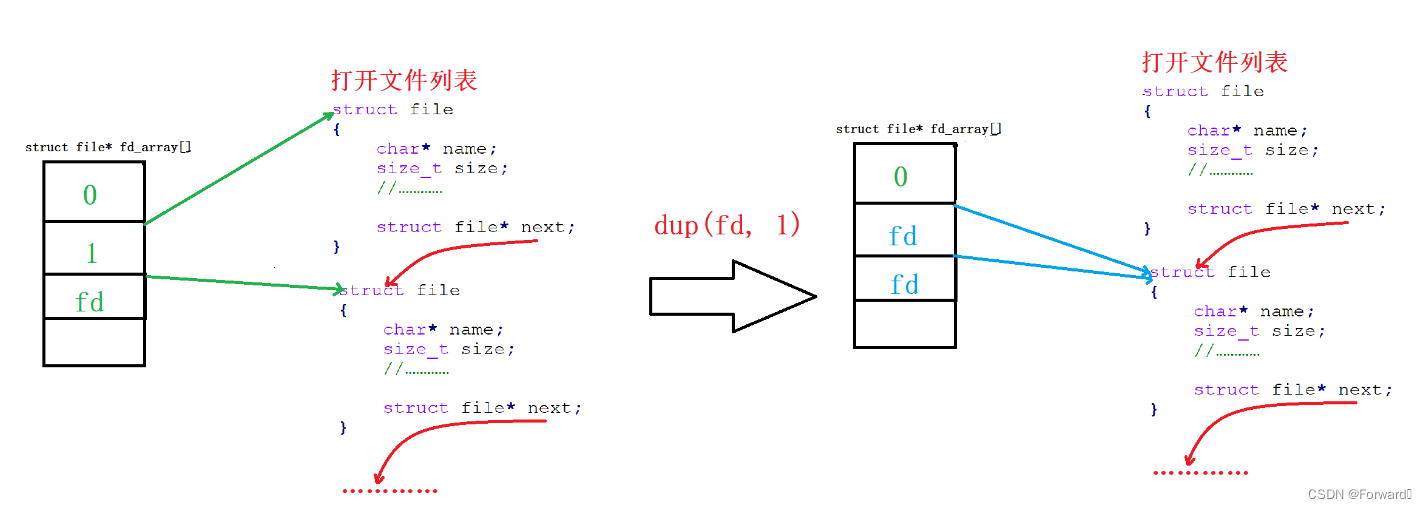
int dup2(int oldfd, int newfd);
需要包含头文件:<unistd.h>
该函数的功能为:将下标oldfd处的file指针拷贝给newfd处的指针,即将newfd重定向到oldfd指向的文件。如图:
例如,实现输出重定向:
#include <stdio.h>
#include <sys/types.h>
#include <sys/stat.h>
#include <fcntl.h>
#include <unistd.h>
int main()
{

  int fd = open("log.txt", O_WRONLY | O_CREAT | O_TRUNC);
  dup2(fd, 1);	//stdout对应的fd为1,实现输出重定向

  printf("hello world\n");

  return 0;
}
cat log.txt
hello world
3. 重新理解一切皆文件
以前我们说在Linux中一切皆文件,刚开始接触这句话时我们肯定觉得难以理解,为什么显示器、键盘、网卡等这种硬件设备也可以称作是文件呢?今天就让我们一起来理解为何“一切皆文件”
首先,很容易理解,对于不同的硬件设备,其所对应的读写方式肯定是不同的:
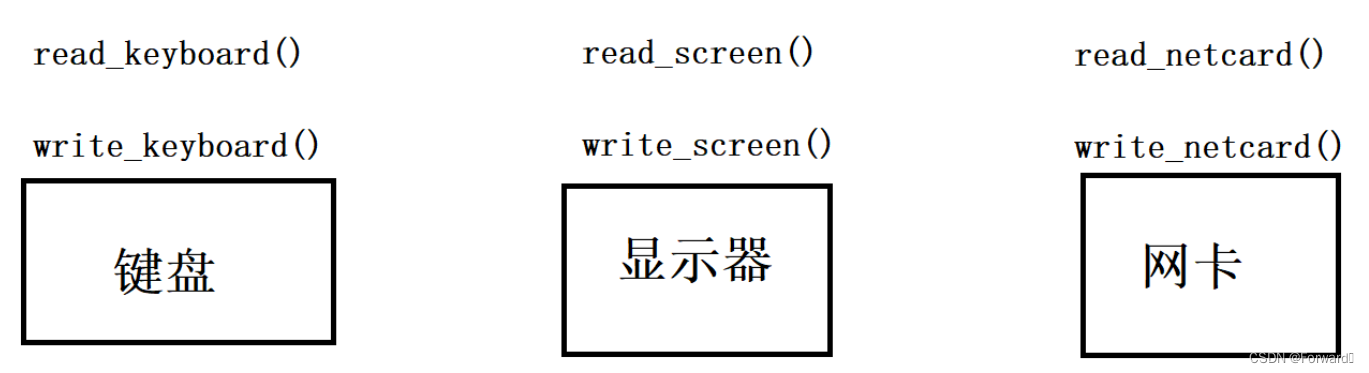
描述文件的结构体file中,有一个函数指针read,用于指向具体设备的读方法,一个函数指针write,用于指向具体设备的写方法(实际上还有更多的函数指针来管理更多文件操作的方法):

这样,我们就用相同的结构体file管理好了不同的硬件设备,换句话说,结构体file屏蔽了不同硬件设备之间的差距
所以,我们在上层使用时,由于结构体file屏蔽了差异,我们就可以以一种统一的读写方式来管理所有设备,即一切皆文件
4. 缓冲区
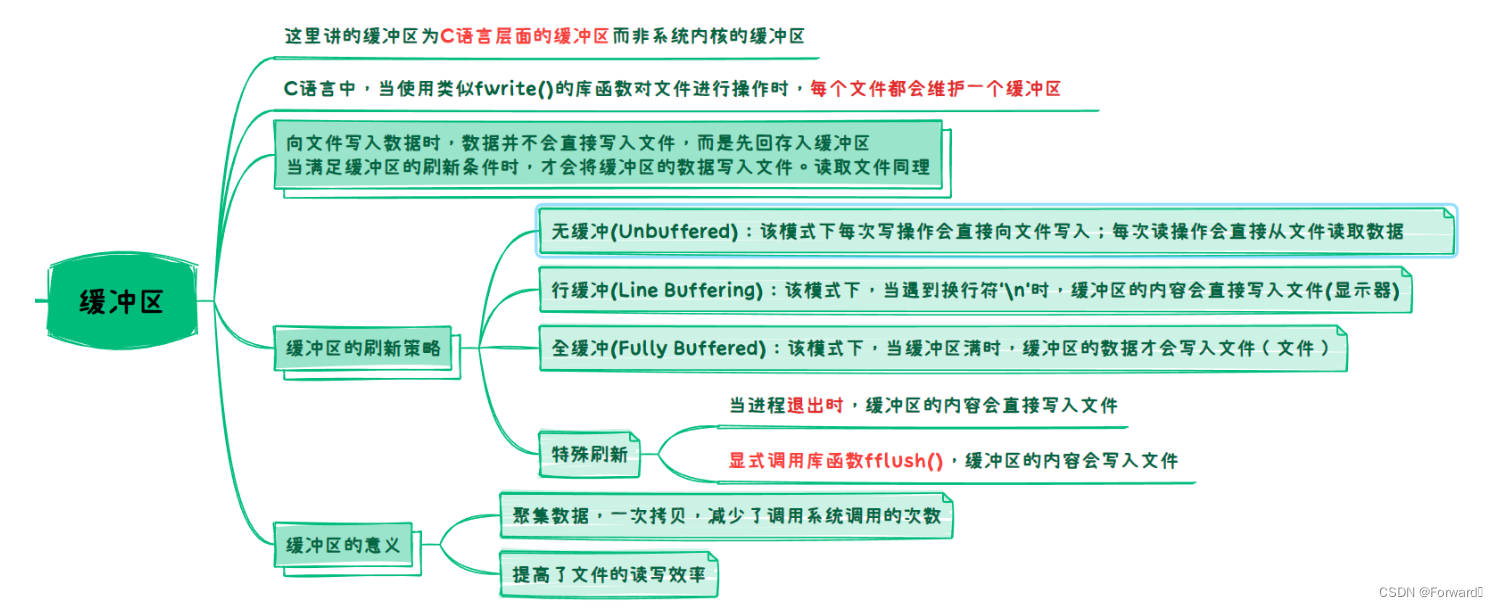
首先需要注意,我们这里讲的缓冲区是C语言层面的缓冲区而不是系统内核的缓冲区
C语言的缓冲区是被文件结构体FILE维护的,因此每个文件都对应一个缓冲区
由于缓冲区的存在,如果要向文件中写入数据,并不会执行一次write指令,内容就会马上写入文件,而是先会将数据存入缓冲区,当满足缓冲区的刷新条件时才会将缓冲区的数据写入文件
例如:
#include <stdio.h>
#include <unistd.h>
int main()
{

  printf("hello world");
  sleep(3);
  printf("\n");

  return 0;
}

可以看到,“hello world”并没有立刻输出到屏幕,而是休眠了3秒后进程退出才将所有内容输出到屏幕
4.1 缓冲区的刷新策略
缓冲区有三种常见的刷新策略:
- 无缓冲(Unbuffered):该模式下每次写操作会直接向文件写入;每次读操作会直接从文件读取数据。通常用于需要实时交互或者需要最小延迟的应用程序中。
- 行缓冲(Line Buffering):该模式下,当遇到换行符’\n’时,缓冲区的内容会直接写入文件(显示器)。对于**终端设备(如控制台)**通常会使用行缓冲
- 全缓冲(Fully Buffered):该模式下,当缓冲区满时,缓冲区的数据才会写入文件(文件)。对于磁盘文件,通常会使用全缓冲
还有几种特殊情况:
当进程退出时,缓冲区的内容会直接写入文件
显式调用库函数fflush(),缓冲区的内容会写入文件
我们通过一个例子来细细体会一下C语言的缓冲区:
代码一:
#include <stdio.h>
#include <unistd.h>
#include <sys/types.h>
#include <sys/stat.h>
#include <fcntl.h>
#include <string.h>
int main()
{

 write(stdout->_fileno, "hello_write ", strlen("hello_write "));
 fwrite("hello_fwrite ", 1, strlen("hello_fwrite "), stdout);
 printf("hello_printf ");

	return 0;
}
output:
hello_write hello_fwrite hello_printf代码二:
#include <stdio.h>
#include <unistd.h>
#include <sys/types.h>
#include <sys/stat.h>
#include <fcntl.h>
#include <string.h>
int main()
{

 write(stdout->_fileno, "hello_write ", strlen("hello_write "));
 fwrite("hello_fwrite ", 1, strlen("hello_fwrite "), stdout);
 printf("hello_printf ");

 fork();

 return 0;
}
ouput:
hello_write hello_fwrite hello_printf hello_fwrite hello_printf有细心的小伙伴发现了奇怪的现象:
代码二只比代码一多了一句
fork(),为什么会多打印一次hello_fwrite hello_printf原因其实很简单:
- fork()创建了子进程后,子进程和父进程共享代码和数据,也就共享了标准输出的缓冲区
- 向标准输出写入默认的是行刷新,因此**
fwrite和printf的内容并不会直接输出到标准输出,而是会先存入缓冲区**- 当进程结束,对缓冲区进行刷新时,由于刷新的本质是改变缓冲区的数据,又因为子进程和父进程共享代码和数据,因此会发生写时拷贝,即子进程会将缓冲区的内容复制一份,因此最终会输出两次
fwrite和printf的内容- 而操作
write是系统调用,不会经过C语言的缓冲区,因此会直接写入标准输出,也就不存在写时拷贝的问题所以,如果我们将上面的
fwrite和printf的内容结尾加上换行符,就不会出现上面的情况了:#include <stdio.h> #include <unistd.h> #include <sys/types.h> #include <sys/stat.h> #include <fcntl.h> #include <string.h> int main() { write(stdout->_fileno, "hello_write\n", strlen("hello_write\n")); fwrite("hello_fwrite\n", 1, strlen("hello_fwrite\n"), stdout); printf("hello_printf\n"); fork(); return 0; }output:
hello_write hello_fwrite hello_printf
4.2 缓冲区的意义
我们知道,对CPU来说,与显示器这种硬件设备的交互是非常浪费时间的
如果我们每向显示器输出一段数据,系统都要调用一次系统调用write那就会大大降低计算机的运行效率
而由于C语言关于文件操作的库函数一定封装了系统调用,因此向文件写入的库函数也就封装了write
由于缓冲区的存在,系统并不会频繁的调用系统调用,而是会等满足缓冲区的刷新条件后再一次调用,一次写入
从而大大提高了文件读写的效率
本篇完
如有错误,欢迎斧正


![<span style='color:red;'>Linux</span> 基础<span style='color:red;'>IO</span> [缓冲区&&<span style='color:red;'>文件</span><span style='color:red;'>系统</span>]](https://img-blog.csdnimg.cn/direct/a9c29f402df04e188d9ffca279c1d012.png)

![[<span style='color:red;'>Linux</span>][基础<span style='color:red;'>IO</span>][一][<span style='color:red;'>系统</span><span style='color:red;'>文件</span><span style='color:red;'>IO</span>][<span style='color:red;'>文件</span>描述符fd]详细解读](https://img-blog.csdnimg.cn/direct/cee819efade14a26afe91277ff551eea.png)