wsl2
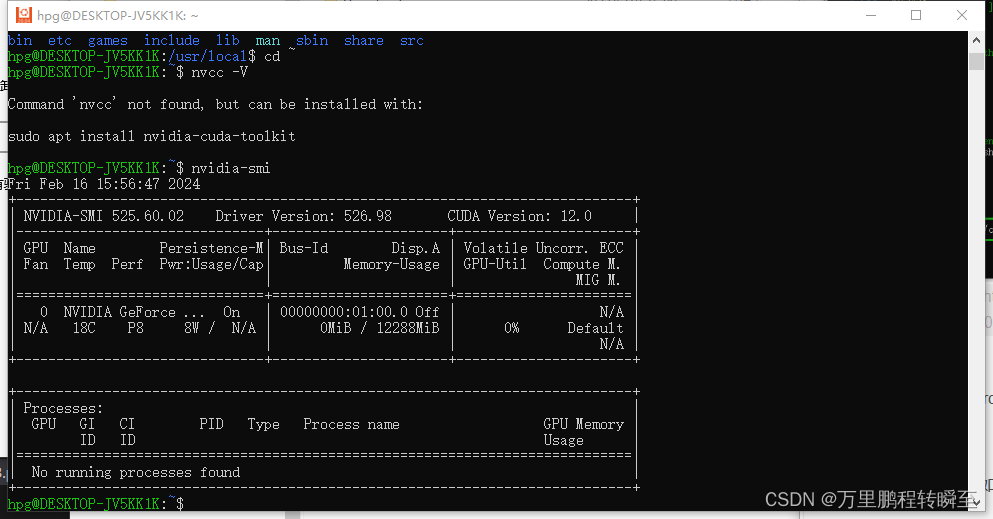
安装好后环境测试效果如下,支持命令nvidia-smi,不支持命令nvcc,usr/local目录下没有cuda文件夹。
系统迁移到非C盘
wsl安装的系统默认在c盘,为节省c盘空间进行迁移。
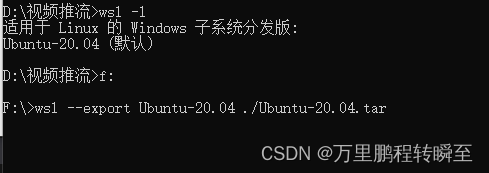
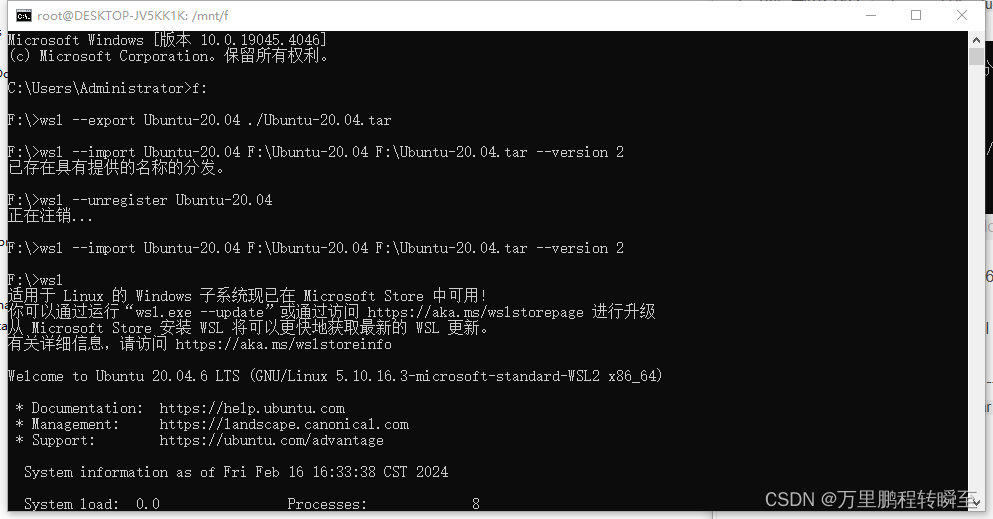
1、输出wsl -l 查看要迁移的系统名称

2、执行导出命令:wsl --export Ubuntu-20.04 ./Ubuntu-20.04.tar ,以下命令将系统导出到F盘,文件名为Ubuntu-20.04.tar
https://zhuanlan.zhihu.com/p/536686989
3、注销原来的环境,命令格式为wsl --unregister (系统名称) 具体案例为: wsl --unregister Ubuntu-20.04
4、执行导入命令 ,命令格式为 wsl --import (发行版) (安装位置) (文件路径以及文件名称) ,具体案例为:wsl --import Ubuntu-20.04 F:\Ubuntu-20.04 F:\Ubuntu-20.04.tar --version 2,–version 2表示是wsl2导出的系统
配置国内源
1、备份sources.list文件
cp /etc/apt/sources.list /etc/apt/sources.list.bak
2、nano /etc/apt/sources.list , 将内容替换为以下(配置阿里云)。参考 https://zhuanlan.zhihu.com/p/421178143
deb http://mirrors.aliyun.com/ubuntu/ focal main restricted universe multiverse
deb-src http://mirrors.aliyun.com/ubuntu/ focal main restricted universe multiverse
deb http://mirrors.aliyun.com/ubuntu/ focal-security main restricted universe multiverse
deb-src http://mirrors.aliyun.com/ubuntu/ focal-security main restricted universe multiverse
deb http://mirrors.aliyun.com/ubuntu/ focal-updates main restricted universe multiverse
deb-src http://mirrors.aliyun.com/ubuntu/ focal-updates main restricted universe multiverse
deb http://mirrors.aliyun.com/ubuntu/ focal-proposed main restricted universe multiverse
deb-src http://mirrors.aliyun.com/ubuntu/ focal-proposed main restricted universe multiverse
deb http://mirrors.aliyun.com/ubuntu/ focal-backports main restricted universe multiverse
deb-src http://mirrors.aliyun.com/ubuntu/ focal-backports main restricted universe multiverse
3、然后执行 sudo apt-get update
sudo apt-get upgrade
安装conda环境
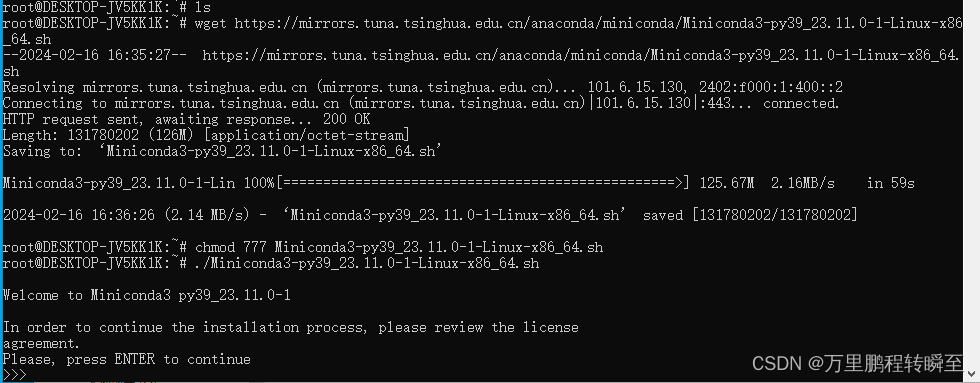
1、下载miniconda
wget https://mirrors.tuna.tsinghua.edu.cn/anaconda/miniconda/Miniconda3-py39_23.11.0-1-Linux-x86_64.sh
2、创建可执行权限 chmod 777 Miniconda3-py39_23.11.0-1-Linux-x86_64.sh
3、执行安装命令
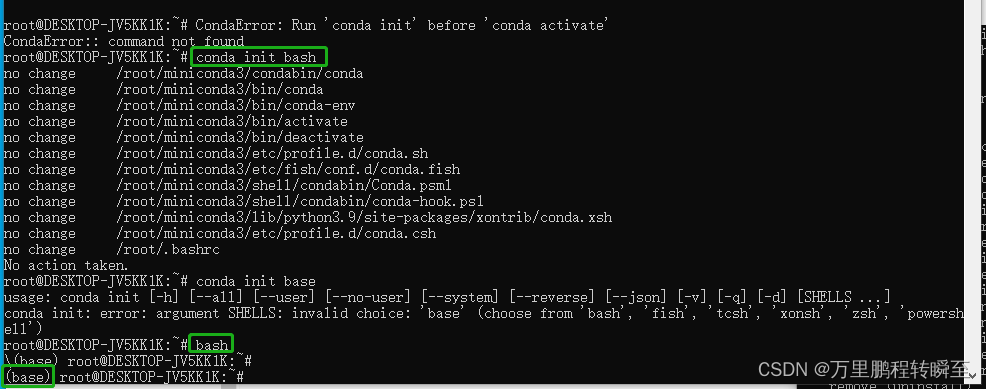
4、测试conda命令,如果执行报错,则配置环境变量。具体操作为在/etc/profile文件的最后面添加一行 export PATH=$PATH:/root/miniconda3/bin,文件保存后再执行 source /etc/profile
5、执行 conda init bash ,然后再执行 bash即可进入conda环境
pip配置豆瓣源
mkdir ~/.pip
nano ~/.pip/pip.conf
输入以下内容
[global]
index-url = http://pypi.douban.com/simple
trusted-host = pypi.douban.com
安装pytorch-gpu环境
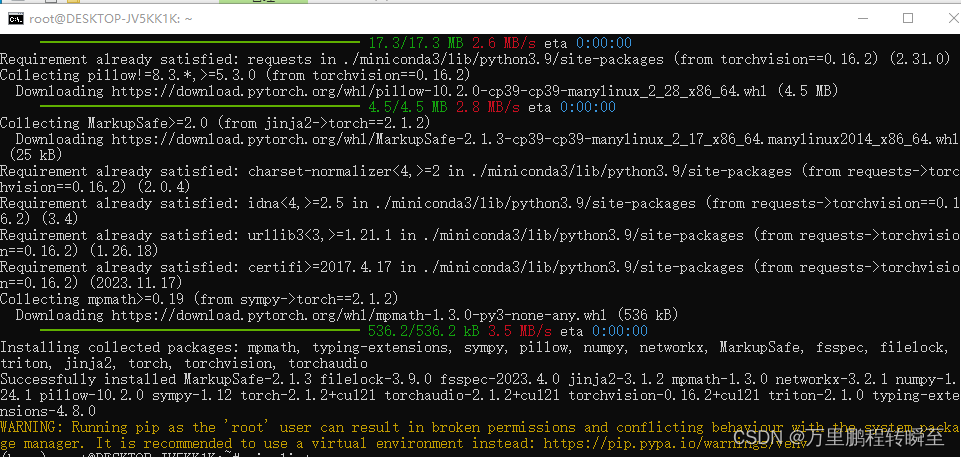
安装命令 :pip install torch==2.1.2 torchvision==0.16.2 torchaudio==2.1.2 --index-url https://download.pytorch.org/whl/cu121
可以根据自己的cuda版本到官网查找对应安装命令 https://pytorch.org/get-started/previous-versions/
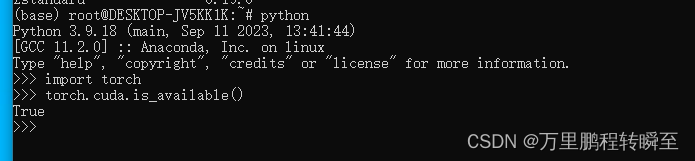
安装结果如下所示
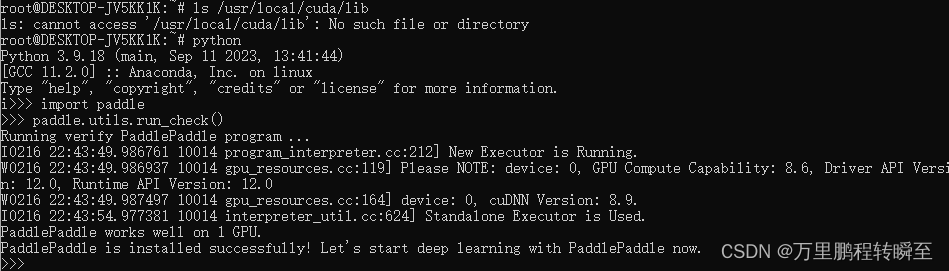
验证安装效果,import torch ;torch.cuda.is_available()
安装paddle-gpu环境
安装命令:python -m pip install paddlepaddle-gpu==2.6.0.post120 -f https://www.paddlepaddle.org.cn/whl/linux/mkl/avx/stable.html
详细安装教程:https://www.paddlepaddle.org.cn/install/quick?docurl=/documentation/docs/zh/install/pip/linux-pip.html

测试paddle环境出现报错
报错一 ImportError: libgomp.so.1: cannot open shared object file: No such file or directory
执行 apt-get install libgomp1 ,安装libgomp库,然后再次测试paddle环境,出现报错二
报错二 ImportError: /lib/x86_64-linux-gnu/libstdc++.so.6: version ‘GLIBCXX_3.4.30’ not found (required by /root/miniconda3/lib/python3.9/site-packages/paddle/base/libpaddle.so)
1、先安装binutils 工具,apt install binutils
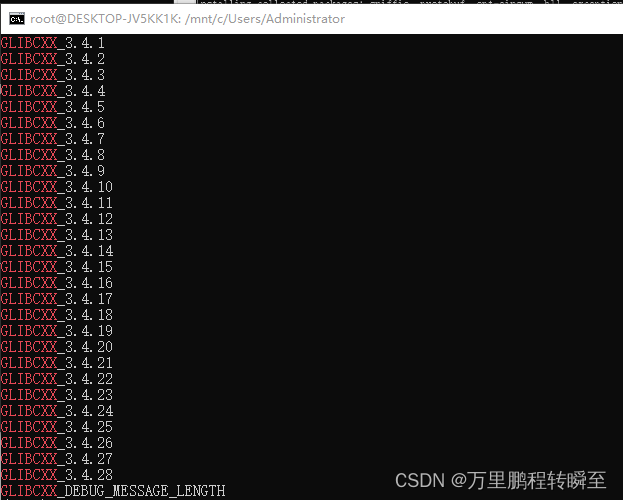
2、执行以下命令 strings /usr/lib/x86_64-linux-gnu/libstdc++.so.6 | grep GLIBCXX,查看所支持的c++版本信息。可以看到刚好差了一点
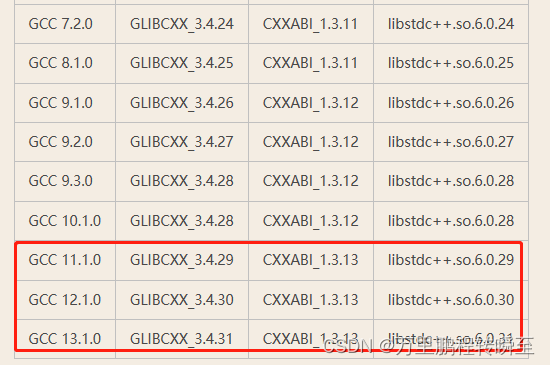
补充知识,GCC 版本 GLibC C++ ABI libstdc++.so 版本可以到以下链接查看
https://www.cnblogs.com/freelancy/p/17012054.html
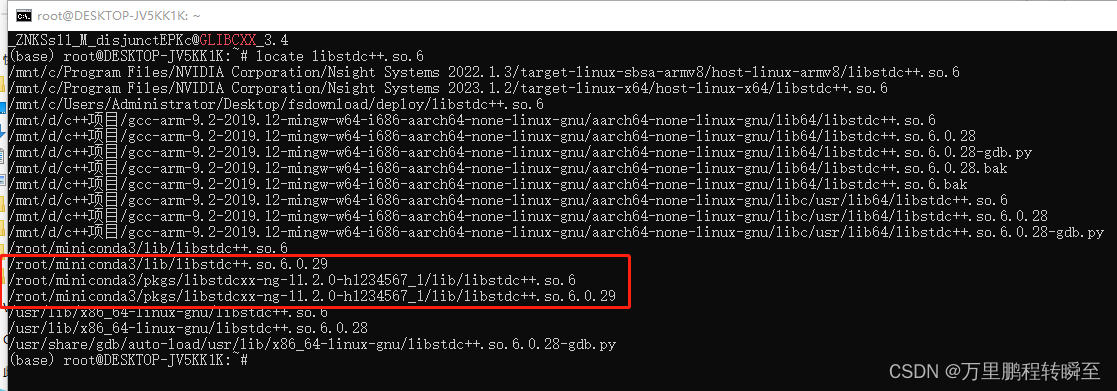
3、尝试查找系统最高版本的/libstdc++.so.6进行覆盖,目前可以找到的最高版本也进行29,与目标版本还是存在差距
**解决方案一 **:只针对cuda12以下程序有效
降低paddle版本,将paddle版本降低到2.4,可能会出现报错 ImportError: libpython3.9.so.1.0: cannot open shared object file: No such file or directory;
1、先执行命令 find / -name libpython3.9.so.1.0

2、将python可执行程序拷贝到系统程序目录下
cp /root/miniconda3/lib/libpython3.9.so.1.0 /usr/lib
3、验证效果

解决方案二:编译安装 (直接apt install gcc-13 也可以解决问题,只是网络太卡)
参考https://zhuanlan.zhihu.com/p/498529973实现gcc-13.2.0的编译安装,整个编译过程很顺利
下载编译gcc-13.2.0库
sudo apt-get install build-essential #安装编译程序依赖项
#编译gcc.13.2.0
wget http://ftp.gnu.org/gnu/gcc/gcc-13.2.0/gcc-13.2.0.tar.gz
tar -xvf gcc-13.2.0.tar.gz
cd gcc-13.2.0
mkdir build
cd build
../configure --enable-checking=release --enable-languages=c,c++ --disable-multilib
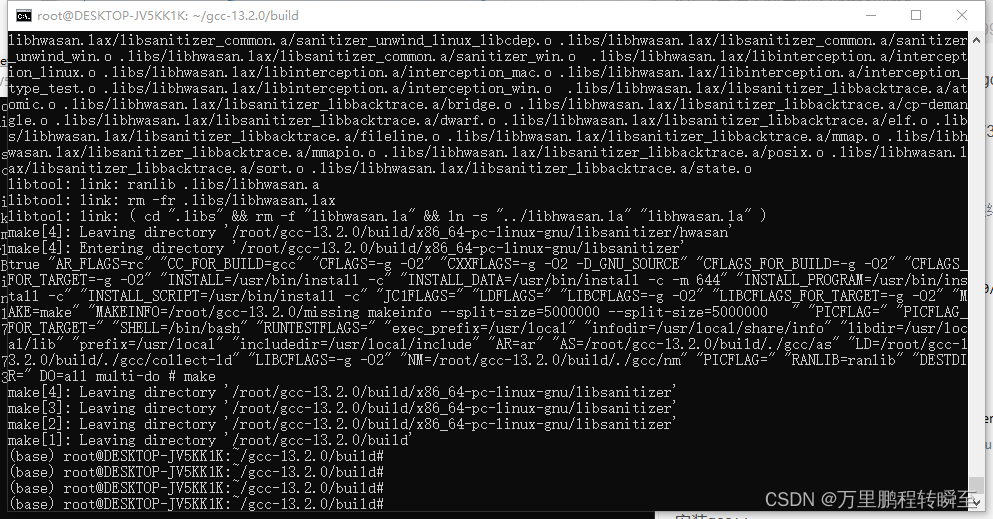
make -j 16 #16个线程进行编译,数量可以是cpu内核的两倍
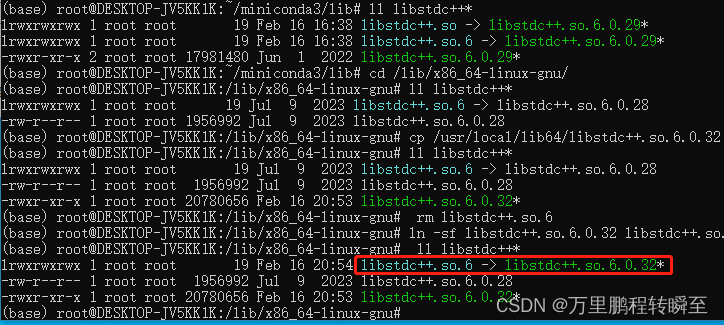
安装gcc++,可以看到所生成的文件名称为/usr/local/lib64/libstdc++.so.6.0.32
#安装gcc.13.2.0
make install
ls /usr/local/lib64/*c++.so*
cp /usr/local/lib64/libstdc++.so.6.0.32  /lib/x86_64-linux-gnu/

此时执行strings /usr/local/lib64/libstdc++.so.6.0.32 | grep GLIBCXX命令,可以看到以下内容:
GLIBCXX_3.4.29
GLIBCXX_3.4.30
GLIBCXX_3.4.31
GLIBCXX_3.4.32
修改原有软连接,最终执行效果如下图所示
 cd /lib/x86_64-linux-gnu/
 ll libstdc++*
 rm libstdc++.so.6
 ln -sf libstdc++.so.6.0.32 libstdc++.so.6
后续如果出现cuda库的报错,请先完成ubuntu下cuda+cudnn的安装
安装cuda与cudnn
wget https://developer.download.nvidia.com/compute/cuda/repos/wsl-ubuntu/x86_64/cuda-wsl-ubuntu.pin
sudo mv cuda-wsl-ubuntu.pin /etc/apt/preferences.d/cuda-repository-pin-600
wget https://developer.download.nvidia.com/compute/cuda/11.8.0/local_installers/cuda-repo-wsl-ubuntu-11-8-local_11.8.0-1_amd64.deb
sudo dpkg -i cuda-repo-wsl-ubuntu-11-8-local_11.8.0-1_amd64.deb
sudo cp /var/cuda-repo-wsl-ubuntu-11-8-local/cuda-*-keyring.gpg /usr/share/keyrings/
sudo apt-get update
sudo apt-get -y install cuda
#wget https://developer.download.nvidia.com/compute/cudnn/9.0.0/local_installers/cudnn-local-repo-ubuntu2004-9.0.0_1.0-1_amd64.deb
wget https://developer.nvidia.com/downloads/compute/cudnn/secure/8.9.7/local_installers/11.x/cudnn-local-repo-ubuntu2004-8.9.7.29_1.0-1_amd64.deb
sudo dpkg -i cudnn-local-repo-ubuntu2004-8.9.7.29_1.0-1_amd64.deb
sudo cp /var/cudnn-local-repo-ubuntu2004-8.9.7.29/cudnn-*-keyring.gpg /usr/share/keyrings/
sudo apt-get update
sudo apt-get -y install cudnn
最后执行命令apt install nvidia-cuda-toolkit
wsl1
Command nvidia-sminot found
在wsl系统中不支持nvidia-smi命令,可以改用nvidia-smi.exe命令
Command ‘nvidia-smi’ not found, but can be installed with:

在使用nvcc命令时,可能也会存在报错。可以尝试执行 /usr/local/cuda/bin/nvcc 试一下
Command ‘nvcc’ not found, but can be installed with:
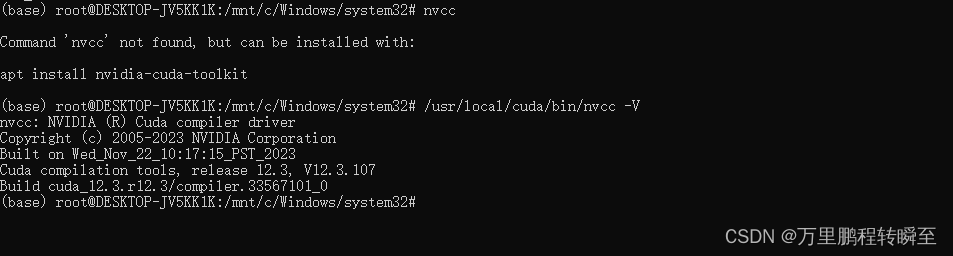
这个可以在/etc/profile文件中增加环境变量,将/usr/local/cuda/bin添加到path中,具体操作如下所示
步骤一、在/etc/profile文件中新增一行 export PATH=$PATH:/usr/local/cuda/bin/
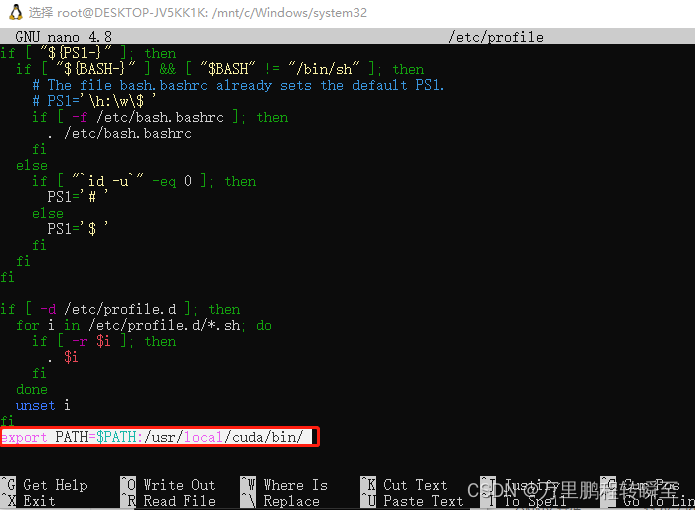
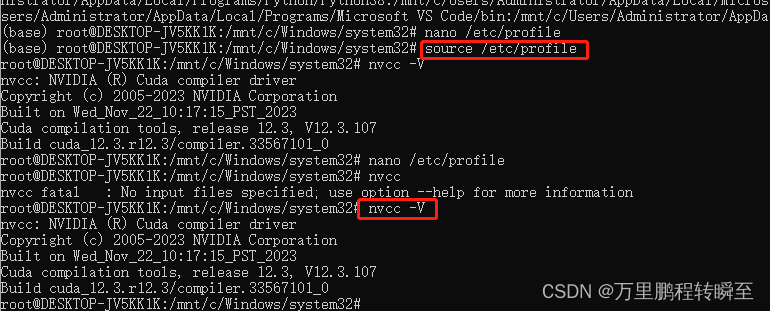
步骤二、输入命令 source /etc/profile 使刚刚修改的环境变量生效
步骤三、输入 nvcc命令进行测试
cuda库报错
Error: libcudart.so.11.0: cannot open shared object file: No such file or directory
先执行以下命令,查找一下libcudart.so文件所在路径。
步骤一: 执行命令 find /usr/local/cuda/ -name libcudart.so*,找到其路径为·/usr/local/cuda/targets/x86_64-linux/lib/

步骤二:将·/usr/local/cuda/targets/x86_64-linux/lib/添加到系统环境变量中。也就是添加到/etc/profile文件中,最终效果如下图所示
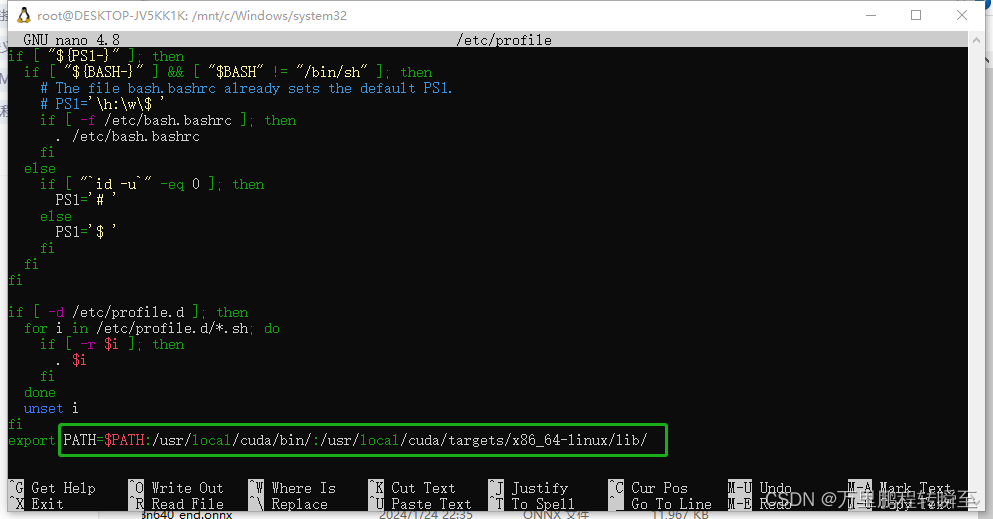
步骤二、输入命令 source /etc/profile 使刚刚修改的环境变量生效


![[力扣 Hot100]Day28 两数相加](https://img-blog.csdnimg.cn/direct/5bdba9fe66b34592a656017f053aa9cc.png)