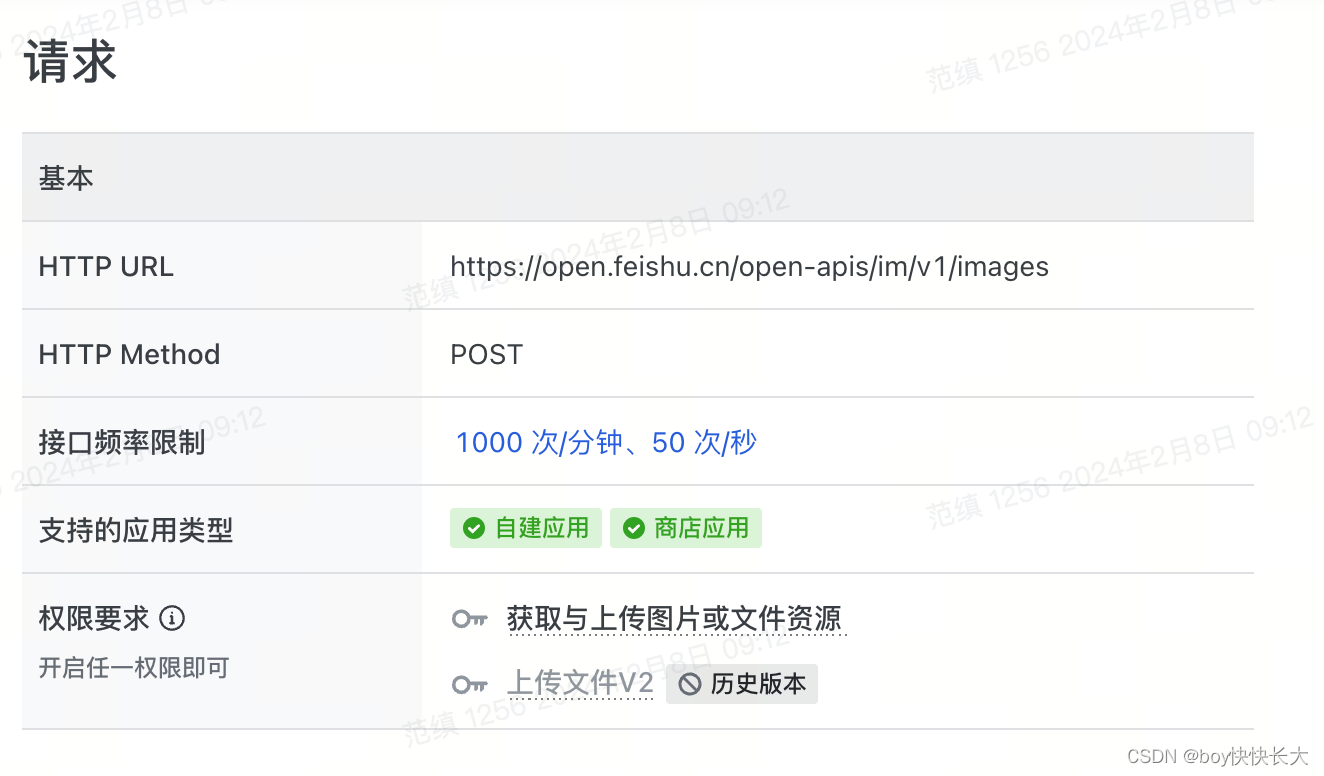
上篇文章中,我们介绍了使用viewer.entities.add添加entity之后的信号传递以及最后entity对象被传递到GeometryVisualizer;
这篇文章,我们则介绍如何在逐帧渲染的过程中根据GeometryVisualizer中的entity对象创建相应的primitive
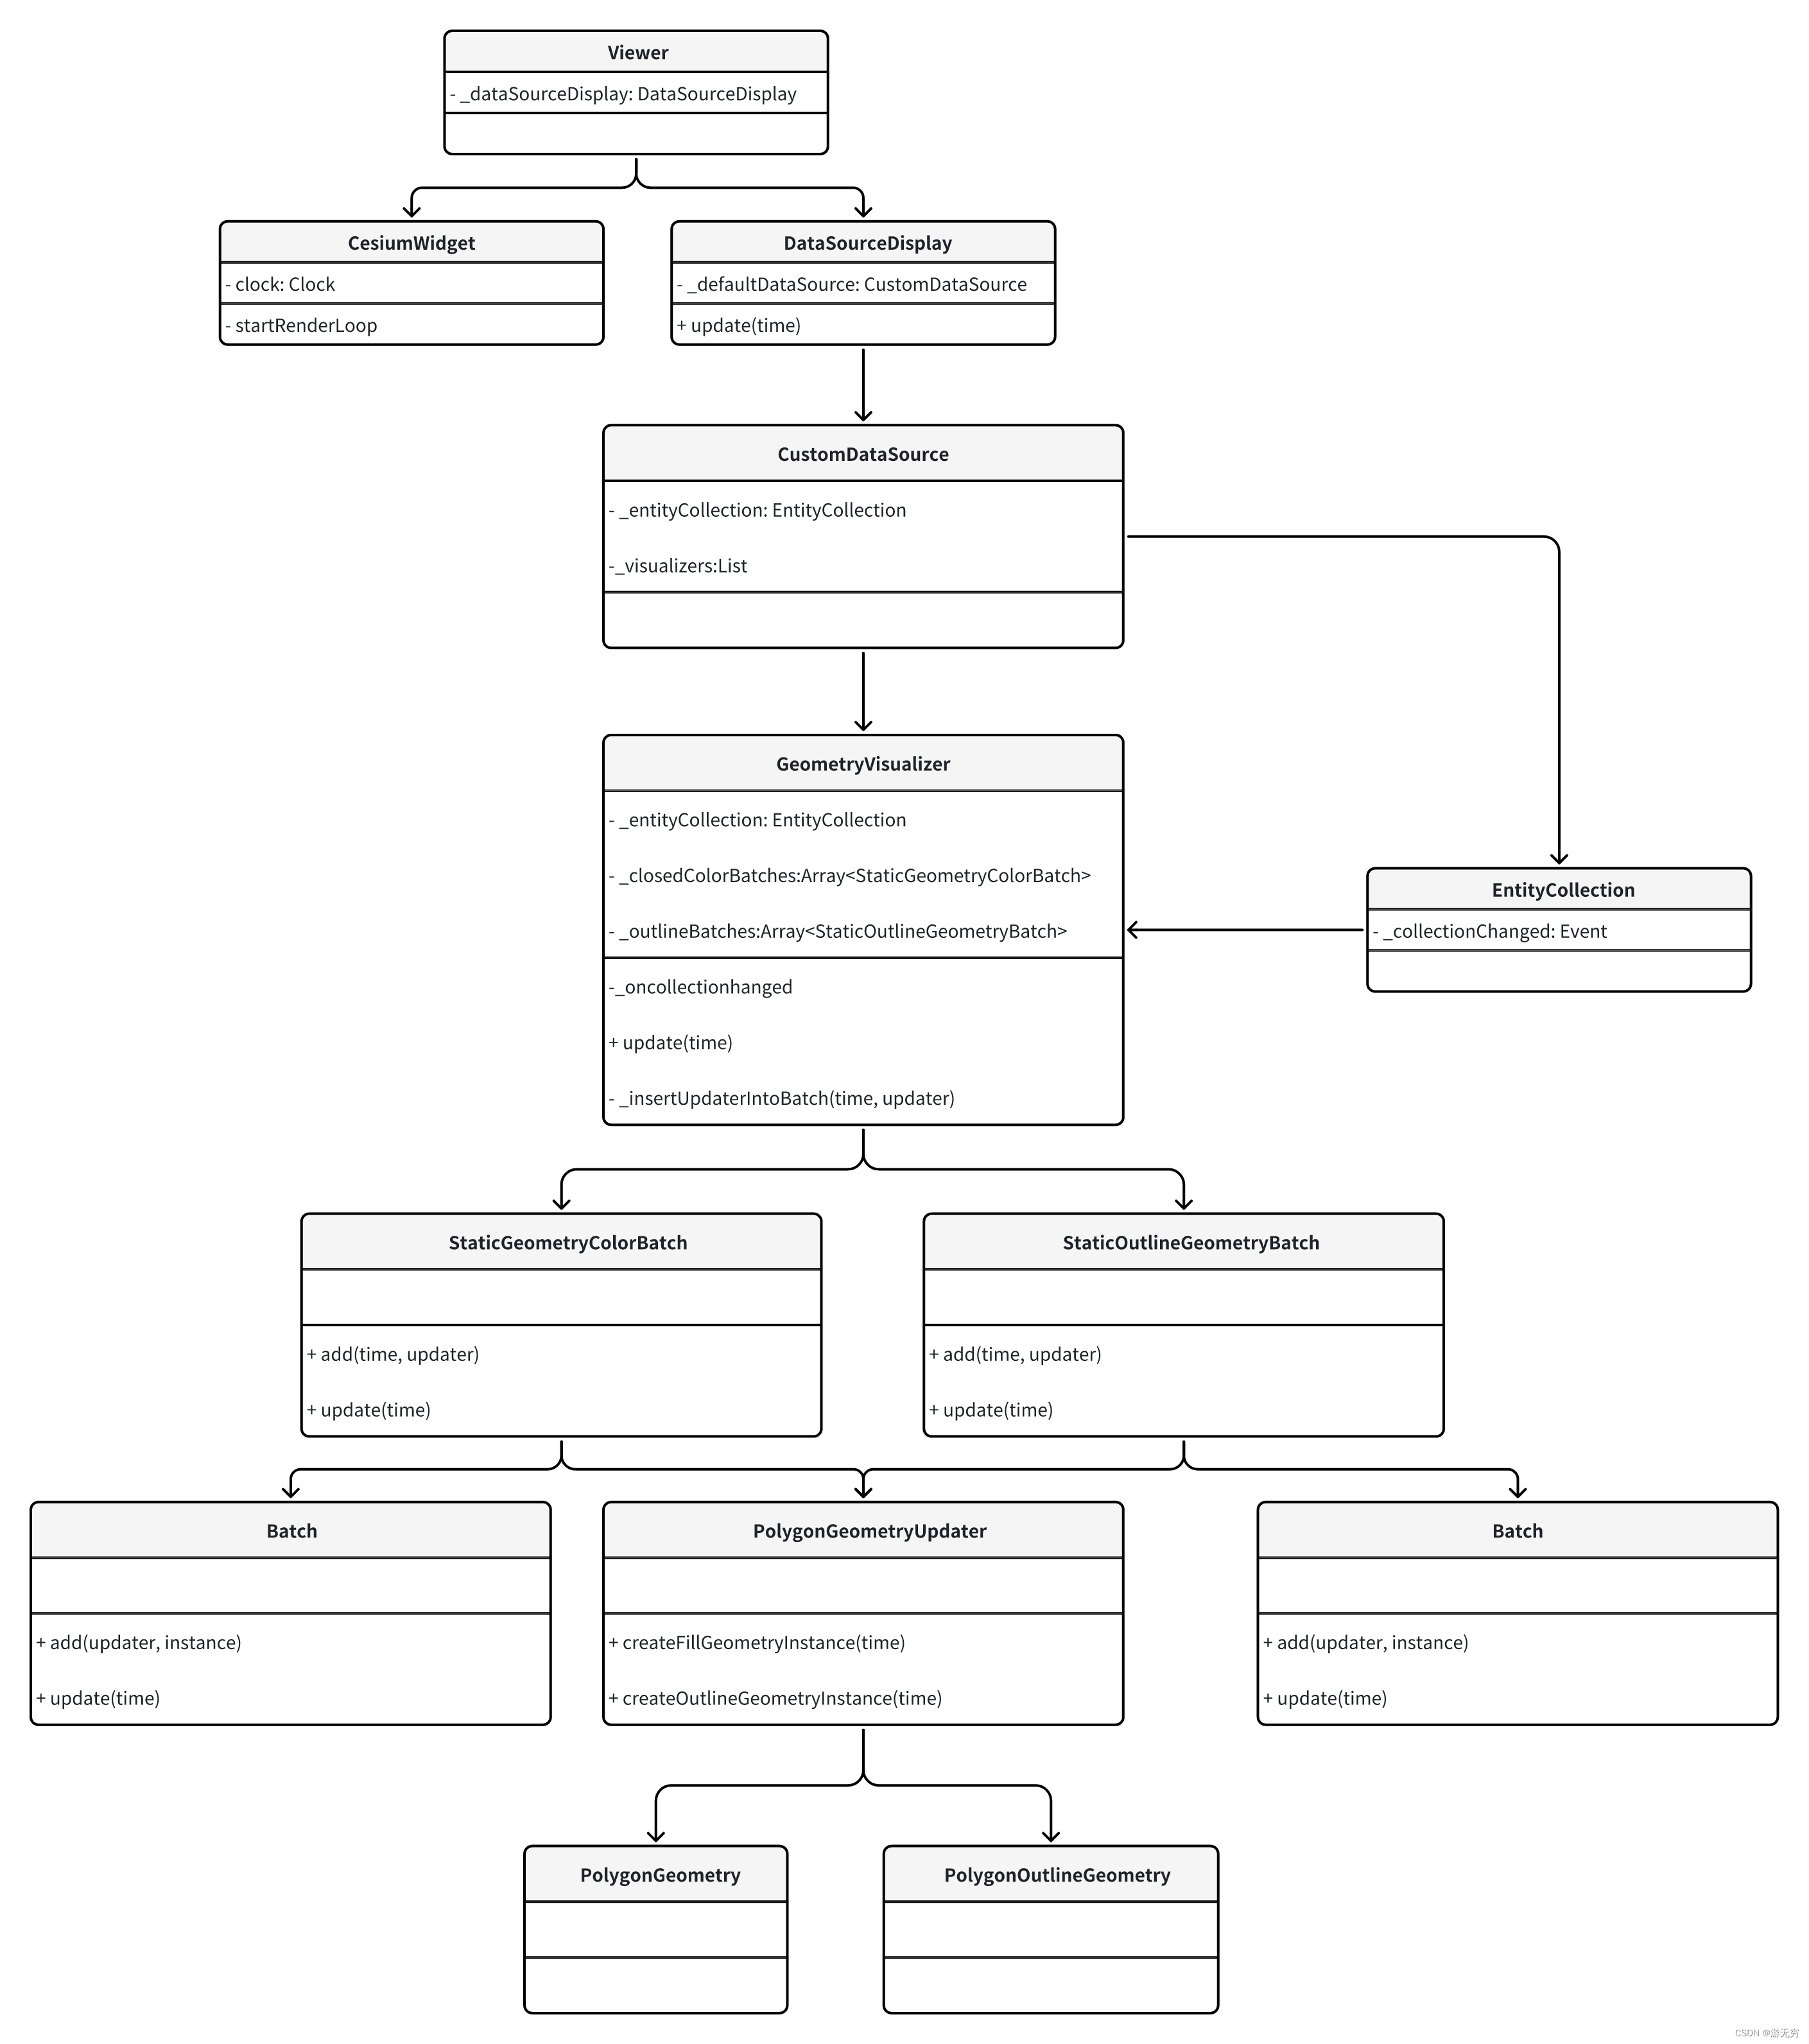
这是下文中涉及到的类的类图,从中可以清晰的了解各个对象之间的关系,下面我们结合代码来仔细讲解。
循环的一帧
我们先看下viewer初始化的时候做了什么,在何处定义了每一帧的循环,并持续的进行渲染,结合时序图(见第三节)和源码,可以将其分为两个部分
Viewer初始化
viewer初始化并创建clock
function Viewer(container, options){

    let clock;
    let clockViewModel;
    let destroyClockViewModel = false;
    if (defined(options.clockViewModel)) {

        clockViewModel = options.clockViewModel;
        clock = clockViewModel.clock;
    } else {

        clock = new Clock();
        clockViewModel = new ClockViewModel(clock);
        destroyClockViewModel = true;
    }
}
- 将
clock作为参数之一创建cesiumWidget
// 省略其他参数
const cesiumWidget = new CesiumWidget(cesiumWidgetContainer, {
   clock: clock});
- 添加监听事件,建立事件响应,其效果我们在后面再具体描述
eventHelper.add(clock.onTick, Viewer.prototype._onTick, this);
cesiumWidget初始化
- 在构造函数中设置渲染循环策略
this.useDefaultRenderLoop
this._useDefaultRenderLoop = undefined;
this.useDefaultRenderLoop = defaultValue(
  options.useDefaultRenderLoop,
  true
);
结合useDefaultRenderLoop的set函数可知其实是调用了startRenderLoop函数
useDefaultRenderLoop: {

    get: function () {

      return this._useDefaultRenderLoop;
    },
    set: function (value) {

      if (this._useDefaultRenderLoop !== value) {

        this._useDefaultRenderLoop = value;
        if (value && !this._renderLoopRunning) {

          startRenderLoop(this);
        }
      }
    },
}
- 在
startRenderLoop中定义了render函数并每一帧进行调用
function startRenderLoop(widget) {

  widget._renderLoopRunning = true;

  let lastFrameTime = 0;
  function render(frameTime) {

    // 此处省略细节
    widget.render();
    requestAnimationFrame(render);
  }

  requestAnimationFrame(render);
}
- 在
render函数中起实际作用的是函数widget.render,其内部通过调用this._clock.tick()发出信号,结合上一节viewer初始化中提到的事件监听的建立可以知道,进行响应的是Viewer.prototype._onTick函数
CesiumWidget.prototype.render = function () {

  if (this._canRender) {

    this._scene.initializeFrame();
    const currentTime = this._clock.tick();
    this._scene.render(currentTime);
  } else {

    this._clock.tick();
  }
};

Clock.prototype.tick = function () {

  this.onTick.raiseEvent(this);
  return currentTime;
};
- 在
Viewer.prototype._onTick函数中,会通过调用函数this._dataSourceDisplay.update(time)进行实际的primitive对象的创建
Viewer.prototype._onTick = function (clock) {

  const isUpdated = this._dataSourceDisplay.update(time);
};
时序图
- 这里我们附上整个过程的时序图,帮助大家更好的了解整个过程
![[图片]](https://img-blog.csdnimg.cn/direct/c168a18051b645f38ba3c3397fdef1f0.png)
生成Primitive
通过上面的描述,我们知道了cesium的每一帧是如何更新的,以及其通过调用this._dataSourceDisplay.update(time)进行primitive的创建,下面我们就探究下具体的创建过程
在
update中,获取了this._defaultDataSource的_visualizers属性,通过上一篇文章我们知道,其是一个包含了GeometryVisualizer等多个Visualizer的列表,其中GeometryVisualizer是后续创建polygon对应primitive的类DataSourceDisplay.prototype.update = function (time) { visualizers = this._defaultDataSource._visualizers; vLength = visualizers.length; for (x = 0; x < vLength; x++) { result = visualizers[x].update(time) && result; } return result; };![[图片]](https://img-blog.csdnimg.cn/direct/f4038e29cbfd4bffaa49fee450ac714c.png)
在
GeometryVisualizer的update函数中主要做了如下几件事:获取被添加对象,在上一篇文章中我们知道,通过
_onCollectionChanged函数,将添加的entity添加到了this._addedObjects属性中const addedObjects = this._addedObjects; addedObjects.set(id, entity);遍历每一个被添加的对象
创建
UpdaterSet,其内部的updaters包含了PolygonGeometryUpdater在内的10个Updater
![[图片]](https://img-blog.csdnimg.cn/direct/8b61925f3b4842aebae2b1c47c1126eb.png)
通过
updater尝试创建instance(后面详细介绍)
移除已经被添加的对象
在
batch中创建primitive(后面详细介绍)
代码节选如下:
GeometryVisualizer.prototype.update = function (time) {

  // 获取被添加对象
  const addedObjects = this._addedObjects;
  const added = addedObjects.values;

  // 遍历每一个被添加的对象
  for (i = added.length - 1; i > -1; i--) {

    entity = added[i];
    id = entity.id;
    // 创建UpdaterSet
    updaterSet = new GeometryUpdaterSet(entity, this._scene);
    this._updaterSets.set(id, updaterSet);
    // 通过每一个updater尝试创建instance 并添加到batch中
    updaterSet.forEach(function (updater) {

      that._insertUpdaterIntoBatch(time, updater);
    });
  }

  // 移除已经被添加的对象
  addedObjects.removeAll();

  // 在batch中创建primitive
  let isUpdated = true;
  const batches = this._batches;
  const length = batches.length;
  for (i = 0; i < length; i++) {

    isUpdated = batches[i].update(time) && isUpdated;
  }

  return isUpdated;
};
生成instance
获取
polygonOutline对应的instance- 在函数
GeometryVisualizer.prototype._insertUpdaterIntoBatch中将updater传递到StaticOutlineGeometryBatch.prototype.add函数中
this._outlineBatches[shadows].add(time, updater);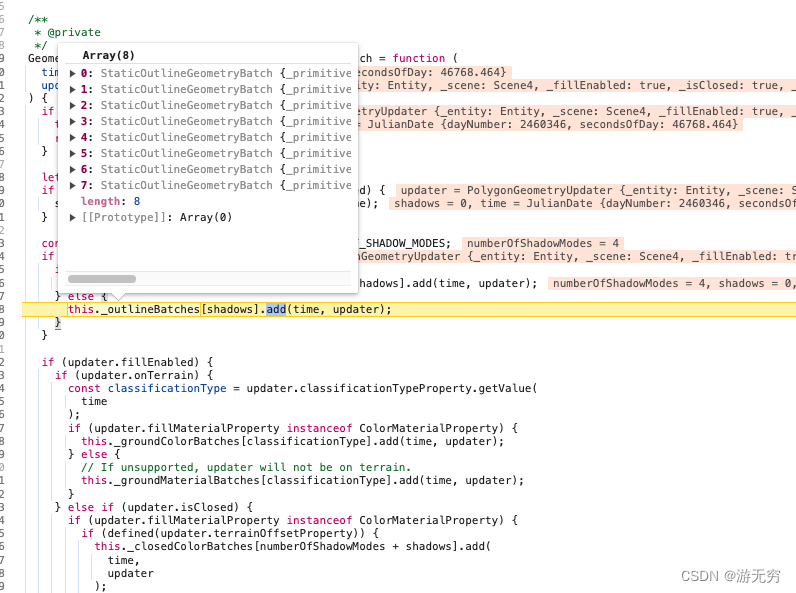
- 在
StaticOutlineGeometryBatch.prototype.add先创建polygonOutline对应的instance
const instance = updater.createOutlineGeometryInstance(time);StaticOutlineGeometryBatch.prototype.add中,调用batch.add函数,传入instance,并写入字典this.geometry
this.geometry.set(id, instance);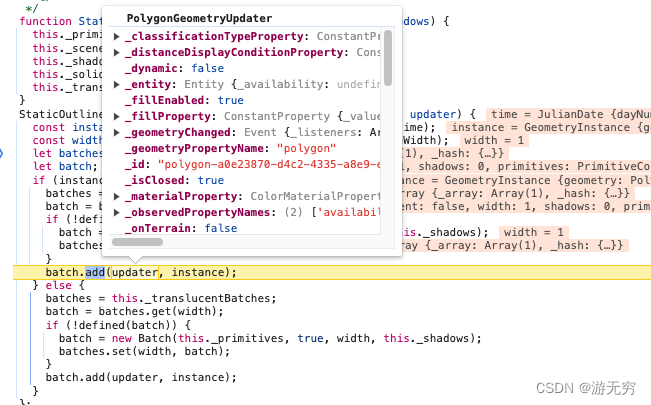
- 在函数
获取
polygon对应的instance同样在函数
GeometryVisualizer.prototype._insertUpdaterIntoBatch中,将updater传递到StaticGeometryColorBatch.prototype.add函数中this._closedColorBatches[shadows].add(time, updater);![[图片]](https://img-blog.csdnimg.cn/direct/c6a2254a28c941198baf1f68baccc9c0.png)
在
StaticGeometryColorBatch.prototype.add先创建polygon对应的instance
const instance = updater.createFillGeometryInstance(time);StaticGeometryColorBatch.prototype.add中,调用batch.add函数,传入instance,并写入字典this.geometry
this.geometry.set(id, instance);
生成primitive
在循环中遍历所有的GeometryBatch对象,并update
![[图片]](https://img-blog.csdnimg.cn/direct/f054cd6d06d9418598ae7e4c83041358.png)
生成
polygonOutline对应的primitive- 通过
StaticOutlineGeometryBatch.prototype.update遍历solidBatchesLength属性,并update
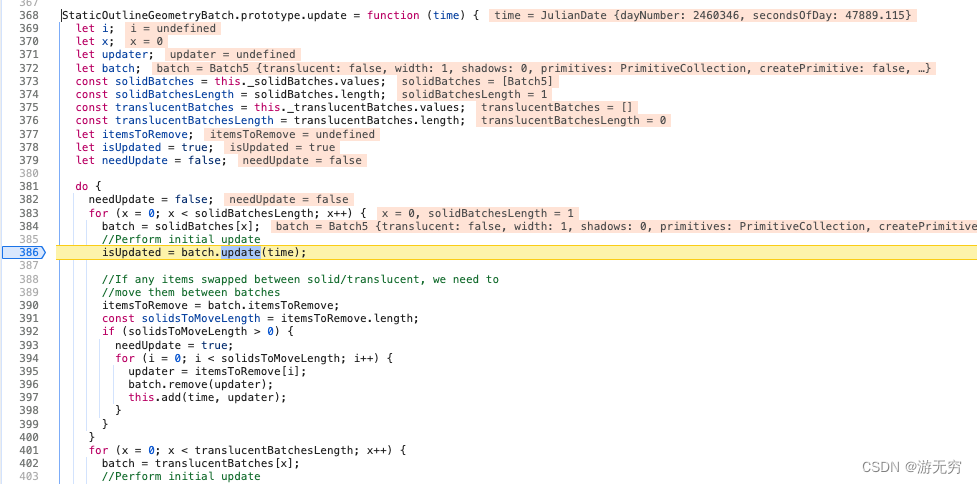
- 在
batch.update中生成primitive
- 通过
生成
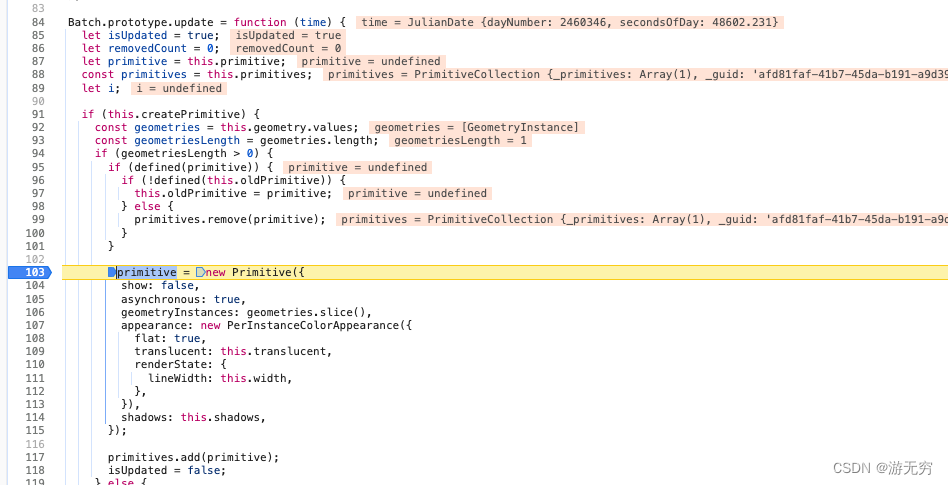
polygon对应的primitive通过
StaticGeometryColorBatch.prototype.update调用updateItems函数,在其内部,遍历batch并update
![[图片]](https://img-blog.csdnimg.cn/direct/c100c8c752ed4869ba6522ce54e2e7db.png)
在
batch.update中生成primitive
![[图片]](https://img-blog.csdnimg.cn/direct/a65a571af0384a94b08d237abd997387.png)
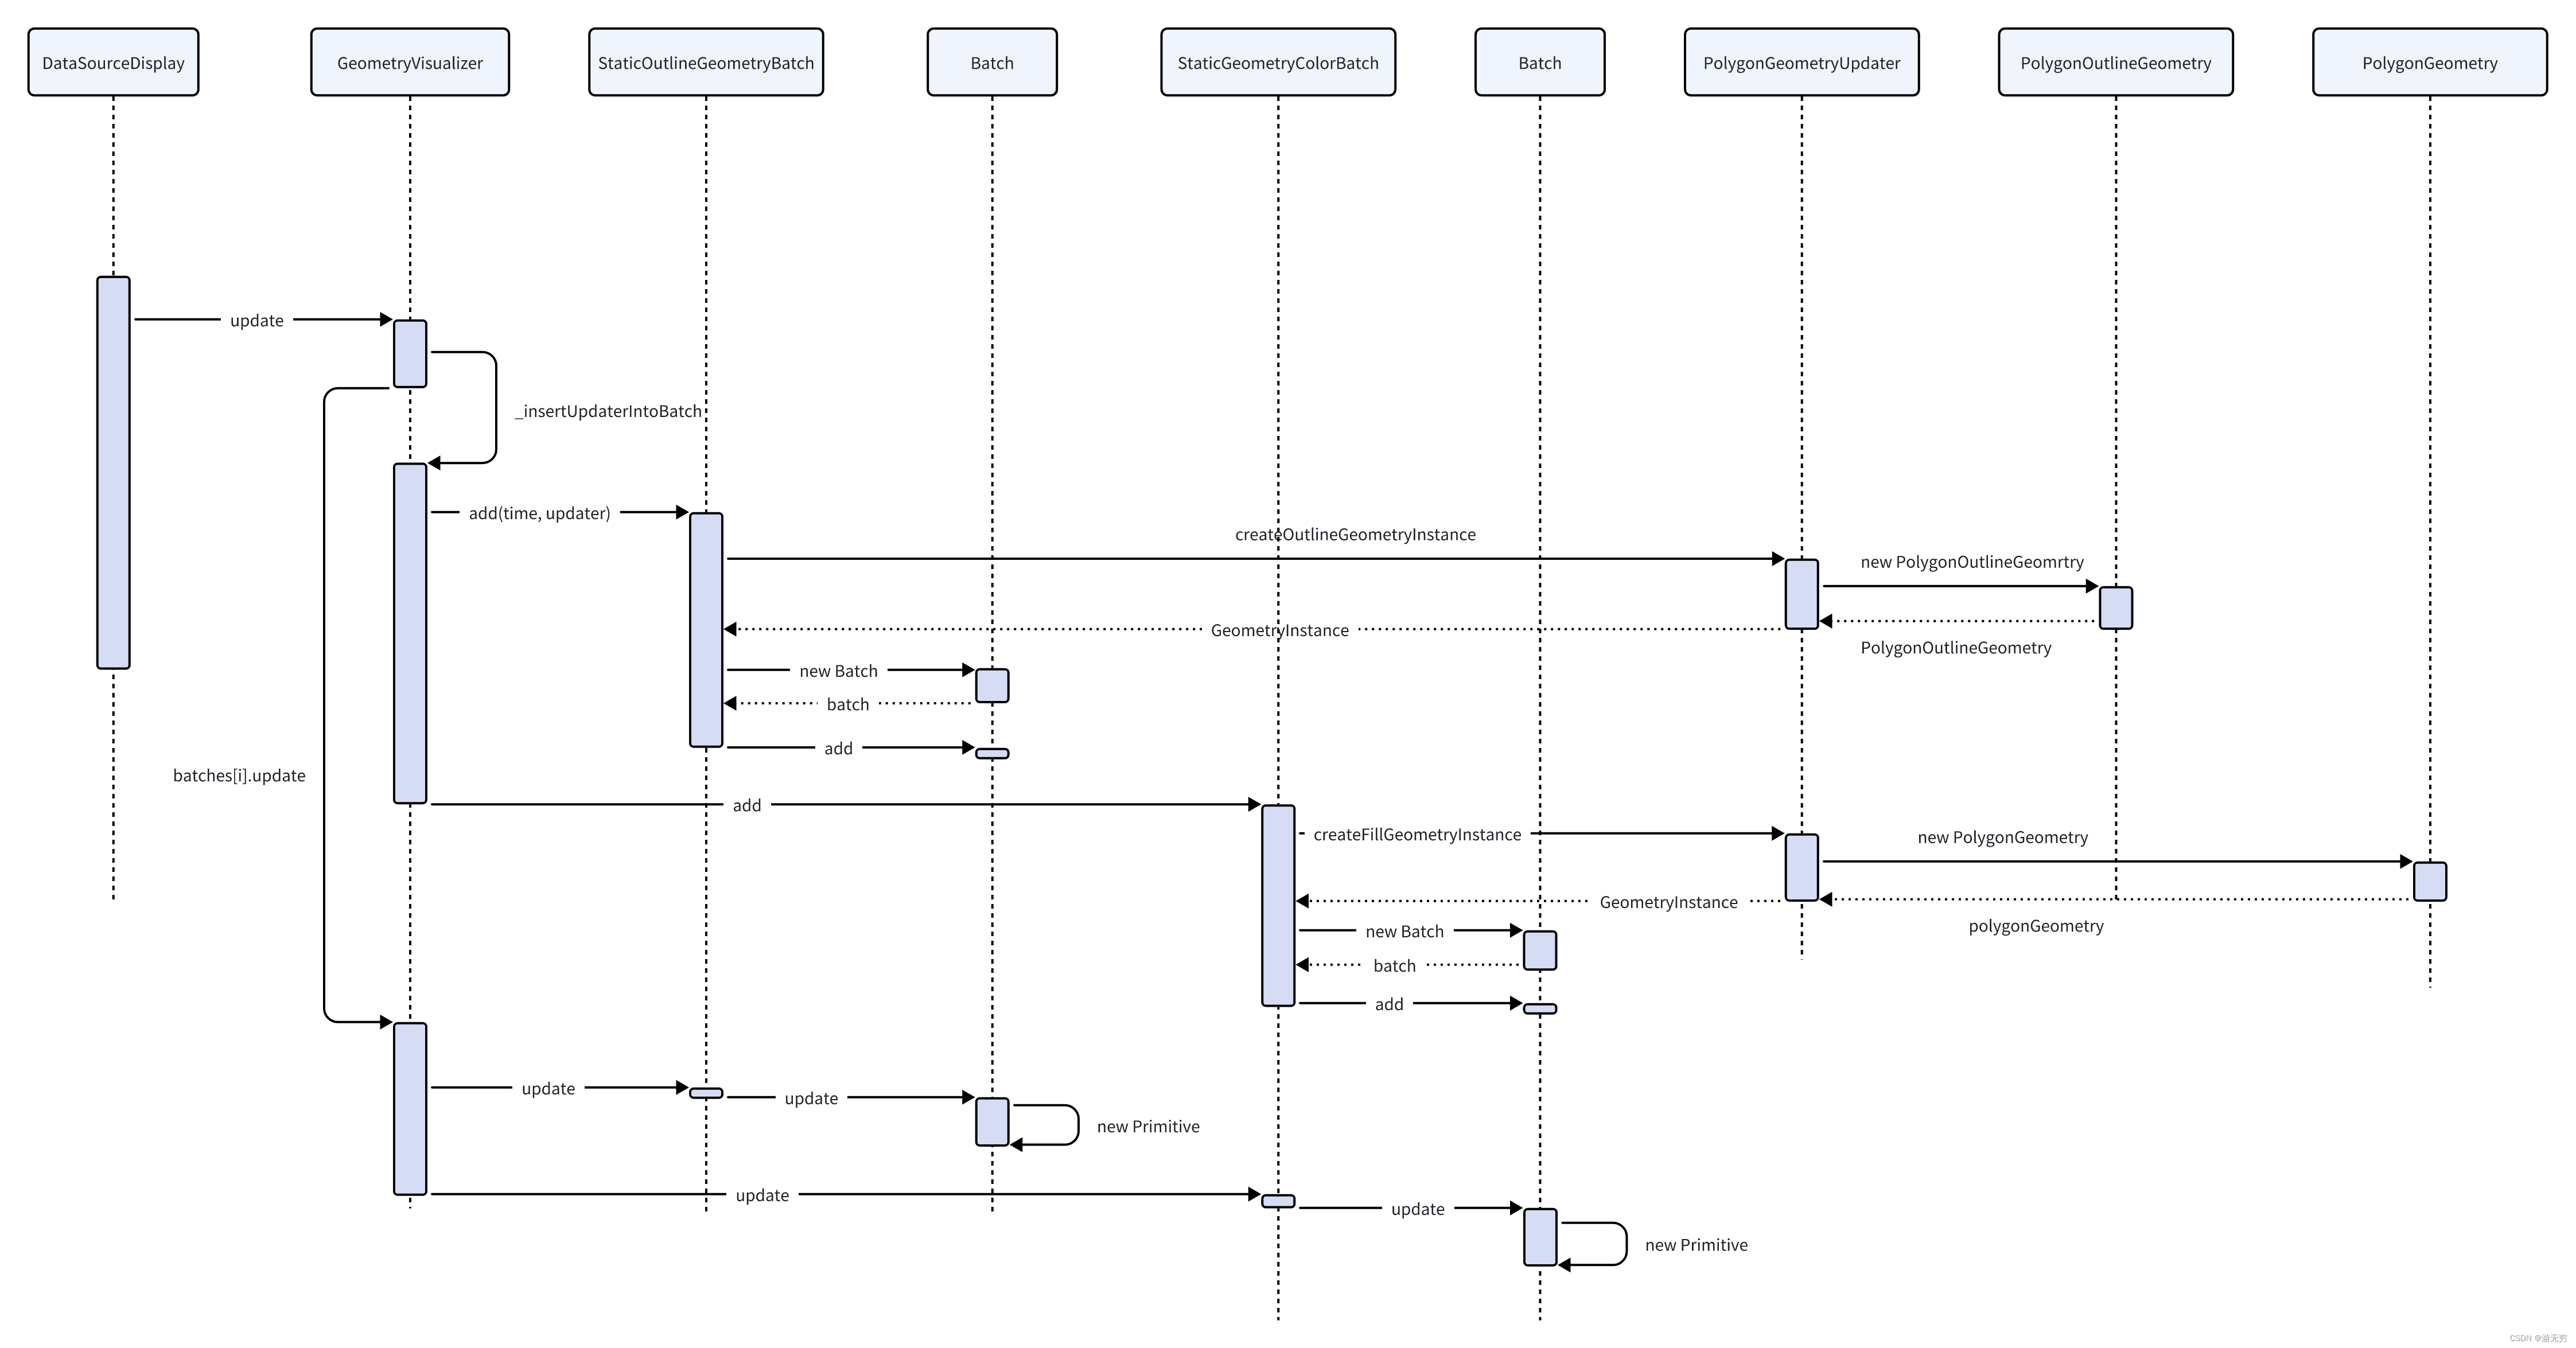
时序图
- 在这里我们附上整个过程的时序图,可以帮助大家更好的了解整个过程
后续
- 后面我们会进一步探索创建得到的
primitive如何被渲染,并对比其和我们直接添加的primitive在组织结构上有什么区别