文章目录
本文参考:
JAVA SpringBoot 项目打成jar包供第三方引用自动配置(Spring发现)解决方案 - 蒋具宏 - 博客园 (cnblogs.com)
1.使用者手动配置 basePackages
1.1 第三方jar项目
新建一个 springboot maven 工程,要被使用者导入的核心 Bean 代码如下:
package com.jxz.thirdpartyjar1;

import org.springframework.stereotype.Component;

@Component // 别的项目 @ComponentScan(basePackages={}) 可以扫描得到
public class ThirdPartyJarBeanOne {

    public void test() {

        System.out.println("我是外部方法");
    }
}
然后用 maven LifeStyle 方法中的 install 方法进行打包,会看到控制台输出如下
[INFO] Installing /Users/gabriel/Desktop/CodingUper/ThirdPartyJar1/pom.xml to /Users/gabriel/Environment/apache-maven-3.6.3/maven_repo/com/jxz/ThirdPartyJar1/0.0.1-SNAPSHOT/ThirdPartyJar1-0.0.1-SNAPSHOT.pom
[INFO] Installing /Users/gabriel/Desktop/CodingUper/ThirdPartyJar1/target/ThirdPartyJar1-0.0.1-SNAPSHOT.jar to /Users/gabriel/Environment/apache-maven-3.6.3/maven_repo/com/jxz/ThirdPartyJar1/0.0.1-SNAPSHOT/ThirdPartyJar1-0.0.1-SNAPSHOT.jar
/Users/gabriel/Environment/apache-maven-3.6.3/maven_repo/ 是我本地 maven 仓库的地址(在公司里就需要打到公网的 maven 仓库里去,这样子别人才能看到),这个时候其实就可以去去看到在 0.0.1-SNAPSHOT 下面就打出了 ThirdPartyJar1-0.0.1-SNAPSHOT.jar 包,这个 jar 包后续还需要导入别的项目使用
Bug:
有可能会碰到 maven 打包问题(repackage failed: Unable to find main class),原因是第三方 jar 包可能缺少主类,需要在 maven-plugin 处进行修改,参考 maven 打包问题(repackage failed: Unable to find main class)-CSDN博客
直接修改maven插件,改用apache的maven插件,配置如下:
 <plugin>
        <groupId>org.apache.maven.plugins</groupId>
        <artifactId>maven-compiler-plugin</artifactId>
</plugin>
1.2 使用者项目
1.2.1 使用者配置
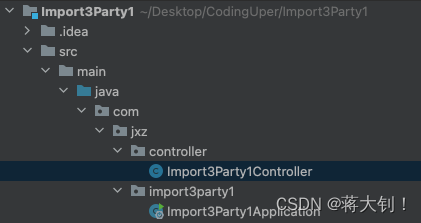
新建一个项目 Import3Party1 进行实验,先在 maven 中导入刚刚的 jar 包依赖
<dependency>
    <groupId>com.jxz</groupId>
    <artifactId>ThirdPartyJar1</artifactId>
    <version>0.0.1-SNAPSHOT</version>
</dependency>
为了便于测试,我这里再引入下 SpringBoot-web 的依赖
<dependency>
    <groupId>org.springframework.boot</groupId>
    <artifactId>spring-boot-starter-web</artifactId>
</dependency>
1.2.2 项目测试
配置方式:在启动类或者能够被 Spring 发现的 Configuration 类上增加 @ComponentScan(basePackages = {xxx 第三方 jar 包路径}),确保第三方Bean能够被扫描到
启动类:
package com.jxz.import3party1;

import org.springframework.boot.SpringApplication;
import org.springframework.boot.autoconfigure.SpringBootApplication;
import org.springframework.context.annotation.ComponentScan;

@SpringBootApplication
// 启动类这里就需要带上第三方 jar bean 的路径 com.jxz.thirdpartyjar
@ComponentScan(basePackages = {
   "com.jxz.thirdpartyjar1","com.jxz.controller"})
public class Import3Party1Application {


    public static void main(String[] args) {

        SpringApplication.run(Import3Party1Application.class, args);
    }

}
测试类:
package com.jxz.controller;

import com.jxz.thirdpartyjar1.ThirdPartyJarBeanOne;
import org.springframework.beans.factory.annotation.Autowired;
import org.springframework.stereotype.Controller;
import org.springframework.web.bind.annotation.GetMapping;
import org.springframework.web.bind.annotation.RequestParam;
import org.springframework.web.bind.annotation.ResponseBody;

/**
 * @Author jiangxuzhao
 * @Description
 * @Date 2024/2/3
 */
@Controller
public class Import3Party1Controller {

    @Autowired
    ThirdPartyJarBeanOne thirdPartyJarBeanOne;

    @GetMapping(value = "/test1")
    @ResponseBody
    public String testApi(@RequestParam String accountId) {

        thirdPartyJarBeanOne.test();
        return accountId;
    }
}
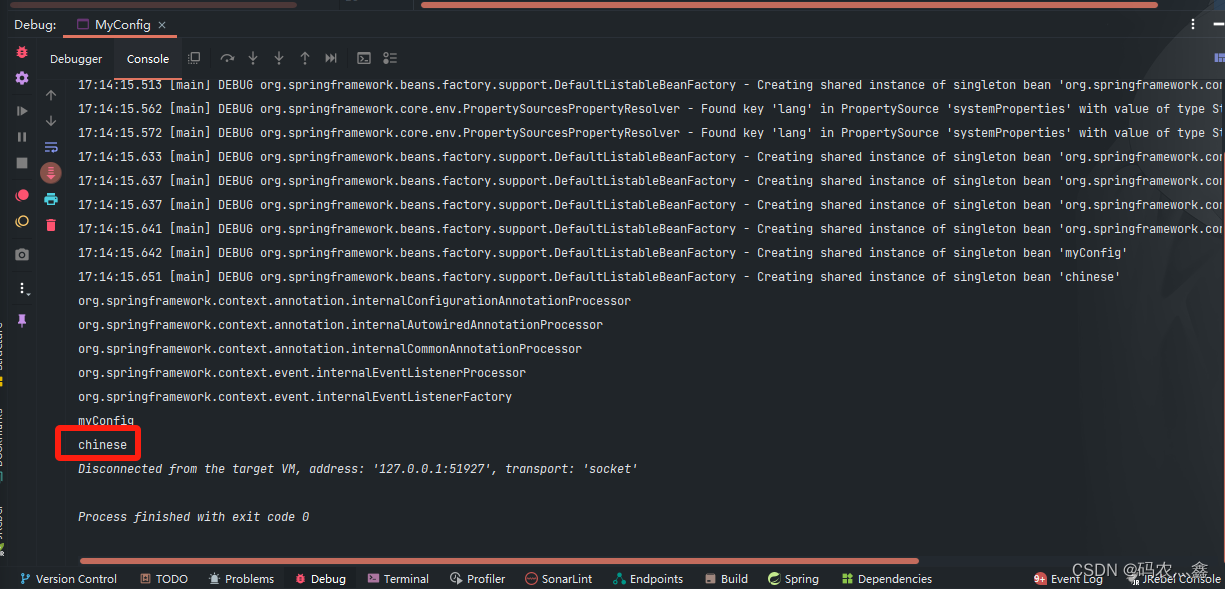
经测试,输出正确
2.使用者通过注解的方式引入
其实就是把更多的工作交给 jar 包生成者去做了,通过注解的方式将 Bean 的导入进行了优化
2.1 第三方jar项目
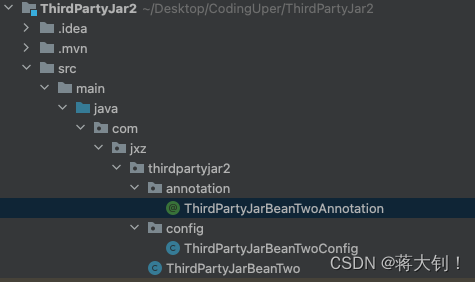
要被使用者导入的核心 Bean 代码:
package com.jxz.thirdpartyjar2;

import org.springframework.stereotype.Component;

/**
 * @Author jiangxuzhao
 * @Description
 * @Date 2024/2/3
 */
@Component
public class ThirdPartyJarBeanTwo {

    public void test() {

        System.out.println("我是外部方法");
    }
}
配置类:
package com.jxz.thirdpartyjar2.config;

import org.springframework.context.annotation.ComponentScan;
import org.springframework.context.annotation.Configuration;

/**
 * @Author jiangxuzhao
 * @Description
 * @Date 2024/2/3
 */
@Configuration
@ComponentScan(basePackages = {
   "com.jxz.thirdpartyjar2"}) // 扫描注册 bean
public class ThirdPartyJarBeanTwoConfig {

}
注解自动注册配置类:
package com.jxz.thirdpartyjar2.annotation;

import com.jxz.thirdpartyjar2.config.ThirdPartyJarBeanTwoConfig;
import org.springframework.context.annotation.Import;

import java.lang.annotation.*;

/**
 * @Author jiangxuzhao
 * @Description
 * @Date 2024/2/3
 */
@Documented
@Retention(RetentionPolicy.RUNTIME)
@Target(ElementType.TYPE)
@Import({
   ThirdPartyJarBeanTwoConfig.class})
public @interface ThirdPartyJarBeanTwoAnnotation {

}
2.2 使用者项目
2.2.1 使用者配置
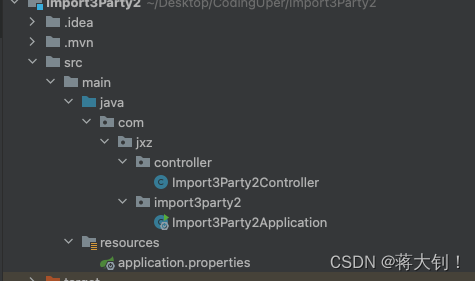
新建一个项目 Import3Party2 进行实验,先在 maven 中导入刚刚的 jar 包依赖
<dependency>
    <groupId>com.jxz</groupId>
    <artifactId>ThirdPartyJar2</artifactId>
    <version>0.0.1-SNAPSHOT</version>
</dependency>
为了便于测试,我这里再引入下 SpringBoot-web 的依赖
<dependency>
    <groupId>org.springframework.boot</groupId>
    <artifactId>spring-boot-starter-web</artifactId>
</dependency>
2.2.2 项目测试
配置方式:只需要引入注解,注解上面都带上了自动导入的要素,会讲原先使用者需要扫描的 Bean 自动扫描
启动类:
package com.jxz.import3party2;

import org.springframework.boot.SpringApplication;
import org.springframework.boot.autoconfigure.SpringBootApplication;
import org.springframework.context.annotation.ComponentScan;
import org.springframework.stereotype.Component;

@SpringBootApplication
// 启动类这里不需要带上第三方 jar bean 的路径
@ComponentScan(basePackages = {
   "com.jxz.controller"})
public class Import3Party2Application {


    public static void main(String[] args) {

        SpringApplication.run(Import3Party2Application.class, args);
    }

}
测试类:
package com.jxz.controller;


import com.jxz.thirdpartyjar2.ThirdPartyJarBeanTwo;
import com.jxz.thirdpartyjar2.annotation.ThirdPartyJarBeanTwoAnnotation;
import org.springframework.beans.factory.annotation.Autowired;
import org.springframework.stereotype.Controller;
import org.springframework.web.bind.annotation.GetMapping;
import org.springframework.web.bind.annotation.RequestParam;
import org.springframework.web.bind.annotation.ResponseBody;

/**
 * @Author jiangxuzhao
 * @Description
 * @Date 2024/2/3
 */
@Controller
// 这里就是第三方 jar 包中定义的注解
@ThirdPartyJarBeanTwoAnnotation
public class Import3Party2Controller {

    // 可以导入注入的 bean 使用
    @Autowired
    ThirdPartyJarBeanTwo thirdPartyJarBeanTwo;

    @GetMapping(value = "/test2")
    @ResponseBody
    public String testApi(@RequestParam String accountId) {

        thirdPartyJarBeanTwo.test();
        return accountId;
    }
}
经测试,输出正确
3.SpringBoot Starter 方式
3.1 第三方jar项目
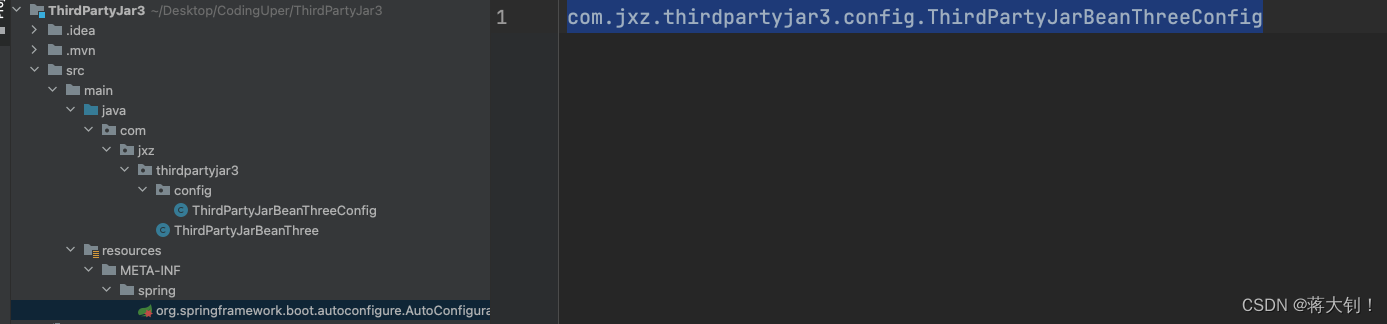
此方法最关键的为 resources/META-INF/spring.factories 文件(特别注意:SpringBoot3更改了配置方式),当项目启动时,Spring会扫描所有jar包下面的 spring.factories 文件(SpringBoot3替换为了spring/org.springframework.boot.autoconfigure.AutoConfiguration.imports *文件,参考下面说明*),进行相应的自动配置处理,其中写入类的全路径名
小于 SpringBoot 3 配置方法(resources/META-INF/spring.factories)
org.springframework.boot.autoconfigure.EnableAutoConfiguration=\
com.jxz.thirdpartyjar3.config.ThirdPartyJarBeanThreeConfig
其中 org.springframework.boot.autoconfigure.EnableAutoConfiguration 代表自动配置的 key,即代表需要自动配置哪些类,\ 可以理解为一个换行符,则该行下面的每行当做一个参数
第二行则为我们刚才看见的配置类的全路径,如果需要 Spring 自动配置多个类,我们依行写入它的全路径即可
大于等于SpringBoot3配置用法(resources/META-INF/spring/org.springframework.boot.autoconfigure.AutoConfiguration.imports)
com.jxz.thirdpartyjar3.config.ThirdPartyJarBeanThreeConfig
当做完这一步,我们的组件就可以打包了,然后使用者只需要引入我们的jar包,Spring 就会在启动时对我们 spring.factories 中的所有配置类进行自动配置(使用者会将第三方 jar 进行配置)
3.2 使用者项目
3.2.1 使用者配置

要被使用者导入的核心 Bean 代码:
package com.jxz.thirdpartyjar3;

import org.springframework.stereotype.Component;

/**
 * @Author jiangxuzhao
 * @Description
 * @Date 2024/2/3
 */
@Component
public class ThirdPartyJarBeanThree {

    public void test() {

        System.out.println("我是外部方法");
    }
}
配置类:
同第二种配置方式
package com.jxz.thirdpartyjar3.config;

import org.springframework.context.annotation.ComponentScan;
import org.springframework.context.annotation.Configuration;

/**
 * @Author jiangxuzhao
 * @Description
 * @Date 2024/2/3
 */
@Configuration
@ComponentScan(basePackages = {
   "com.jxz.thirdpartyjar3"}) // 扫描注册 bean
public class ThirdPartyJarBeanThreeConfig {

}
主要是自动扫描文件 META-INF/spring/org.springframework.boot.autoconfigure.AutoConfiguration.imports:
com.jxz.thirdpartyjar3.config.ThirdPartyJarBeanThreeConfig
3.2.2 项目测试
新建一个项目 Import3Party3 进行实验,先在 maven 中导入刚刚的 jar 包依赖
<dependency>
    <groupId>com.jxz</groupId>
    <artifactId>ThirdPartyJar3</artifactId>
    <version>0.0.1-SNAPSHOT</version>
</dependency>
为了便于测试,我这里再引入下 SpringBoot-web 的依赖
<dependency>
    <groupId>org.springframework.boot</groupId>
    <artifactId>spring-boot-starter-web</artifactId>
</dependency>
不需要额外的配置,只需要上面引入了 pom 就能够自动扫描
启动类:
package com.jxz.import3party3;

import org.springframework.boot.SpringApplication;
import org.springframework.boot.autoconfigure.SpringBootApplication;
import org.springframework.context.annotation.ComponentScan;

@SpringBootApplication
@ComponentScan(basePackages = {
   "com.jxz.controller"}) // 还是需要能够扫描到 controller 的,默认扫描 com.jxz.import3party3
public class Import3Party3Application {


    public static void main(String[] args) {

        SpringApplication.run(Import3Party3Application.class, args);
    }

}
测试类:
package com.jxz.controller;

import com.jxz.thirdpartyjar3.ThirdPartyJarBeanThree;
import org.springframework.beans.factory.annotation.Autowired;
import org.springframework.stereotype.Controller;
import org.springframework.web.bind.annotation.GetMapping;
import org.springframework.web.bind.annotation.RequestParam;
import org.springframework.web.bind.annotation.ResponseBody;

/**
 * @Author jiangxuzhao
 * @Description
 * @Date 2024/2/3
 */
@Controller
public class Import3Party3Controller {

    // 可以直接导入注入的 bean 使用
    @Autowired
    ThirdPartyJarBeanThree thirdPartyJarBeanThree;

    @GetMapping(value = "/test3")
    @ResponseBody
    public String testApi(@RequestParam String accountId) {

        thirdPartyJarBeanThree.test();
        return accountId;
    }
}
经测试,输出正确


![[嵌入式AI从0开始到入土]5_炼丹炉的搭建(基于wsl2_Ubuntu22.04)](https://img-blog.csdnimg.cn/direct/356bc33ef232468fb658928460612957.png)