配置OSPF负载分担示例
组网图形
OSPF负载分担简介
等价负载分担ECMP(Equal-Cost Multiple Path),是指在两个网络节点之间同时存在多条路径时,节点间的流量在多条路径上平均分摊。负载分担的作用是减轻每条路径的流量压力,增强网络健壮性。当到达同一目的地存在同一路由协议发现的多条路由时,且这几条路由的开销值也相同,那么就满足负载分担的条件。当实现负载分担时,路由器根据五元组(源地址、目的地址、源端口、目的端口、协议)进行转发,当五元组相同时,路由器总是选择与上一次相同的下一跳地址发送报文。当五元组不同时,路由器会选取相对空闲的路径进行转发。
在OSPF网络中,有时候两个网元之间会存在多条等价路径,而单条路径又很难承担全部的业务流量,此时用户一般希望多条路径平均分摊所有的业务流量,这样既能提高网络的可靠性,又能提高资源的利用率,这种情况下可以考虑配置OSPF负载分担。
配置注意事项
- 通过maximum load-balancing命令配置进行负载分担的等价路由的最大数量。
- 如果需要取消负载分担,可以将等价路由的最大数量设置为1。
- 本举例适用的产品包括:
- S3700-EI、S3700-HI
- S5700-EI、S5700-HI、S5710-EI、S5710-HI、S5720-SI、S5720S-SI、S5720I-SI、S5720-EI、S5720-HI、S5730-HI、S5730-SI、S5730S-EI、S5731-H、S5731-S、S5731S-S、S5731S-H、S5731-H-K、S5732-H、S5732-H-K、S5735-S、S5735S-S、S5735-S-I、S5735S-H、S5736-S
- S6700-EI、S6720-SI、S6720S-SI、S6720-EI、S6720S-EI、S6720-HI、S6730-H、S6730-S、S6730S-S、S6730S-H、S6730-H-K
- S7703、S7706、S7712、S7710、S7703 PoE、S7706 PoE、S7905、S7908
- S9703、S9706、S9712
本举例中产品的默认适用版本请参见“案例适用的产品和版本说明”中的表1。
如需了解交换机软件配套详细信息,请点击Info-Finder,在选择产品系列或产品型号后,在“硬件中心”进行查询。
S5731-L和S5731S-L属于远端模块,不支持Web管理、YANG和命令行,仅支持通过中心交换机对其下发配置,相关操作请参见《S300, S500, S2700, S5700, S6700 V200R022C00 配置指南-设备管理》中的“智能极简园区网络配置(小行星方案)”。
组网需求
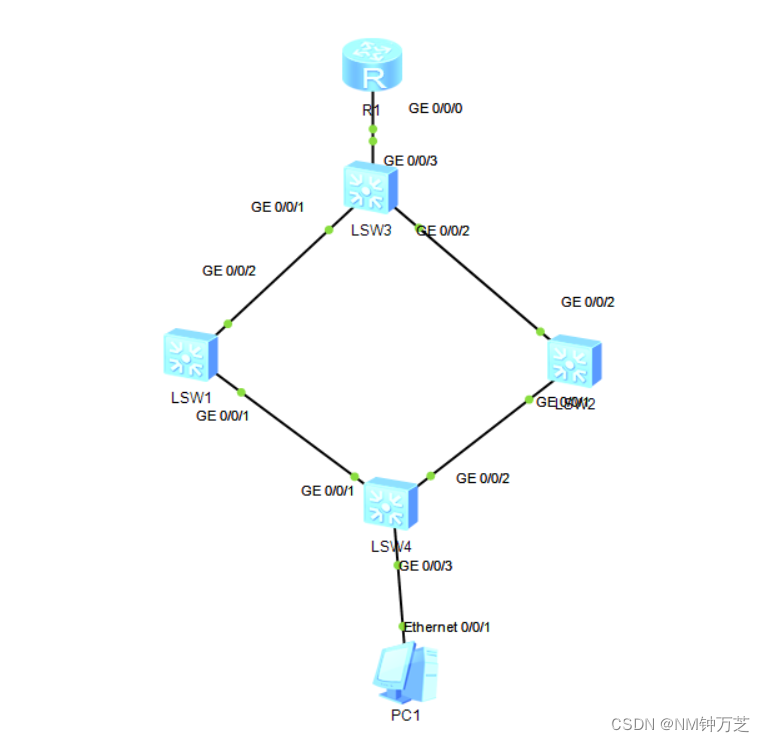
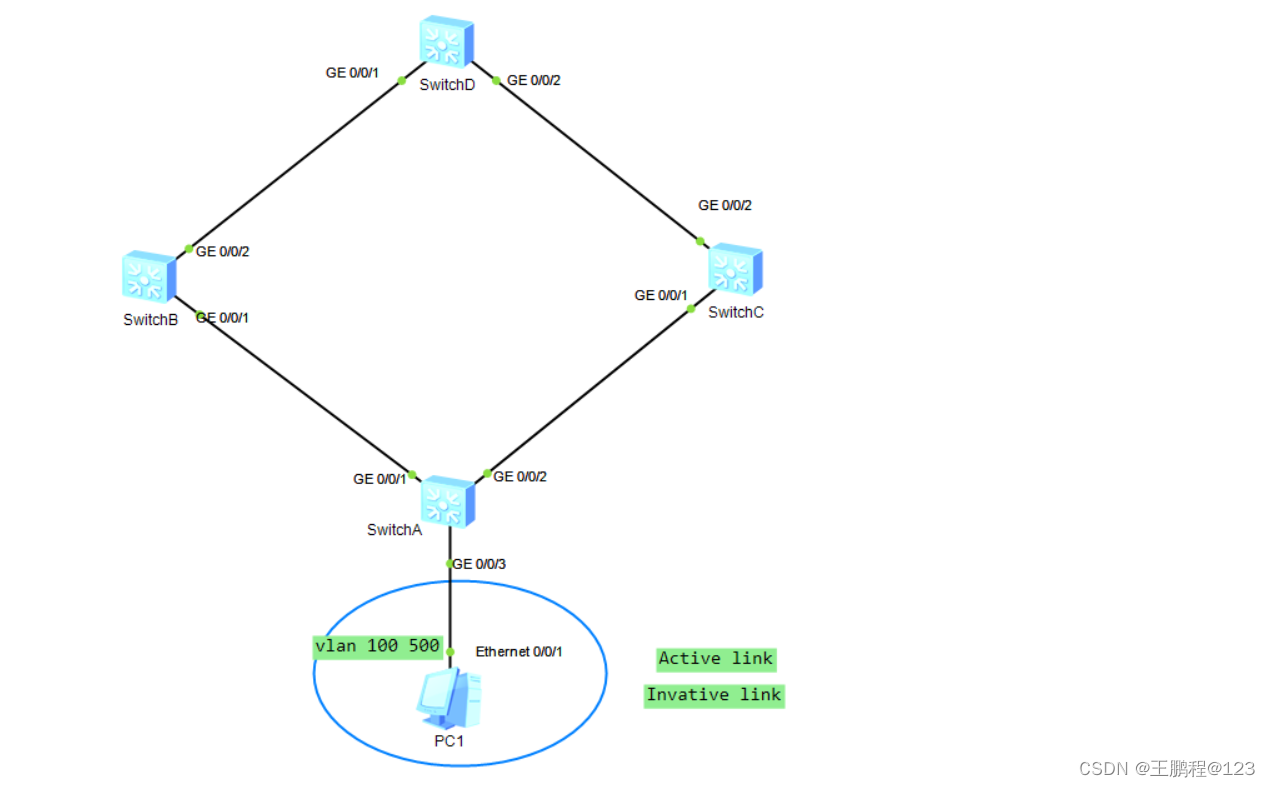
如图1所示,OSPF网络中有四台交换机,同属于区域0。要求配置负载分担,使得SwitchA流量,可以分别通过SwitchB和SwitchC送到SwitchD。
请确保该场景下互联接口的STP处于未使能状态。因为在使能STP的环形网络中,如果用交换机的VLANIF接口构建三层网络,会导致某个端口被阻塞,从而导致三层业务不能正常运行。
配置思路
采用如下的思路配置OSPF的负载分担:
在各交换机上配置OSPF基本功能,实现OSPF网络的基本互通。
- 在SwitchA配置负载分担,实现负载均衡的目的。
操作步骤
- 配置各接口所属VLAN
# 配置SwitchA。SwitchB、SwitchC和SwitchD的配置与SwitchA类似。 <HUAWEI> system-view [HUAWEI] sysname SwitchA [SwitchA] vlan batch 10 20 50 [SwitchA] interface gigabitethernet 1/0/1 [SwitchA-GigabitEthernet1/0/1] port link-type trunk [SwitchA-GigabitEthernet1/0/1] port trunk allow-pass vlan 10 [SwitchA-GigabitEthernet1/0/1] quit [SwitchA] interface gigabitethernet 1/0/2 [SwitchA-GigabitEthernet1/0/2] port link-type trunk [SwitchA-GigabitEthernet1/0/2] port trunk allow-pass vlan 20 [SwitchA-GigabitEthernet1/0/2] quit [SwitchA] interface gigabitethernet 1/0/3 [SwitchA-GigabitEthernet1/0/3] port link-type trunk [SwitchA-GigabitEthernet1/0/3] port trunk allow-pass vlan 50 [SwitchA-GigabitEthernet1/0/3] quit - 配置各VLANIF接口的IP地址
# 配置SwitchA。SwitchB、SwitchC和SwitchD的配置与SwitchA类似。 [SwitchA] interface vlanif 10 [SwitchA-Vlanif10] ip address 10.1.1.1 24 [SwitchA-Vlanif10] quit [SwitchA] interface vlanif 20 [SwitchA-Vlanif20] ip address 10.1.2.1 24 [SwitchA-Vlanif20] quit [SwitchA] interface vlanif 50 [SwitchA-Vlanif50] ip address 172.16.1.1 24 [SwitchA-Vlanif50] quit - 配置OSPF基本功能
# 配置SwitchA。 [SwitchA] ospf 1 router-id 10.10.10.1 [SwitchA-ospf-1] area 0 [SwitchA-ospf-1-area-0.0.0.0] network 172.16.1.0 0.0.0.255 [SwitchA-ospf-1-area-0.0.0.0] network 10.1.1.0 0.0.0.255 [SwitchA-ospf-1-area-0.0.0.0] network 10.1.2.0 0.0.0.255 [SwitchA-ospf-1-area-0.0.0.0] quit [SwitchA-ospf-1] quit # 配置SwitchB。 [SwitchB] ospf 1 router-id 10.10.10.2 [SwitchB-ospf-1] area 0 [SwitchB-ospf-1-area-0.0.0.0] network 10.1.1.0 0.0.0.255 [SwitchB-ospf-1-area-0.0.0.0] network 192.168.0.0 0.0.0.255 [SwitchB-ospf-1-area-0.0.0.0] quit [SwitchB-ospf-1] quit # 配置SwitchC。 [SwitchC] ospf 1 router-id 10.10.10.3 [SwitchC-ospf-1] area 0 [SwitchC-ospf-1-area-0.0.0.0] network 10.1.2.0 0.0.0.255 [SwitchC-ospf-1-area-0.0.0.0] network 192.168.1.0 0.0.0.255 [SwitchC-ospf-1-area-0.0.0.0] quit [SwitchC-ospf-1] quit # 配置SwitchD。 [SwitchD] ospf 1 router-id 10.10.10.4 [SwitchD-ospf-1] area 0 [SwitchD-ospf-1-area-0.0.0.0] network 192.168.0.0 0.0.0.255 [SwitchD-ospf-1-area-0.0.0.0] network 192.168.1.0 0.0.0.255 [SwitchD-ospf-1-area-0.0.0.0] network 172.17.1.0 0.0.0.255 [SwitchD-ospf-1-area-0.0.0.0] quit [SwitchD-ospf-1] quit # 查看SwitchA的路由表。 [SwitchA] display ip routing-table Route Flags: R - relay, D - download to fib, T - to vpn-instance ------------------------------------------------------------------------------ Routing Tables: Public Destinations : 11 Routes : 12 Destination/Mask Proto Pre Cost Flags NextHop Interface 10.1.1.0/24 Direct 0 0 D 10.1.1.1 Vlanif10 10.1.1.1/32 Direct 0 0 D 127.0.0.1 Vlanif10 10.1.2.0/24 Direct 0 0 D 10.1.2.1 Vlanif20 10.1.2.1/32 Direct 0 0 D 127.0.0.1 Vlanif20 127.0.0.0/8 Direct 0 0 D 127.0.0.1 InLoopBack0 127.0.0.1/32 Direct 0 0 D 127.0.0.1 InLoopBack0 172.16.1.0/24 Direct 0 0 D 172.16.1.1 Vlanif50 172.16.1.1/32 Direct 0 0 D 127.0.0.1 Vlanif50 172.17.1.0/24 OSPF 10 3 D 10.1.2.2 Vlanif20 OSPF 10 3 D 10.1.1.2 Vlanif10 192.168.0.0/24 OSPF 10 2 D 10.1.1.2 Vlanif10 192.168.1.0/24 OSPF 10 2 D 10.1.2.2 Vlanif20 从路由表可以看出,SwitchA的两个下一跳10.1.1.2(SwitchB)和10.1.2.2(SwitchC)均成为有效路由。 - 在SwitchA上配置等价路由优先级
如果不希望SwitchB和SwitchC形成负载分担,可以配置等价路由优先级,指定下一跳。

[SwitchA] ospf 1
[SwitchA-ospf-1] nexthop 10.1.2.2 weight 1   //通过weight参数设置等价路由的优先级,缺省情况下weight的取值是255,数值越小优先级越高。
[SwitchA-ospf-1] quit
# 查看SwitchA的路由表

[SwitchA] display ip routing-table
Route Flags: R - relay, D - download to fib, T - to vpn-instance
------------------------------------------------------------------------------
Routing Tables: Public
         Destinations : 11       Routes : 11

Destination/Mask    Proto   Pre  Cost      Flags NextHop         Interface

       10.1.1.0/24  Direct  0    0           D   10.1.1.1        Vlanif10
       10.1.1.1/32  Direct  0    0           D   127.0.0.1       Vlanif10
       10.1.2.0/24  Direct  0    0           D   10.1.2.1        Vlanif20
       10.1.2.1/32  Direct  0    0           D   127.0.0.1       Vlanif20
      127.0.0.0/8   Direct  0    0           D   127.0.0.1       InLoopBack0
      127.0.0.1/32  Direct  0    0           D   127.0.0.1       InLoopBack0
     172.16.1.0/24  Direct  0    0           D   172.16.1.1      Vlanif50
     172.16.1.1/32  Direct  0    0           D   127.0.0.1       Vlanif50
     172.17.1.0/24  OSPF    10   3           D   10.1.2.2        Vlanif20
    192.168.0.0/24  OSPF    10   2           D   10.1.1.2        Vlanif10
    192.168.1.0/24  OSPF    10   2           D   10.1.2.2        Vlanif20
从路由表中可以看出,当配置等价路由的优先级后,由于下一跳为10.1.2.2(SwitchC)的优先级(权值为1)高于下一跳为10.1.1.2(SwitchB)的优先级,所以OSPF优先选择下一跳为10.1.2.2为唯一最优路由。
配SwitchA的配置文件 # sysname SwitchA # vlan batch 10 20 50 # interface Vlanif10 ip address 10.1.1.1 255.255.255.0 # interface Vlanif20 ip address 10.1.2.1 255.255.255.0 # interface Vlanif50 ip address 172.16.1.1 255.255.255.0 # interface GigabitEthernet1/0/1 port link-type trunk port trunk allow-pass vlan 10 # interface GigabitEthernet1/0/2 port link-type trunk port trunk allow-pass vlan 20 # interface GigabitEthernet1/0/3 port link-type trunk port trunk allow-pass vlan 50 # ospf 1 router-id 10.10.10.1 nexthop 10.1.2.2 weight 1 area 0.0.0.0 network 10.1.1.0 0.0.0.255 network 10.1.2.0 0.0.0.255 network 172.16.1.0 0.0.0.255 # return SwitchB的配置文件 # sysname SwitchB # vlan batch 10 30 # interface Vlanif10 ip address 10.1.1.2 255.255.255.0 # interface Vlanif30 ip address 192.168.0.1 255.255.255.0 # interface GigabitEthernet1/0/1 port link-type trunk port trunk allow-pass vlan 10 # interface GigabitEthernet1/0/2 port link-type trunk port trunk allow-pass vlan 30 # ospf 1 router-id 10.10.10.2 area 0.0.0.0 network 10.1.1.0 0.0.0.255 network 192.168.0.0 0.0.0.255 # return SwitchC的配置文件 # sysname SwitchC # vlan batch 20 40 # interface Vlanif20 ip address 10.1.2.2 255.255.255.0 # interface Vlanif40 ip address 192.168.1.1 255.255.255.0 # interface GigabitEthernet1/0/1 port link-type trunk port trunk allow-pass vlan 20 # interface GigabitEthernet1/0/2 port link-type trunk port trunk allow-pass vlan 40 # ospf 1 router-id 10.10.10.3 area 0.0.0.0 network 10.1.2.0 0.0.0.255 network 192.168.1.0 0.0.0.255 # return SwitchD的配置文件 # sysname SwitchD # vlan batch 30 40 60 # interface Vlanif30 ip address 192.168.0.2 255.255.255.0 # interface Vlanif40 ip address 192.168.1.2 255.255.255.0 # interface Vlanif60 ip address 172.17.1.1 255.255.255.0 # interface GigabitEthernet1/0/1 port link-type trunk port trunk allow-pass vlan 30 # interface GigabitEthernet1/0/2 port link-type trunk port trunk allow-pass vlan 40 # interface GigabitEthernet1/0/3 port link-type trunk port trunk allow-pass vlan 60 # ospf 1 router-id 10.10.10.4 area 0.0.0.0 network 172.17.1.0 0.0.0.255 network 192.168.0.0 0.0.0.255 network 192.168.1.0 0.0.0.255 # return置文件


![[Linux 进程(六)] 写时拷贝 - 进程终止](https://img-blog.csdnimg.cn/direct/3dbeb6ece1be48c5ab271f177538e475.gif#pic_center)