折腾了一周的iPXE,大概弄明白了,ipxe原理 文件的具体作用就不讲了 自己也半懂不懂
不过有一说一 这可能是全网最完全的iPXE环境部署了
记录自己操作的每一个步骤 ┭┮﹏┭┮
为了支持legacy BIOS 以及 UEFI 还要同时支持IPv4/IPv6
我先说一下 我的机器是多网卡
配置ipxe的端口连接了一个内网交换机 部署的设备机器(client)连接内网
yum 下载东西是通过外网口
前期准备
iPXE server :
OS:CentOS Stream 9
kernel:5.14.0-391.el9.x86_64
1. 开启ssh远程登陆,方便远程操作
vim /etc/ssh/sshd_config
#PermitRootLogin prohibit-password
PermitRootLogin yes
:wq
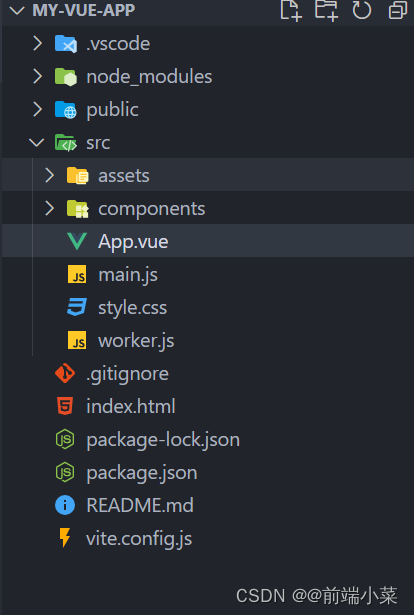
systemctl restart sshd2. 配置静态ip,根据自己需求配置就行,我准备用enp1s0作为dhcp端口
IPv4 设置为 10.10.10.10
IPv6 设置为 2024:1::1
IPv6 前缀生成:Unique Local IPv6 Generator (unique-local-ipv6.com)
enp1s0: flags=4163<UP,BROADCAST,RUNNING,MULTICAST>  mtu 1500
        inet 10.10.10.10  netmask 255.255.255.0  broadcast 10.10.10.255
        inet6 fe80::76fe:48ff:fe04:f56a  prefixlen 64  scopeid 0x20<link>
        inet6 2024:1::1  prefixlen 64  scopeid 0x0<global>
        ether 74:fe:48:04:f5:6a  txqueuelen 1000  (Ethernet)
        RX packets 606  bytes 81017 (79.1 KiB)
        RX errors 0  dropped 0  overruns 0  frame 0
        TX packets 296  bytes 30501 (29.7 KiB)
        TX errors 0  dropped 0 overruns 0  carrier 0  collisions 0
        device memory 0x80800000-8087ffff

enp2s0: flags=4099<UP,BROADCAST,MULTICAST>  mtu 1500
        ether 74:fe:48:04:f5:6b  txqueuelen 1000  (Ethernet)
        RX packets 0  bytes 0 (0.0 B)
        RX errors 0  dropped 0  overruns 0  frame 0
        TX packets 0  bytes 0 (0.0 B)
        TX errors 0  dropped 0 overruns 0  carrier 0  collisions 0
        device memory 0x80500000-805fffff

enp3s0: flags=4163<UP,BROADCAST,RUNNING,MULTICAST>  mtu 1500
        inet 192.168.4.117  netmask 255.255.255.0  broadcast 192.168.4.255
        inet6 fe80::2e0:4cff:fe68:3  prefixlen 64  scopeid 0x20<link>
        ether 00:e0:4c:68:00:03  txqueuelen 1000  (Ethernet)
        RX packets 49776  bytes 31614023 (30.1 MiB)
        RX errors 0  dropped 2  overruns 0  frame 0
        TX packets 10959  bytes 735874 (718.6 KiB)
        TX errors 0  dropped 0 overruns 0  carrier 0  collisions 0
3.配置yum源:阿里镜像源
报错curl: (6) Could not resolve host
改DNS 8.8.8.8 114.114.114.114
安装git
yum install git4. 关闭防火墙 以及seLinux
##永久关闭
[root@localhost ~]# systemctl stop firewalld.service
[root@localhost ~]# systemctl disable firewalld.service

##添加规则
[root@localhost ~]# firewall-cmd  --add-service=http --permanent
FirewallD is not running
[root@localhost ~]# firewall-cmd  --add-service=tftp --permanent
FirewallD is not running
[root@localhost ~]# firewall-cmd  --reload

##临时关闭selinux
[root@localhost ~]# setenforce 0
[root@localhost ~]#

##永久关闭
vim /etc/selinux/config

SELINUX=disabled

:wq
一、安装iPXE
1.1. 安装iPXE
下载地址:https://github.com/ipxe/ipxe.git
[root@localhost ~]# git clone https://github.com/ipxe/ipxe.git若是git 报错 如下处理; 重新下载iPXE
##编辑
vim /etc/hosts
140.82.113.4 github.com
140.82.114.4 gist.github.com
:wq


##重启网络
systemctl restart NetworkManager


[root@localhost ~]# git clone https://github.com/ipxe/ipxe.git
Cloning into 'ipxe'...
remote: Enumerating objects: 59629, done.
remote: Counting objects: 100% (13184/13184), done.
remote: Compressing objects: 100% (1723/1723), done.
remote: Total 59629 (delta 11831), reused 11543 (delta 11461), pack-reused 46445
Receiving objects: 100% (59629/59629), 17.87 MiB | 5.01 MiB/s, done.
Resolving deltas: 100% (45094/45094), done.
[root@localhost ~]#
1.2. 安装iPXE编译坏境
yum install gcc binutils make perl liblzma mtools mkisofs xz-devel[root@localhost ~]# yum install gcc binutils make perl liblzma mtools mkisofs xz-devel
Last metadata expiration check: 0:25:50 ago on Fri 26 Jan 2024 03:24:40 PM CST.
Package gcc-11.4.1-2.3.el9.x86_64 is already installed.
Package binutils-2.35.2-42.el9.x86_64 is already installed.
Package make-1:4.3-7.el9.x86_64 is already installed.
No match for argument: liblzma
Package mtools-4.0.26-4.el9.x86_64 is already installed.
Package xorriso-1.5.4-4.el9.x86_64 is already installed.
Package xz-devel-5.2.5-8.el9.x86_64 is already installed.
Error: Unable to find a match: liblzma
不用管liblzma (liblzma or xz header files)
如果报错Can't locate FindBin.pm in @INC (you may need to install the FindBin module)
原因perl 没有下载 下载perl后重新编译
编译成功:显示ipxe的相关用法 我们后面自定义image
===========================================================

To create a bootable floppy, type
    cat bin/ipxe.dsk > /dev/fd0
where /dev/fd0 is your floppy drive.  This will erase any
data already on the disk.

To create a bootable USB key, type
    cat bin/ipxe.usb > /dev/sdX
where /dev/sdX is your USB key, and is *not* a real hard
disk on your system.  This will erase any data already on
the USB key.

To create a bootable CD-ROM, burn the ISO image
bin/ipxe.iso to a blank CD-ROM.

These images contain drivers for all supported cards.  You
can build more customised images, and ROM images, using
    make bin/<rom-name>.<output-format>
二、部署PXE引导iPXE
通过PXE服务引导iPXE
具体情况就是通过sever上网卡(PXE) 引导加载编译好的iPXE image (包含了其他所有网卡)
2.1 下载tftp dhcpd httpd
注意: CentOS 8版本 以前的系统需要安装xinetd
在 RHEL/CentOS 的更高版本中,我们可能不需要 xinetd,因为在以前的版本中,tftp 是由 xinetd 管理的,关于xinetd的配置在后文
yum install dhcp-server tftp-server httpd[root@localhost ~]# yum install dhcp-server httpd tftp-server
Last metadata expiration check: 5:07:54 ago on Tue 30 Jan 2024 10:51:22 AM CST.
Package dhcp-server-12:4.4.2-19.b1.el9.x86_64 is already installed.
Package httpd-2.4.57-6.el9.x86_64 is already installed.
Package tftp-server-5.2-37.el9.x86_64 is already installed.
Dependencies resolved.
Nothing to do.
Complete!
2.2 配置ipv4 ipv6 dhcp 服务器
参拷/usr/share/doc/dhcp-server/dhcpd.conf.example 编辑 /etc/dhcp/dhcpd.conf 配置文件
参拷/usr/share/doc/dhcp-server/dhcpd6.conf.example 编辑 /etc/dhcp/dhcpd6.conf 配置文件
关于DHCP 配置 PXE 参数的可以查看 RedHat or CentOS官方的参拷链接
关于DHCP PXE文件参数的说明 参拷 博主 lvbibir的博客
关于DHCP 服务相关参数 见 本文 参考资料
说明:
ipxe.efi UEFI 启动引导文件
undionly.kpxe Legacy 启动引导文件
已经编译好的文件:
链接:https://pan.baidu.com/s/1RoFpb5aeTIJqPeijjLeLTQ
提取码:1111
是自定义编译iPXE后生成的 这里先在DHCP配置中文件写好了。
参数为什么这样写参拷 lvbibir 博客
# 启用 PXE 支持
allow booting;
allow bootp;

# PXE 定义命名空间

option space pxelinux;
option pxelinux.magic code 208 = string;
option pxelinux.configfile code 209 = text;
option pxelinux.pathprefix code 210 = text;
option pxelinux.reboottime code 211 = unsigned integer 32;
option architecture-type code 93 = unsigned integer 16;   # RFC4578

authoritative;
one-lease-per-client true;
# 不使用DNS动态更新
ddns-update-style none;
# 忽略客户端DNS更新
ignore client-updates;


# 使用 PXE 的网络
subnet 10.10.10.0 netmask 255.255.255.0 {
     option routers             10.10.10.10;
#    option domain-name-servers 8.8.8.8;
     option subnet-mask         255.255.255.0;
     range dynamic-bootp        10.10.10.20 10.10.10.254;
     default-lease-time         28800;
     max-lease-time             43200;
     next-server                10.10.10.10;
     class "pxeclients" {
          # 这里判断 option 60 选项的值的前9个字符是否是 PXEClient
          match if substring (option vendor-class-identifier, 0, 9) = "PXEClient";

          # 这里通过 if 判断 arch 代码来决定如何去分配对应的 pxe 引导程序
          # Legacy
          if option system-arch = 00:00 {
             filename "undionly.kpxe";
          }
             # UEFI-64
             else if option system-arch = 00:07 {
                        filename "UEFI/ipxe.efi";
          }

          # aarch64 ( arm 64 bit)
          else if option system-arch = 00:0b {
              filename "arm/ipxe.efi";
          }
          else
          {
              filename "undionly.kpxe";
          }
     }
dhcp6 配置配置文件
 allow booting;
 allow bootp;

 option dhcp6.bootfile-url code 59 = string;
 option dhcp6.vendor-class code 16 = {integer 32, integer 16, string};
 option dhcp6.user-class code 15 = { integer 16, string };

 option dhcp6.name-servers 2024:1::1;

 option dhcp6.bootfile-url "tftp://[2024:1::1]/ipv6/ipxe.efi";

 subnet6 2024:1::/64 {
            range6 2024:1::100 2024:1::ffff;
             }
2.3 下载 radvd
路由广告守护进程 radvd( (router advertisement daemon))发送路由器公告信息,这是 IPv6 无状态自动配置所需的。这可让用户根据这些公告自动配置其地址、设置、路由和选择默认路由。
下载radvd
yum install radvd2.4 配置 radvd
vim /etc/radvd.confinterface enp1s0
{
AdvSendAdvert on;
MinRtrAdvInterval 30;
MaxRtrAdvInterval 600;
AdvManagedFlag on;
AdvOtherConfigFlag on;
prefix 2024:1::/64
{
AdvPreferredLifetime 3600;
AdvValidLifetime 7200;
};
route 2024:1::/64
{
};
};
2.5 启动radvd 服务
设置开机自启动
systemctl start radvd
systemctl enable radvd
2.6 启动dhcp dhcp6服务
设置开机自启动
#设置开机自启动

[root@localhost ~]# systemctl start dhcpd
[root@localhost ~]# systemctl enable dhcpd
[root@localhost ~]#
[root@localhost ~]# systemctl start dhcpd6
[root@localhost ~]# systemctl enable dhcpd6
2.7 dhcp服务检查
若局域网内有其他机器处于开机状态可以看看有没有自动分配ipv4 ipv6地址
Ping检查通信正常
2.8 配置tftp(RHEL/CentOS 8/9可以省略此步)7版本必须配置
下载xinetd服务
yum install xinetd -y编辑vim /etc/xinetd.d/tftp文件 若没有 需要手动创建
vim /etc/xinetd.d/tftpdisable = yes 改为 no
默认路径 /var/lib/tftpboot
service tftp
{
    socket_type = dgram
    protocol = udp
    wait = yes
    user = root
    server = /usr/sbin/in.tftpd
    server_args = -s /var/lib/tftpboot -c  #文件路径  /tftpboot
    disable = no
    per_source = 11
    cps = 100 2
    flags = IPv 4
}
启动xinetd服务
#设置开机自启动
systemctl start xinetd
systemctl enable xinetd
2.9 配置tftp服务
在 RHEL/CentOS 的更高版本中,我们可能不需要 xinetd,因为在以前的版本中,tftp 是由 xinetd 管理的,但是现在它由 systemd 管理。
RHEL/CentOS 8/9 查看 systemd 单元文件的路径
rpm -ql tftp-server | grep -E "service|socket"[root@localhost tftpboot]# rpm -ql tftp-server | grep -E "service|socket"
/usr/lib/systemd/system/tftp.service
/usr/lib/systemd/system/tftp.socket
[root@localhost tftpboot]# cat /usr/lib/systemd/system/tftp.service
[Unit]
Description=Tftp Server
Requires=tftp.socket
Documentation=man:in.tftpd
[Service]
ExecStart=/usr/sbin/in.tftpd -s /var/lib/tftpboot
StandardInput=socket
[Install]
Also=tftp.socket
[root@localhost tftpboot]# pwd
/var/lib/tftpboot
2.10 启动 tftp 服务
设置开机自启动
systemctl daemon-reload
systemctl restart tftp.service

systemctl enable tftp.service --now
一段时间后,服务可能显示为非活动状态,这是意料之中的,由于tftp服务由tftp套接字管理,因此套接字启动并运行是很重要的。当有传入的TFTP请求时,套接字将自动启动服务。
检查套接字的状态以确保它已成功启动。
systemctl status tftp.socket[root@localhost tftpboot]# systemctl status tftp.socket
● tftp.socket - Tftp Server Activation Socket
Loaded: loaded (/usr/lib/systemd/system/tftp.socket; enabled; preset: disabled)
Active: active (listening) since Tue 2024-01-30 14:13:30 CST; 1h 40min ago
Until: Tue 2024-01-30 14:13:30 CST; 1h 40min ago
Triggers: ● tftp.service
Listen: [::]:69 (Datagram)
Tasks: 0 (limit: 201875)
Memory: 4.0K
CPU: 271us
CGroup: /system.slice/tftp.socket
Jan 30 14:13:30 localhost systemd[1]: Listening on Tftp Server Activation Socket.
[root@localhost tftpboot]#
2.11 配置 http服务
备份welcome.conf文件
cd /etc/httpd/conf.d
mv welcome.conf welcome.conf.bak
2.12 启动 http服务
设置开机自启动
[root@localhost ~]# systemctl start httpd
[root@localhost ~]# systemctl enable httpd
[root@localhost ~]# systemctl status httpd
● httpd.service - The Apache HTTP Server
     Loaded: loaded (/usr/lib/systemd/system/httpd.service; enabled; preset: disabled)
     Active: active (running) since Tue 2024-01-30 14:13:43 CST; 1h 52min ago
       Docs: man:httpd.service(8)
   Main PID: 1408 (httpd)
     Status: "Total requests: 0; Idle/Busy workers 100/0;Requests/sec: 0; Bytes served/sec:   0 B/sec"
      Tasks: 214 (limit: 201875)
     Memory: 43.8M
        CPU: 4.970s
     CGroup: /system.slice/httpd.service
             ├─1408 /usr/sbin/httpd -DFOREGROUND
             ├─1587 /usr/sbin/httpd -DFOREGROUND
             ├─1588 /usr/sbin/httpd -DFOREGROUND
             ├─1589 /usr/sbin/httpd -DFOREGROUND
             ├─1590 /usr/sbin/httpd -DFOREGROUND
             └─1591 /usr/sbin/httpd -DFOREGROUND

Jan 30 14:13:43 localhost.localdomain systemd[1]: Starting The Apache HTTP Server...
Jan 30 14:13:43 localhost.localdomain httpd[1408]: AH00558: httpd: Could not reliably determine the server's fully qualified domain name, using localhost.locald>
Jan 30 14:13:43 localhost.localdomain httpd[1408]: Server configured, listening on: port 443, port 80
Jan 30 14:13:43 localhost.localdomain systemd[1]: Started The Apache HTTP Server.
lines 1-21/21 (END)
2.13 上传操作系统镜像至OS
上传iPXE 需要部署的镜像ISO到server
后面介绍Windows怎么部署
-rw-r--r--. 1 root root 4712300544 Jan 10 10:50 CentOS-7-x86_64-DVD-2009.iso
-rw-r--r--  1 root root 6102130688 May  4  2023 zh-cn_windows_10_consumer_editions_version_22h2_updated_april_2023_x64_dvd_80cec13e.iso
[root@localhost ~]#
创建目录
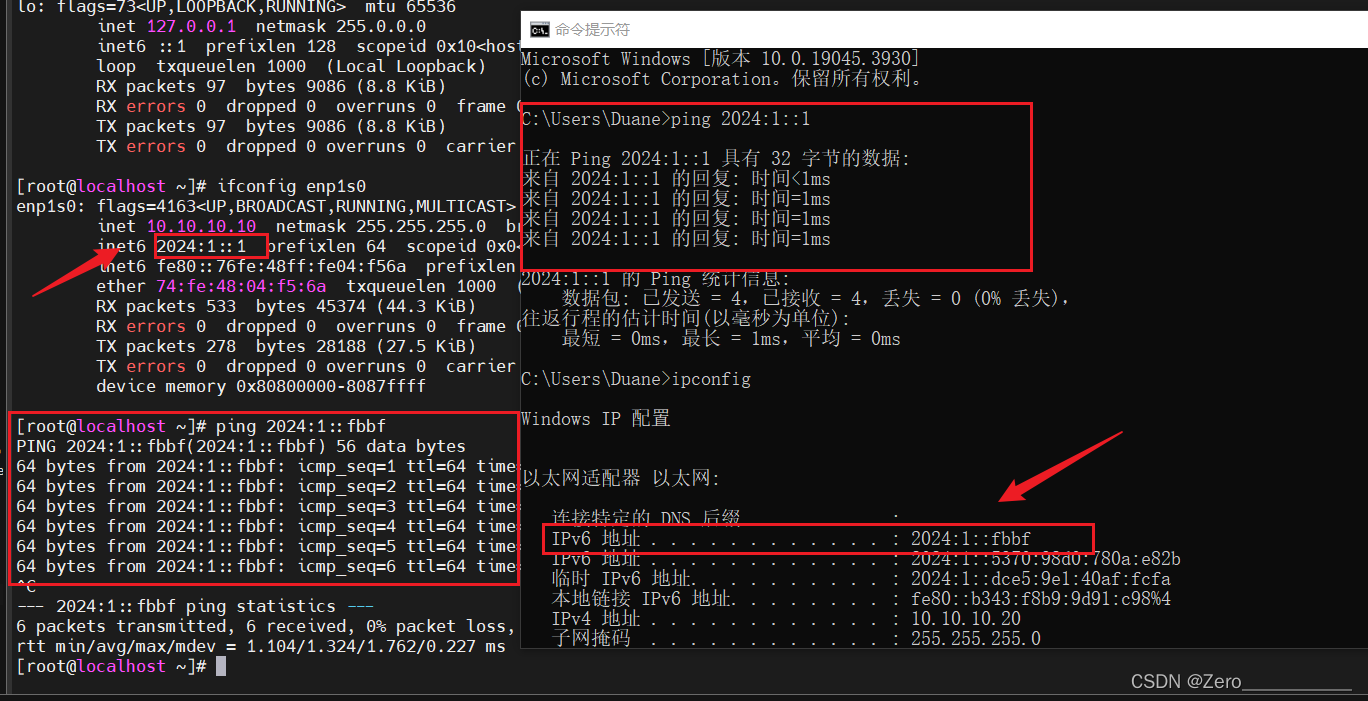
mkdir /var/www/html/centos7.9
挂载镜像
mount CentOS-7-x86_64-DVD-2009.iso /mnt/
拷贝系统文件到 http 目录
注:若使用其他方式拷贝镜像,需要保证目标系统镜像目录下有隐藏文件.treeinfo
cp -a /mnt/* /var/www/html/centos7.9
[root@localhost centos7.9]# ls -a
.   CentOS_BuildTag  EFI   GPL     isolinux  Packages  RPM-GPG-KEY-CentOS-7          TRANS.TBL
..  .discinfo        EULA  images  LiveOS    repodata  RPM-GPG-KEY-CentOS-Testing-7  .treeinfo
[root@localhost centos7.9]#
2.14 重启httpd服务
systemctl restart httpd2.15 http服务检查
局域网内可以通过浏览器正常访问
IPv4
IPv6

若提示
Forbidden
You don't have permission to access XXX on this server
请参拷此设置 : CentOS7下Apache服务器提示无权访问
若提示网页无法访问 检查是否开启了 代理 或者 科学上网
参拷: 【解决方案】Microsoft Edge 浏览器 出现“无法访问该页面”问题_we couldn鈥檛 load the requested page. please try ag-CSDN博客
三、创建定义iPXE引导
3.1 编写demo.ipxe 打破循坏
demo.ipxe 的作用:打破无限循环的另一种方法是使用嵌入式脚本构建 iPXE
boot.php 的作用:启动菜单配置文件
在/root/ipxe/src目录下 vim demo.ipxe文件
在/root/ipxe/src目录下 vim demo-ipv6.ipxe文件
cd  /root/ipxe/src
[root@localhost src]# cat demo.ipxe
#!ipxe
dhcp
chain http://10.10.10.10/boot.php
[root@localhost src]#
[root@localhost src]# vim demo-ipv6.ipxe
[root@localhost src]# cat demo-ipv6.ipxe
#!ipxe
dhcp
chain http://[2024:1::1]/ipv6/boot-ipv6.php
[root@localhost src]#
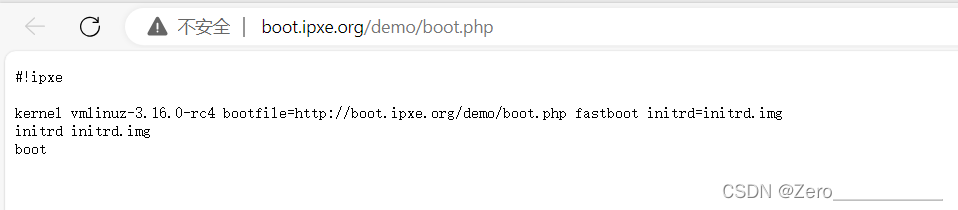
您可以通过网络启动某些内容。与传统的 PXE ROM 不同,iPXE 能够通过广域网(如 Internet)启动。如果要测试的计算机已连接到 Internet,则可以启动 iPXE
chain 命令的作用 下载并启动可执行映像
chain http://boot.ipxe.org/demo/boot.php3.2 嵌入脚本编译 ipxe 引导文件
编译legacy mode 引导
IPv6 PXE不支持legacy boot
[root@localhost src]# make bin/undionly.kpxe EMBED=demo.ipxe
 [root@localhost src]# make bin/undionly.kpxe EMBED=demo.ipxe
  [DEPS] image/embedded.c
  [BUILD] bin/embedded.o
  [AR] bin/blib.a
  [VERSION] bin/version.undionly.kpxe.o
  [LD] bin/undionly.kpxe.tmp
  [BIN] bin/undionly.kpxe.bin
  [ZINFO] bin/undionly.kpxe.zinfo
  [ZBIN] bin/undionly.kpxe.zbin
  [FINISH] bin/undionly.kpxe
rm bin/undionly.kpxe.bin bin/undionly.kpxe.zinfo bin/version.undionly.kpxe.o bin/undionly.kpxe.zbin
[root@localhost src]#
编译 UEFI mode 引导
[root@localhost src]# make bin-x86_64-efi/ipxe.efi EMBED=demo.ipxe[root@localhost src]# make bin-x86_64-efi/ipxe.efi EMBED=demo.ipxe
[PARSEROM]
[DEPS] core/version.c
[DEPS] arch/x86/transitions/librm.S
[DEPS] arch/x86/transitions/libpm.S
..............................................................
..............................................................等待编译完成
创建目录/var/lib/tftpboot/UEFI/ mkdir /var/lib/tftpboot/ipv6/
mkdir /var/lib/tftpboot/UEFI/
mkdir /var/lib/tftpboot/ipv6/
拷贝至/var/lib/tftpboot目录下
cp /root/ipxe/src/bin/undionly.kpxe /var/lib/tftpboot/
cp /root/ipxe/src/bin-x86_64-efi/ipxe.efi /var/lib/tftpboot/UEFI/
修改vim /root/ipxe/src/config/general.h 文件 第38行 取消注释
 33  * Network protocols
 34  *
 35  */
 36
 37 #define NET_PROTO_IPV4          /* IPv4 protocol */
 38 #define NET_PROTO_IPV6  /* IPv6 protocol */
 39 #undef  NET_PROTO_FCOE          /* Fibre Channel over Ethernet protocol */
 40 #define NET_PROTO_STP           /* Spanning Tree protocol */
 41 #define NET_PROTO_LACP          /* Link Aggregation control protocol */
 42 #define NET_PROTO_EAPOL         /* EAP over LAN protocol */
 43 //#define NET_PROTO_LLDP        /* Link Layer Discovery protocol */
再次编译demo-ipv6.ipxe
[root@localhost src]# make bin-x86_64-efi/ipxe.efi EMBED=demo-ipv6.ipxe
[root@localhost src]# make bin-x86_64-efi/ipxe.efi EMBED=demo-ipv6.ipxe
  [DEPS] image/embedded.c
  [BUILD] bin-x86_64-efi/embedded.o
  [AR] bin-x86_64-efi/blib.a
  [VERSION] bin-x86_64-efi/version.ipxe.efi.o
  [LD] bin-x86_64-efi/ipxe.efi.tmp
  [FINISH] bin-x86_64-efi/ipxe.efi
rm bin-x86_64-efi/version.ipxe.efi.o
[root@localhost src]#
拷贝至/var/lib/tftpboot目录下
cp /root/ipxe/src/bin-x86_64-efi/ipxe.efi /var/lib/tftpboot/ipv63.3 编写boot.php启动菜单配置文件
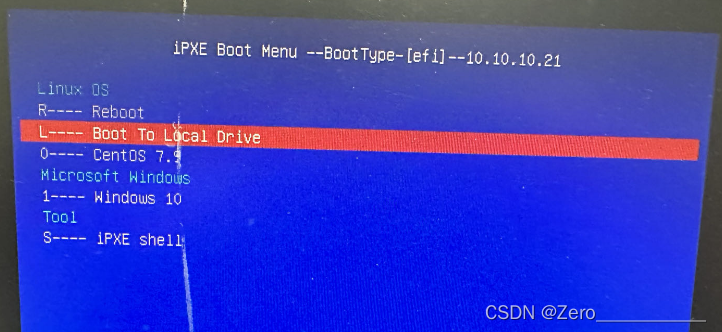
我们打开boot.php文件里的内容 看看
可以看到下载了kernel 和 img 然后启动
Legacy 和 UEFI模式可共用同一启动菜单配置文件 boot.php
WindowsPE引导待会在做
kickstart 文件配置参拷Kickstart 安装 :: CentOS Docs Site
现在我们在 /var/www/html/ 目录下编写一个一样的boot.php文件以及boot-ipv6.php文件
boot menu参数参拷:iPXE启动菜单详解-CSDN博客
关于内外网 boot.php 参拷 ipxe菜单 内嵌实现自动判断服务器,外网内网全协议自动判断启动 - 网络启动区 - 无忧启动论坛 - Powered by Discuz! (wuyou.net)
vim boot.php
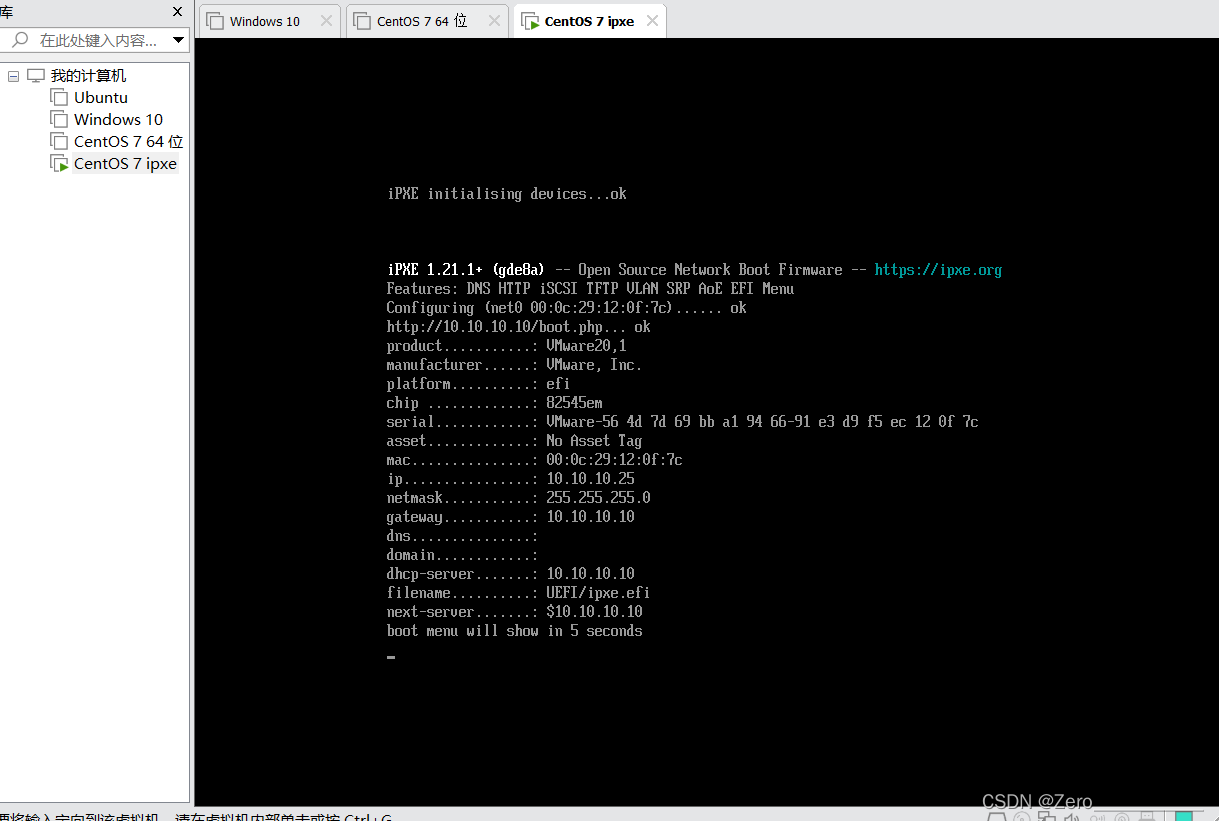
#!ipxe
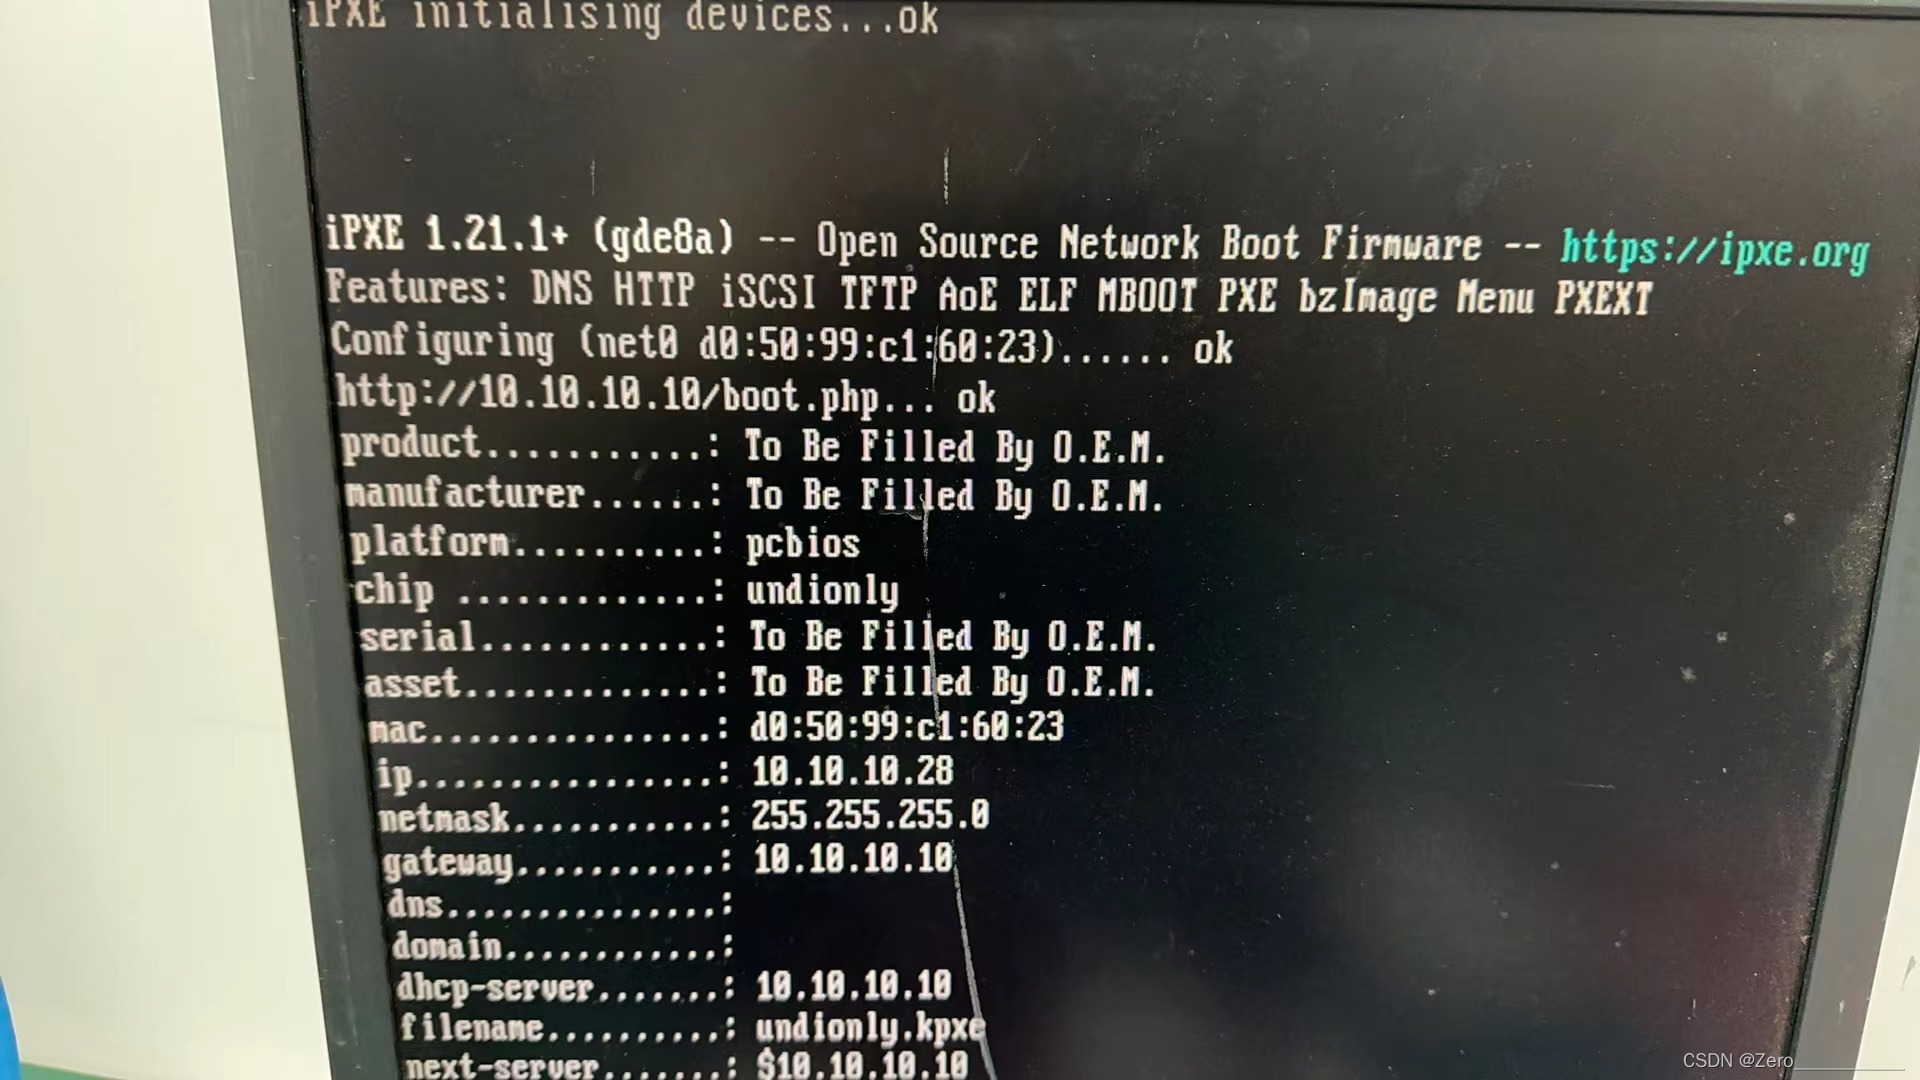
#打印信息
echo platform..........: ${platform}
echo chip .............: ${chip}
echo mac...............: ${mac}
echo ip................: ${ip}
echo netmask...........: ${netmask}
echo gateway...........: ${gateway}
echo dns...............: ${dns}
echo domain............: ${domain}
echo dhcp-server.......: ${dhcp-server}
echo filename..........: ${filename}
echo next-server.......: ${next-server}
echo boot menu will show in 5 seconds
sleep 10
#启动菜单
:start
menu iPXE Boot Menu --BootType-[${platform}]--${ip}
item --gap -- Linux OS
item --key R reboot R---- Reboot
item --key L local L---- Boot To Local Drive
item --key 0 CentOS7.9 0---- CentOS 7.9
item --gap -- Microsoft Windows
item --key 1 WIN10 1---- Windows 10
item --gap -- Tool
item --key S shell S---- iPXE shell
#等60S默认启动reboot
choose --default reboot --timeout 60000 target && goto ${target}
#kickstart 安装 CentOS
:CentOS7.9
kernel http://{next-server}/centos7.9/images/pxeboot/vmlinuz initrd=initrd.img inst.repo=http://{next-server}/centos7.9 ks=http://{next-server}/centos7u9.cfg
initrd http://{next-server}/centos7.9/images/pxeboot/initrd.img
boot
#安装Windows
:WIN10
kernel http://{next-server}/wimboot
initrd http://{next-server}/win10pe/install.bat install.bat
initrd http://{next-server}/win10pe/winpeshl.ini winpeshl.ini
initrd http://{next-server}/win10pe/Boot/BCD BCD
initrd http://{next-server}/win10pe/Boot/boot.sdi boot.sdi
initrd http://{next-server}/win10pe/sources/boot.wim boot.wim
initrd http://{next-server}/win10pe/bootmgr.efi bootmgr.efi
boot
#从硬盘启动
:local
sanboot --no-describe --drive 0x80 || goto start
:shell
shell || goto start
:reboot
reboot
:wqboot-ipv6.php 文件 和 boot.php 一致 替换 url 即可
创建 mkdir /var/www/html/ipv6/ 文件夹用存放boot-ipv6.php
:CentOS7.9
kernel http://[2024:1::1]/centos7.9/images/pxeboot/vmlinuz initrd=initrd.img inst.repo=http://[2024:1::1]/centos7.9 ks=http://[2024:1::1]/centos7u9.cfg
initrd http://[2024:1::1]/centos7.9/images/pxeboot/initrd.img
boot

:WIN10
kernel http://[2024:1::1]/wimboot
initrd http://[2024:1::1]/win10pe/install.bat install.bat
initrd http://[2024:1::1]/win10pe/winpeshl.ini winpeshl.ini
initrd http://[2024:1::1]/win10pe/Boot/BCD BCD
initrd http://[2024:1::1]/win10pe/Boot/boot.sdi boot.sdi
initrd http://[2024:1::1]/win10pe/sources/boot.wim boot.wim
initrd http://[2024:1::1]/win10pe/bootmgr.efi bootmgr.efi
boot
ok 这里就基本完成了
重启一下 httpd服务
systemctl restart httpd现在局域网的其他设备可以通过BIOS-->PXE boot 验证一下CentOS启动了
四、 Windows安装环境配置
4.1 下载Windows ADK 制作PE
ADK下载:Download and install the Windows ADK | Microsoft Learn
安装完成之后以管理员身份运行 Deployment and Imaging Tools Environment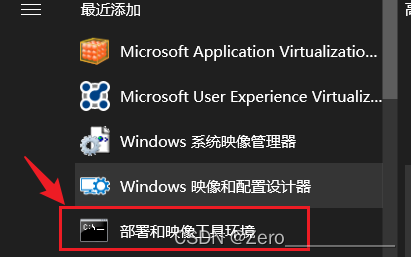
这里我只创建了64位PE
mkdir C:\temp\winpe

## 创建32位PE
copype x86 C:\temp\winpe\x86

## 创建64位PE
copype amd64 C:\temp\winpe\amd64
目录 C:\winpe\media 下即为 WINPE 文件
新建mkdir /var/www/html/win10pe文件夹
mkdir /var/www/html/win10pe将media文件的内容拷贝至/var/www/html/win10pe
用scp传输输入root密码
C:\winpe\media>scp -r C:\winpe\media\ root@192.168.4.117:/var/www/html/win10pe[root@localhost win10pe]# ls
bg-bg bootmgr.efi de-de en-gb es-mx fr-ca hu-hu ja-jp lv-lv pl-pl ro-ro sl-si sr-latn-rs uk-ua zh-tw
Boot cs-cz EFI en-us et-ee fr-fr install.bat ko-kr nb-no pt-br ru-ru smb.conf-backup sv-se winpeshl.ini
bootmgr da-dk el-gr es-es fi-fi hr-hr it-it lt-lt nl-nl pt-pt sk-sk sources tr-tr zh-cn
[root@localhost win10pe]#
4.2 下载 wimboot
wimboot 为一款 Windows 镜像格式文件的引导程序,可让你能够启动到 WinPE 环境
下载地址:https://github.com/ipxe/wimboot/releases/latest/download/wimboot
您可以从 https://github.com/ipxe/wimboot/releases/latest/download/wimboot 下载最新版本的二进制文件。这是一个混合二进制文件,可在 BIOS 和 64 位 UEFI 系统(包括启用了安全启动的 UEFI 系统)上运行。
wimboot您还可以从 Release v2.7.6 (2023-08-16) · ipxe/wimboot · GitHub 下载替代二进制文件(例如用于 32 位 UEFI 系统)。
旧版本可从 Releases · ipxe/wimboot · GitHub 获得。
源代码保存在 GitHub - ipxe/wimboot: WIM bootloader 的存储库中。
git
将winboot上传至 /var/www/html
[root@localhost html]# ll
total 84
-rw-r--r--   1 root root  1739 Feb  1 12:03 boot.php
drwxr-xr-x.  8 root root  4096 Jan 26 17:48 centos7.9
-rw-r--r--.  1 root root  1945 Jan 26 18:37 centos7u9.cfg
drwxr-xr-x   2 root root    27 Feb  1 13:44 ipv6
-rw-r--r--   1 root root 67200 Jan 29 17:30 wimboot
drwxr-xr-x  40 root root  4096 Jan 29 17:36 win10pe
[root@localhost html]# pwd
/var/www/html
[root@localhost html]#
4.3 安装smaba服务传输Windows文件
yum install samba samba-client创建共享目录和 samba 用户
mkdir /smbshare

useradd smbuser

smbpasswd -a smbuser

chown smbuser:smbuser /smbshare
修改和添加以下配置。为配置方便,此 samba 配置为允许匿名访问
vim /etc/samba/smb.conf[global]
workgroup = WORKGROUP
guest account = root
[smbshare]
comment = Windows Media
path = /smbshare
public = yes
writeable = no
browseable = yes
guest ok = yes
设置开机自启动
systemctl start smb

systemctl enable smb
拷贝Windows镜像到smaba目录
mount Win10.iso /mnt
cp -a /mnt/* /smbshare/win10
4.4. 验证samba服务器正常访问
通过局域网的Windows访问samba服务

4.5 创建的批处理文件 install.bat
创建的批处理文件 install.bat 中包含连接文件服务器和运行 Windows 安装程序的命令
wpeinit
net use z: \\10.10.10.10\smbshare\win10
z:\setup.exe
4.6 创建指示文件 winpeshl.ini
vim /var/www/html/win10pe/winpeshl.ini[LaunchApps]
"install.bat"ok 至此所有步骤都已完成!!!
五、iPXE 环境验证
本人IPv4 / IPv6 PXE均可正常安装
Windows:
win11 报错 this pc can't run windows 11 参拷:
如何解决安装Windows11时出现“这台电脑无法运行Windows11”_这台电脑无法运行win11-CSDN博客
win11 跳过联网参拷:
Windows11跳过联网激活 & 跳过登陆操作 - 个人文章 - SegmentFault 思否

Linux:
legacy mode 也没问题的

在局域网的虚拟机legacy BIOS 引导不了iPXE好奇怪 ip都正常分配了 可能是我用的虚拟机版本太新了吧

UEFI可以
其他:
想说点什么
参拷资料:
iPXE - open source boot firmware [start]
第 24 章 准备网络安装 Red Hat Enterprise Linux 7 | Red Hat Customer Portal
14.5. DHCP for IPv6 (DHCPv6) Red Hat Enterprise Linux 7 | Red Hat Customer Portal
准备使用 PXE 从网络安装 :: CentOS Docs Site
pxe 如何应对复杂的服务器硬件环境 | lvbibir's Blog
动态主机配置协议 (DHCP) 和引导协议 (BOOTP) 参数 (iana.org)
Dynamic Host Configuration Protocol for IPv6 (DHCPv6) (iana.org)