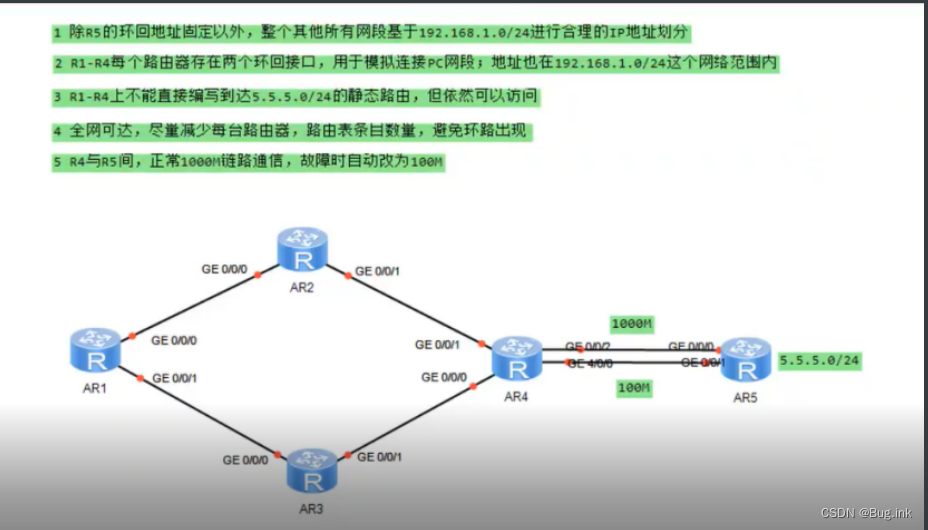
k8s实例举例
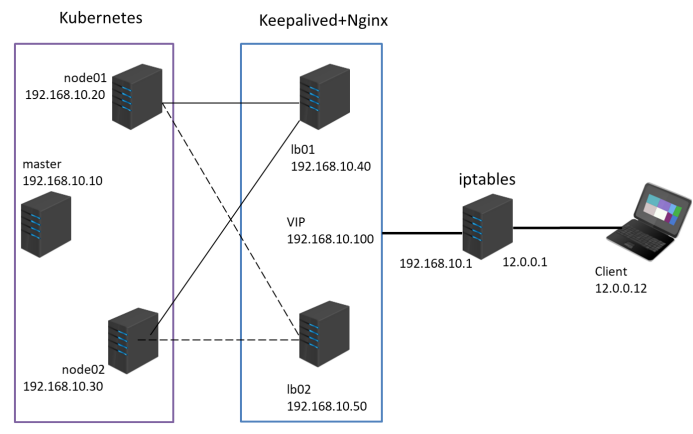
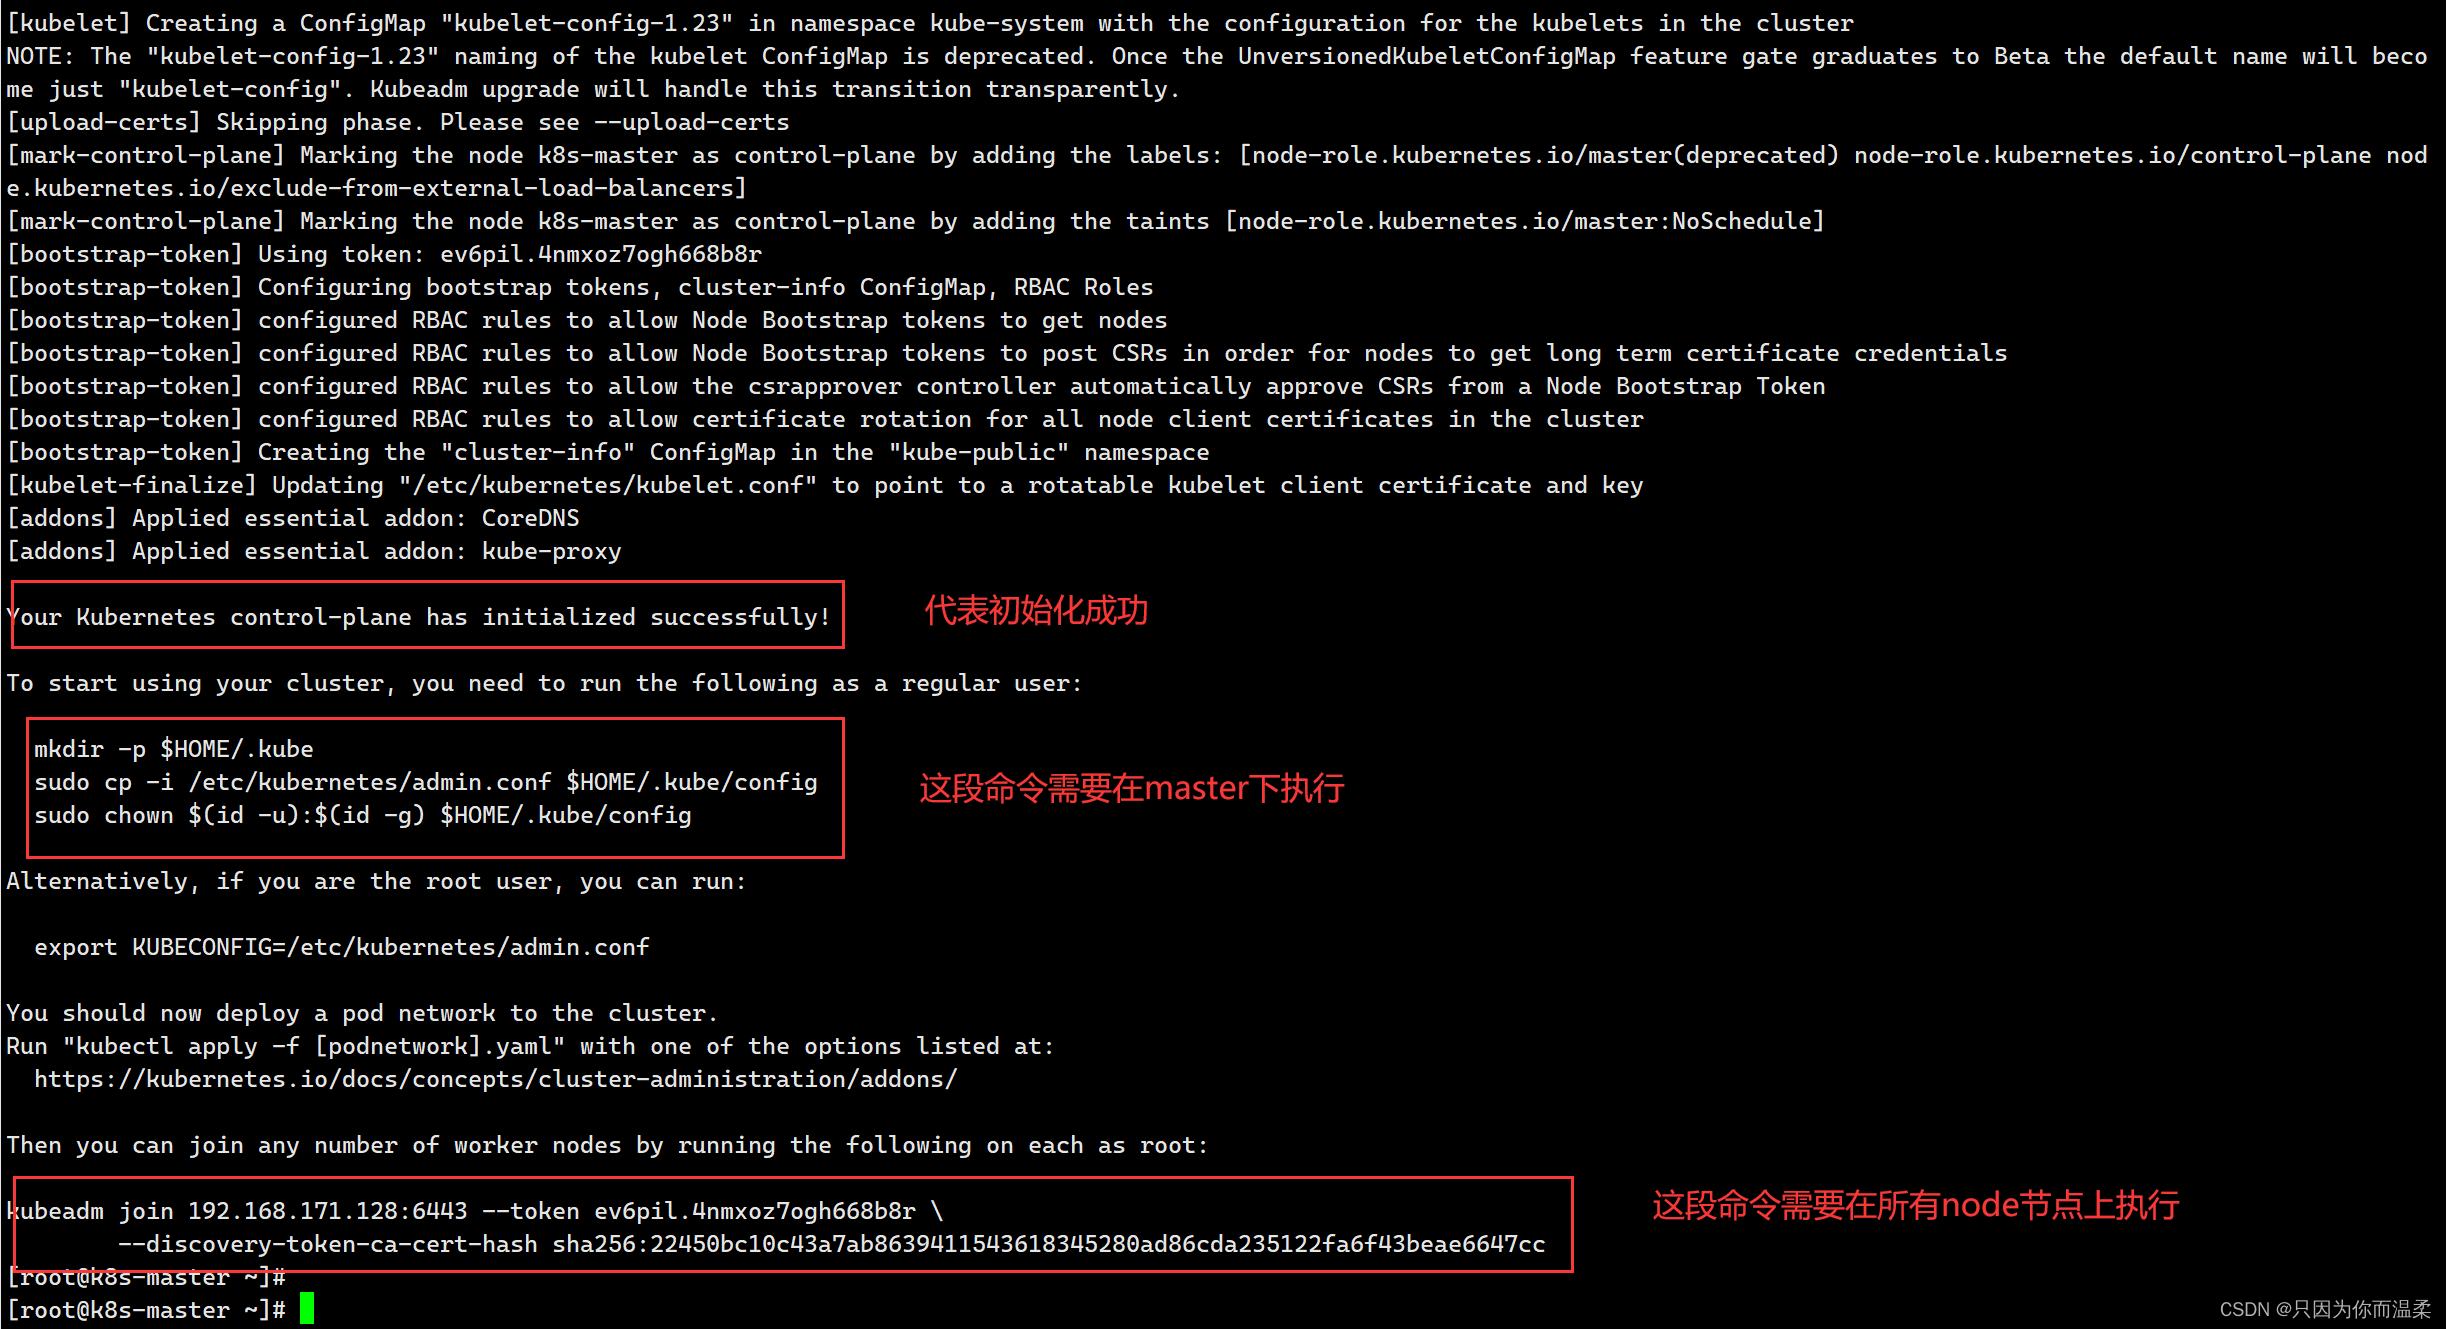
(1)Kubernetes 区域可采用 Kubeadm 方式进行安装。
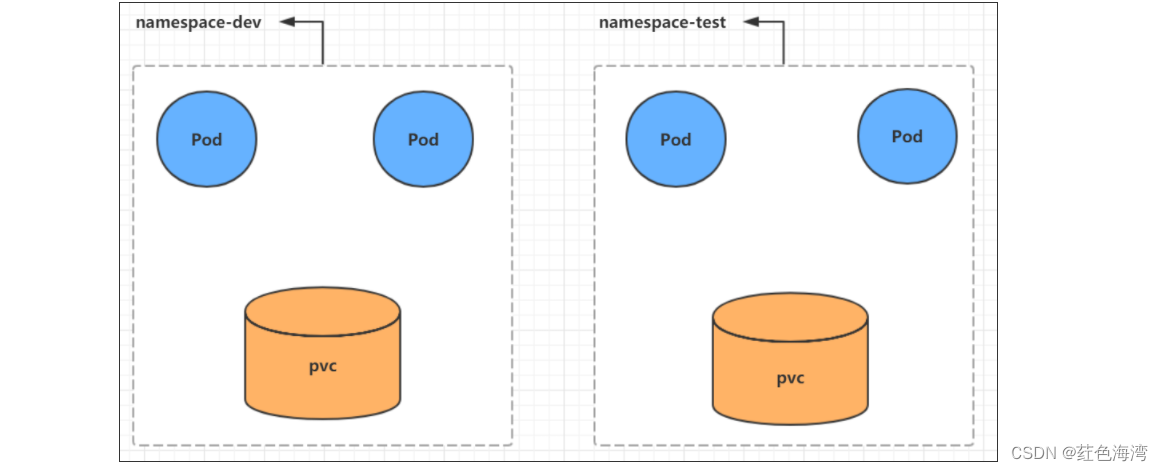
(2)要求在 Kubernetes 环境中,通过yaml文件的方式,创建2个Nginx Pod分别放置在两个不同的节点上,Pod使用动态PV类型的存储卷挂载,节点本地目录共享使用 /data,2个Pod副本测试页面二者要不同,以做区分,测试页面可自己定义。
(3)编写service对应的yaml文件,使用NodePort类型和TCP 30000端口将Nginx服务发布出去。(10分)
(4)负载均衡区域配置Keepalived+Nginx,实现负载均衡高可用,通过VIP 192.168.10.100和自定义的端口号即可访问K8S发布出来的服务。
(5)iptables防火墙服务器,设置双网卡,并且配置SNAT和DNAT转换实现外网客户端可以通过12.0.0.1访问内网的Web服务。
实验开始
Kubernetes已经搭建完成直接开始实验
master01---20.0.0.32
node01---20.0.0.34
node02---20.0.0.35
NFS挂载---20.0.0.36
nginx+keepalived1---20.0.0.20
nginx+keepalived2---20.0.0.30
iptables---20.0.0.31
客户机---20.0.0.10


master01---

vim nfs-client-rbac.yaml

apiVersion: v1
kind: ServiceAccount
metadata:
  name: nfs-client-provisioner
---
apiVersion: rbac.authorization.k8s.io/v1
kind: ClusterRole
metadata:
  name: nfs-client-provisioner-role
rules:
  - apiGroups: [""]
    resources: ["persistentvolumes"]
    verbs: ["get","list","watch","create","delete"]
  - apiGroups: [""]
    resources: ["persistentvolumeclaims"]
    verbs: ["watch","get","list","update"]
  - apiGroups: ["storage.k8s.io"]
    resources: ["storageclasses"]
    verbs: ["get","list","watch"]
  - apiGroups: [""]
    resources: ["events"]
    verbs: ["list","watch","create","update","patch"]
  - apiGroups: [""]
    resources: ["endpoints"]
    verbs: ["create","delete","get","list","watch","patch","update"]
---
apiVersion: rbac.authorization.k8s.io/v1
kind: ClusterRoleBinding
metadata:
  name: nfs-client-provisioner-bind
subjects:
- kind: ServiceAccount
  name: nfs-client-provisioner
  namespace: default
roleRef:
  kind: ClusterRole
  name: nfs-client-provisioner-role
  apiGroup: rbac.authorization.k8s.io


vim nfs-client-provisioner.yaml
#创建nfs共享目录

apiVersion: apps/v1
kind: Deployment
metadata:
  name: nfs-provisioner
  labels:
    app: nfs1
spec:
  replicas: 1
  selector:
    matchLabels:
      app: nfs1
  template:
    metadata:
      labels:
        app: nfs1
    spec:
      serviceAccountName: nfs-client-provisioner
      containers:
        - name: nfs1
          image: quay.io/external_storage/nfs-client-provisioner:latest
          volumeMounts:
          - name: nfs
            mountPath: /persistentvolumes
          env:
            - name: PROVISIONER_NAME
              value: nfs-storage
            - name: NFS_SERVER
              value: 20.0.0.36
            - name: NFS_PATH
              value: /data/volume
      volumes:
        - name: nfs
          nfs:
            server: 20.0.0.36
            path: /data/volume


vim nfs-client-storageclass.yaml

apiVersion: storage.k8s.io/v1
kind: StorageClass
metadata:
  name: nfs-client-storageclass
#匹配provisioner
provisioner: nfs-storage
#定义pv的相关属性
parameters:
  archiveOnDelete: "false"
#表示当pvc被删除之后pv的状态。有false和true两种
#如果是false。pvc如果被删除那么pv的状态将是released。可以人工调整继续使用
#如果定义是true,那么pv的状态将是Archived。表示pv将不再可用。
#一般来说都用false
reclaimPolicy: Delete
#定义pv的回收策略。reclaimPolicy定义的只支持两种retain和delete
allowVolumeExpansion: true
#pv的存储空间可以动态的扩缩容


vim pvc-pv.yaml
#创建pod并挂载pvc

metadata:
  name: nfs-pvc2
spec:
  accessModes:
    - ReadWriteMany
  storageClassName: nfs-client-storageclass
  resources:
    requests:
      storage: 2Gi

---

apiVersion: apps/v1
kind: Deployment
metadata:
  name: nginx1
  labels:
    app: nginx1
spec:
  replicas: 1
  selector:
    matchLabels:
      app: nginx
  template:
    metadata:
      labels:
         app: nginx
    spec:
      containers:
      - name: nginx1
        image: nginx:1.22
        volumeMounts:
        - name: html
          mountPath: /usr/share/nginx/html
      volumes:
      - name: html
        persistentVolumeClaim:
          claimName: nfs-pvc

---

apiVersion: apps/v1
kind: Deployment
metadata:
  name: nginx2
  labels:
    app: nginx
spec:
  replicas: 1
  selector:
    matchLabels:
      app: nginx
  template:
    metadata:
      labels:
         app: nginx
    spec:
      containers:
      - name: nginx2
        image: nginx:1.22
        volumeMounts:
        - name: html
          mountPath: /usr/share/nginx/html
      volumes:
      - name: html
        persistentVolumeClaim:
          claimName: nfs-pvc2


vim nginx-svc.yaml
#定义service使两个pod公用一个service端口

apiVersion: v1
kind: Service
metadata:
  name: nginx1-svc
spec:
  ports:
  type: NodePort
  ports:
  - port: 80
    targetPort: 80
    nodePort: 30000
  selector:
    app: nginx


NFS挂载---
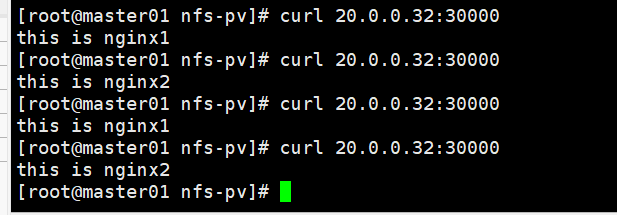
进入挂载目录创建自定义页面做区分
echo this is nginx1 > index.html
echo this is nginx2 > index.html
在master01
访问测试
开始配置nginx+keepalived实现负载均衡高可用,实现访问页面是容器内nginx的页面
nginx+keepalived1---20.0.0.20
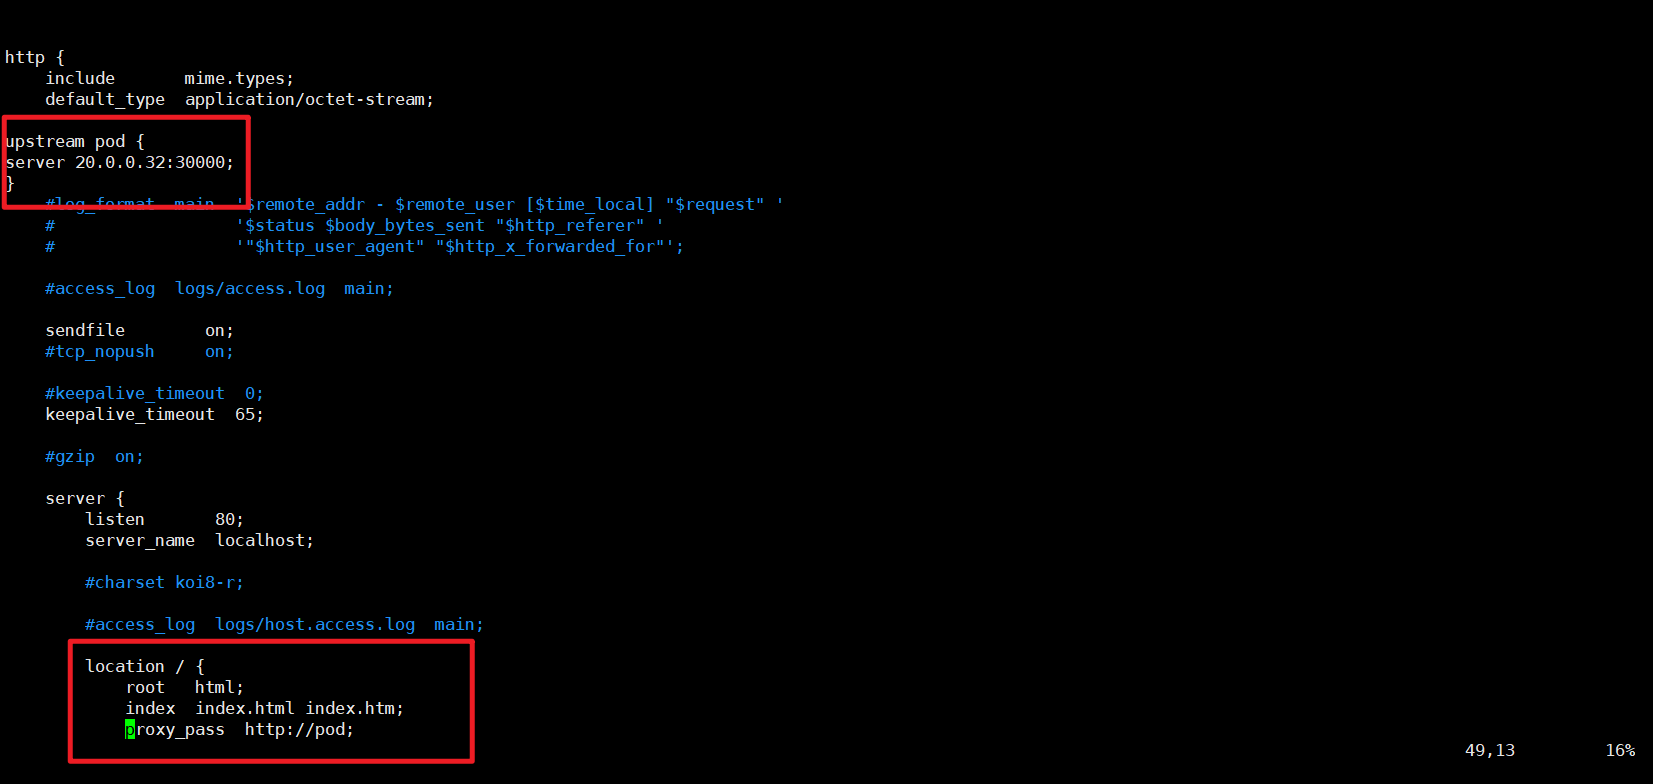
vim /usr/local/nginx/conf/nginx.conf
#配置nginx配置指定master01和端口
http {
include mime.types;
default_type application/octet-stream;
upstream pod {
server 20.0.0.32:30000;
}
server {
listen 80;
server_name localhost;
location / {
root html;
index index.html index.htm;
proxy_pass http://pod;
}
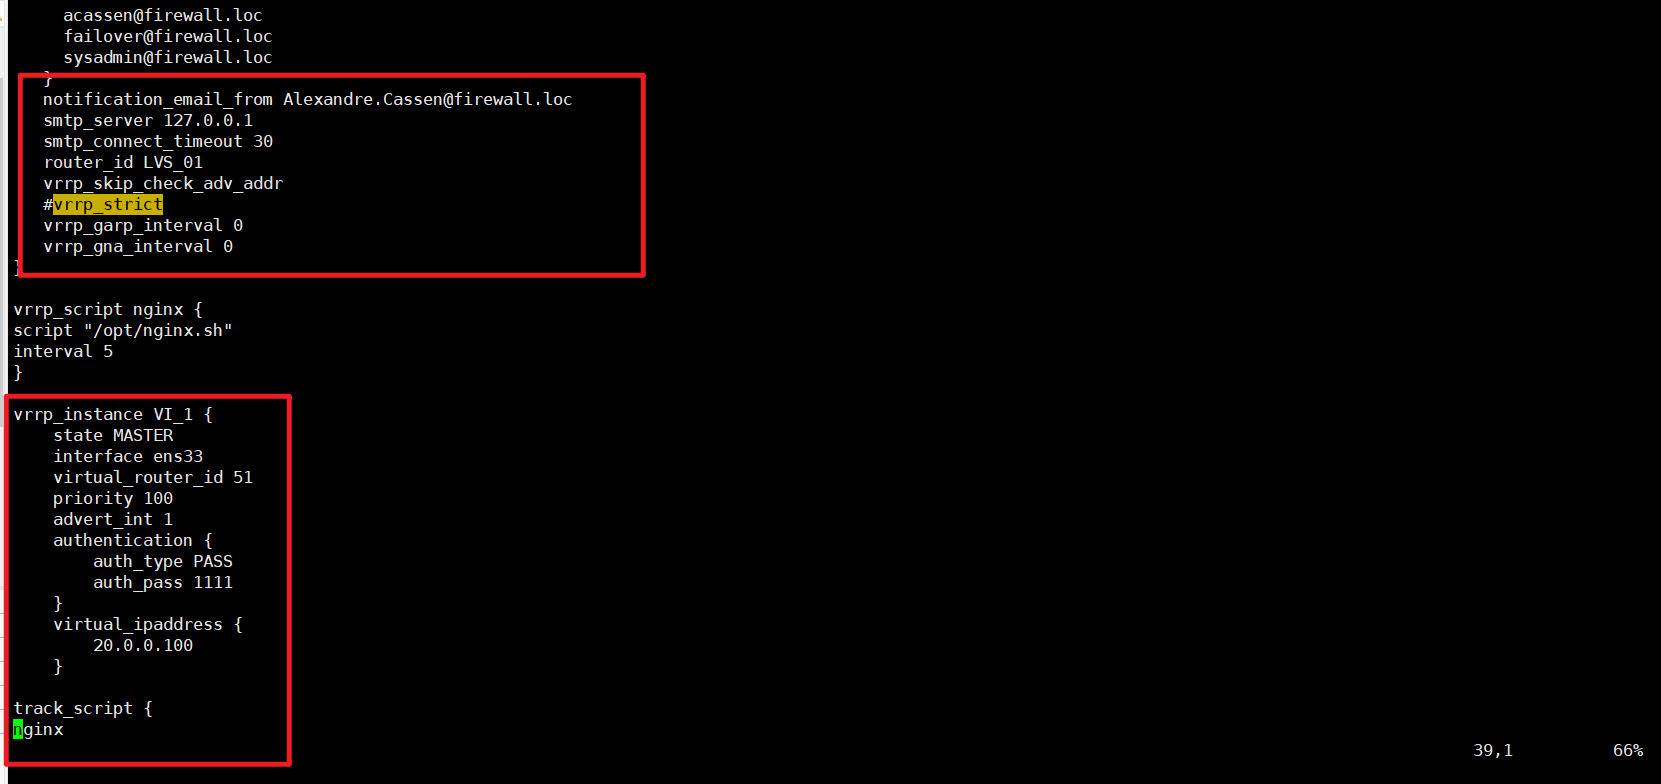
vim /etc/keepalived/keepalived.conf
#配置keepalived和VIP地址
global_defs {
notification_email {
acassen@firewall.loc
failover@firewall.loc
sysadmin@firewall.loc
}
notification_email_from Alexandre.Cassen@firewall.loc
smtp_server 127.0.0.1
smtp_connect_timeout 30
router_id LVS_01
vrrp_skip_check_adv_addr
#vrrp_strict
vrrp_garp_interval 0
vrrp_gna_interval 0
}
vrrp_script nginx {
script "/opt/nginx.sh"
interval 5
}
vrrp_instance VI_1 {
state MASTER
interface ens33
virtual_router_id 51
priority 100
advert_int 1
authentication {
auth_type PASS
auth_pass 1111
}
virtual_ipaddress {
20.0.0.100
}
track_script {
nginx
}
}
nginx+keepalived2---20.0.0.30
vim /usr/local/nginx/conf/nginx.conf
#配置nginx配置指定master01和端口
http {
include mime.types;
default_type application/octet-stream;
upstream pod {
server 20.0.0.32:30000;
}
server {
listen 80;
server_name localhost;
location / {
root html;
index index.html index.htm;
proxy_pass http://pod;
}
vim /etc/keepalived/keepalived.conf
#配置keepalived和VIP地址
global_defs {
notification_email {
acassen@firewall.loc
failover@firewall.loc
sysadmin@firewall.loc
}
notification_email_from Alexandre.Cassen@firewall.loc
smtp_server 127.0.0.1
smtp_connect_timeout 30
router_id LVS_02
vrrp_skip_check_adv_addr
#vrrp_strict
vrrp_garp_interval 0
vrrp_gna_interval 0
}
vrrp_script nginx {
script "/opt/nginx.sh"
interval 5
}
vrrp_instance VI_1 {
state MASTER
interface ens33
virtual_router_id 51
priority 90
advert_int 1
authentication {
auth_type PASS
auth_pass 1111
}
virtual_ipaddress {
20.0.0.100
}
track_script {
nginx
}
}
在nginx+keepalivd主机上测试查看VIP地址是否生成并测试页面
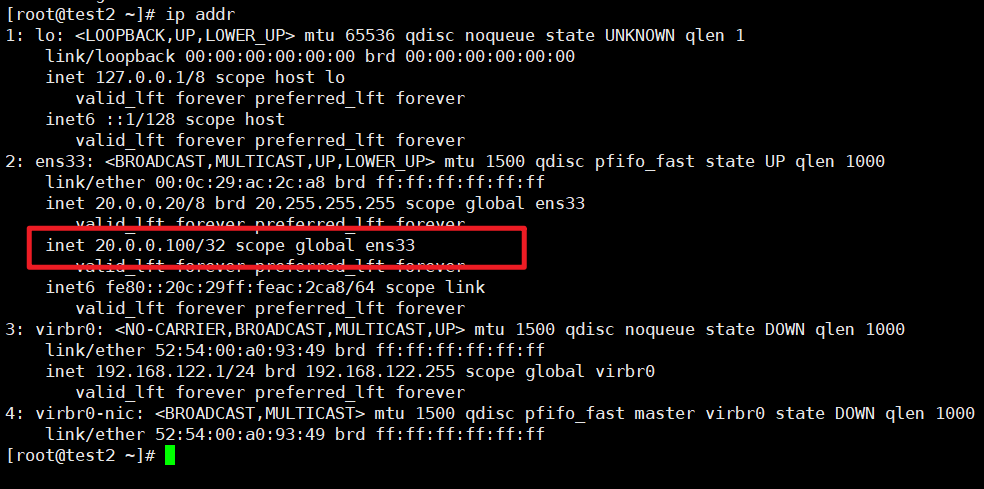

配置完成
内部访问正常
开始配置iptables地址转换
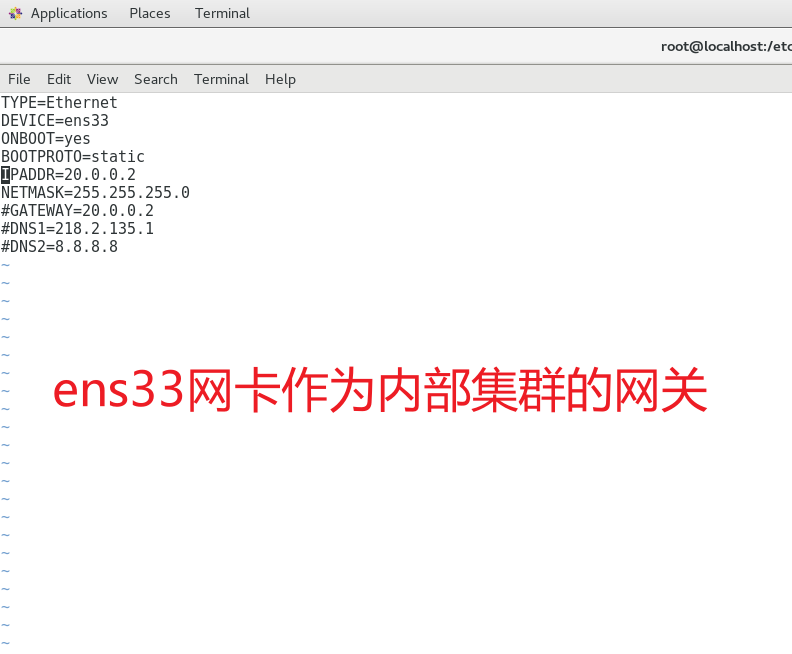
iptables---

给iptables主机上添加网卡
vim ifcfg-ens33

TYPE=Ethernet
DEVICE=ens33
ONBOOT=yes
BOOTPROTO=static
IPADDR=20.0.0.2
NETMASK=255.255.255.0
#GATEWAY=20.0.0.2
#DNS1=218.2.135.1
#DNS2=8.8.8.8

vim ifcfg-ens36

TYPE=Ethernet
DEVICE=ens36
ONBOOT=yes
BOOTPROTO=static
IPADDR=12.0.0.1
NETMASK=255.255.255.0
#GATEWAY=12.0.0.254
#DNS1=218.2.135.1
#DNS2=8.8.8.8

systemctl restart network


客户机---

vim ifcfg-ens33

TYPE=Ethernet
DEVICE=ens33
ONBOOT=yes
BOOTPROTO=static
IPADDR=12.0.0.10
NETMAS=255.255.255.0
GATEWAY=12.0.0.1
#DNS1=218.2.135.1

systemctl restart network


配置iptables
iptables---
iptables -t nat -A PREROUTING -i ens36 -p tcp --dport 80 -j DNAT --to-destination 20.0.0.100:80
iptables -t nat -A POSTROUTING -s 20.0.0.0/24 -o ens36 -j SNAT --to 12.0.0.10
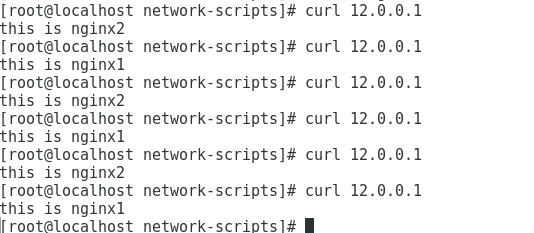
iptables -t nat -A PREROUTING -d 12.0.0.10 -i ens36 -p tcp --dport 80 -j DNAT --to 20.0.0.100:80配置完成在客户机测试访问外网地址可以访问集群内的页面
实验完成