1、需求
开发接收含颜色字符串显示到窗口,可解析字符串颜色配置窗口属性,且分割字符串显示。
mprintf(“xxxxxx”);打印的xxxxxx含有颜色配置。
2、实现方法
2.1、条件
选用Qt的PlainTextEdit控件显示字符串,配置为只读模式
初始化串口成功后,用下列代码绑定串口信号,收到数据会及时显示
connect(this->serialPort,SIGNAL(readyRead()),this,SLOT(log_serialread()));

/* readyRead()触发,接收到的数据长度是不定长的 */
/* log_serialread()是自己实现的接收函数 */
2.2、颜色配置函数
颜色规则参考链接: ANSI控制码
void logThread::display_config(const QString &text)
{

    QTextCharFormat fmt;
    QMap<QString, int> map; //颜色列表
    map["black"] = 30;  //背景色40
    map["red"] = 31;    //背景色41
    map["green"] = 32;  //背景色42
    map["yellow"] = 33; //背景色43
    map["blue"] = 34;   //背景色44
    map["magenta"] = 35;//背景色45
    map["cyan"] = 36;   //背景色46
    map["white"] = 37;  //背景色47

    QString text_style = text;
    QRegularExpression regex("\x1b\\[");
    QRegularExpression regex_else("m");
    text_style = text_style.remove(regex); //去掉\033[
    text_style = text_style.remove(regex_else); //去掉m

    QStringList list = text_style.split(";"); //用;分割属性成列表
    foreach (QString type, list) {

        if(type == "0") {
    //常规文本,清除属性
            fmt.setForeground(QBrush(QColor("black")));
            fmt.setFontWeight(50); //取消加粗
            fmt.setFontUnderline(false); //取消下划线
        }
        else if(type == "1") {
    //加粗文本
            fmt.setFontWeight(63); //63、75、87
        }
        else if(type == "4") {
    //含下划线文件
            fmt.setFontUnderline(true);
        }

        if((type.toInt() >= 30) && (type.toInt() <= 47))
        {

            QMap<QString, int>::iterator itor;
            for (itor = map.begin(); itor != map.end(); ++itor)
            {

                if(type.toInt() == itor.value()) //30 ~ 37
                {

                    fmt.setForeground(QBrush(QColor(itor.key()))); //字体色
                }
                else if((type.toInt() - 10) == itor.value()) //40 ~ 47
                {

                    fmt.setBackground(QBrush(QColor(itor.key()))); //背景色
                }
            }
        }
    }

    this->printlog_displayPlainTextEdit->mergeCurrentCharFormat(fmt);
}
2.3、log显示函数
void logThread::log_display(const QString &text)
{

    QString text_in = text;
    text_in = text_in.remove(QRegularExpression("\\r")); //去掉\r,会当做换行

    #if 0
    //将获取的数据追加在文本编辑的末尾,会导致插入的文本换行,显示会乱
    this->displayPlainTextEdit->appendPlainText(text_in);
    #else
    //虽然配置为只读,如果鼠标移动了光标,会导致当前这段数据跳到光标处显示
    this->displayPlainTextEdit->insertPlainText(text_in); //当前光标位置显示
    this->displayPlainTextEdit->moveCursor(QTextCursor::End,QTextCursor::MoveAnchor); //移动光标到最后
    #endif
}
2.4、log接收函数
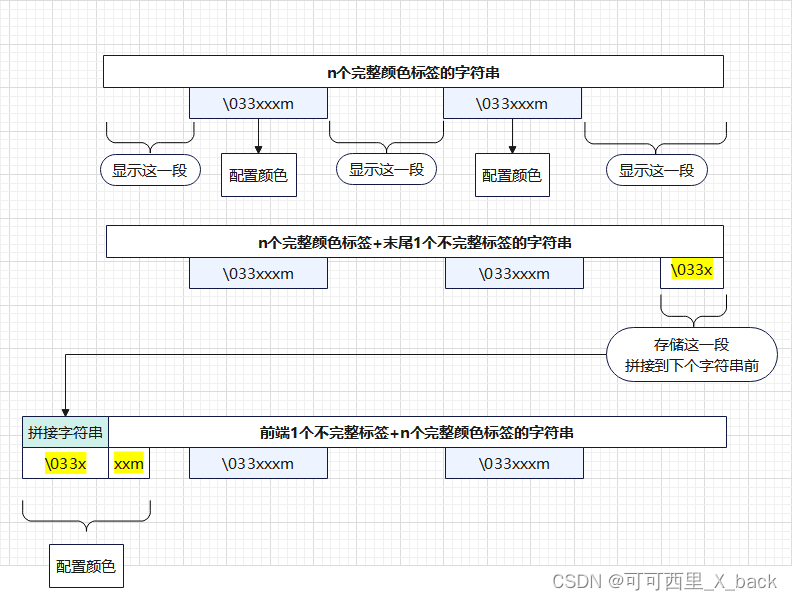
3种情况的处理规则如图:
代码实现:
void logThread::log_serialread()
{

    static QString str;
    int config_flag = 0;

    /* 每一次readyRead()触发,都把数据读完,长度不定长*/
    QString buf = QString(this->serialPort->readAll());
    int string_length = buf.length();

    if(!save_str.isEmpty()) //上一次存储的字符串不为空
    {

        buf = save_str + buf; //拼接到当前字符串前
        string_length = buf.length();
        save_str = ""; //清除存储的字符串
    }

    QRegularExpression re_esc("\x1b"); //匹配颜色标志\033
    QRegularExpressionMatchIterator j = re_esc.globalMatch(buf); //运用迭代器,可获取每个\033的位置
    int count_esc = 0;
    int last_esc_index = 0;
    while (j.hasNext()) //是否有下一个匹配结果
    {

        count_esc++; //统计\033的个数
        QRegularExpressionMatch match = j.next();; //next()指针往后移动1
        if(!(j.hasNext())) //无下一个匹配结果,记录最后一个\033的位置
        {

            last_esc_index = match.capturedStart();
        }
    }

    QRegularExpression re("\x1b\\[[0-9;]*[mGKF]"); //匹配完整颜色配置
    QRegularExpressionMatchIterator i = re.globalMatch(buf);
    QRegularExpressionMatch match_before;
    int count = 0;
    while (i.hasNext()) {

        config_flag = 1; //标志按照颜色配置分割字符串显示
        count++; //统计完整颜色配置的个数
        QRegularExpressionMatch match = i.next(); //next()指针往后移动1

        if(count == 1) //取第一个完整颜色标签之前的文字显示
        {

            if(match.capturedStart() != 0)
            {

            		//buf.left()表示从下标0往后,分割match.capturedStart()个字符
                this->log_display(buf.left(match.capturedStart()));
            }
        }
        else //取上一个标签和当前标签之间字符串显示
        {

        		 //先按上一个标签配置颜色
            this->display_config(match_before.captured());
            //buf.mid()从下标match_before.capturedEnd()往后,分割match.capturedStart() - match_before.capturedEnd()个字符
            this->log_display(buf.mid(match_before.capturedEnd(), match.capturedStart() - match_before.capturedEnd()));
        }

        if(!(i.hasNext())) //无下一个匹配结果
        {

            //按当前标签配置颜色
            this->display_config(match.captured());
            if(count_esc != count) //完整颜色标签和\033个数不一样
            {

                //取当前标签和最后的\033之间字符串显示
                this->log_display(buf.mid(match.capturedEnd(), last_esc_index - match.capturedEnd()));

                //存储不完整颜色标签(最后\033及之后的字符串)
                save_str = buf.right(string_length - last_esc_index);
            }
            else
            {

                //取末尾标签后面的所有内容显示
                this->log_display(buf.right(string_length - match.capturedEnd()));
            }
        }
        else //有下一个匹配,存储当前的
        {

            match_before = match;
        }
    }

    if(!config_flag)
    {

        this->log_display(buf);
    }
}
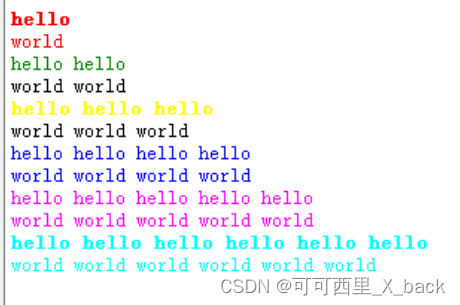
2.5、显示结果
log内容:
mprintf("\033[1;31mhello\033[0;31m\n"); //1;31m表示红色加粗,0;31m表示红色和取消加粗
mprintf("world\n");
mprintf("\033[32mhello hello\033[0m\n"); //32m表示绿色,0m表示取消颜色
mprintf("world world\n");
mprintf("\033[1;33mhello hello hello\033[0m\n"); //1;33m表示黄色加粗
mprintf("world world world\n");
mprintf("\033[34mhello hello hello hello\033[0;34m\n"); //34m表示蓝色
mprintf("world world world world\n");
mprintf("\033[35mhello hello hello hello hello\033[0;35m\n"); //35m表示紫色
mprintf("world world world world world\n");
mprintf("\033[1;36mhello hello hello hello hello hello\033[0m\n"); //36m表示青色
mprintf("world world world world world world\n");
mprintf("\033[37mhello hello hello hello hello hello hello\033[0;37m\n"); //37m表示白色
mprintf("world world world world world world world\n");
显示结果:
3、注意事项
“ \t ” 即table,直接送到显示,可能是默认的10多个空格,显示不是很好看,验证配置为8个空格可以对齐。
//设置制表符\t为8个空格
QFontMetrics metrics(this->printlog_displayPlainTextEdit->font());
int tabStopWidth = 8 * metrics.width(' ');
this->printlog_displayPlainTextEdit->setTabStopDistance(tabStopWidth);
“ \r ” 即为enter,直接送到显示,会换行,不需要多余的换行,可以用下列方法去掉。
QString text_in = "\r\n你好\r\n";
text_in = text_in.remove(QRegularExpression("\\r")); //去掉\r,会当做换行
new一个新的QSerialPort()前,一定要检查指针是否为空,关闭串口delete时,一定要将指针置为空,不然程序闪退。


![[docker] Docker 基本管理](https://img-blog.csdnimg.cn/direct/4096616faf7c493a914b355f985d70eb.png)


![[每日一题] 01.23 - 画矩形](https://img-blog.csdnimg.cn/direct/250bda83656b4502b5ffa418821fba8c.png)