目录
一、概述
随着对NX二次开发的学习,我们在各种项目里面会积累很多函数,对于一些经常用到的函数,我们可以考虑将其封装为类库,以后在开发其他新建项目时,只需将我们自己的类库添加到项目中就可以马上使用,大大提高了开发的效率。由于本人不是计算机科班出身,函数的封装不一定好,但是语法逻辑没有问题,可以正常使用。注意:个人建议采用类+命名空间的(Namespace)的方式,避免与其他人封装的函数重复,产生错误;在NX二次开发中建议各模块分类封装。
二、函数封装
UserCustomTree.h
#pragma once//防止头文件重复被引用

#ifndef USERCUSTOMTREE_H  //防止重定义
#define USERCUSTOMTREE_H

#include <NXOpen/BlockStyler_Tree.hxx>//引入头文件
#include <NXOpen/BlockStyler_TreeListMenu.hxx>
#include <NXOpen/BlockStyler_Node.hxx>
#include <NXOpen/BlockStyler_UIBlock.hxx>
#include <NXOpen/BlockStyler_PropertyList.hxx>
#include "uf_ui.h"
#include "uf_ui_ugopen.h"

using namespace std;//命名空间
using namespace NXOpen;
using namespace NXOpen::BlockStyler;

namespace LiangFuns
{
	class UserCustomTree
	{
	public:

		//打印输出信息
		static void print();
		static void print(const std::string &, bool ISEnter = true);
		static void print(const char*, bool ISEnter = true);
		static void print(const int &, bool ISEnter = true);
		static void print(const double &, bool ISEnter = true);
	};
}


#endif
UserCustomTree.cpp
#include "UserCustomTree.h"

using namespace LiangFuns;


void UserCustomTree::print()
{
	logical response = 0;
	UF_UI_is_listing_window_open(&response);
	if (!response) UF_UI_open_listing_window();
	UF_UI_write_listing_window("\n");
}
void UserCustomTree::print(const std::string &msg, bool ISEnter)
{
	logical response = 0;
	UF_UI_is_listing_window_open(&response);
	if (!response) UF_UI_open_listing_window();
	UF_UI_write_listing_window(msg.c_str());
	if (ISEnter) UF_UI_write_listing_window("\n");
}
void UserCustomTree::print(const char * msg, bool ISEnter)
{
	logical response = 0;
	UF_UI_is_listing_window_open(&response);
	if (!response) UF_UI_open_listing_window();
	UF_UI_write_listing_window(msg);
	if (ISEnter) UF_UI_write_listing_window("\n");
}
void UserCustomTree::print(const int &i, bool ISEnter)
{
	char msg[50];
	sprintf(msg, "%d", i);
	logical response = 0;
	UF_UI_is_listing_window_open(&response);
	if (!response) UF_UI_open_listing_window();
	UF_UI_write_listing_window(msg);
	if (ISEnter) UF_UI_write_listing_window("\n");
}
void UserCustomTree::print(const double &d, bool ISEnter)
{
	char msg[50];
	sprintf(msg, "%f", d);
	logical response = 0;
	UF_UI_is_listing_window_open(&response);
	if (!response) UF_UI_open_listing_window();
	UF_UI_write_listing_window(msg);
	if (ISEnter) UF_UI_write_listing_window("\n");
}
三、函数引用
1、更改配置为所有配置;字符集改为多字符集;添加封装函数路径至附加包含目录。如图1,2,3所示。
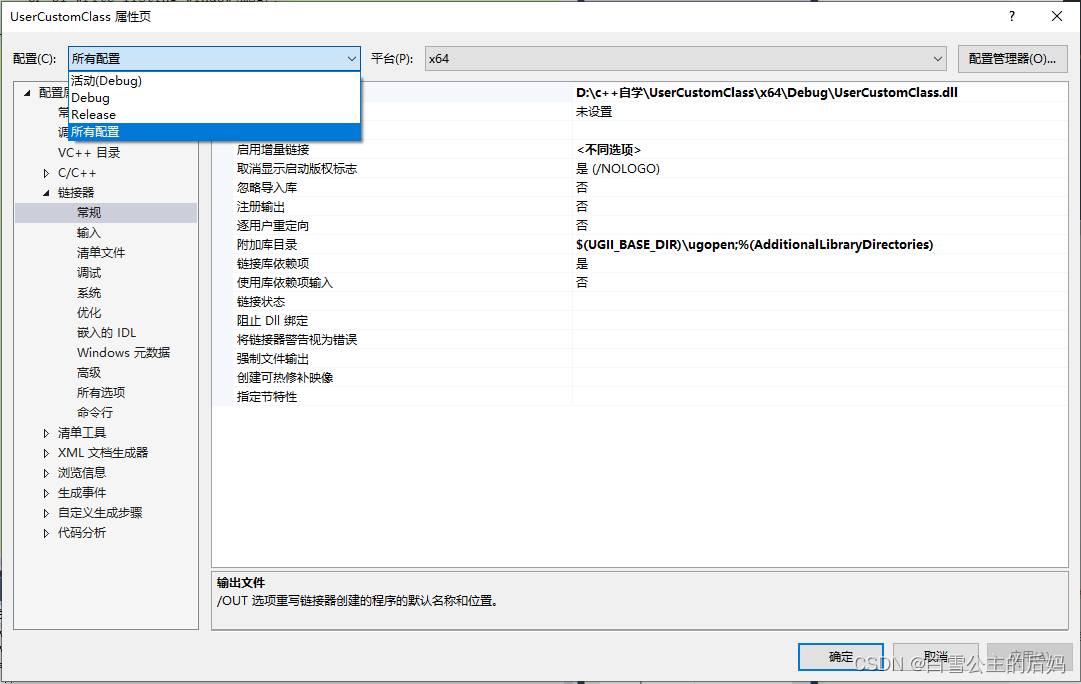
图1 修改配置选项
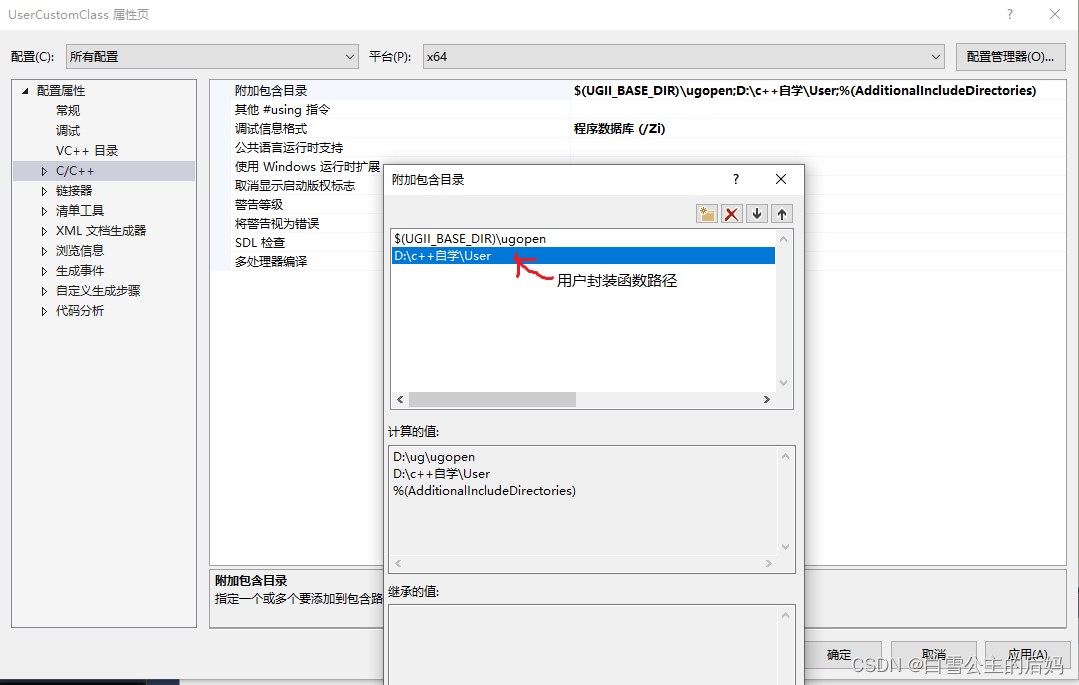
图2 添加包含目录

图3 修改字符集
2、将封装好的.h和.cpp导入到创建的筛选器中

图4 创建筛选器
3、在要引用的项目中添加#include "UserCustomTree.h"头文件
四、案例——在NX中运行后输出“测试”两字
//用户定义
#include "UserCustomTree.h"

using namespace LiangFuns;

void MyClass::do_it()
{

	// TODO: add your code here
	UserCustomTree::print("测试",1);
}
结果如下图5所示: