基于嵌入式的智能智能通风系统
功能说明
通过微信小程序控制窗户的开关状体以及倒计时开关和定时开关,小程序上实时显示当前温度湿度和光照强度。
功能展示
02智能通风系统
Mqtt服务器
- http://www.yoyolife.fun/iot:Mqtt服务器,我是在这里注册的,免费一个,之后每个2块钱每月。主要是结构简单,用起来容易。
- 下位机即ESP32要选择
mqtt地址:t.yoyolife.fun 端口:1883地址(里边有三个地址) - 微信小程序要选择
mqtt:wss地址:t.yoyolife.fun/mqtt 端口:8084地址,不可选错。 - 两边的发布和订阅要对应起来,一个发布一个订阅,跟串口的Tx、Rx一样。服务器的主题可以随意定,意为服务器要监听哪个地址。
- 设备ID即是用户名,密码即是密码。
- 调试软件为mqttx,可自行下载https://mqttx.app/zh,调试下位机的时候可以连接上边提到的微信小程序8084那个端口,即服务器地址:
wss://t.yoyolife.fun、端口:8084、Path:/mqtt、用户名即设备ID、密码即密码,然后订阅ESP32发布的那个地址,或者向ESP32订阅的那个地址发布信息。
程序思路
下位机每隔1秒发送当前状态数据,上位机改变值之后发送一次当前改变的数据。下位机接收之后再去分析是哪个数据,再去解析。
关于时间思路:接受NTP时间后,转为北京时间,然后将时间化为分钟,即小时x60+分钟。精度到分钟,然后秒等于0的话执行一次。然后上位机发送倒计时后,当前时间再加上倒计时的时间,得到一个时间A,当当前时间再走到时间A时就是倒计时结束的时间。关于定时开和定时关,也是如此,将时间化为分钟传递给下位机,下位机再获取当前时间去对比。
硬件制作
采用的是ESP32+微信小程序+Mqtt协议。
硬件选型
- ESP32开发板(VSCode+PlatformIO环境)
- DHT11温湿度传感器
- 光敏电阻
- 0.96寸OLED屏
- SG90舵机(用来开关窗户)
- 杜邦线若干
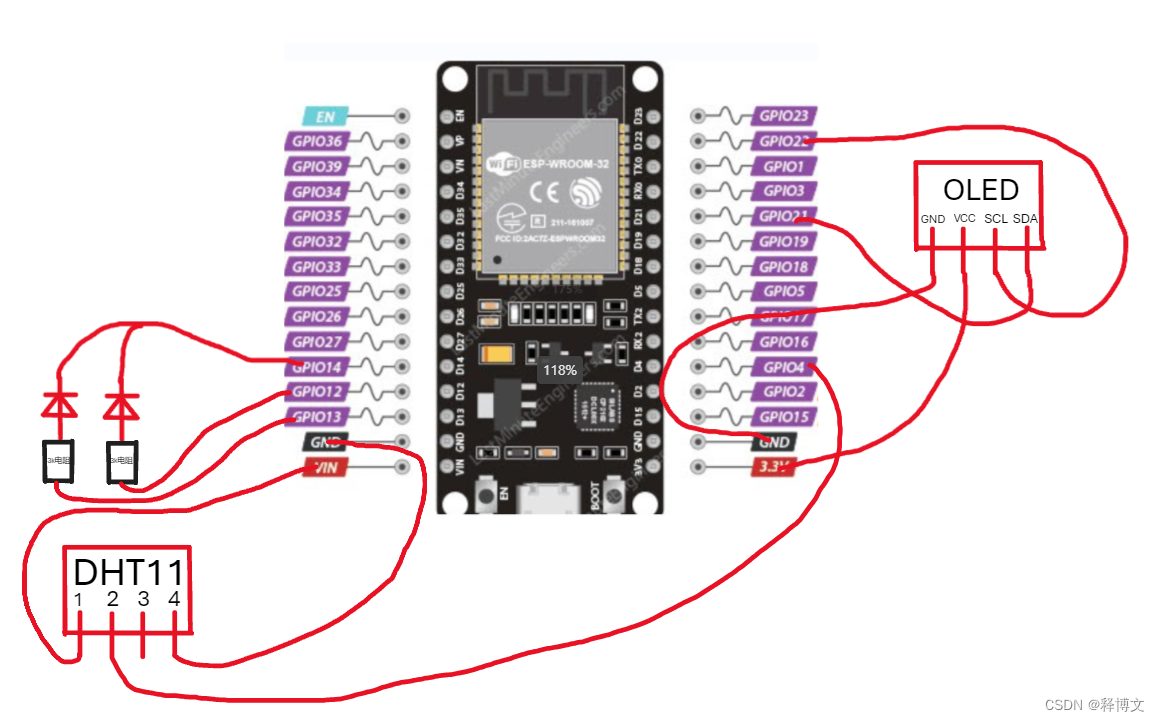
硬件连接
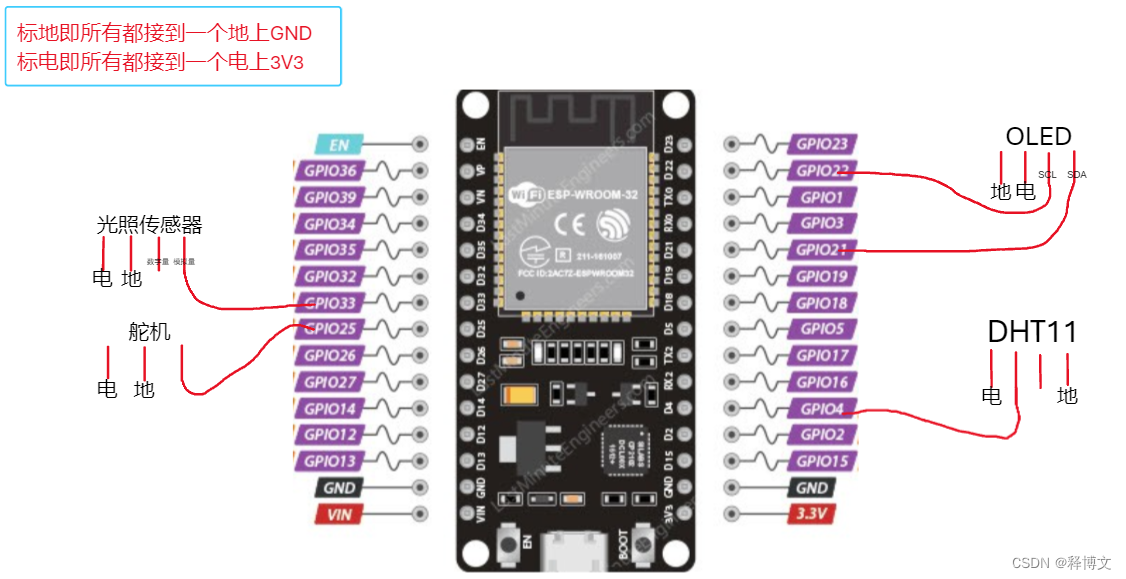
如图所示,需要注意的是光敏电阻接的是模拟位引脚,共电共地要外接可以找一排排针然后一端全部连在一起,板子3V3和GND出来后,分别插在一排上,然后需要共地和共电的地方插到排针上,注意千万要区分开来,否则短路会烧坏板子。
硬件程序
程序采用VSCode+PlatformIO环境。安装以下库
ArduinoJson库:解析Mqtt协议收发的json格式数据。DHT sensor library库:用于DHT11采集温湿度数据。NTPClient库:获取网络NTP时间。PubSubClient库:Mqtt通讯协议。U8g2库:OLED显示库。
代码展示
以下展示部分重要代码,完整完成在文章末尾。
Mqtt连接
const char *ssid = "Hide_2805";                            // ESP32连接的WiFi账号
const char *password = "asdfghjkl";                        // WiFi密码
const char *mqttServer = "t.yoyolife.fun";                 // 要连接到的服务器IP
const int mqttPort = 1883;                                 // 要连接到的服务器端口号
const char *mqttUser = "75bdfb62a1c56065949702a3a6430e38"; // MQTT服务器账号
const char *mqttPassword = "123465";                       // MQTT服务器密码
const char *mqttsub = "/iot/4432/wsy";                     // MQTT订阅主题
const char *mqttpub = "/iot/4432/waa";                     // MQTT发送主题

WiFiClient espClient;                              // 定义wifiClient实例
PubSubClient client(espClient);                    // 定义PubSubClient的实例

DynamicJsonDocument Json(1024);                    // 定义Json实例

String Debug_Mqtt = "";// Mqtt回调函数
void callback(char *topic, byte *payload, unsigned int length)
{

    String Str = "";
    Serial.print("来自订阅的主题:"); // 串口打印:来自订阅的主题:
    Serial.println(topic);           // 串口打印订阅的主题
    Serial.print("信息:");          // 串口打印:信息:
    for (int i = 0; i < length; i++) // 使用循环打印接收到的信息
    {

        Serial.print((char)payload[i]);
        Str += (char)payload[i];
    }
    Serial.println();
    Serial.println("-----------------------");

    Debug_Mqtt = Str;
    deserializeJson(Json, Str);

    if (Json.containsKey("debug"))
    {

        Debug = Json["debug"].as<unsigned char>();
    }
    // 倒计时
    if (Json.containsKey("time"))
    {

        Time = Json["time"].as<unsigned char>();
        if (Time)
            Time = Now_Time + Time;
    }

    if (Json.containsKey("open"))
    {

        Open_Time = Json["open"].as<unsigned int>();
        if(Open_Time)
            Open_State = 1;
        else
            Open_State = 0;
    }

    if (Json.containsKey("close"))
    {

        Close_Time = Json["close"].as<unsigned int>();
        if(Close_Time)
            Close_State = 1;
        else
            Close_State = 0;
        Serial.println("Close_Time");
        Serial.println(Close_Time);


    }

    if (Json.containsKey("Win_State"))
    {

        Win_State = Json["Win_State"].as<bool>();
        if (Win_State)
            Ment = true;
        else
            Ment = false;
    }

    Serial.print("Json:");      // 串口打印:来自订阅的主题:
    Serial.println(Debug_Mqtt); // 串口打印订阅的主题
}

void WiFi_Click(void)
{

    while (WiFi.status() != WL_CONNECTED) // 若WiFi接入成功WiFi.status()会返回 WL_CONNECTED
    {

        Serial.println("连接wifi中"); // 串口输出:连接wifi中
        WiFi.begin(ssid, password);   // 接入WiFi函数(WiFi名称,密码)重新连接wif
        delay(2000);                  // 若尚未连接WiFi,则进行重连WiFi的循环
    }
    Serial.println("wifi连接成功");         // 连接wifi成功之后会跳出循环,串口并输出:wifi连接成功
    client.setServer(mqttServer, mqttPort); // MQTT服务器连接函数(服务器IP,端口号)
    client.setCallback(callback);           // 设定回调方式,当ESP32收到订阅消息时会调用此方法
    while (!client.connected())             // 是否连接上MQTT服务器
    {

        Serial.println("连接服务器中");                            // 串口打印:连接服务器中
        if (client.connect("ESP32Client", mqttUser, mqttPassword)) // 如果服务器连接成功
        {

            Serial.println("服务器连接成功"); // 串口打印:服务器连接成功
        }
        else
        {

            Serial.print("连接服务器失败"); // 串口打印:连接服务器失败
            Serial.print(client.state());   // 重新连接函数
            delay(2000);
        }
    }
    client.subscribe(mqttsub);                    // 连接MQTT服务器后订阅主题
    Serial.print("已订阅主题,等待主题消息...."); // 串口打印:已订阅主题,等待主题消息
    client.publish(mqttpub, "Hello from ESP32");  // 向服务器发送的信息(主题,内容)
}

void Pub_Mqtt(void)
{

    char payload[200];
    StaticJsonDocument<200> jsonDocument; // 声明一个Json格式变量
    jsonDocument["windowstate"] = Ment;
    jsonDocument["temperature"] = Temp;
    jsonDocument["humidity"] = Humi;
    jsonDocument["light"] = Light;
    serializeJson(jsonDocument, payload);
    Serial.println(payload);
    client.publish(mqttpub, payload); // 向服务器发送的信息(主题,内容)son转换为字符串
}
主函数及时间片
// 时间片
void Time_Slice(void)
{

    if (F_Time_10ms)
    {

        F_Time_10ms = 0;
    }
    if (F_Time_100ms)
    {

        F_Time_100ms = 0;
        Display();
        Log_Print();
        // Ctrl_Motor();
        Ctrl_Window();
    }
    if (F_Time_500ms)
    {

        F_Time_500ms = 0;
        Light = analogRead(LIGHT_PIN);
        Light = 100 - (Light * 100 / 4095);
    }
    if (F_Time_2s)
    {

        F_Time_2s = 0;

        DHT11_Get();
        Pub_Mqtt();
        TimeClient.update();
        Serial.println(TimeClient.getFormattedTime());
        Hour = TimeClient.getHours();
        Min = TimeClient.getMinutes();
        Sec = TimeClient.getSeconds();
        Now_Time = Hour * 60 + Min;
    }
    if (F_Time_5s)
    {

        F_Time_5s = 0;
        Serial.print("目前时间");
        Serial.println(Now_Time);
        Serial.print("开窗时间");
        Serial.println(Open_Time);
        Serial.print("关窗时间");
        Serial.println(Close_Time);
        Serial.print("倒计时时间");
        Serial.println(Time);

    }
}
// 初始化
void setup()
{

    Sys_Init();
    U8g2_Init();
    u8g2.setCursor(0, 8);
    u8g2.print("U8g2 OK!");
    u8g2.sendBuffer();
    Serial.begin(115200); // 串口函数,波特率设置
    u8g2.setCursor(0, 8 + 12 * 1);
    u8g2.print("串口 OK!");
    u8g2.sendBuffer();
    WiFi_Click();
    u8g2.setCursor(0, 8 + 12 * 2);
    u8g2.print("WiFi OK!");
    u8g2.sendBuffer();
    Timer0_Init();
    Motor_Init();
    TimeClient.begin();
    TimeClient.setTimeOffset(28800); //+1地区偏移3600
    u8g2.setCursor(0, 8 + 12 * 3);
    u8g2.print("NTP OK!");
    u8g2.sendBuffer();
    DHT.begin();
    u8g2.setCursor(0, 8 + 12 * 4);
    u8g2.print("DHT11 OK!");
    u8g2.sendBuffer();

    delay(2000);
}
// 主函数
void loop()
{

    client.loop(); // 回旋接收函数  等待服务器返回的数据
    Time_Slice();
}
舵机控制函数
// 控制窗户
void Ctrl_Window(void)
{

    if (Open_State)
    {

        if (Open_Time == Now_Time)
        {

            Ment = true;
            Open_State = 0;
        }
    }
    if (Close_State)
    {

        if (Close_Time == Now_Time)
        {

            Ment = false;
            Close_State = 0;
        }
    }
    if (Time)
    {

        if (Time == Now_Time)
        {

            Time = 0;
            Ment = !Ment;
        }
    }
    if (Ment)
    {

        ledcWrite(2, 26);
    }
    else
    {

        ledcWrite(2, 70);
    }
}
硬件修改代码作为己用
用户如需借用代码,只需修改关键部分即可,例如Mqtt的Key、发布订阅地址,WiFi的账号密码等。
初始化修改
// 硬件宏定义
#define LED_Pin 2 // 板载LED
#define DHT11_Pin 4
#define DHTTYPE DHT11
#define LIGHT_PIN 33

#define MOTOR_A1 12 // 预留步进电机
#define MOTOR_A2 14
#define MOTOR_A3 27
#define MOTOR_A4 26

#define Lamp_Pin1 12
#define Lamp_Pin2 13
#define LED_Pin_Gnd 14
#define DuJ_Pin 25 // 开窗舵机

const char *ssid = "Hide_2805";                            // ESP32连接的WiFi账号
const char *password = "asdfghjkl";                        // WiFi密码
const char *mqttServer = "t.yoyolife.fun";                 // 要连接到的服务器IP
const int mqttPort = 1883;                                 // 要连接到的服务器端口号
const char *mqttUser = "75bdfb62a1c56065949702a3a6430e38"; // MQTT服务器账号
const char *mqttPassword = "123465";                       // MQTT服务器密码
const char *mqttsub = "/iot/4432/wsy";                     // MQTT订阅主题
const char *mqttpub = "/iot/4432/waa";                     // MQTT发送主题
callback函数中修改地方
// 倒计时
if (Json.containsKey("time"))	// 判断当前接受的是哪个字符串
{

    Time = Json["time"].as<unsigned char>();	// 做一些处理
    if (Time)
        Time = Now_Time + Time;
}
Pub_Mqtt函数中修改地方
jsonDocument["windowstate"] = Ment;// 需要发布的Json键和值
jsonDocument["temperature"] = Temp;
jsonDocument["humidity"] = Humi;
jsonDocument["light"] = Light;
微信小程序制作
软件采用的是微信开发者工具,下载软件即可使用,无需复杂环境,成品直接发布就能使用,方便快捷。
软件程序
- 引入Mqtt的js包。
- 请求获取系统地址权限,请求天气API(高德),获取当地天气。
- 请求Mqtt服务器,订阅相关地址。
- 获取接受的数据,Json解析。
- 按键像相关地址发布Json数据。
下边是具体代码。
天气数据
  getUserLocation: function () {

    let that = this;
    wx.getSetting({

      success: (res) => {

        console.log("天气", res);
        if (
          res.authSetting["scope.userLocation"] != undefined &&
          res.authSetting["scope.userLocation"] != true
        ) {

          wx.showModal({

            title: "请求授权当前位置",
            content: "需要获取您的地理位置,请确认授权",
            success: function (res) {

              if (res.cancel) {

                wx.showToast({

                  title: "拒绝授权",
                  icon: "none",
                  duration: 1000,
                });
              } else if (res.confirm) {

                wx.openSetting({

                  success: function (dataAu) {

                    if (dataAu.authSetting["scope.userLocation"] == true) {

                      wx.showToast({

                        title: "授权成功",
                        icon: "success",
                        duration: 1000,
                      });
                      //再次授权,调用wx.getLocation的API
                      that.getLocation();
                    } else {

                      wx.showToast({

                        title: "授权失败",
                        icon: "none",
                        duration: 1000,
                      });
                    }
                  },
                });
              }
            },
          });
        } else if (res.authSetting["scope.userLocation"] == undefined) {

          //调用wx.getLocation的API
          that.getLocation();
        } else {

          //res.authSetting['scope.userLocation'] == true
          //调用wx.getLocation的API
          that.getLocation();
        }
      },
    });
  },
  getLocation() {

    let that = this;
    wx.getLocation({

      type: "wgs84",
      success(res) {

        console.log("经纬度", res);
        if (res?.errMsg === "getLocation:ok") {

          /* ----------------通过经纬度获取地区编码---------------- */
          wx.request({

            url: "https://restapi.amap.com/v3/geocode/regeo?parameters",
            data: {

              key: KEY, //填入自己申请到的Key
              location: res.longitude + "," + res.latitude, //传入经纬度
            },
            header: {

              "content-type": "application/json",
            },
            success: function (res) {

              console.log("坐标转换和查询天气", res.data);
              wx.setStorageSync(
                "city",
                res.data.regeocode.addressComponent.adcode //地区编码
              );
              that.setData({

                location: res.data.regeocode.addressComponent.city +
                  " " +
                  res.data.regeocode.addressComponent.district,
              });
              wx.request({

                url: "https://restapi.amap.com/v3/weather/weatherInfo",
                data: {

                  key: KEY, //填入自己申请到的Key
                  city: res.data.regeocode.addressComponent.adcode, //传入地区编码
                },
                header: {

                  "content-type": "application/json",
                },
                success: function (weather) {

                  console.log("天气", weather.data);
                  that.setData({

                    temp: weather.data.lives[0].temperature, //温度
                    weatherText: weather.data.lives[0].weather, //天气描述 晴天 下雨天...
                    welcome: "今天的天气是 " + weather.data.lives[0].weather + ",又是爱豆的一天!", //欢迎语
                  });
                },
              });
            },
          });
        }
      },
    });
  },
Mqtt协议
  connectMqtt() {

    let that = this;
    const options = {

      connectTimeout: 4000,
      address: "t.yoyolife.fun/mqtt", //输入的地址
      port: 8084, //输入的端口号
      username: "75bdfb62a1c56065949702a3a6430e38", //输入的用户名
      password: "123465", //输入的密码
    };

    console.log("address是:", options.address);
    client = mqtt.connect(MQTTADDRESS, options); //连接

    client.on("connect", (e) => {

      console.log('连接成功');
    })

    client.on("reconnect", (error) => {

      console.log("正在重连:", error);
      wx.showToast({

        icon: "none",
        title: "正在重连",
      });
    });
    client.on("error", (error) => {

      console.log("连接失败:", error);
      wx.showToast({

        icon: "none",
        title: "mqtt连接失败",
      });
    });
    // 订阅一个主题
    let message = this.data.push;
    client.subscribe(this.data.push, {

      qos: 0
    }, function (err) {

      if (!err) {

        console.log("订阅成功", message);
        wx.showToast({

          icon: "none",
          title: "添加成功",
        });
      }
    });
    client.on("message", (topic, message) => {

      console.log("收到地址:", topic);
      console.log("收到消息:", message.toString());
      let getMessage = {
   }; //收到的消息
      try {

        getMessage = JSON.parse(message); //收到的消息转换成json对象
        console.log(getMessage);
        that.setData({

          temperature: getMessage.temperature,
          humidity: getMessage.humidity,
          light: getMessage.light,
          windowsta: getMessage.windowstate,
        })
      } catch (error) {

        console.log("JSON解析失败!");
      }
    })
  }
修改代码作为己用
用户如需借用代码,只需修改关键部分即可,例如Mqtt的Key、发布订阅地址,WiFi的账号密码等。
程序初始化
const KEY = "1acc1391bf1593cf96f258d2f9ebe552";	//注意这里是高德地图的KEY 不是Mqtt服务器的KEY

const app = getApp();
import mqtt from "../../utils/mqtt.min";		//加载的Mqtt协议的文件名
const MQTTADDRESS = "wxs://t.yoyolife.fun/mqtt"; //mqtt服务器地址
data中数据
    welcome: "你好,这里是Shiboven。",//主页显示

    push: "/iot/4432/waa", //订阅地址
    subscr: "/iot/4432/wsy", //发布地址
connectMqtt函数
    const options = {

      connectTimeout: 4000,		//重连时间
      address: "t.yoyolife.fun/mqtt", //Mqtt服务器地址
      port: 8084, //Mqtt服务器端口号
      username: "75bdfb62a1c56065949702a3a6430e38", //Mqtt用户名
      password: "123465", //Mqtt密码
    };
总结
项目本身功能简单,但是包含内容还是挺多的,扩展的话也比较容易。
项目地址:
https://download.csdn.net/download/weixin_42320020/88758864