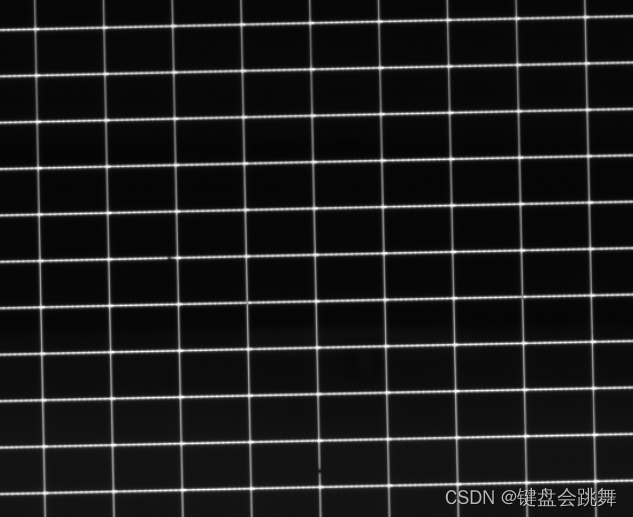
提供了直线检测python与C++版本,用于检测竖直线与横线,主要流程为:图像二值化+Canny边缘检测+霍夫直线变换直线检测
一、python实现
import shutil

import os

import cv2
import numpy as np

filename = "20230525-173637.jpg"
file_ext = ".jpg"

src_path = "./" + filename
dirpath = "./"
print(src_path)
# TODO: 在此处添加对图片的处理代码

new_filename = filename.split('.')[0] + '_result.' + file_ext

new_file_path = os.path.join(dirpath, new_filename)


img_path = src_path
 # 读取图像
img2 = cv2.imread(img_path)
img = cv2.imread(img_path,0)

lower = 25
upper = 255
 # 将图像二值化到指定范围内
binary_img = cv2.inRange(img, lower, upper)
#  # 显示结果
cv2.imshow('Binary Image', binary_img)
cv2.waitKey(0)
cv2.destroyAllWindows()


cv2.imwrite(new_file_path,binary_img)


 # 边缘检测
edges = cv2.Canny(binary_img, 50, 150, apertureSize=3)
 # 使用霍夫直线变换检测直线
lines = cv2.HoughLinesP(edges, rho=1, theta=0.5*np.pi/180, threshold=50, minLineLength=1000, maxLineGap=80)

# shutil.copy2(src_path, new_file_path)

 # 遍历所有直线,绘制竖直方向的直线
for line in lines:
    x1, y1, x2, y2 = line[0]
    # 计算直线的斜率
    # print(x2-x1)
    # k = (y2 - y1) / (x2 - x1)
    # 当斜率大于0.5时,认为是竖直方向的直线
    if x2 -x1 == 0 :
        # img = cv2.cvtColor(img, cv2.COLOR_GRAY2BGR)
        cv2.line(img2, (x1, y1), (x2, y2), (0, 0, 255), 5)
        # print(6666)

cv2.imwrite(new_file_path,img2)
二、C++实现
#include <iostream>
#include <string>
#include <opencv2/opencv.hpp>
#include <cmath>
const std::string file_ext = ".jpeg";
const int lower = 10;
const int upper = 255;
 double distance(int x1, int y1, int x2, int y2)
{

    // 计算两点直线距离
    double dx = x1 - x2;
    double dy = y1 - y2;
    return std::sqrt(dx*dx + dy*dy);
}
 int main()
{


    std::string src_path = "../1/top3.jpeg";
    // 读取图片
    // cv::Mat img = cv::imread(src_path, 0);

    cv::Mat img2 = cv::imread(src_path);

    cv::Mat img;
    cv::cvtColor(img2, img, cv::COLOR_BGR2GRAY);


    // 判断是否读取成功
    if (img.empty()) {

        std::cout << "read image failed" << std::endl;
        return -1;
    }


        // 将图像二值化到指定范围内
    cv::Mat binary_img;
    cv::inRange(img, lower, upper, binary_img);
        // 边缘检测
    cv::Mat edges;
    cv::Canny(binary_img, edges, 50, 150, 3);
        // 使用霍夫直线变换检测直线
    std::vector<cv::Vec4i> lines;
    cv::HoughLinesP(edges, lines, 1, 0.5*CV_PI/180, 50, 1000, 80);
        // 遍历所有直线,绘制竖直方向的直线

    bool ifLeft = false;
    bool iRight = false;
    for (auto line : lines)
    {

        int x1 = line[0], y1 = line[1], x2 = line[2], y2 = line[3];
        // 当斜率大于0.5时,认为是竖直方向的直线
        if (x2 - x1 == 0)
        {

            double dis = distance(x1, y1, x2, y2);
            if ((630 < x1 && x1 < 650) && (dis > 1000))
            {

                cv::line(img2, cv::Point(x1, y1), cv::Point(x2, y2), cv::Scalar(0, 0, 255), 5);
                std::cout << x1 << std::endl;

                ifLeft = true;


                // cv::imwrite(new_file_path, img2);
            }

            if ((1270 < x1 && x1 < 1290) && (dis > 1000))
            {


                cv::line(img2, cv::Point(x1, y1), cv::Point(x2, y2), cv::Scalar(0, 0, 255), 5);
                std::cout << x1 << std::endl;

                iRight = true;

            }
        }

    }

    // cv::imshow("image", img2);
    // cv::waitKey(0);

    if( ifLeft && iRight){

        std::cout << 2 << std::endl;
        return 2;
        }

    if( ifLeft && !iRight){

        std::cout << 1 << std::endl;
        return 1;
        }
    std::cout << 0 << std::endl;
    return 0;
    cv::imshow("image", img2);
    cv::waitKey(0);
}
cmake
# For more information about using CMake with Android Studio, read the
# documentation: https://d.android.com/studio/projects/add-native-code.html

# Sets the minimum version of CMake required to build the native library.
project("linedetector")
cmake_minimum_required(VERSION 3.4.1)

# Declares and names the project.


set(CMAKE_C_FLAGS "${CMAKE_C_FLAGS} -fexceptions")
set(CMAKE_CXX_FLAGS "${CMAKE_CXX_FLAGS} -fexceptions" )


# 添加opencv
set(thirdPath ${CMAKE_SOURCE_DIR}/thirdParty)
set(OPENCV_ANDROID_SDK_PATH ${thirdPath}/opencv/)
include_directories(${OPENCV_ANDROID_SDK_PATH}/native/jni/include)
add_library(opencv
        SHARED
        IMPORTED)
set_target_properties(opencv
        PROPERTIES
        IMPORTED_LOCATION
        ${OPENCV_ANDROID_SDK_PATH}/native/libs/${ANDROID_ABI}/libopencv_java3.so)

# 添加自定义文件
set(INTERFACE_SRC ${CMAKE_SOURCE_DIR}/src/main/cpp)
include_directories(${INTERFACE_SRC}/)

file(GLOB_RECURSE INTERFACE_SRC
        ${INTERFACE_SRC}/linedetector.cpp

        )

add_library(linedetector SHARED ${INTERFACE_SRC})


find_library( # Sets the name of the path variable.
        log-lib

        # Specifies the name of the NDK library that
        # you want CMake to locate.
        log)

# Specifies libraries CMake should link to your target library. You
# can link multiple libraries, such as libraries you define in this
# build script, prebuilt third-party libraries, or system libraries.

target_link_libraries( # Specifies the target library.
        linedetector
        opencv
        jnigraphics

        # Links the target library to the log library
        # included in the NDK.
        ${log-lib})
编译运行:
mkdir build
cd build
cmake ..
make
./linedetector


![[<span style='color:red;'>python</span>]<span style='color:red;'>基于</span><span style='color:red;'>opencv</span>实现<span style='color:red;'>的</span>车道线<span style='color:red;'>检测</span>](https://img-blog.csdnimg.cn/direct/8ec3bf45b4f04ab8b7fedc054c530b39.jpeg)