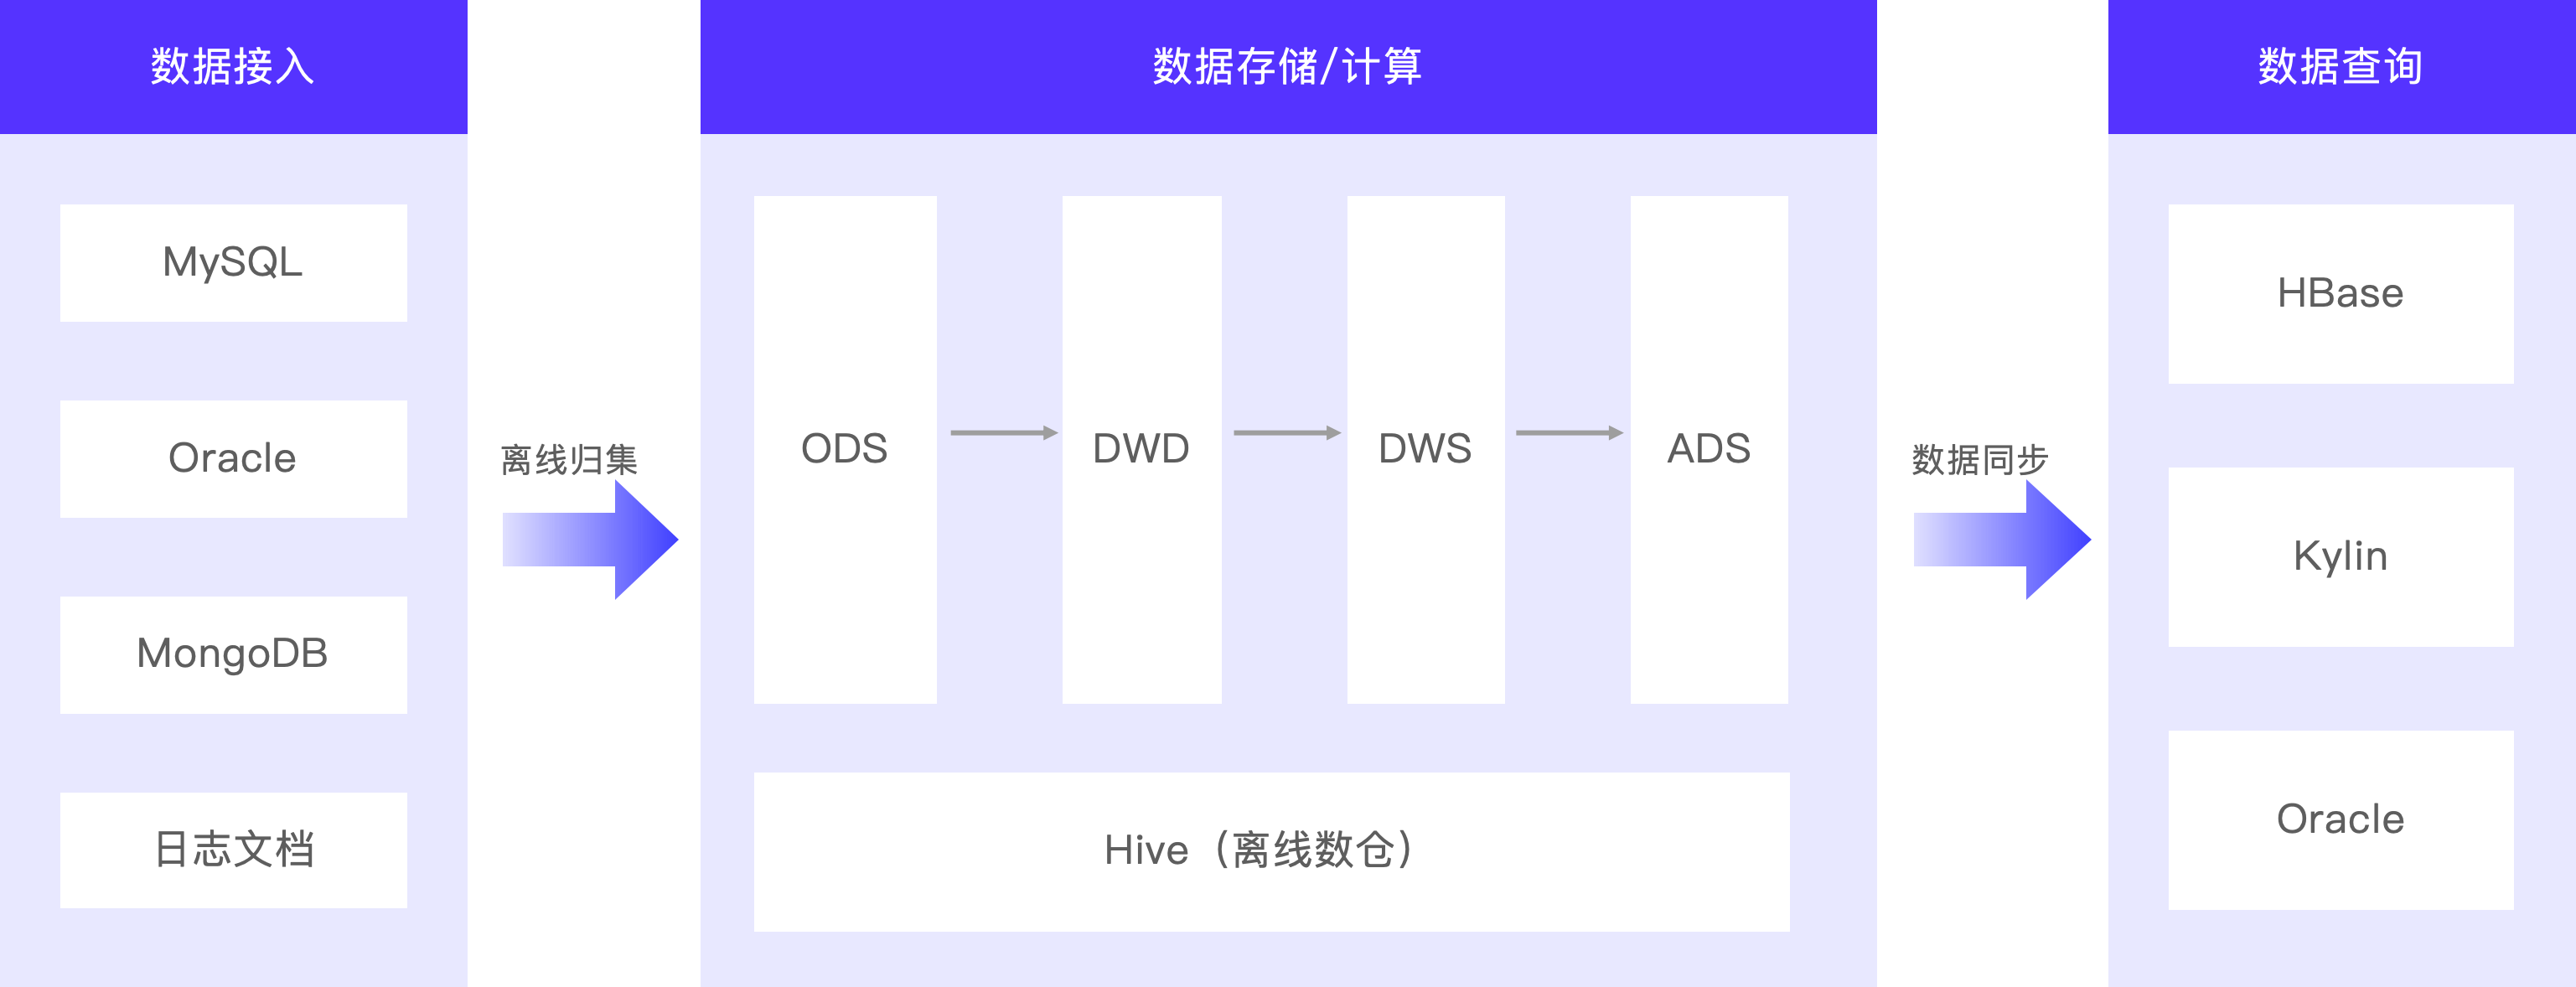
windows中安装Apache http server(httpd-2.4.58-win64-VS17)
1、下载windows版本的的httpd,
https://httpd.apache.org/docs/current/platform/windows.html#down
这里选择的是Apache Lounge编译的版本
https://www.apachelounge.com/download/
2、解压到指定目录,这里解压到D盘根目录,得到D:\Apache24
3、修改配置文件http.conf
# 服务的根目录(根据实际情况修改)
Define SRVROOT "D:/Apache24"
# 需要监听的端口(根据需要修改)
Listen 80
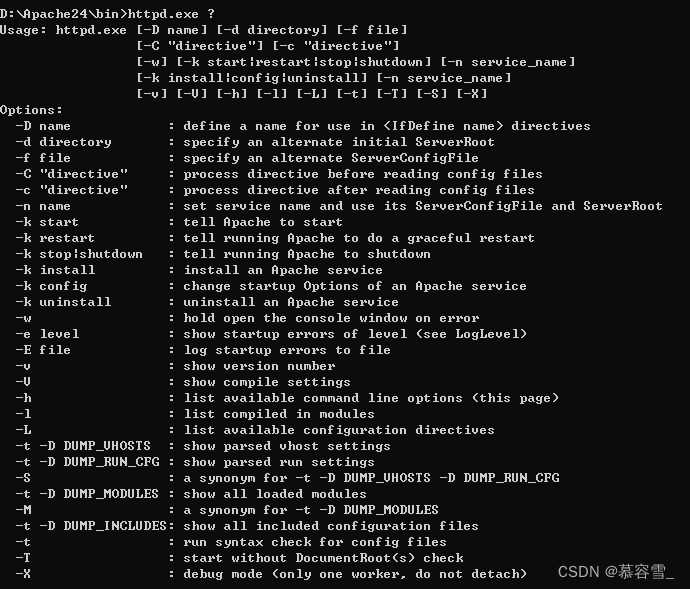
4、修改之后,检测配置文件是否有语法错误
# 检测配置文件语法是否有错误
httpd.exe -t

语法OK,至于ServerName的问题可以暂时不处理。
6、注册服务,根据命令提示注册windows服务
# 注册服务,默认服务名为Apache2.4
httpd.exe -k install
# 卸载服务,默认卸载服务名为Apache2.4
httpd.exe -k uninstall

# 注册服务,指定服务名
httpd.exe -k install -n Httpd2.4
# 卸载服务,指定服务名
httpd.exe -k uninstall -n Httpd2.4
7、启动服务
使用命令启动服务,或者打开服务管理窗口启动服务
# 使用net命令启动服务
net start Apache2.4
8、使用浏览器,查看
It works!
表示服务安装、运行正常。
9、部署前端项目、设置vhosts,编辑conf\extra\httpd-vhosts.conf。根据项目需要设置自己的VirtualHost。
<VirtualHost *:80>
    DocumentRoot D:/Apache24/dist
    ServerName 192.168.0.44
    <Directory D:/Apache24/dist>
        RewriteEngine on
        RewriteCond %{
   REQUEST_FILENAME} !-f
        RewriteCond %{
   REQUEST_FILENAME} !-d
        RewriteRule . index.html [L]
        SetOutputFilter DEFLATE
        Options FollowSymLinks
        AllowOverride All
        Require all granted
        DirectoryIndex index.php index.html index.htm default.php default.html default.htm
    </Directory>
    ProxyRequests off
    ProxyPass /prod-api http://192.168.0.44:8097
    ProxyPassReverse /prod-api http://192.168.0.44:8097
</VirtualHost>
# 在主配置文件httpd.conf中把引入httpd-vhosts.conf文件的注释去掉
# Virtual hosts
Include conf/extra/httpd-vhosts.conf
10、处理异常问题
此时重启服务,发现服务是无法启动的,我们再使用httpd.exe -t,检测一下配置文件,根据提示解决问题
①RewriteEngine on,开启了重写引擎,需要引入相关模块

在主配置文件httpd.conf中搜索关键词,把重写模块引入进来
# 把注释去掉
LoadModule rewrite_module modules/mod_rewrite.so
②vhost中使用了反向代理,需要把代理模块引入进来

在主配置文件httpd.conf中引入代理请求模块
# 把注释去掉
LoadModule proxy_module modules/mod_proxy.so
# 引入上述两个模块后,服务可以正常启动了,但是仍不能完成代理请求工作,项目是http请求,所以还需要把http这个子模块引入进来
LoadModule proxy_http_module modules/mod_proxy_http.so
11、访问项目,查看运行情况。
12、隐藏Httpd版本信息和操作系统信息
可以在\conf\extra中新建一个httpd-servertokens.conf配置文件,从httpd-default.conf中把ServerTokens的信息复制过来。
并修改为ServerTokens Prod。之后在主配置文件中引入该文件,并重启服务。
#
# ServerTokens
# This directive configures what you return as the Server HTTP response
# Header. The default is 'Full' which sends information about the OS-Type
# and compiled in modules.
# Set to one of:  Full | OS | Minor | Minimal | Major | Prod
# where Full conveys the most information, and Prod the least.
#
ServerTokens Prod
# ServerTokens
Include conf/extra/httpd-servertokens.conf
小尾巴~~
只要有积累,就会有进步


![[Kubernetes]9. K8s ingress讲解借助ingress配置http,https访问k8s集群应用](https://img-blog.csdnimg.cn/direct/103b811397b8408a8d0e0f42def2d89d.png)