Python的cryptography是密码库,源码地址为:https://github.com/pyca/cryptography,最新发布版本为41.0.7,license为Apache 2.0/BSD 3,它支持在Windows、Linux、macOS上使用。如果通过源码编译,需要依赖OpenSSL。Python版本需要为3.7+.
通过pip安装,执行:
pip install cryptography以下是对称加密AES测试code:
关于OpenSSL AES GCM的介绍可以参考:https://blog.csdn.net/fengbingchun/article/details/106113185
import os
from cryptography.hazmat.primitives.ciphers import Cipher, algorithms, modes
def aes_gcm_encrypt(plain_text, key, iv, aad):
# Construct an AES-GCM Cipher object with the given key and iv
encryptor = Cipher(algorithms.AES(key), modes.GCM(iv),).encryptor()
# associated_data will be authenticated but not encrypted, it must also be passed in on decryption
encryptor.authenticate_additional_data(aad)
# Encrypt the plaintext and get the associated ciphertext. GCM does not require padding
cipher_text = encryptor.update(plain_text) + encryptor.finalize()
return (cipher_text, encryptor.tag)
def aes_gcm_decrypt(cipher_test, key, iv, aad, tag):
# Construct a Cipher object, with the key, iv, and additionally the GCM tag used for authenticating the message
decryptor = Cipher(algorithms.AES(key), modes.GCM(iv, tag),).decryptor()
# We put associated_data back in or the tag will fail to verify when we finalize the decryptor
decryptor.authenticate_additional_data(aad)
# Decryption gets us the authenticated plaintext. If the tag does not match an InvalidTag exception will be raised
return decryptor.update(cipher_test) + decryptor.finalize()
if __name__ == "__main__":
# reference: https://cryptography.io/en/latest/hazmat/primitives/symmetric-encryption/
plain_test = b"https://github.com/fengbingchun"
key = os.urandom(32) # bytes, secret key: either 128, 192, or 256 bits long
iv = os.urandom(12) # bytes, initialisation vector
aad = os.urandom(16) # authenticated encryption with additional data
print("key: {}\niv: {}\naad: {}\n".format(key, iv, aad))
cipher_text, tag = aes_gcm_encrypt(plain_test, key, iv, aad)
print("cipher text: {}\ntag: {}\n".format(cipher_text, tag))
plain_test2 = aes_gcm_decrypt(cipher_text, key, iv, aad, tag)
print("before encryption, plaintext:{}\nafter decryption, plaintext:{}".format(plain_test, plain_test2))
if plain_test != plain_test2:
print("Error: the decrypted content does not match the original plaintext")
raise
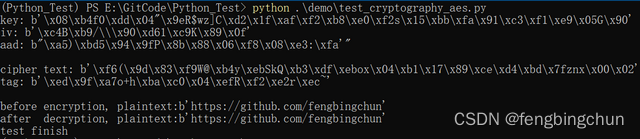
print("test finish")执行结果如下图所示:
以下是非对称加密RSA测试code:
关于OpenSSL RSA的介绍可以参考:https://blog.csdn.net/fengbingchun/article/details/43638013
通过openssl执行文件生成rsa公钥-私钥对文件rsa_private.pem,密钥对长度为3072,执行如下命令:
openssl.exe genrsa -out rsa_private.pem 3072from cryptography.hazmat.primitives.asymmetric import rsa, padding
from cryptography.hazmat.primitives import serialization, hashes
def rsa_public_key_encrypt(plain_text, public_key):
return public_key.encrypt(
plain_text,
padding.OAEP(
mgf=padding.MGF1(algorithm=hashes.SHA256()),
algorithm=hashes.SHA256(),
label=None
)
)
def rsa_private_key_decrypt(cipher_test, private_key):
return private_key.decrypt(
cipher_test,
padding.OAEP(
mgf=padding.MGF1(algorithm=hashes.SHA256()),
algorithm=hashes.SHA256(),
label=None
)
)
if __name__ == "__main__":
# reference: https://cryptography.io/en/latest/hazmat/primitives/asymmetric/rsa/
plain_test = b"https://blog.csdn.net/fengbingchun/"
with open("test_data/rsa_private.pem", "rb") as key_file:
private_key = serialization.load_pem_private_key(key_file.read(), password=None,)
pem = private_key.private_bytes(
encoding=serialization.Encoding.PEM,
format=serialization.PrivateFormat.TraditionalOpenSSL,
encryption_algorithm=serialization.NoEncryption()
)
#print("private key: {}\n".format(pem.splitlines()))
public_key = private_key.public_key()
pem = public_key.public_bytes(
encoding=serialization.Encoding.PEM,
format=serialization.PublicFormat.SubjectPublicKeyInfo
)
#print("public key: {}\n".format(pem.splitlines()))
cipher_text = rsa_public_key_encrypt(plain_test, public_key)
print("cipher text:{}\n".format(cipher_text))
plain_test2 = rsa_private_key_decrypt(cipher_text, private_key)
print("before encryption, plaintext:{}\nafter decryption, plaintext:{}".format(plain_test, plain_test2))
if plain_test != plain_test2:
print("Error: the decrypted content does not match the original plaintext")
raise
print("test finish")执行结果如下图所示: