英文在日常生活中已经随处可见,我们一般中英互译需要使用专业的翻译软件来实现。但如果我们在输入法中,在输入中文的时候,可以顺便瞟一眼对应的英文词汇,或者在输入英文的时候可以顺便了解对应的中文词汇,那将为我们的日常办公带来极大的便利。
我们在 rime中州韵小狼毫 easyEnglish 输入法 一文中为 rime中州韵小狼毫输入法配置了 easyEnglish 输入方案。本文就以 五笔・拼音 输入方案和 easyEnglish 输入方案为例,通过使用 rime中州韵小狼毫 输入法的滤镜功能,来实现中英互译的功能。
dic_4w_en.txt
为了英文向中文的映射,我们需要一个 dic_4w_en.txt 文档,这是一个"表",这个表记录着英文词汇向中文词汇的映射关系,截取显示如下👇:
aar	【Aar】n.阿尔河
aardvark	【aardvark】n.土豚;土猪
aardwolf	【aardwolf】n.土狼
aaron	【Aaron】n.艾伦
aaronic	【Aaronic】adj.亚伦的
dic_4w_en.txt文档中共有两列内容,第一列是英文单词,第二列是对应的中文释义,中间以tab制表符分隔。
原则上来说,第一列和第二列的长度是不限制的,但为了在输入法中显示不至于凌乱,第二列的释义内容不易过长。在下面的脚本中,第二列的长度会被限制在100字符内。
dic_4w_cn.txt
同样,为了中文向英文的映射,我们亦需要一个 dic_4w_cn.txt 文档来记录中文词汇向英文词汇的映射关系,截取显示如下👇:
阿尔河	aar(n.);
土豚	aardvark(n.);
土猪	aardvark(n.);
土狼	aardwolf(n.);
艾伦	aaron(n.);
亚伦	aaronic(adj.);
实际上,dic_4w_en.txt 文档和 dic_4w_cn.txt 文档是互反的。
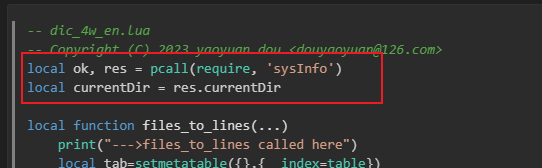
dic_4w.lua
有了 dic_4w_en.txt 文档和 dic_4w_cn.txt 文档,还不能在输入法中使用,我们需要通过 dic_4w.lua 脚本将 dic_4w_en.txt 文档和 dic_4w_cn.txt 文档中的内容进行加载整理,以使其可以在 lua 程序中进行索引。
dic_4w.lua 脚本的内容如下👇:
-- dic_4w_en.lua
-- Copyright (C) 2023 yaoyuan.dou <douyaoyuan@126.com>
local ok, res = pcall(require, 'sysInfo')
local currentDir = res.currentDir

local function files_to_lines(...)
	print("--->files_to_lines called here")
	local tab=setmetatable({
   },{
   __index=table})
	local index=1
	for i,filename in next,{
   ...} do
		local fn = io.open(filename)
		if fn then
			for line in fn:lines() do
				if not line or #line > 0 then
					tab:insert(line)
				end
			end
			fn:close()
		end
	end

	print("--->files_to_lines completed here")
	return tab
end

local function dictload(...) -- filename)
	print("-->dictload called here")

	local lines=files_to_lines(...)
	local dict={
   }
	for i,line in next ,lines do
		if not line:match("^%s*#") then  -- 第一字 # 为注释行
			local key,val = string.match(line,"(.+)\t(.+)")
			if nil ~= key then
				--此处,相同的key,后加载的内容将覆盖前面加载的内容
				dict[key] = val
			end
		end
	end

	print("-->dictload completed here")
	return dict
end

--   Module
local M={
   }
local dict={
   }
local function getVal(s)
  return dict[s]
end

function M.init(...)
	print("-> M.init called here")

	local files={
   ...}
	--以下files文件的顺序,后面的内容优先级高于前面的,
	--即后面文件中同一key的value将覆盖前面文件内同一key的value
	--文件名不支持中文
	table.insert(files,"dic_4w_cn.txt")
	table.insert(files,"dic_4w_en.txt")

	for i,v in next, files do
		files[i] = currentDir().."/".. v
	end
	dict= dictload(table.unpack(files))

	M.getVal=getVal
	print("->M.init completed here")
end

M.init()

return M
👆以上 lua 脚本中,我们把 dic_4w_en.txt 文档和 dic_4w_cn.txt 文档内的内容进行了根据 tab 制表符进行切割,第一列的内容为键,第二列的内容为值,最终将这些内容整理成了字典对象 dict,然后脚本提供了一个 getVal 方法,该方法以入参为键,尝试在 dict 字典中查找对应该键的值,并返回。如果查找不到这个键的值,则返回 nil。
dic_4w_Filter.lua
dic_4w.lua 脚本将 dic_4w_en.txt 文档和 dic_4w_cn.txt 文档内的词条整理成了 lua 程序的字典对象 dict,并提供了查找的方法 getVal。接下来我们在 dic_4w_Filter.lua 脚本中将 dic_4w.lua 脚本提供的 getVal 方法封装成 rime 滤镜方法。
dic_4w_Filter.lua脚本内容如下👇:
-- spaceAppending.lua
-- Copyright (C) 2023 yaoyuan.dou <douyaoyuan@126.com>
local ok, res = pcall(require, 'dic_4w')
local getVal = res.getVal
local ok, utf8String = pcall(require, 'utf8String')
--最长的comment长度限制
local maxLenOfComment = 100
local function dic_4w_Filter(input, env)
--获取中英对照开关状态
local on = env.engine.context:get_option("encnDic")
for cand in input:iter() do
if on then
local candTxt = cand.text:gsub("%s","") or ""
local thisComment = cand.comment
if candTxt ~= "" then
--获取字典释义
thisComment = getVal(candTxt)
if nil == thisComment then
thisComment = cand.comment
else
--成功获取了释义,下面进行一些格式化处理
--替换 <br> 为换行符
thisComment = thisComment:gsub("<br>","\r")
--替换   为空格
thisComment = thisComment:gsub(" "," ")
--需要限制释义长度为 maxLenOfComment
thisComment = string.sub(thisComment, 1, maxLenOfComment)
--去除首尾空格 和 符号
thisComment = utf8String.utf8PunctuationsTrim(thisComment)
end
if cand.comment ~= "" then
if thisComment ~= cand.comment then
if utf8.len(cand.comment) < 5 then
if '💡'==cand.comment then
thisComment = cand.comment..thisComment
else
thisComment = cand.comment..'✔'..thisComment
end
else
thisComment = cand.comment..'\r'..thisComment
end
end
end
end
cand:get_genuine().comment = thisComment
end
yield(cand)
end
end
return dic_4w_Filter
sysInfo.lua
在以上👆的 dic_4w.lua 脚本中, 我们发现其引用了一个 sysInfo 的外部脚本,如下👇:
sysInfo.lua 脚本文档提供了一些系统信息获取的方法,脚本内容如下👇:
local M={
   }
local dbgFlg = false

--设置 dbg 开关
M.setDbg = function(flg)
	dbgFlg = flg
	print('sysInfo dbgFlg is '..tostring(dbgFlg))
end

M.homePath = function()
	return os.getenv("HOMEPATH")
end

M.computerName = function()
	return os.getenv("COMPUTERNAME")
end

M.userName = function()
	return os.getenv("USERNAME")
end

M.osName = function()
	return os.getenv("OS")
end

M.NUMBER_OF_PROCESSORS = function()
	return os.getenv("NUMBER_OF_PROCESSORS")
end

M.PROCESSOR_IDENTIFIER = function()
	return os.getenv("PROCESSOR_IDENTIFIER")
end

M.PROGRAMDATA = function()
	return os.getenv("PROGRAMDATA")
end
M.PROGRAMFILES = function()
	return os.getenv("PROGRAMW6432")
end
M.PROGRAMFILESx86 = function()
	return os.getenv("PROGRAMFILES(X86)")
end
M.APPDATA = function()
	return os.getenv("APPDATA")
end
M.WINDIR = function()
	return os.getenv("WINDIR")
end
M.COMMONPROGRAMFILES = function()
	return os.getenv("COMMONPROGRAMFILES")
end
M.COMMONPROGRAMFILESx86 = function()
	return os.getenv("COMMONPROGRAMFILES(x86)")
end
M.TEMP = function()
	local path = os.getenv("TEMP")
	if nil == path or '' == path then
		path = os.getenv("TMP")
	end
	return path
end
M.SYSTEMDRIVE = function()
	return os.getenv("SYSTEMDRIVE")
end

M.currentDir = function()
	local info = debug.getinfo(2) --debug.getinfo(2), 2: 返回调用 currentDir 的函数的信息

	--解析info.source所在的路径
	local path = info.source
	path = string.sub(path, 2, -1) -- 去掉开头的"@"
	path = string.gsub(path,'\\','/') -- 路径格式由 c:\\Users\\san.zhang\\ 转换为 c:/Users/san.zhang/
	path = string.match(path, "^(.*)/") -- 捕获最后一个 "/" 之前的部分 就是我们最终要的目录部分

	return path
end

M.test = function(printPrefix)
	if nil == printPrefix then
		printPrefix = ' '
	end

	if dbgFlg then
		print(printPrefix..'sysInfo test starting...')

		print(printPrefix, 'currentDir is:', M.currentDir())
		print(printPrefix, 'computerName is:', M.computerName())
		print(printPrefix, 'homePath is:', M.homePath())
		print(printPrefix, 'userName is:', M.userName())
	end
end

return M
👆以上 sysInfo.lua 脚本中,我们可以看到其提供了很多的系统信息的获取方法,例如系统名称,系统路径,脚本工作路径等。这些基础的信息,在将来的其它 lua 脚本中还会继续用到。
utf8String.lua
在以上👆的 utf8String.lua 脚本中, 我们发现其引用了一个 utf8String 的外部脚本,如下👇:

utf8String.lua 脚本文档提供了一些utf-8字符串处理的方法,脚本内容如下👇:
--utf8String.lua
--这个模块主要用于处理一些utf8字符串相关的操作

-- 定义一个全局变量,用于记录一个随机数种子
randomseed = os.time()

local M={
   }
local dbgFlg = false

--左侧标点,例如左侧括号,左侧引号等,以及单符号标点也被识为左侧标点,例如 | , 等
local punctuationsAtLeft = {
   [','] = true,[','] = true,
							['。'] = true, ['.'] = true,
							[';'] = true,[';'] = true,
							['、'] = true,['\\'] = true,
							['?'] = true,['?'] = true,
							['!'] = true,['!'] = true,
							['@'] = true,['@'] = true,
							['&'] = true,['&'] = true,
							['/'] = true,
							['…'] = true,
							[' '] = true,
							['('] = true,['('] = true,
							['‘'] = true,['“'] = true,
							['['] = true,['['] = true,['【'] = true,
							['<'] = true,['《'] = true,['〈'] = true
							}

--右侧标点,例如右侧括号,右侧绰号等,以及单符号标点也被识别为右侧标点,例如 | , 等
local punctuationsAtRight = {
   [','] = true,[','] = true,
							['。'] = true, ['.'] = true,
							[';'] = true,[';'] = true,
							['、'] = true,['\\'] = true,
							['?'] = true,['?'] = true,
							['!'] = true,['!'] = true,
							['@'] = true,['@'] = true,
							['&'] = true,['&'] = true,
							['/'] = true,
							['…'] = true,
							[' '] = true,
							[')'] = true,[')'] = true,
							['’'] = true,['”'] = true,
							[']'] = true,[']'] = true,['】'] = true,
							['>'] = true,['》'] = true,['〉'] = true
							}

local lettersForPwd = {
   "A", "B", "C", "D", "E", "F", "G", "H", "I", "J", "K", "L", "M", "N", "O", "P", "Q", "R", "S", "T", "U", "V", "W", "X", "Y", "Z",
"a", "b", "c", "d", "e", "f", "g", "h", "i", "j", "k", "l", "m", "n", "o", "p", "q", "r", "s", "t", "u", "v", "w", "x", "y", "z",
"0", "1", "2", "3", "4", "5", "6", "7", "8", "9",
"~", "!", "@", "#", "$", "%", "^", "&", "*", "-", "=", "+"}

--设置 dbg 开关
local function setDbg(flg)
	dbgFlg = flg
	print('utf8String dbgFlg is '..tostring(dbgFlg))
end

--判断给定的一个字符头,实际占用的字节数
local function chsize(char)
	if not char then
		return 0
	elseif char > 240 then
		return 4
	elseif char > 225 then
		return 3
	elseif char > 192 then
		return 2
	else
		return 1
	end
end

--判断给定的一个字符串的实际字符长度
local function utf8Len(str)
	local len = 0
	local currentIndex = 1
	while currentIndex <= #str do
		local char = string.byte(str,currentIndex)
		currentIndex = currentIndex + chsize(char)
		len = len + 1
	end

	return len
end

--根据给定的字符串,和指定的起始位置和字符数,截取子串
local function utf8Sub(str,startChar,numChars)
	local startIndex = 1
	while startChar > 1 do
		local char = string.byte(str,startIndex)
		startIndex = startIndex + chsize(char)
		startChar = startChar - 1
	end

	local currentIndex = startIndex

	while numChars > 0 and currentIndex <= #str do
		local char = string.byte(str,currentIndex)
		currentIndex = currentIndex + chsize(char)
		numChars = numChars - 1
	end

	return str:sub(startIndex,currentIndex - 1)
end

--根据给定的字符串,去除其头尾的空白符
local function utf8Trim(str)
	str = str or ''
	local cnt = 0
	local subChar = utf8Sub(str,1,1)

	--去除其头部的 空白
	while subChar:match("%s") do
		str = utf8Sub(str,2,utf8Len(str)-1)
		subChar = utf8Sub(str,1,1)
		cnt = cnt + 1
	end

	--去除其尾部的 空白
	subChar = utf8Sub(str,utf8Len(str),1)
	while subChar:match("%s") do
		str = utf8Sub(str,1,utf8Len(str)-1)
		subChar = utf8Sub(str,utf8Len(str),1)
		cnt = cnt + 1
	end

	return str,cnt
end

--根据给定的字符串,去除其头尾部的 符号 字符
local function utf8PunctuationsGo(str)
	str = str or ''
	local cnt = 0
	local subChar = utf8Sub(str,1,1)

	--去除其头部的 右侧 标点
	while punctuationsAtRight[subChar] do
		str = utf8Sub(str,2,utf8Len(str)-1)
		subChar = utf8Sub(str,1,1)
		cnt = cnt + 1
	end

	--去除其尾部的 左侧 标点
	subChar = utf8Sub(str,utf8Len(str),1)
	while punctuationsAtLeft[subChar] do
		str = utf8Sub(str,1,utf8Len(str)-1)
		subChar = utf8Sub(str,utf8Len(str),1)
		cnt = cnt + 1
	end

	return str,cnt
end

--根据给定的字符串,去除其头尾部的 符号 和 空白
local function utf8PunctuationsTrim(str)
	str = str or ''
	local cnt = 0
	local subChar = utf8Sub(str,1,1)

	--去除其头部的 右侧 标点
	while punctuationsAtRight[subChar] do
		str = utf8Sub(str,2,utf8Len(str)-1)
		subChar = utf8Sub(str,1,1)
		cnt = cnt + 1
	end

	--去除其尾部的 左侧 标点
	subChar = utf8Sub(str,utf8Len(str),1)
	while punctuationsAtLeft[subChar] do
		str = utf8Sub(str,1,utf8Len(str)-1)
		subChar = utf8Sub(str,utf8Len(str),1)
		cnt = cnt + 1
	end

	return str,cnt
end

--生成一个指定长度的随机密码
function newPwd(len, easyRead)
    len = len or 8
	easyRead = easyRead or true

	local pwd = ''
	local tmpChar = ''
	local cntForOptions = #lettersForPwd

	-- 初始化随机数种子
	math.randomseed(randomseed)

	repeat
		-- 重置随机数种子
		randomseed = math.random(0, 100000000)

		--随机挑选一个字符
		tmpChar = lettersForPwd[math.random(cntForOptions)]
		if easyRead then
			--如果要求易读,则禁用 1,l,o,O,0 这些字符
			if not ({
   ['1']=true, ['l']=true, ['o']=true, ['O']=true, ['0']=true})[tmpChar] then
				pwd = pwd .. tmpChar
			end
		else
			pwd = pwd .. tmpChar
		end

	until (#pwd >= len)

    return pwd
end


--这是用于测试的函数
local function test(printPrefix)
	if nil == printPrefix then
		printPrefix = ' '
	end

	if dbgFlg then
		print(printPrefix,'utf8StringModule test starting...')

		print(printPrefix,utf8Len("好好学习5天天向上"))
		print(printPrefix,utf8Sub("好好学习5天天向上",5,2))
	end
end

--Module
function M.init(...)
	M.utf8Sub = utf8Sub
	M.utf8Len = utf8Len
	M.utf8Trim = utf8Trim
	M.utf8PunctuationsGo = utf8PunctuationsGo
	M.utf8PunctuationsTrim = utf8PunctuationsTrim
	M.newPwd = newPwd

	M.setDbg = setDbg
	M.test = test
end

M.init()

return M
👆以上脚本中, 我们可以看到 utf8String.lua 提供了丰富的基础字符串处理和生成方法,这些方法在将来的 rime 配置脚本中,还将会引用。
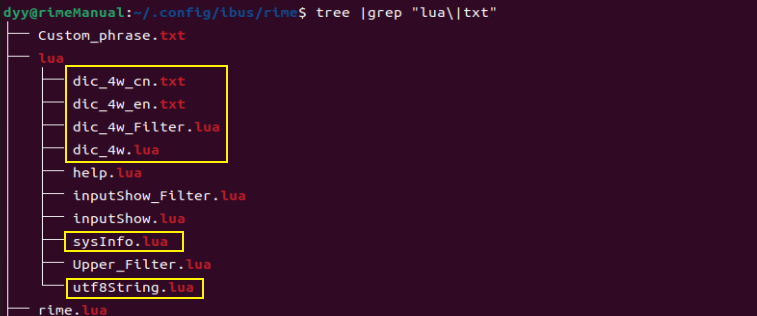
dic_4w_en.txt 文档、dic_4w_cn.txt 文档、dic_4w.lua 文档、dic_4w_Filter.lua 文档、sysInfo.lua 文档和 utf8String.lua 文档,都应该位于 用户文件夹 下的 lua 文件夹内,如下👇:
rime.lua
以上 dic_4w_Filter.lua 脚本中所定义的 dic_4w_Filter 滤镜方法,需要在 rime.lua 中映射为 dic_4w_Filter 滤镜接口,以便在配置文档中引用该接口。 rime.lua 中增加如下👇配置:
dic_4w_Filter = require("dic_4w_Filter")
保存你的 rime.lua 文档,请注意 rime.lua 文档的位置
easy_en.custom.yaml & wubi_pinyin.custom.yaml
接下来,我们需要在输入方案的补丁文档中配置引用 dic_4w_Filter 滤镜了。不过在此之前,我们需要注意到一个状态开关。
如果你仔细阅读了上面的代码,你应该会在 dic_4w_Filter.lua 脚本中注意到以下脚本内容:

这里脚本获取了一个系统的选项开关,这个开头决定了脚本是否继续运行 dic_4w_Filter 滤镜的功能逻辑。所以我们需要在输入方案的配置文档中配置一个 encnDic 的开关。我们在 easy_en.custom.yaml 和 wubi_pinyin.custom.yaml 文档中增加以下配置以增加 encnDic 开关:
patch:
  switches/+: #增加以下开关
    - name: encnDic					# 中英字典开关
      reset: 1
      states: [Off, 中英对照]
有了开关以后,我们需要将 dic_4w_Filter 滤镜配置到输入方案中,我们在 easy_en.custom.yaml 和 wubi_pinyin.custom.yaml 文档中增加以下配置以引用 dic_4w_Filter 滤镜:
patch:
  engine/filters/+:
    - lua_filter@dic_4w_Filter						# 英中对照滤镜
配置文档
👆以上所涉的配置文档,你可以在 rime中州韵小狼毫 中英互译滤镜 下载取用。
效果欣赏
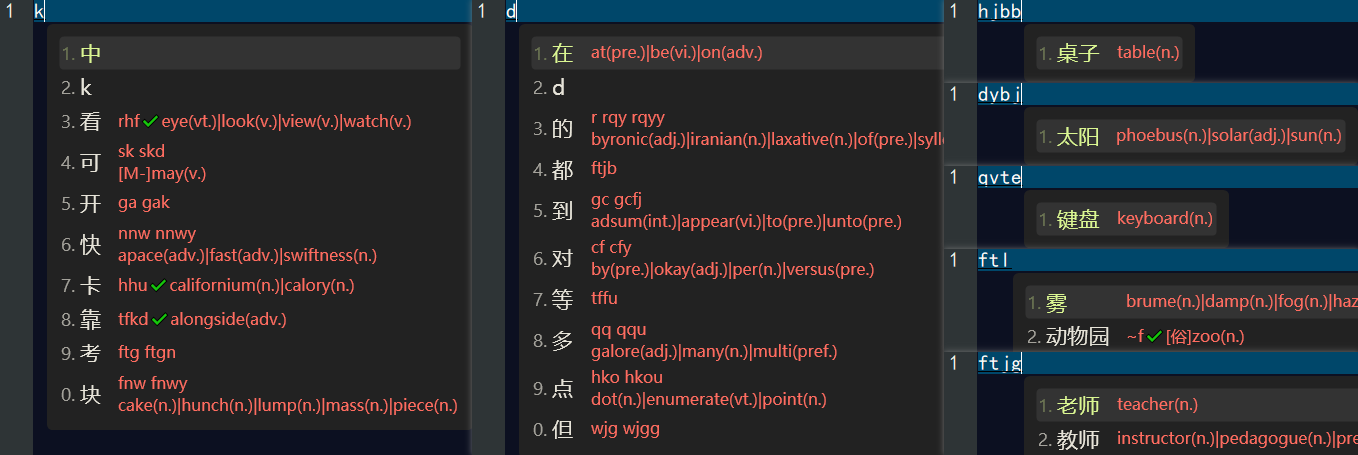
当我们完成以上配置后,我们需要 重新配置 rime中州韵小狼毫输入方法,然后我们就可以在 五笔・拼音 输入方案中看到英文翻译,如下👇:
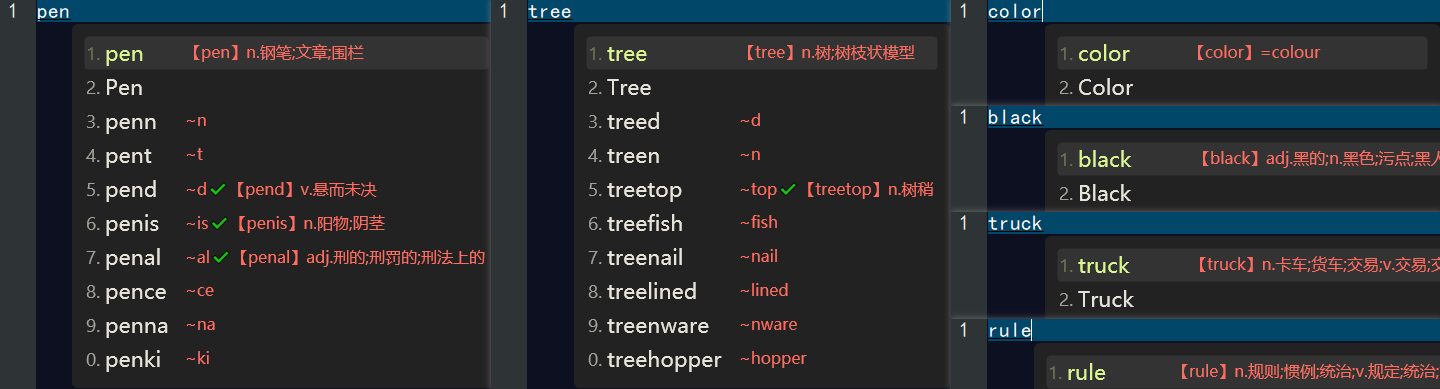
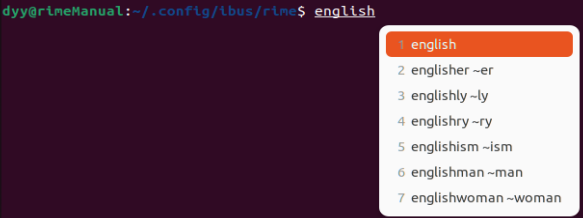
在 easyEnglish 输入方案中看到中文翻译,如下👇:
小结
文章分享介绍了在 rime中州韵小狼毫输入法中定义并配置实现中英互译滤镜的方法,共涉及脚本及字典文档9个,实现滤镜定义1个,配置输入方案2个,总体现实了既定的功能效果。


![第八章[字符串]:8.4:大小写转换](https://img-blog.csdnimg.cn/direct/5c434ee468f9492cb7f9f8861f745ce6.png)