Pytorch从零开始实战——ResNeXt-50算法实战
本系列来源于365天深度学习训练营
原作者K同学
环境准备
本文基于Jupyter notebook,使用Python3.8,Pytorch2.0.1+cu118,torchvision0.15.2,需读者自行配置好环境且有一些深度学习理论基础。本次实验的目的是了解并使用ResNeXt-50模型。
第一步,导入常用包
import torch
import torch.nn as nn
import matplotlib.pyplot as plt
import torchvision
import torchvision.transforms as transforms
import torchvision.datasets as datasets
import torch.nn.functional as F
import random
from time import time
import numpy as np
import pandas as pd
import datetime
import gc
import os
import copy
import warnings
os.environ['KMP_DUPLICATE_LIB_OK']='True'  # 用于避免jupyter环境突然关闭
torch.backends.cudnn.benchmark=True  # 用于加速GPU运算的代码
设置随机数种子
torch.manual_seed(428)
torch.cuda.manual_seed(428)
torch.cuda.manual_seed_all(428)
random.seed(428)
np.random.seed(428)
检查设备对象
torch.manual_seed(428)
torch.cuda.manual_seed(428)
torch.cuda.manual_seed_all(428)
random.seed(428)
np.random.seed(428)
检查设备对象
device = torch.device("cuda" if torch.cuda.is_available() else "cpu")
device, torch.cuda.device_count() # # (device(type='cuda'), 2)
数据集
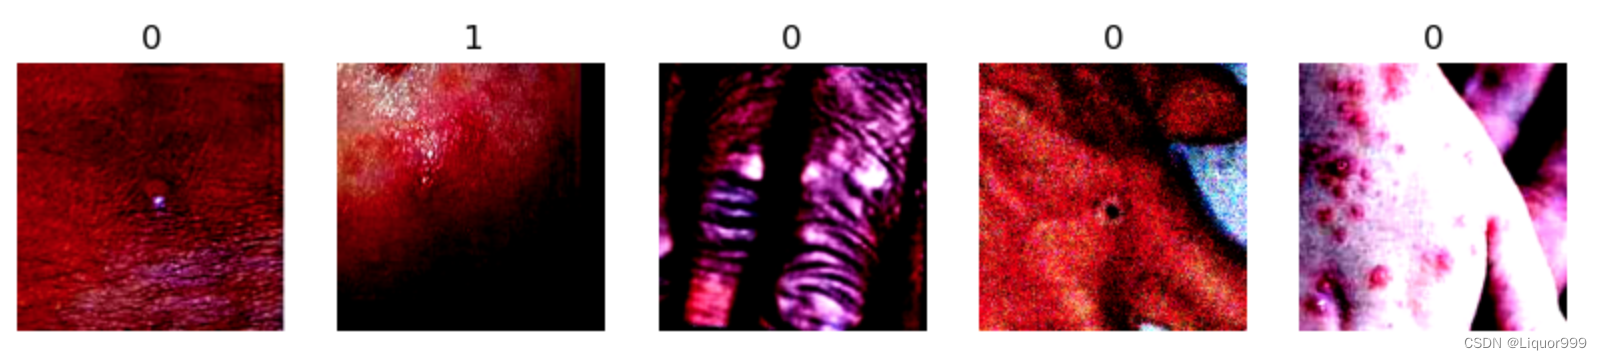
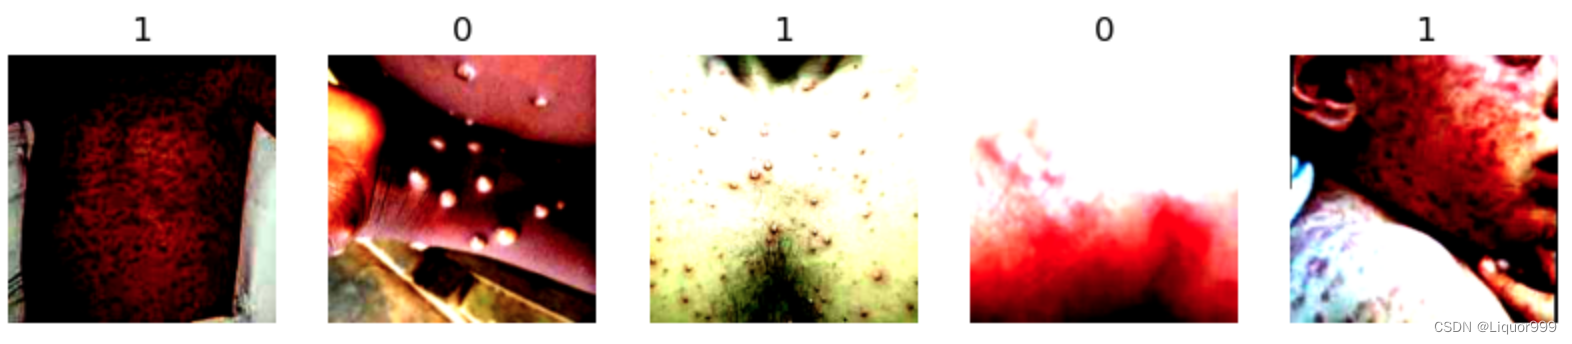
本次实验继续使用猴痘病数据集,使用pathlib查看类别,本次类别只有0,1两种类别分别代表患病和不患病。
import pathlib
data_dir = './data/ill/'
data_dir = pathlib.Path(data_dir) # 转成pathlib.Path对象
data_paths = list(data_dir.glob('*'))
classNames = [str(path).split("/")[2] for path in data_paths]
classNames # ['Monkeypox', 'Others']
使用transforms对数据集进行统一处理,并且根据文件夹名映射对应标签
all_transforms = transforms.Compose([
    transforms.Resize([224, 224]),
    transforms.ToTensor(),
    transforms.Normalize(mean=[0.485, 0.456, 0.406], std=[0.229, 0.224, 0.225]) # 标准化
])

total_data = datasets.ImageFolder("./data/ill/", transform=all_transforms)
total_data.class_to_idx # {'Monkeypox': 0, 'Others': 1}
随机查看5张图片
def plotsample(data):
    fig, axs = plt.subplots(1, 5, figsize=(10, 10)) #建立子图
    for i in range(5):
        num = random.randint(0, len(data) - 1) #首先选取随机数,随机选取五次
        #抽取数据中对应的图像对象,make_grid函数可将任意格式的图像的通道数升为3,而不改变图像原始的数据
        #而展示图像用的imshow函数最常见的输入格式也是3通道
        npimg = torchvision.utils.make_grid(data[num][0]).numpy()
        nplabel = data[num][1] #提取标签
        #将图像由(3, weight, height)转化为(weight, height, 3),并放入imshow函数中读取
        axs[i].imshow(np.transpose(npimg, (1, 2, 0)))
        axs[i].set_title(nplabel) #给每个子图加上标签
        axs[i].axis("off") #消除每个子图的坐标轴

plotsample(total_data)
根据8比2划分数据集和测试集,并且利用DataLoader划分批次和随机打乱
train_size = int(0.8 * len(total_data))
test_size  = len(total_data) - train_size
train_ds, test_ds = torch.utils.data.random_split(total_data, [train_size, test_size])

batch_size = 32
train_dl = torch.utils.data.DataLoader(train_ds,
                                        batch_size=batch_size,
                                        shuffle=True,
                                      )
test_dl = torch.utils.data.DataLoader(test_ds,
                                        batch_size=batch_size,
                                        shuffle=True,
                                     )

len(train_dl.dataset), len(test_dl.dataset) # (1713, 429)
模型选择
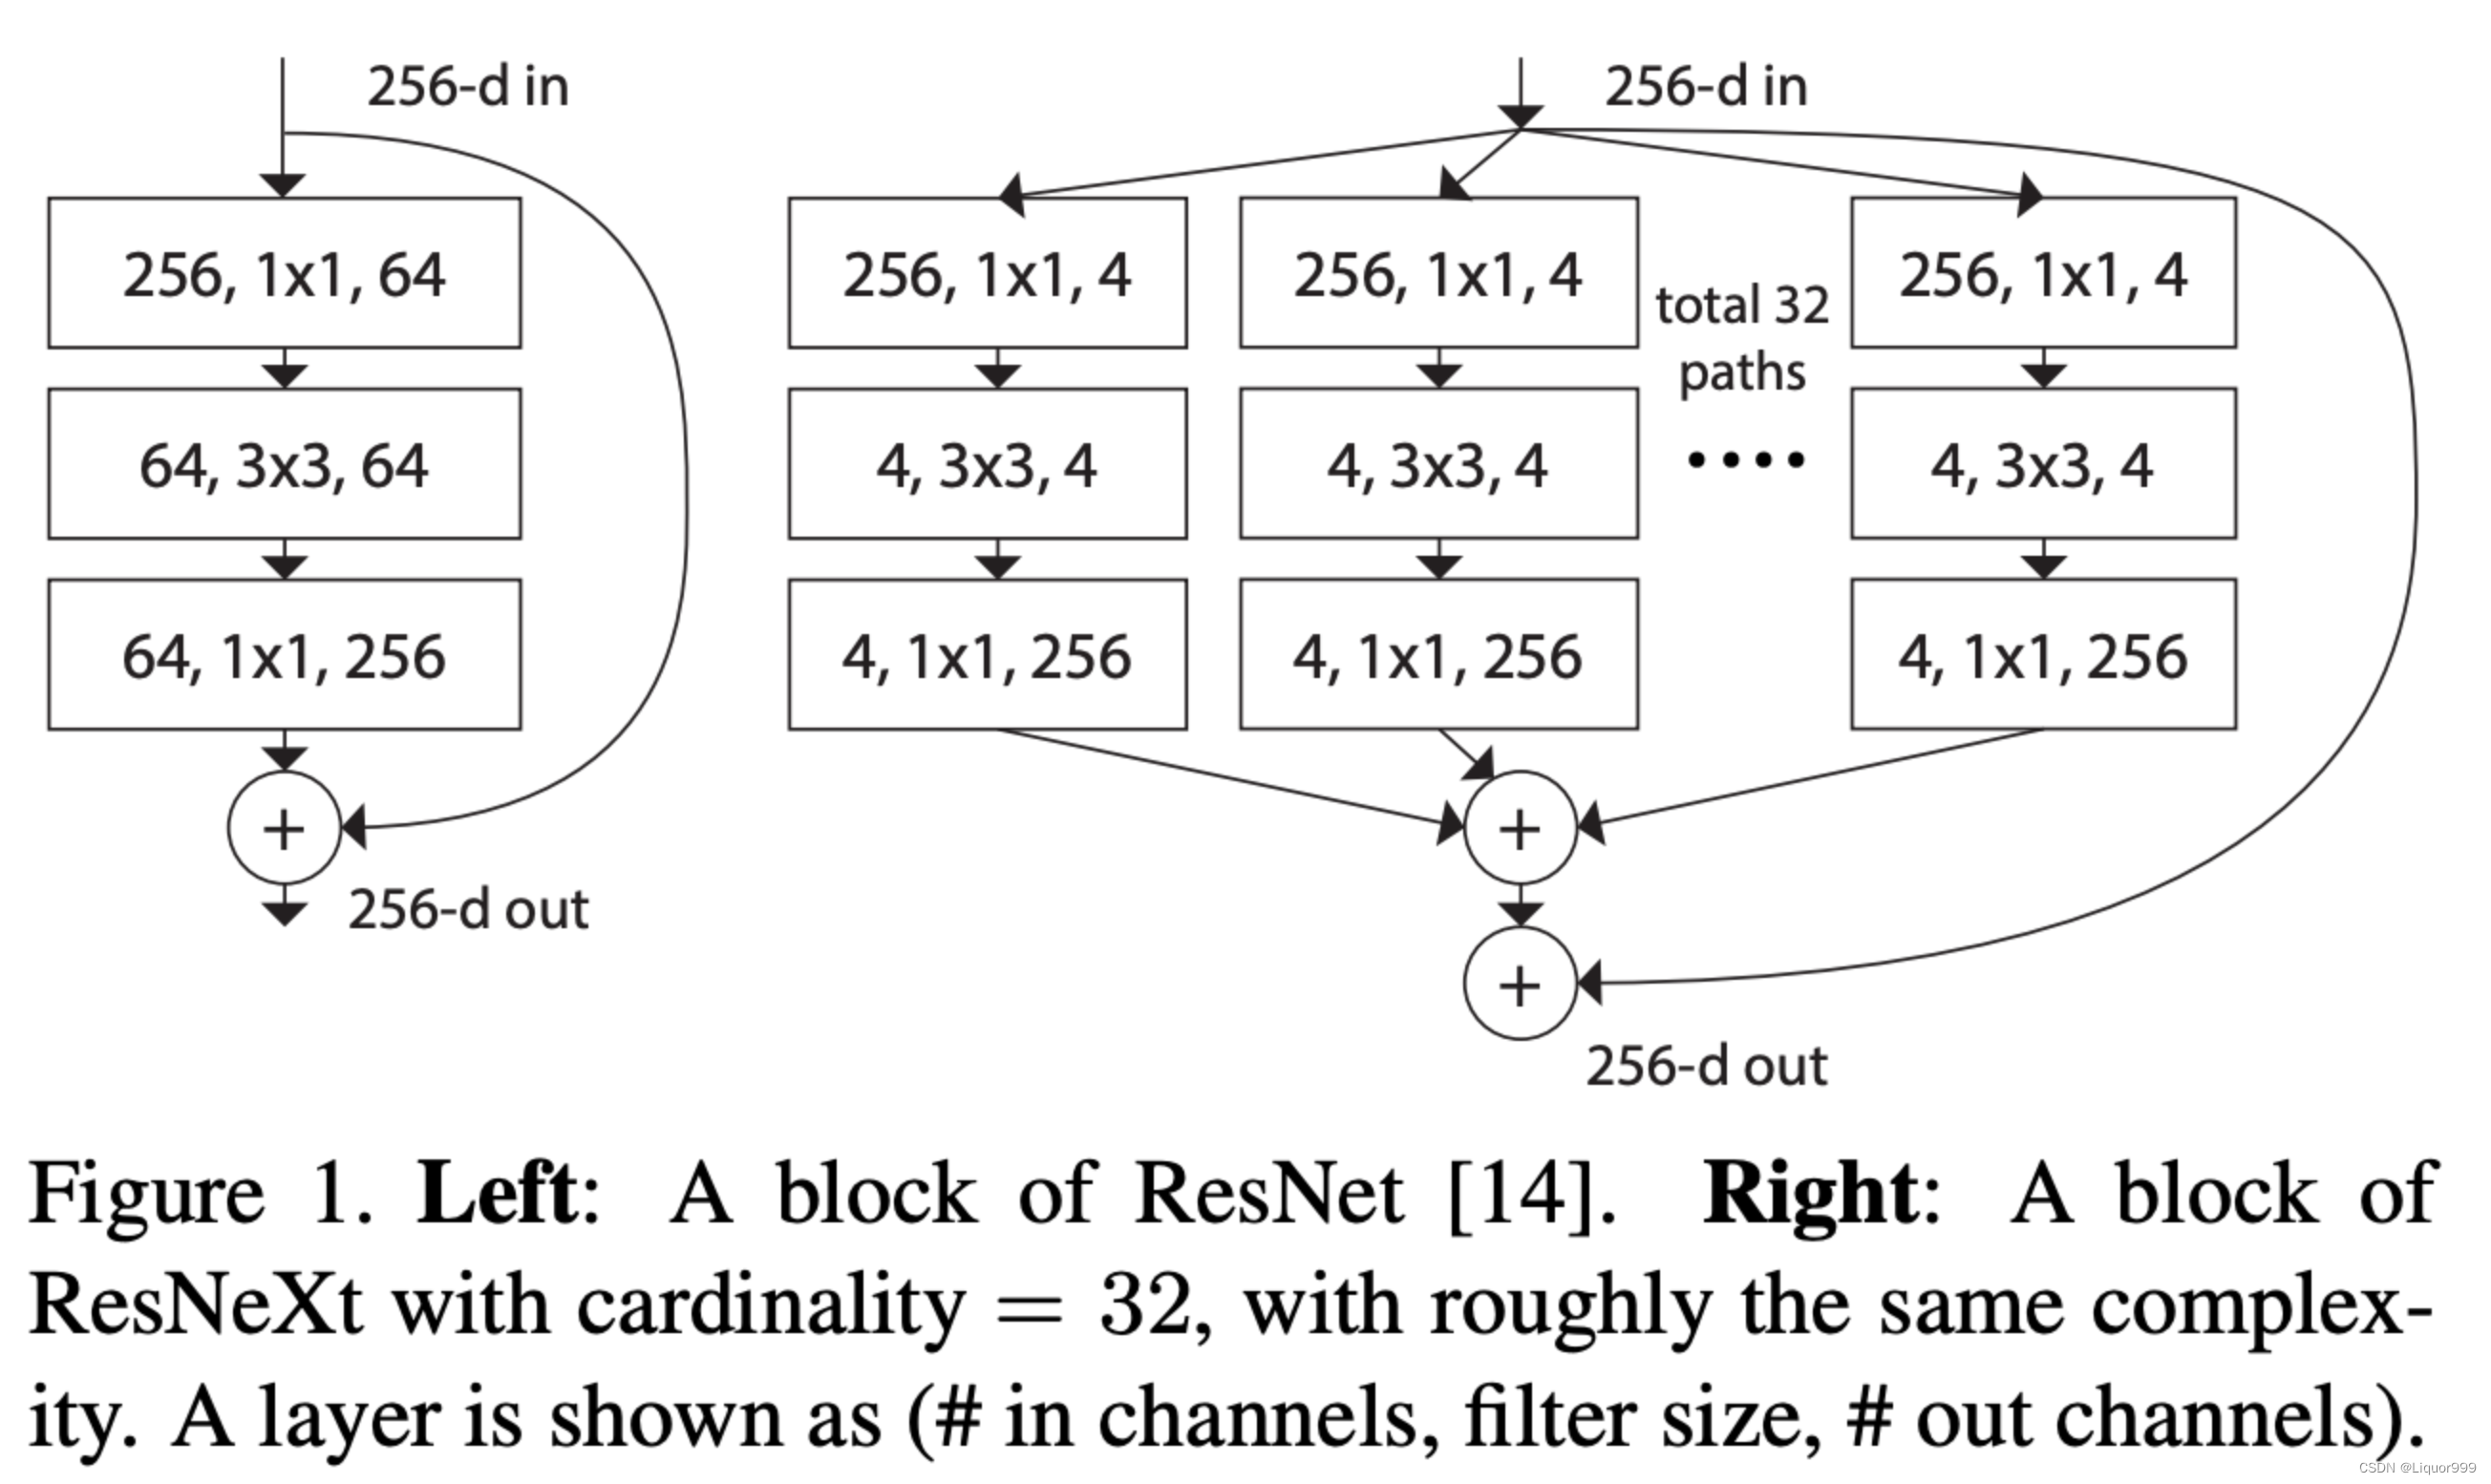
ResNeXt是由何凯明团队在2017年CVPR会议上提出来的新型图像分类网络。ResNeXt是ResNet的升级版,在ResNet的基础上,引入了cardinality的概念。该概念用于控制模型的宽度,以提高模型的表达能力。主要的创新点是在基本的残差块结构中引入了多个相互独立的分支,这些分支的数量由 cardinality 参数控制。每个分支都有自己的权重,允许网络以更多的角度观察输入数据,从而提高特征提取的多样性。本质其实是分组卷积处理。
BasicBlock 是 ResNet 中的基本块,用于构建浅层次的网络。它包含两个卷积层,每个卷积层后面都有 Batch Normalization 和 ReLU 激活函数。在残差连接中,如果输入和输出的通道数或空间大小不一致,会使用 downsample 函数进行下采样,以保持一致性。expansion 变量表示块内部的维度倍增系数,用于调整残差块中卷积核的通道数。
class BasicBlock(nn.Module):
    expansion = 1

    def __init__(self, in_channel, out_channel, stride=1, downsample=None, **kwargs):
        super(BasicBlock, self).__init__()
        self.conv1 = nn.Conv2d(in_channels=in_channel, out_channels=out_channel,
                               kernel_size=3, stride=stride, padding=1, bias=False)
        self.bn1 = nn.BatchNorm2d(out_channel)
        self.relu = nn.ReLU()
        self.conv2 = nn.Conv2d(in_channels=out_channel, out_channels=out_channel,
                               kernel_size=3, stride=1, padding=1, bias=False)
        self.bn2 = nn.BatchNorm2d(out_channel)
        self.downsample = downsample

    def forward(self, x):
        identity = x
        if self.downsample is not None:
            identity = self.downsample(x)

        out = self.conv1(x)
        out = self.bn1(out)
        out = self.relu(out)

        out = self.conv2(out)
        out = self.bn2(out)

        out += identity
        out = self.relu(out)

        return out
Bottleneck 类是 ResNet 中的瓶颈块,用于构建深层次的网络。它包含三个卷积层,分别用于降维、3x3 卷积以及升维。与 BasicBlock 不同,Bottleneck 使用 1x1 卷积降维和升维,以减小计算复杂度。expansion 变量表示块内部的维度倍增系数,用于调整残差块中卷积核的通道数。
class Bottleneck(nn.Module):
    expansion = 4

    def __init__(self, in_channel, out_channel, stride=1, downsample=None,
                 groups=1, width_per_group=64):
        super(Bottleneck, self).__init__()

        width = int(out_channel * (width_per_group / 64.)) * groups

        self.conv1 = nn.Conv2d(in_channels=in_channel, out_channels=width,
                               kernel_size=1, stride=1, bias=False)
        self.bn1 = nn.BatchNorm2d(width)
        self.conv2 = nn.Conv2d(in_channels=width, out_channels=width, groups=groups,
                               kernel_size=3, stride=stride, bias=False, padding=1)
        self.bn2 = nn.BatchNorm2d(width)
        self.conv3 = nn.Conv2d(in_channels=width, out_channels=out_channel*self.expansion,
                               kernel_size=1, stride=1, bias=False)
        self.bn3 = nn.BatchNorm2d(out_channel*self.expansion)
        self.relu = nn.ReLU(inplace=True)
        self.downsample = downsample

    def forward(self, x):
        identity = x
        if self.downsample is not None:
            identity = self.downsample(x)

        out = self.conv1(x)
        out = self.bn1(out)
        out = self.relu(out)

        out = self.conv2(out)
        out = self.bn2(out)
        out = self.relu(out)

        out = self.conv3(out)
        out = self.bn3(out)

        out += identity
        out = self.relu(out)

        return out
ResNet 类是整个模型的主体,由多个 block 组成。初始化时,它包括卷积层、Batch Normalization、ReLU 激活函数以及四个layer。_make_layer 方法用于构建每个阶段中的多个块,根据每个残差块的数量 block_num 和指定的残差块类型 block,它会堆叠多个相同类型的残差块,最终将这些块串联在一起。
class ResNet(nn.Module):

    def __init__(self,
                 block,
                 blocks_num,
                 num_classes=1000,
                 include_top=True,
                 groups=1,
                 width_per_group=64):
        super(ResNet, self).__init__()
        self.include_top = include_top
        self.in_channel = 64

        self.groups = groups
        self.width_per_group = width_per_group

        self.conv1 = nn.Conv2d(3, self.in_channel, kernel_size=7, stride=2,
                               padding=3, bias=False)
        self.bn1 = nn.BatchNorm2d(self.in_channel)
        self.relu = nn.ReLU(inplace=True)
        self.maxpool = nn.MaxPool2d(kernel_size=3, stride=2, padding=1)
        self.layer1 = self._make_layer(block, 64, blocks_num[0])
        self.layer2 = self._make_layer(block, 128, blocks_num[1], stride=2)
        self.layer3 = self._make_layer(block, 256, blocks_num[2], stride=2)
        self.layer4 = self._make_layer(block, 512, blocks_num[3], stride=2)
        if self.include_top:
            self.avgpool = nn.AdaptiveAvgPool2d((1, 1))  # output size = (1, 1)
            self.fc = nn.Linear(512 * block.expansion, num_classes)

        for m in self.modules():
            if isinstance(m, nn.Conv2d):
                nn.init.kaiming_normal_(m.weight, mode='fan_out', nonlinearity='relu')

    def _make_layer(self, block, channel, block_num, stride=1):
        downsample = None
        if stride != 1 or self.in_channel != channel * block.expansion:
            downsample = nn.Sequential(
                nn.Conv2d(self.in_channel, channel * block.expansion, kernel_size=1, stride=stride, bias=False),
                nn.BatchNorm2d(channel * block.expansion))

        layers = []
        layers.append(block(self.in_channel,
                            channel,
                            downsample=downsample,
                            stride=stride,
                            groups=self.groups,
                            width_per_group=self.width_per_group))
        self.in_channel = channel * block.expansion

        for _ in range(1, block_num):
            layers.append(block(self.in_channel,
                                channel,
                                groups=self.groups,
                                width_per_group=self.width_per_group))

        return nn.Sequential(*layers)

    def forward(self, x):
        x = self.conv1(x)
        x = self.bn1(x)
        x = self.relu(x)
        x = self.maxpool(x)

        x = self.layer1(x)
        x = self.layer2(x)
        x = self.layer3(x)
        x = self.layer4(x)

        if self.include_top:
            x = self.avgpool(x)
            x = torch.flatten(x, 1)
            x = self.fc(x)

        return x
定义resnext50_32x4d,“32x4d” 的意义是每个残差块内有 32 个分支,每个分支内有 4 个通道。
def resnext50_32x4d(num_classes=2, include_top=True):
    groups = 32
    width_per_group = 4
    return ResNet(Bottleneck, [3, 4, 6, 3],
                  num_classes=num_classes,
                  include_top=include_top,
                  groups=groups,
                  width_per_group=width_per_group)
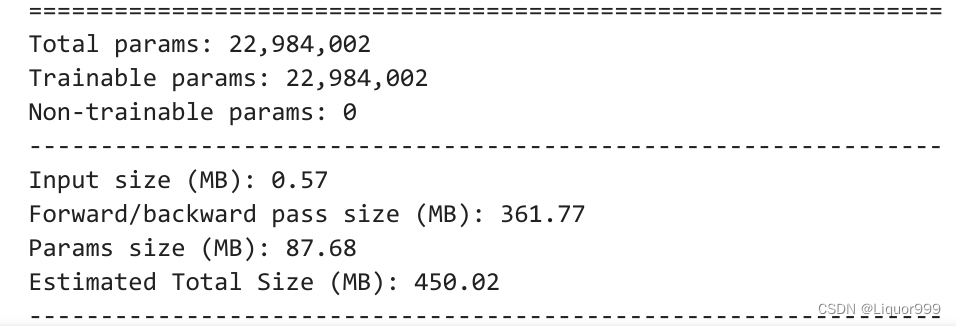
使用summary查看模型。
from torchsummary import summary
model = resnext50_32x4d().to(device)
summary(model, input_size=(3, 224, 224))
开始训练
定义训练函数
def train(dataloader, model, loss_fn, opt):
    size = len(dataloader.dataset)
    num_batches = len(dataloader)
    train_acc, train_loss = 0, 0

    for X, y in dataloader:
        X, y = X.to(device), y.to(device)
        pred = model(X)
        loss = loss_fn(pred, y)

        opt.zero_grad()
        loss.backward()
        opt.step()

        train_acc += (pred.argmax(1) == y).type(torch.float).sum().item()
        train_loss += loss.item()

    train_acc /= size
    train_loss /= num_batches
    return train_acc, train_loss
定义测试函数
def test(dataloader, model, loss_fn):
    size = len(dataloader.dataset)
    num_batches = len(dataloader)
    test_acc, test_loss = 0, 0
    with torch.no_grad():
        for X, y in dataloader:
            X, y = X.to(device), y.to(device)
            pred = model(X)
            loss = loss_fn(pred, y)

            test_acc += (pred.argmax(1) == y).type(torch.float).sum().item()
            test_loss += loss.item()

    test_acc /= size
    test_loss /= num_batches
    return test_acc, test_loss
定义学习率、损失函数、优化算法
loss_fn = nn.CrossEntropyLoss()
learn_rate = 0.0001
opt = torch.optim.Adam(model.parameters(), lr=learn_rate)
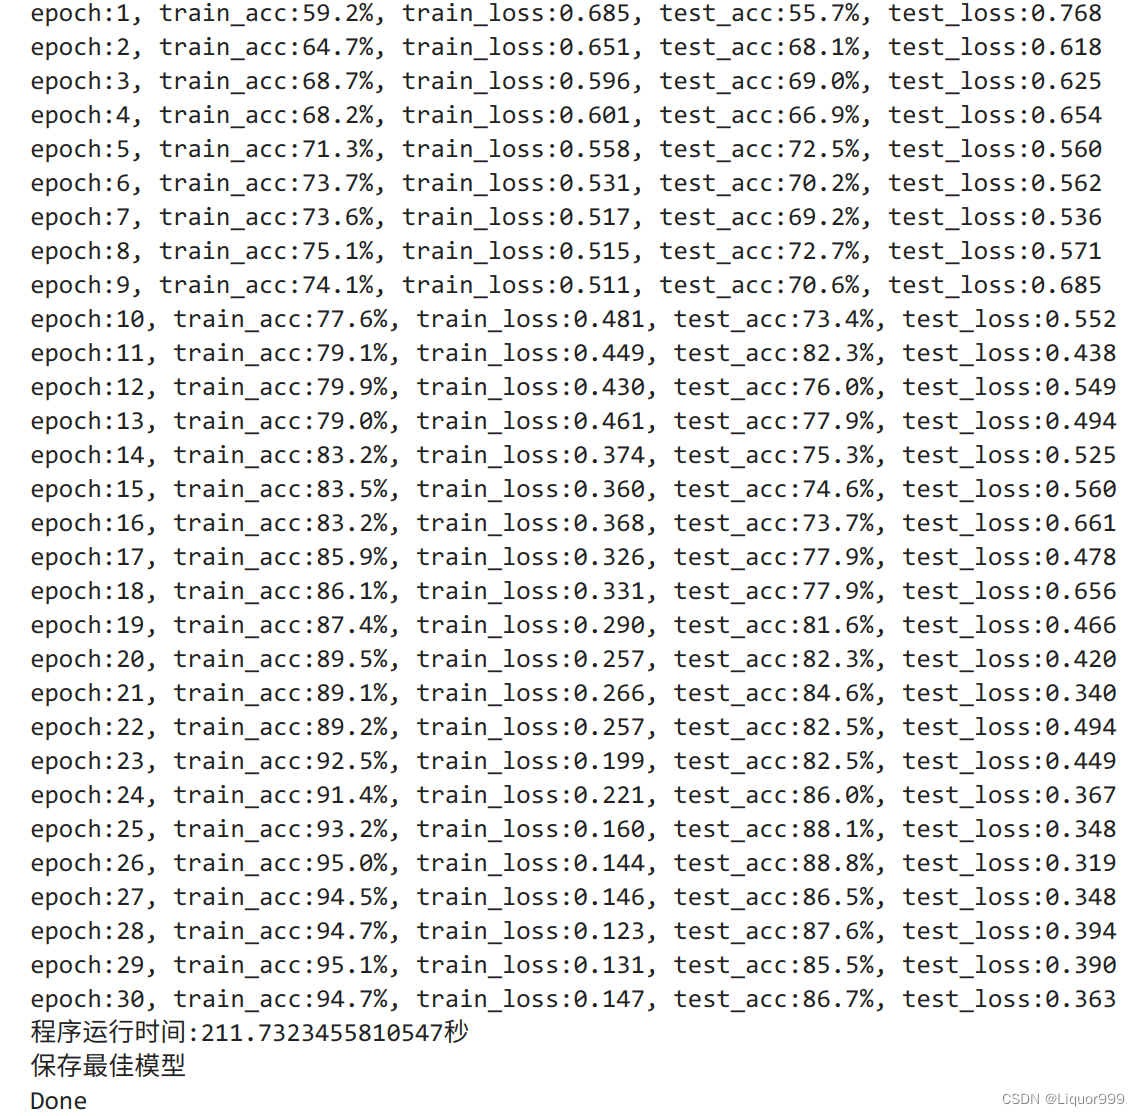
开始训练,epoch设置为30
import time
epochs = 30
train_loss = []
train_acc = []
test_loss = []
test_acc = []

T1 = time.time()

best_acc = 0
best_model = 0

for epoch in range(epochs):

    model.train()
    epoch_train_acc, epoch_train_loss = train(train_dl, model, loss_fn, opt)

    model.eval() # 确保模型不会进行训练操作
    epoch_test_acc, epoch_test_loss = test(test_dl, model, loss_fn)

    if epoch_test_acc > best_acc:
        best_acc = epoch_test_acc
        best_model = copy.deepcopy(model)

    train_acc.append(epoch_train_acc)
    train_loss.append(epoch_train_loss)
    test_acc.append(epoch_test_acc)
    test_loss.append(epoch_test_loss)

    print("epoch:%d, train_acc:%.1f%%, train_loss:%.3f, test_acc:%.1f%%, test_loss:%.3f"
          % (epoch + 1, epoch_train_acc * 100, epoch_train_loss, epoch_test_acc * 100, epoch_test_loss))

T2 = time.time()
print('程序运行时间:%s秒' % (T2 - T1))

PATH = './best_model.pth'  # 保存的参数文件名
if best_model is not None:
    torch.save(best_model.state_dict(), PATH)
    print('保存最佳模型')
print("Done")
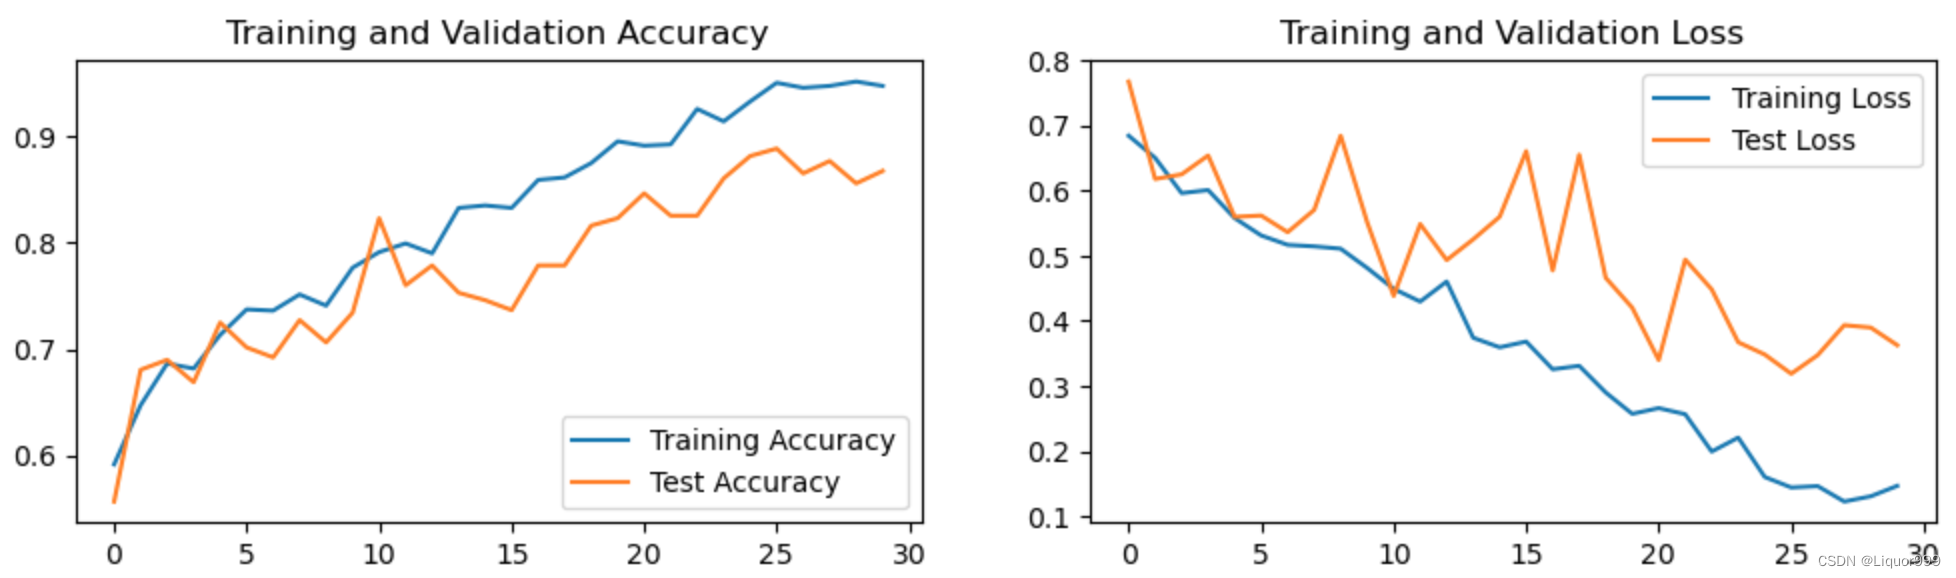
可视化
可视化训练过程与测试过程
import warnings
warnings.filterwarnings("ignore")               #忽略警告信息
plt.rcParams['font.sans-serif']    = ['SimHei'] # 用来正常显示中文标签
plt.rcParams['axes.unicode_minus'] = False      # 用来正常显示负号
plt.rcParams['figure.dpi']         = 100        #分辨率

epochs_range = range(epochs)

plt.figure(figsize=(12, 3))
plt.subplot(1, 2, 1)

plt.plot(epochs_range, train_acc, label='Training Accuracy')
plt.plot(epochs_range, test_acc, label='Test Accuracy')
plt.legend(loc='lower right')
plt.title('Training and Validation Accuracy')

plt.subplot(1, 2, 2)
plt.plot(epochs_range, train_loss, label='Training Loss')
plt.plot(epochs_range, test_loss, label='Test Loss')
plt.legend(loc='upper right')
plt.title('Training and Validation Loss')
plt.show()
总结
ResNeXt 使用多个分支(cardinality)来学习特征,每个分支都是一个小型的卷积网络。分支的输出在通道维度上进行拼接,增加了模型的宽度,提高了特征的丰富性。通过增加模型的宽度而不是深度,ResNeXt 在一定程度上提高了模型性能,同时减少了参数量和计算复杂度。通过学习它的设计理念可能会启发我们后续工作。