🎉🎉欢迎来到我的CSDN主页!🎉🎉
🏅我是君易--鑨,一个在CSDN分享笔记的博主。📚📚
🌟推荐给大家我的博客专栏《SpringBoot开发之Security系列》。🎯🎯
🎁如果感觉还不错的话请给我关注加三连吧!🎁🎁
前言
在上一期的博客中我们博客分享了Security的相关登陆验证的数据获取,以及记住我复选框功能、还有CSRF防御等等。今天给大家带来的是基于上一期的博客分享,是对上一期博客的完善功能以及扩展,上期博客完成的是Security联合数据库登陆验证,以及密码加码、网页生成cookie存储用户信息,最后做了一个csrf接口防御。本期博客带来的是用户登陆后的权限管理以及分配。
一、用户权限集成
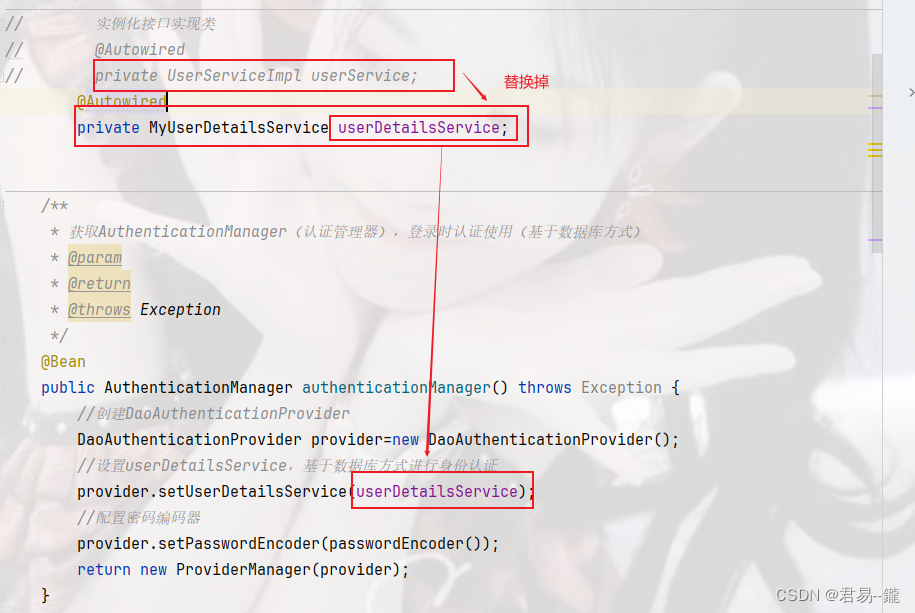
1. 代码调整
在上一期博客中我们的接口实现类实现两个接口类,这种写法是不规格的,因此我们要把一个实现类移出到目录上。
MyUserDetailsService.java
package com.yx.security.config;

import com.baomidou.mybatisplus.core.conditions.query.QueryWrapper;
import com.yx.security.pojo.User;
import com.yx.security.service.IUserService;
import org.springframework.beans.factory.annotation.Autowired;
import org.springframework.security.core.userdetails.UserDetails;
import org.springframework.security.core.userdetails.UserDetailsService;
import org.springframework.security.core.userdetails.UsernameNotFoundException;
import org.springframework.stereotype.Component;

/**
 * com.yx.security.config
 *
 * @author 君易--鑨
 * @site www.yangxin.com
 * @company 木易
 * @create 2023/12/23
 */
@Component
public class MyUserDetailsService implements UserDetailsService {

//    实例化实体接口类
    @Autowired
    private IUserService userService;

    @Override
    public UserDetails loadUserByUsername(String username) throws UsernameNotFoundException {
//                根据用户查询用户信息
        User user = userService.getOne(new QueryWrapper<User>().eq("username", username));
        return user;
    }

}
配置类调整

我们之前是跳转页面,现在我们模拟前后端分离,从后台发送数据到前台上用于判断跳转页面。
我们要想传说数据到前台需要我们借助下面两个工具类,这两个类的代码在之前的博客文章中有,有需要的请翻阅之前的博客文章。

配置类进行对应的编写


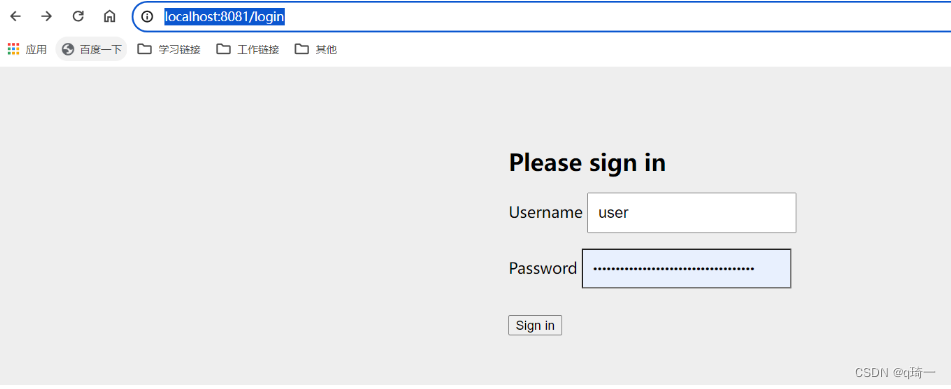
然后我们再重新运行启动项目

上述就是我们重新登陆后返回的用户信息。
2. 权限设置
MyUserDetailsService.java
package com.yx.security.config;

import com.baomidou.mybatisplus.core.conditions.query.QueryWrapper;
import com.yx.security.pojo.*;
import com.yx.security.service.*;
import org.springframework.beans.factory.annotation.Autowired;
import org.springframework.security.core.authority.SimpleGrantedAuthority;
import org.springframework.security.core.userdetails.UserDetails;
import org.springframework.security.core.userdetails.UserDetailsService;
import org.springframework.security.core.userdetails.UsernameNotFoundException;
import org.springframework.stereotype.Component;

import java.util.List;
import java.util.stream.Collectors;

/**
 * com.yx.security.config
 *
 * @author 君易--鑨
 * @site www.yangxin.com
 * @company 木易
 * @create 2023/12/23
 */
@Component
public class MyUserDetailsService implements UserDetailsService {

//    实例化实体接口类
    @Autowired
    private IUserService userService;
//    实例化实体接口类
//    用户角色接口
    @Autowired
    private IUserRoleService userRoleService;
//   角色接口
    @Autowired
    private IRoleService roleService;
//    角色权限接口
    @Autowired
    private IRoleModuleService roleModuleService;
//    权限接口类
    @Autowired
    private IModuleService moduleService;

    @Override
    public UserDetails loadUserByUsername(String username) throws UsernameNotFoundException {
//                根据用户查询用户信息
        User user = userService.getOne(new QueryWrapper<User>().eq("username", username));
//        判断是否存在用户
        if (user == null) {//不存在
            throw new UsernameNotFoundException("用户名不存在");
     }
//        先查询用户的身份根据用户的id,获取身份id
//        map遍历对象并且返回新的数据放到一个新的流中
//        collectors.toList()将新的流转换成list集合
        List<Integer> role_ids = userRoleService.list(new QueryWrapper<UserRole>().eq("user_id", user.getId()))
                .stream().map(UserRole::getRoleId)
                .collect(Collectors.toList());
//        根据身份id查询角色信息的名字字段
        List<String> roles = roleService
                .list(new QueryWrapper<Role>().in("role_id", role_ids))
                .stream().map(Role::getRoleName)
                .collect(Collectors.toList());
//        根据身份id具备的权限id
        List<Integer> module_ids = roleModuleService.list(new QueryWrapper<RoleModule>().in("role_id", role_ids))
                .stream().map(RoleModule::getModuleId)
                .collect(Collectors.toList());
//      根据权限id对应的权限
        List<String> modules = moduleService.list(new QueryWrapper<Module>().in("id", module_ids))
                .stream().map(Module::getUrl)
                .collect(Collectors.toList());
//        拼接身份及权限
        roles.addAll(modules);
//        遍历集合获取信息生成新的集合
        List<SimpleGrantedAuthority> authorities = roles.stream()
                .map(SimpleGrantedAuthority::new).collect(Collectors.toList());
//        将该集合添加到用户实体对象中的权限属性中
        user.setAuthorities(authorities);
        return user;
    }

}
我们现在去登陆测试一下

控制台也会显示对应的错误提示
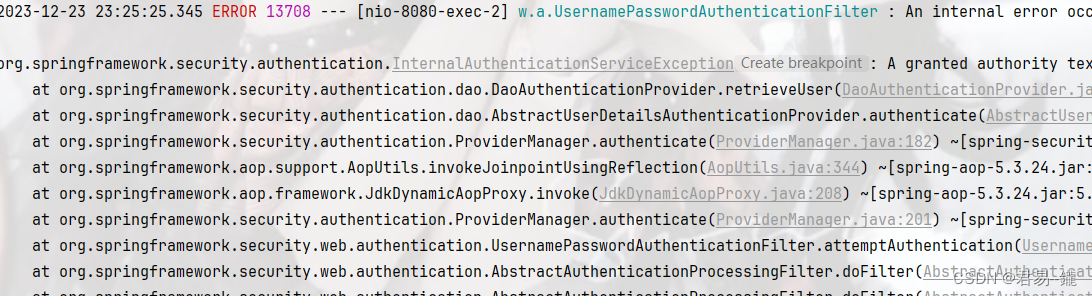
如下图所示我们在该位置标记端点进行运行测试

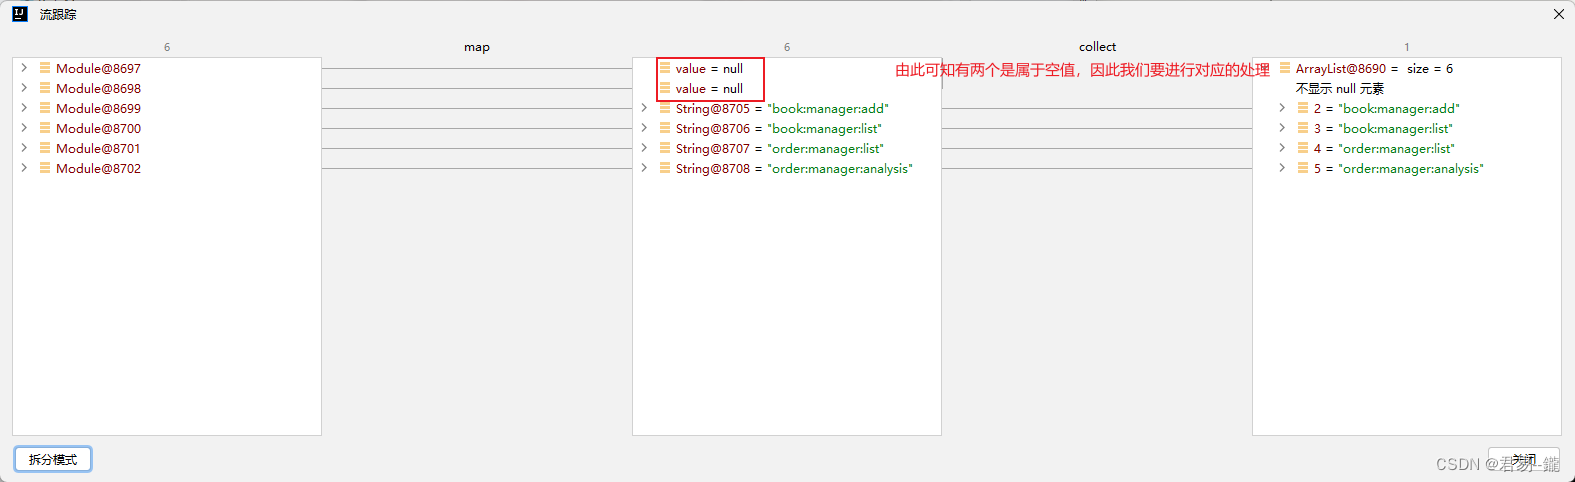
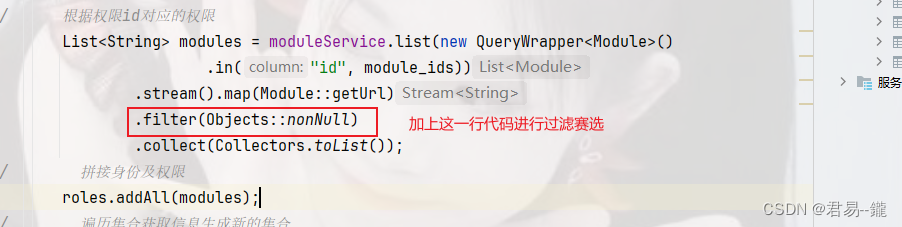
解决的方案有两种,一种是对其数据库中的空值对其进行填写补充;另一种方法就是在后台对其进行空处理。 下面是在后端进行的空处理
在配置类中加上一个注解

给指定的接口方法设置的权限。
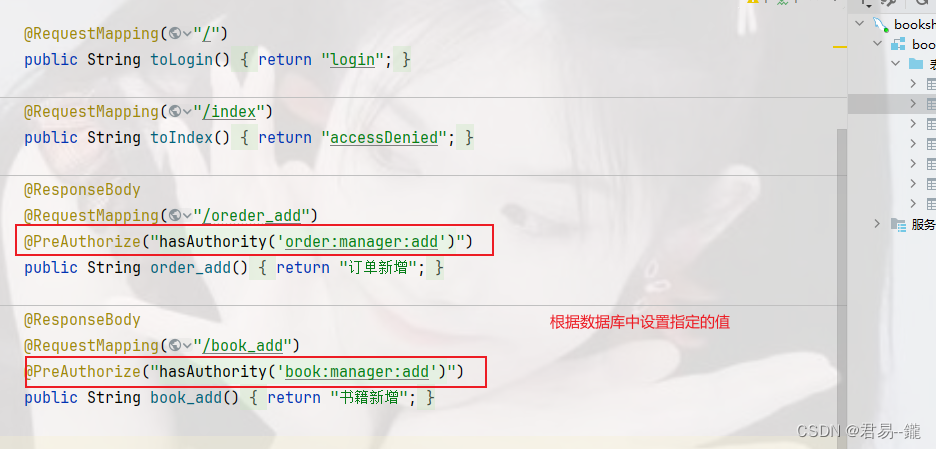
下面是完整的代码
IndexController.java
package com.yx.security.controller;

import org.springframework.security.access.prepost.PreAuthorize;
import org.springframework.security.core.context.SecurityContextHolder;
import org.springframework.stereotype.Controller;
import org.springframework.web.bind.annotation.RequestMapping;
import org.springframework.web.bind.annotation.ResponseBody;

@Controller
public class IndexController {


    @RequestMapping("/")
    public String toLogin(){
        return "login";
    }

    @RequestMapping("/index")
    public String toIndex(){
        return "accessDenied";
    }

    @ResponseBody
    @RequestMapping("/oreder_add")
    @PreAuthorize("hasAuthority('order:manager:add')")
    public String order_add(){
        return "订单新增";
    }

    @ResponseBody
    @RequestMapping("/book_add")
    @PreAuthorize("hasAuthority('book:manager:add')")
    public String book_add(){
        return "书籍新增";
    }

}
MyUserDetailsService.java
package com.yx.security.config;

import com.baomidou.mybatisplus.core.conditions.query.QueryWrapper;
import com.yx.security.pojo.*;
import com.yx.security.service.*;
import org.springframework.beans.factory.annotation.Autowired;
import org.springframework.security.core.authority.SimpleGrantedAuthority;
import org.springframework.security.core.userdetails.UserDetails;
import org.springframework.security.core.userdetails.UserDetailsService;
import org.springframework.security.core.userdetails.UsernameNotFoundException;
import org.springframework.stereotype.Component;

import java.util.List;
import java.util.Objects;
import java.util.stream.Collectors;

/**
 * com.yx.security.config
 *
 * @author 君易--鑨
 * @site www.yangxin.com
 * @company 木易
 * @create 2023/12/23
 */
@Component
public class MyUserDetailsService implements UserDetailsService {

//    实例化实体接口类
    @Autowired
    private IUserService userService;
//    实例化实体接口类
//    用户角色接口
    @Autowired
    private IUserRoleService userRoleService;
//   角色接口
    @Autowired
    private IRoleService roleService;
//    角色权限接口
    @Autowired
    private IRoleModuleService roleModuleService;
//    权限接口类
    @Autowired
    private IModuleService moduleService;

    @Override
    public UserDetails loadUserByUsername(String username) throws UsernameNotFoundException {
//                根据用户查询用户信息
        User user = userService.getOne(new QueryWrapper<User>().eq("username", username));
//        判断是否存在用户
        if (user == null) {//不存在
            throw new UsernameNotFoundException("用户名不存在");
     }
//        先查询用户的身份根据用户的id,获取身份id
//        map遍历对象并且返回新的数据放到一个新的流中
//        collectors.toList()将新的流转换成list集合
//        filter过滤器过滤掉null
        List<Integer> role_ids = userRoleService.list(new QueryWrapper<UserRole>().eq("user_id", user.getId()))
                .stream().map(UserRole::getRoleId)
                .collect(Collectors.toList());
//        根据身份id查询角色信息的名字字段
        List<String> roles = roleService
                .list(new QueryWrapper<Role>().in("role_id", role_ids))
                .stream().map(Role::getRoleName)
                .collect(Collectors.toList());
//        根据身份id具备的权限id
        List<Integer> module_ids = roleModuleService.list(new QueryWrapper<RoleModule>().in("role_id", role_ids))
                .stream().map(RoleModule::getModuleId)
                .collect(Collectors.toList());
//      根据权限id对应的权限
        List<String> modules = moduleService.list(new QueryWrapper<Module>()
                        .in("id", module_ids))
                .stream().map(Module::getUrl)
                .filter(Objects::nonNull)
                .collect(Collectors.toList());
//        拼接身份及权限
        roles.addAll(modules);
//        遍历集合获取信息生成新的集合
        List<SimpleGrantedAuthority> authorities = roles.stream()
                .map(SimpleGrantedAuthority::new).collect(Collectors.toList());
//        将该集合添加到用户实体对象中的权限属性中
        user.setAuthorities(authorities);
        return user;
    }

}
WebSecurityConfig.java
package com.yx.security.config;

import com.fasterxml.jackson.databind.ObjectMapper;
import com.yx.security.service.impl.UserServiceImpl;
import org.springframework.beans.factory.annotation.Autowired;
import org.springframework.context.annotation.Bean;
import org.springframework.context.annotation.Configuration;
import org.springframework.context.annotation.Primary;
import org.springframework.security.authentication.AuthenticationManager;
import org.springframework.security.authentication.ProviderManager;
import org.springframework.security.authentication.dao.DaoAuthenticationProvider;
import org.springframework.security.config.annotation.method.configuration.EnableGlobalMethodSecurity;
import org.springframework.security.config.annotation.web.builders.HttpSecurity;
import org.springframework.security.config.annotation.web.configuration.EnableWebSecurity;
import org.springframework.security.core.userdetails.User;
import org.springframework.security.core.userdetails.UserDetails;
import org.springframework.security.core.userdetails.UserDetailsService;
import org.springframework.security.crypto.bcrypt.BCryptPasswordEncoder;
import org.springframework.security.crypto.password.NoOpPasswordEncoder;
import org.springframework.security.crypto.password.PasswordEncoder;
import org.springframework.security.provisioning.InMemoryUserDetailsManager;
import org.springframework.security.web.SecurityFilterChain;
import org.springframework.security.web.authentication.rememberme.JdbcTokenRepositoryImpl;
import org.springframework.security.web.authentication.rememberme.PersistentTokenRepository;

import javax.sql.DataSource;

@Configuration
//开启SpringSecurity的默认行为
@EnableWebSecurity
@EnableGlobalMethodSecurity(prePostEnabled = true)
public class WebSecurityConfig {

//    引入密码加密类
    @Bean
    public PasswordEncoder passwordEncoder() {
        return new BCryptPasswordEncoder();
    }


//        实例化接口实现类
//        @Autowired
//        private UserServiceImpl userService;
        @Autowired
        private MyUserDetailsService userDetailsService;

//    实例化SpringBoot自带的json序列化操作了
    @Autowired
    private ObjectMapper objectMapper;

    /**
     * 获取AuthenticationManager(认证管理器),登录时认证使用(基于数据库方式)
     * @param
     * @return
     * @throws Exception
     */
    @Bean
    public AuthenticationManager authenticationManager() throws Exception {
        //创建DaoAuthenticationProvider
        DaoAuthenticationProvider provider=new DaoAuthenticationProvider();
        //设置userDetailsService,基于数据库方式进行身份认证
        provider.setUserDetailsService(userDetailsService);
        //配置密码编码器
        provider.setPasswordEncoder(passwordEncoder());
        return new ProviderManager(provider);
    }

//    实例化数据源
    @Autowired
    private DataSource dataSource;

    /**
     * 配置持久化Token方式,注意tokenRepository.setCreateTableOnStartup()配置
     */
    @Bean
    public PersistentTokenRepository persistentTokenRepository(){
        JdbcTokenRepositoryImpl tokenRepository = new JdbcTokenRepositoryImpl();
        tokenRepository.setDataSource(dataSource);
        // 设置为true要保障数据库该表不存在,不然会报异常哦
        // 所以第二次打开服务器应用程序的时候得把它设为false
        tokenRepository.setCreateTableOnStartup(false);
        return tokenRepository;
    }


    @Bean
    public SecurityFilterChain securityFilterChain(HttpSecurity http)
            throws Exception{
         http.authorizeRequests()
                    // 开放接口访问权限,不需要登录就可以访问
                    .antMatchers("/").permitAll()
//                admin开头的路径全要只能由管理员进入
//                  .antMatchers("/admin/**").hasRole("ADMIN")
                    // 其余所有请求全部需要登陆才能访问
                    .anyRequest().authenticated()
                 .and()
                 .formLogin()
//                 设置登录页面的Url
                 .loginPage("/toLogin")
//                 设置处理登陆请求的接口
                 .loginProcessingUrl("/userLogin")
//                 设置用户名参数名与页面的一致
                 .loginProcessingUrl("/userLogin")
                 .usernameParameter("username")
                 .passwordParameter("password")
//                 成功处理器
                 .successHandler((req, resp, auth)->{
//                     resp.sendRedirect("/index");
                     objectMapper.writeValue(resp.getOutputStream(),auth.getPrincipal());
                 })
//                 设置登录失败跳转页面
                 .failureHandler((req, resp, ex) -> {
//                     设置错误消息
                     req.setAttribute("msg", ex.getMessage());
//                                          跳转到登录页面
                     req.getRequestDispatcher("/").forward(req, resp);
                 })
                .and()
//                 处理异常跳转其他页面
               .exceptionHandling()
                 .accessDeniedPage("/noAccess")
                 .and()
                 .logout()
                 // 设置安全退出的URL路径
                 .logoutUrl("/logout")
                 // 设置退出成功后跳转的路径
                 .logoutSuccessUrl("/toLogin")
                 .and()
                 .rememberMe()
                 // 指定 rememberMe 的参数名,用于在表单中携带 rememberMe 的值。
                 //.rememberMeParameter("remember-me")
                 // 指定 rememberMe 的有效期,单位为秒,默认2周。
                 .tokenValiditySeconds(30)
                 // 指定 rememberMe 的 cookie 名称。
                 .rememberMeCookieName("remember-me-cookie")
                 // 指定 rememberMe 的 token 存储方式,可以使用默认的 PersistentTokenRepository 或自定义的实现。
                 .tokenRepository(persistentTokenRepository())
                 // 指定 rememberMe 的认证方式,需要实现 UserDetailsService 接口,并在其中查询用户信息。
                 .userDetailsService(userDetailsService);
        http.csrf().disable();
    	return http.build();
    }
}
运行测试代码
由上图可知我们使用不同的身份进行登陆时,若该身份没有该权限进行访问一些方法时会出现权限报错。
二、自定义处理器
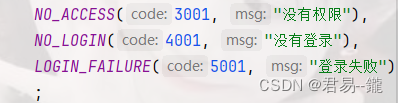
1. 自定义错误类型
在JsonResponseStatus中进行自定义
2. 修改配置类
package com.yx.security.config;

import com.fasterxml.jackson.databind.ObjectMapper;
import com.yx.security.resp.JsonResponseBody;
import com.yx.security.resp.JsonResponseStatus;
import org.springframework.beans.factory.annotation.Autowired;
import org.springframework.context.annotation.Bean;
import org.springframework.context.annotation.Configuration;
import org.springframework.security.authentication.AuthenticationManager;
import org.springframework.security.authentication.ProviderManager;
import org.springframework.security.authentication.dao.DaoAuthenticationProvider;
import org.springframework.security.config.annotation.method.configuration.EnableGlobalMethodSecurity;
import org.springframework.security.config.annotation.web.builders.HttpSecurity;
import org.springframework.security.config.annotation.web.configuration.EnableWebSecurity;
import org.springframework.security.crypto.bcrypt.BCryptPasswordEncoder;
import org.springframework.security.crypto.password.PasswordEncoder;
import org.springframework.security.web.SecurityFilterChain;
import org.springframework.security.web.authentication.rememberme.JdbcTokenRepositoryImpl;
import org.springframework.security.web.authentication.rememberme.PersistentTokenRepository;

import javax.sql.DataSource;

@Configuration
//开启SpringSecurity的默认行为
@EnableWebSecurity
@EnableGlobalMethodSecurity(prePostEnabled = true)
public class WebSecurityConfig {

//    引入密码加密类
    @Bean
    public PasswordEncoder passwordEncoder() {
        return new BCryptPasswordEncoder();
    }


//        实例化接口实现类
//        @Autowired
//        private UserServiceImpl userService;
        @Autowired
        private MyUserDetailsService userDetailsService;

//    实例化SpringBoot自带的json序列化操作了
    @Autowired
    private ObjectMapper objectMapper;

    /**
     * 获取AuthenticationManager(认证管理器),登录时认证使用(基于数据库方式)
     * @param
     * @return
     * @throws Exception
     */
    @Bean
    public AuthenticationManager authenticationManager() throws Exception {
        //创建DaoAuthenticationProvider
        DaoAuthenticationProvider provider=new DaoAuthenticationProvider();
        //设置userDetailsService,基于数据库方式进行身份认证
        provider.setUserDetailsService(userDetailsService);
        //配置密码编码器
        provider.setPasswordEncoder(passwordEncoder());
        return new ProviderManager(provider);
    }

//    实例化数据源
    @Autowired
    private DataSource dataSource;

    /**
     * 配置持久化Token方式,注意tokenRepository.setCreateTableOnStartup()配置
     */
    @Bean
    public PersistentTokenRepository persistentTokenRepository(){
        JdbcTokenRepositoryImpl tokenRepository = new JdbcTokenRepositoryImpl();
        tokenRepository.setDataSource(dataSource);
        // 设置为true要保障数据库该表不存在,不然会报异常哦
        // 所以第二次打开服务器应用程序的时候得把它设为false
        tokenRepository.setCreateTableOnStartup(false);
        return tokenRepository;
    }


    @Bean
    public SecurityFilterChain securityFilterChain(HttpSecurity http)
            throws Exception{
         http.authorizeRequests()
                    // 开放接口访问权限,不需要登录就可以访问
                    .antMatchers("/").permitAll()
//                admin开头的路径全要只能由管理员进入
//                  .antMatchers("/admin/**").hasRole("ADMIN")
                    // 其余所有请求全部需要登陆才能访问
                    .anyRequest().authenticated()
                 .and()
                 .formLogin()
//                 设置登录页面的Url
                 .loginPage("/toLogin")
//                 设置处理登陆请求的接口
                 .loginProcessingUrl("/userLogin")
//                 设置用户名参数名与页面的一致
                 .loginProcessingUrl("/userLogin")
                 .usernameParameter("username")
                 .passwordParameter("password")
//                 成功处理器
                 .successHandler((req, resp, auth)->{
//                     resp.sendRedirect("/index");
                     Object user = auth.getPrincipal();
                     objectMapper.writeValue(resp.getOutputStream(), JsonResponseBody.success(user));
                 })
//                 设置登录失败跳转页面
                 .failureHandler((req, resp, ex) -> {
//                     设置错误消息
                     objectMapper.writeValue(resp.getOutputStream(),JsonResponseBody.other(JsonResponseStatus.NO_LOGIN));

                 })
                .and()
//                 处理异常跳转其他页面
               .exceptionHandling()
//                 .accessDeniedPage("/noAccess")
//                 进入到这里代表权限不足
                 .accessDeniedHandler((req, resp, ex)->{
//                     返回权限不足的提示
                     objectMapper.writeValue(resp.getOutputStream(),JsonResponseBody.other(JsonResponseStatus.NO_ACCESS));
                 })
                 //没有认证   用户没有登陆
                 .authenticationEntryPoint((req, resp, ex) -> {
                     objectMapper
                             .writeValue(resp.getOutputStream(), JsonResponseBody.other(JsonResponseStatus.NO_LOGIN));
                 })
                 .and()
                 .logout()
                 // 设置安全退出的URL路径
                 .logoutUrl("/logout")
                 // 设置退出成功后跳转的路径
                 .logoutSuccessUrl("/toLogin")
                 .and()
                 .rememberMe()
                 // 指定 rememberMe 的参数名,用于在表单中携带 rememberMe 的值。
                 //.rememberMeParameter("remember-me")
                 // 指定 rememberMe 的有效期,单位为秒,默认2周。
                 .tokenValiditySeconds(30)
                 // 指定 rememberMe 的 cookie 名称。
                 .rememberMeCookieName("remember-me-cookie")
                 // 指定 rememberMe 的 token 存储方式,可以使用默认的 PersistentTokenRepository 或自定义的实现。
                 .tokenRepository(persistentTokenRepository())
                 // 指定 rememberMe 的认证方式,需要实现 UserDetailsService 接口,并在其中查询用户信息。
                 .userDetailsService(userDetailsService);
        http.csrf().disable();
    	return http.build();
    }
}
3. 运行测试
我们运行时由于某些原因导致的代码问题会提示相应的问题
如果你的代码后面特别多建议移出来新建一个工具类
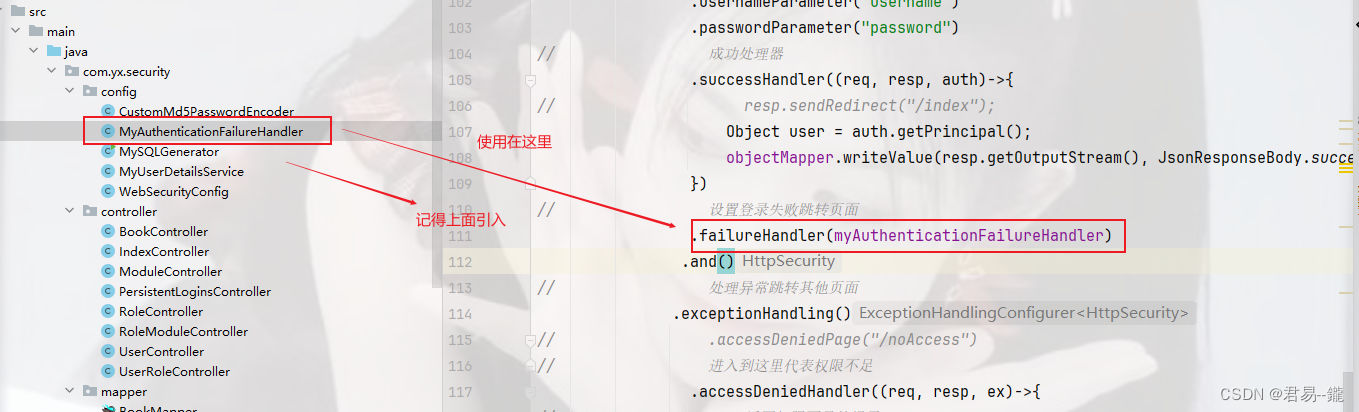
MyAuthenticationFailureHandler.java
package com.yx.security.config;

import com.fasterxml.jackson.databind.ObjectMapper;
import com.yx.security.resp.JsonResponseBody;
import com.yx.security.resp.JsonResponseStatus;
import org.springframework.beans.factory.annotation.Autowired;
import org.springframework.security.core.AuthenticationException;
import org.springframework.security.web.authentication.AuthenticationFailureHandler;
import org.springframework.stereotype.Component;

import javax.servlet.ServletException;
import javax.servlet.http.HttpServletRequest;
import javax.servlet.http.HttpServletResponse;
import java.io.IOException;

/**
 * com.yx.security.config
 *
 * @author 君易--鑨
 * @site www.yangxin.com
 * @company 木易
 * @create 2023/12/24
 */
@Component
public class MyAuthenticationFailureHandler implements AuthenticationFailureHandler {
    //    实例化SpringBoot自带的json序列化操作了
    @Autowired
    private ObjectMapper objectMapper;
    @Override
    public void onAuthenticationFailure(HttpServletRequest request, HttpServletResponse response, AuthenticationException exception) throws IOException, ServletException {
//        设置错误消息
        objectMapper.writeValue(response.getOutputStream(), JsonResponseBody.other(JsonResponseStatus.NO_LOGIN));
    }
}
后续可以在MyAuthenticationFailureHandler实现用户登陆次数过多用户禁用的功能
🎉🎉本期的博客分享到此结束🎉🎉
📚📚各位老铁慢慢消化📚📚
🎯🎯下期博客博主会带来新货🎯🎯
🎁三连加关注,阅读不迷路 !🎁