文章目录
一、安装前准备
1.环境
os:centos 7.6
docker:v20+
k8s:1.23.6
2.k8s集群规划
| 主机名 | ip |
|---|---|
| 192.168.113.129 | k8s-master |
| 192.168.113.130 | k8s-node1 |
| 192.168.113.131 | k8s-node2 |
二、k8s 安装
1. centos基础设置
# 关闭防火墙
systemctl stop firewalld
systemctl disable firewalld

# 关闭selinux
sed -i 's/enforcing/disabled/' /etc/selinux/config  # 永久
# setenforce 0  # 临时

# 关闭swap
# swapoff -a  # 临时
sed -ri 's/.*swap.*/#&/' /etc/fstab    # 永久

# 关闭完swap后,一定要重启一下虚拟机!!!
# 根据规划设置主机名
hostnamectl set-hostname <hostname>

# 在master添加hosts
cat >> /etc/hosts << EOF
192.168.190.129 k8s-master
192.168.190.130 k8s-node1
192.168.190.131 k8s-node2
EOF

# 将桥接的IPv4流量传递到iptables的链
cat > /etc/sysctl.d/k8s.conf << EOF
net.bridge.bridge-nf-call-ip6tables = 1
net.bridge.bridge-nf-call-iptables = 1
EOF

sysctl --system  # 生效

# 时间同步
yum install ntpdate -y
ntpdate time.windows.com
2. docker 安装
传送门:阿里云docker安装
3. k8s安装
3.1 添加阿里云 yum 源
cat > /etc/yum.repos.d/kubernetes.repo << EOF
[kubernetes]
name=Kubernetes
baseurl=https://mirrors.aliyun.com/kubernetes/yum/repos/kubernetes-el7-x86_64
enabled=1
gpgcheck=0
repo_gpgcheck=0

gpgkey=https://mirrors.aliyun.com/kubernetes/yum/doc/yum-key.gpg https://mirrors.aliyun.com/kubernetes/yum/doc/rpm-package-key.gpg
EOF
3.2 安装 kubeadm、kubelet、kubectl
yum install -y kubelet-1.23.6 kubeadm-1.23.6 kubectl-1.23.6

systemctl enable kubelet

# 配置关闭 Docker 的 cgroups,修改 /etc/docker/daemon.json,加入以下内容
# 指定docker不要使用原本的cgroupdriver
{

"exec-opts": ["native.cgroupdriver=systemd"]
}

# 重启 docker
systemctl daemon-reload
systemctl restart docker
3.3 部署 Kubernetes Master
- 在 Master 节点下执行
kubeadm init \
      --apiserver-advertise-address=192.168.190.129 \
      --image-repository registry.aliyuncs.com/google_containers \
      --kubernetes-version v1.23.6 \
      --service-cidr=10.96.0.0/12 \
      --pod-network-cidr=10.244.0.0/16
出现如下log信息:主节点token及cert证书如下:
Your Kubernetes control-plane has initialized successfully!

To start using your cluster, you need to run the following as a regular user:

  mkdir -p $HOME/.kube
  sudo cp -i /etc/kubernetes/admin.conf $HOME/.kube/config
  sudo chown $(id -u):$(id -g) $HOME/.kube/config

Alternatively, if you are the root user, you can run:

  export KUBECONFIG=/etc/kubernetes/admin.conf

You should now deploy a pod network to the cluster.
Run "kubectl apply -f [podnetwork].yaml" with one of the options listed at:
  https://kubernetes.io/docs/concepts/cluster-administration/addons/

Then you can join any number of worker nodes by running the following on each as root:

kubeadm join 192.168.190.129:6443 --token 5bcjya.f11md2zfoc6vwu31 \
        --discovery-token-ca-cert-hash sha256:442becd8e42021f78c307a4bc2ae3cf15eef8313c0621d3c71be0a03cd6fc2ac
- 主节点执行以下操作
# 安装成功后,复制如下配置并执行
mkdir -p $HOME/.kube
sudo cp -i /etc/kubernetes/admin.conf $HOME/.kube/config
sudo chown $(id -u):$(id -g) $HOME/.kube/config
kubectl get nodes
3.4 加入 Kubernetes Node
分别在 k8s-node1 和 k8s-node2 执行
# 下方命令可以在 k8s master 控制台初始化成功后复制 join 命令

kubeadm join 192.168.190.129:6443 --token 5bcjya.f11md2zfoc6vwu31 \
        --discovery-token-ca-cert-hash sha256:442becd8e42021f78c307a4bc2ae3cf15eef8313c0621d3c71be0a03cd6fc2ac
加入时--v=5报错:
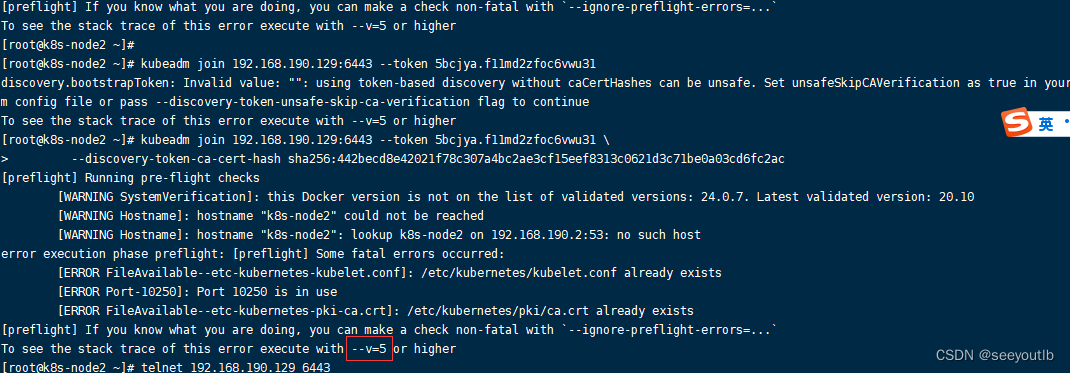
解决:加入token时加入–v=5的参数
kubeadm join 192.168.190.129:6443 --token 5bcjya.f11md2zfoc6vwu31 \
	--v=5 \
        --discovery-token-ca-cert-hash sha256:442becd8e42021f78c307a4bc2ae3cf15eef8313c0621d3c71be0a03cd6fc2ac
注意:以上的ip、token、cert需要替换成自己的
如果初始化的 token 不小心清空了,可以通过如下命令获取或者重新申请
# 如果 token 已经过期,就重新申请
kubeadm token create

# token 没有过期可以通过如下命令获取
kubeadm token list

# 获取 --discovery-token-ca-cert-hash 值,得到值后需要在前面拼接上 sha256:
openssl x509 -pubkey -in /etc/kubernetes/pki/ca.crt | openssl rsa -pubin -outform der 2>/dev/null | \
openssl dgst -sha256 -hex | sed 's/^.* //'
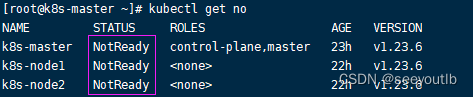
集群还没准备好:如下图 ↓
原因:pod未指定命名空间会有个默认的命名空间;k8s集群创建的时候pod不是放在默认命名空间里面
查看k8s集群组件 ↓
[root@k8s-master ~]# kubectl get componentstatus
Warning: v1 ComponentStatus is deprecated in v1.19+
NAME                 STATUS    MESSAGE                         ERROR
scheduler            Healthy   ok
controller-manager   Healthy   ok
etcd-0               Healthy   {
   "health":"true","reason":""}
指定看哪个命名空间的pod信息 ↓
[root@k8s-master ~]# kubectl get pods -n kube-system
NAME                                 READY   STATUS    RESTARTS   AGE
coredns-6d8c4cb4d-b5ps8              0/1     Pending   0          23h
coredns-6d8c4cb4d-g6zf7              0/1     Pending   0          23h
etcd-k8s-master                      1/1     Running   0          23h
kube-apiserver-k8s-master            1/1     Running   0          23h
kube-controller-manager-k8s-master   1/1     Running   0          23h
kube-proxy-6dk8z                     1/1     Running   0          23h
kube-proxy-6r8hm                     1/1     Running   0          23h
kube-proxy-gzlh2                     1/1     Running   0          23h
kube-scheduler-k8s-master            1/1     Running   0          23h

# 其中pending就是没下载下来的内容;
# coredns 多数是可能没有网络导致,calico安装完成无问题后此日期会得到解决
3.5 部署 CNI 网络插件
master节点
# 1.查看是/opt目录下是否有k8s目录,没有则创建
[root@k8s-master ~]# cd /opt/
[root@k8s-master opt]# ls
cni  containerd  docker_opt
[root@k8s-master opt]# mkdir k8s
[root@k8s-master opt]# cd k8s

#2.下载网络插件
[root@k8s-master ~]# curl  https://docs.tigera.io/calico/latest/manifests/calico.yaml -O

# 如果上面链接下载不成功执行下面的:
[root@k8s-master ~]# curl https://docs.projectcalico.org/archive/v3.23/manifests/calico.yaml -O

#3.修改下载文件calico.yaml中的值为
	- name: CALICO_IPV4POOL_CIDR
      value: "10.244.0.0/16" # 因为我上面k8s集群的网段设置是这个

#3.1 编辑文件calico.yaml
[root@k8s-master ~]# vim calico.yaml
#3.1 文件calico.yaml中查找CALICO_IPV4POOL_CIDR
#输入
:/CALICO_IPV4POOL_CIDR
#输入完后按下n进行查找并替换


# 4.在文件中的CLUSTER_TYPE下方添加或替换指定网卡(我的网卡是eth0)
  - name: IP_AUTODETECTION_METHOD
    value: "interface=ens33"
#注意此处一定要对应自己linux的网卡对应上

# 5.删除镜像 docker.io/ 前缀,避免下载过慢导致失败
[root@k8s-master ~]#  sed -i 's#docker.io/##g' calico.yaml

# 6.查看文件中image出现的行
[root@k8s-master ~]#  grep image calico.yaml


# 7.部署k8s集群,等待k8s集群部署完成(过程需要10分钟左右),yaml修改后直接运行即更新
[root@k8s-master ~]#  kubectl apply -f calico.yaml
获取k8s集群节点信息
[root@k8s-master ~]# kubectl get no
获取k8s集群pod信息
[root@k8s-master k8s]# kubectl get po -n kube-system
NAME                                       READY   STATUS              RESTARTS      AGE
calico-kube-controllers-66bf87d4b8-hvd7x   0/1     ContainerCreating   0             5m17s
calico-node-r5jf8                          0/1     Init:2/3            0             5m20s
calico-node-w58bz                          0/1     Init:2/3            0             5m19s
calico-node-x5rzp                          0/1     Init:0/3            0             5m19s
coredns-6d8c4cb4d-b5ps8                    0/1     ContainerCreating   0             24h
coredns-6d8c4cb4d-g6zf7                    0/1     ContainerCreating   0             24h
etcd-k8s-master                            1/1     Running             0             24h
kube-apiserver-k8s-master                  1/1     Running             0             24h
kube-controller-manager-k8s-master         0/1     Error               0             24h
kube-proxy-6dk8z                           1/1     Running             0             24h
kube-proxy-6r8hm                           1/1     Running             0             24h
kube-proxy-gzlh2                           1/1     Running             0             24h
kube-scheduler-k8s-master                  0/1     Running             1 (28s ago)   24h
查看pod在干什么事情
[root@k8s-master k8s]# kubectl describe po calico-kube-controllers-66bf87d4b8-hvd7x
删除k8s pod
[root@k8s-master k8s]# kubectl delete pod -n kube-system -l k8s-app=calico-node
安装完成标志如下:
# 1.pod都已经running
[root@k8s-master ~]# kubectl get po -n kube-system
NAME                                       READY   STATUS    RESTARTS      AGE
calico-kube-controllers-66bf87d4b8-7cpn4   1/1     Running   0             11m
calico-node-68hrg                          1/1     Running   0             8m7s
calico-node-jxhx4                          1/1     Running   0             8m7s
calico-node-kmlpm                          1/1     Running   0             8m7s
coredns-6d8c4cb4d-b5ps8                    1/1     Running   0             3d21h
coredns-6d8c4cb4d-g6zf7                    1/1     Running   0             3d21h
etcd-k8s-master                            1/1     Running   1 (52m ago)   3d21h
kube-apiserver-k8s-master                  1/1     Running   1 (52m ago)   3d21h
kube-controller-manager-k8s-master         1/1     Running   2 (52m ago)   3d21h
kube-proxy-6dk8z                           1/1     Running   1 (52m ago)   3d20h
kube-proxy-6r8hm                           1/1     Running   1 (52m ago)   3d21h
kube-proxy-gzlh2                           1/1     Running   1 (52m ago)   3d20h
kube-scheduler-k8s-master                  1/1     Running   2 (52m ago)   3d21h

# 2.node都已经ready
[root@k8s-master ~]# kubectl get no -n kube-system
NAME         STATUS   ROLES                  AGE     VERSION
k8s-master   Ready    control-plane,master   3d21h   v1.23.6
k8s-node1    Ready    <none>                 3d20h   v1.23.6
k8s-node2    Ready    <none>                 3d20h   v1.23.6
3.6 测试 kubernetes 集群
以nginx为例子:
# 创建部署
kubectl create deployment nginx --image=nginx

# 暴露端口
kubectl expose deployment nginx --port=80 --type=NodePort

# 查看 pod 以及服务信息
[root@k8s-master k8s]# kubectl get svc
NAME         TYPE        CLUSTER-IP      EXTERNAL-IP   PORT(S)        AGE
kubernetes   ClusterIP   10.96.0.1       <none>        443/TCP        3d21h
nginx        NodePort    10.96.174.105   <none>        80:31754/TCP   10m

#测试方式1
[root@k8s-master k8s]# curl localhost:31754
#测试方式2
[root@k8s-master k8s]# curl  192.168.190.129:31754
从节点kubectl 无法使用问题:需要配置master的apiserver地址
[root@k8s-master ~]# cd ~/.kube
[root@k8s-master .kube]# ls
cache  config
# 配置文件 config中进行配置
[root@k8s-master .kube]#


![[<span style='color:red;'>云</span>原生] 二进制<span style='color:red;'>安装</span><span style='color:red;'>K</span><span style='color:red;'>8</span><span style='color:red;'>S</span>一部分](https://img-blog.csdnimg.cn/direct/1be4595835ff4680b10a2e1372f55ebd.png)
![[<span style='color:red;'>云</span>原生] 二进制<span style='color:red;'>安装</span><span style='color:red;'>K</span><span style='color:red;'>8</span><span style='color:red;'>S</span>(中)](https://img-blog.csdnimg.cn/direct/0abed983a4fe4e28b89cf3d00ff87613.png)