SpringMVC-02
SSM 框架集成与测试
环境配置
IDEA 下创建项⽬
创建Maven对应的Web项⽬配置 pom.xml
2.1. 修改 JDK 版本
<properties>
	 <project.build.sourceEncoding>UTF-8</project.build.sourceEncoding>
	 <maven.compiler.source>1.8</maven.compiler.source>
	 <maven.compiler.target>1.8</maven.compiler.target>
</properties>
2.2. 添加坐标依赖
<dependencies>
		<!-- junit 测试 -->
		 <dependency>
			 <groupId>junit</groupId>
			 <artifactId>junit</artifactId>
			 <version>4.12</version>
			 <scope>test</scope>
		 </dependency>

		 <!-- spring 核⼼jar -->
		 <dependency>
			 <groupId>org.springframework</groupId>
			 <artifactId>spring-context</artifactId>
			 <version>5.2.4.RELEASE</version>
		 </dependency>

		 <!-- spring 测试jar -->
		 <dependency>
			 <groupId>org.springframework</groupId>
			 <artifactId>spring-test</artifactId>
			 <version>5.2.4.RELEASE</version>
		 </dependency>

		 <!-- spring jdbc -->
		 <dependency>
			 <groupId>org.springframework</groupId>
			 <artifactId>spring-jdbc</artifactId>
			 <version>5.2.4.RELEASE</version>
		 </dependency>

		 <!-- spring事物 -->
		 <dependency>
			 <groupId>org.springframework</groupId>
			 <artifactId>spring-tx</artifactId>
			 <version>5.2.4.RELEASE</version>
		 </dependency>

		 <!-- aspectj切⾯编程的jar -->
		 <dependency>
			 <groupId>org.aspectj</groupId>
			 <artifactId>aspectjweaver</artifactId>
			 <version>1.9.5</version>
		 </dependency>

		 <!-- c3p0 连接池,连接数据库 -->
		 <dependency>
			 <groupId>com.mchange</groupId>
			 <artifactId>c3p0</artifactId>
			 <version>0.9.5.2</version>
		 </dependency>

		 <!-- mybatis -->
		 <dependency>
			 <groupId>org.mybatis</groupId>
			 <artifactId>mybatis</artifactId>
			 <version>3.5.3</version>
		 </dependency>

		 <!-- 添加mybatis与Spring整合的核⼼包 -->
		 <dependency>
			 <groupId>org.mybatis</groupId>
			 <artifactId>mybatis-spring</artifactId>
			 <version>2.0.3</version>
		 </dependency>

		 <!-- mysql 驱动包 -->
		 <dependency>
			 <groupId>mysql</groupId>
			 <artifactId>mysql-connector-java</artifactId>
			 <version>8.0.19</version>
		 </dependency>

		 <!-- ⽇志打印相关的jar -->
		 <dependency>
			 <groupId>org.slf4j</groupId>
			 <artifactId>slf4j-log4j12</artifactId>
			 <version>1.7.2</version>
		 </dependency>
		 <dependency>
			 <groupId>org.slf4j</groupId>
			 <artifactId>slf4j-api</artifactId>
			 <version>1.7.2</version>
		 </dependency>

		 <!-- 分⻚插件 -->
		 <dependency>
			 <groupId>com.github.pagehelper</groupId>
			 <artifactId>pagehelper</artifactId>
			 <version>5.1.10</version>
		 </dependency>

		 <!-- spring web -->
		 <dependency>
			 <groupId>org.springframework</groupId>
			 <artifactId>spring-web</artifactId>
			 <version>5.2.4.RELEASE</version>
		 </dependency>

		 <!-- spring mvc -->
		 <dependency>
			 <groupId>org.springframework</groupId>
			 <artifactId>spring-webmvc</artifactId>
			 <version>5.2.4.RELEASE</version>
		 </dependency>

		<!-- web servlet -->
		 <dependency>
			 <groupId>javax.servlet</groupId>
			 <artifactId>javax.servlet-api</artifactId>
			 <version>3.0.1</version>
		 </dependency>

		 <!-- 添加json 依赖jar包(注意版本问题) -->
		 <dependency>
			 <groupId>com.fasterxml.jackson.core</groupId>
			 <artifactId>jackson-core</artifactId>
			 <version>2.10.0</version>
		 </dependency>
		 <dependency>
			 <groupId>com.fasterxml.jackson.core</groupId>
			 <artifactId>jackson-databind</artifactId>
			 <version>2.10.0</version>
		 </dependency>
		 <dependency>
			 <groupId>com.fasterxml.jackson.core</groupId>
			 <artifactId>jackson-annotations</artifactId>
			 <version>2.10.0</version>
		 </dependency>

		 <!-- commons-fileupload -->
		 <dependency>
			 <groupId>commons-fileupload</groupId>
			 <artifactId>commons-fileupload</artifactId>
			 <version>1.3.2</version>
		 </dependency>
</dependencies>
2.3. 设置资源⽬录和插件
 <build>
 <finalName>ssm</finalName>
 <!--
 Maven 项⽬:如果源代码(src/main/java)存在xml、properties、tld 等⽂件
 Maven 默认不会⾃动编译该⽂件到输出⽬录,如果要编译源代码中xml properties tld 等⽂件
 需要显式配置 resources 标签
 -->
 <resources>
		 <resource>
			 <directory>src/main/resources</directory>
			 </resource>
			 <resource>
			 <directory>src/main/java</directory>
			 <includes>
			 <include>**/*.xml</include>
			 <include>**/*.properties</include>
			 <include>**/*.tld</include>
			 </includes>
			 <filtering>false</filtering>
		 </resource>
 </resources>
 <plugins>
		 <!-- 编译环境插件 -->
		 <plugin>
			 <groupId>org.apache.maven.plugins</groupId>
			 <artifactId>maven-compiler-plugin</artifactId>
			 <version>2.3.2</version>
			 <configuration>
			 <source>1.8</source>
			 <target>1.8</target>
			 <encoding>UTF-8</encoding>
			 </configuration>
		 </plugin>

		 <!-- jetty插件 -->
		 <plugin>
			 <groupId>org.eclipse.jetty</groupId>
			 <artifactId>jetty-maven-plugin</artifactId>
			 <version>9.4.27.v20200227</version>
			 <configuration>
			 <scanIntervalSeconds>10</scanIntervalSeconds>
			 <!-- 设置端⼝ -->
			 <httpConnector>
			 <port>8080</port>
			 </httpConnector>
			 <!-- 设置项⽬路径 -->
			 <webAppConfig>
			 <contextPath>/ssm</contextPath>
			 </webAppConfig>
			 </configuration>
		 </plugin>
 </plugins>
 </build>
- 配置 web.xml
<?xml version="1.0" encoding="UTF-8"?>
<web-app id="WebApp_ID" version="3.0"
		 xmlns="http://java.sun.com/xml/ns/javaee"
		 xmlns:xsi="http://www.w3.org/2001/XMLSchema-instance"
		 xsi:schemaLocation="http://java.sun.com/xml/ns/javaee
		 http://java.sun.com/xml/ns/javaee/web-app_3_0.xsd">

 <!-- 启动spring容器-->
 <context-param>
		 <param-name>contextConfigLocation</param-name>
		 <param-value>classpath:spring.xml</param-value>
 </context-param>

 <!-- 设置监听器 -->
 <listener>
	 <listener-class>org.springframework.web.context.ContextLoaderListener</listenerclass>
 </listener>

 <!-- 编码过滤 utf-8 -->
 <filter>
		 <description>char encoding filter</description>
		 <filter-name>encodingFilter</filter-name>
		 <filter-class>org.springframework.web.filter.CharacterEncodingFilter</filterclass>
		 <init-param>
			 <param-name>encoding</param-name>
			 <param-value>UTF-8</param-value>
		 </init-param>
 </filter>
 <filter-mapping>
		 <filter-name>encodingFilter</filter-name>
		 <url-pattern>/*</url-pattern>
 </filter-mapping>

 <!-- servlet请求分发器 -->
 <servlet>
 <servlet-name>springMvc</servlet-name>
 <servlet-class>org.springframework.web.servlet.DispatcherServlet</servlet-class>
 <init-param>
		 <param-name>contextConfigLocation</param-name>
		 <param-value>classpath:servlet-context.xml</param-value>
 </init-param>

 <!-- 表示启动容器时初始化该Servlet -->
 <load-on-startup>1</load-on-startup>
 </servlet>
 <servlet-mapping>
 <servlet-name>springMvc</servlet-name>
 <!-- 这是拦截请求, "/"代表拦截所有请求,"*.do"拦截所有.do请求 -->
 <url-pattern>/</url-pattern>
 <!--<url-pattern>*.do</url-pattern>-->
 </servlet-mapping>
</web-app>

- 配置 servlet-context.xml
在项⽬的 src/main/resources 下创建 servlet-context.xml ⽂件, 内容如下
<beans xmlns="http://www.springframework.org/schema/beans"
		 xmlns:xsi="http://www.w3.org/2001/XMLSchema-instance"
		 xmlns:mvc="http://www.springframework.org/schema/mvc"
		 xmlns:context="http://www.springframework.org/schema/context"
		 xsi:schemaLocation="
		 http://www.springframework.org/schema/mvc
		 http://www.springframework.org/schema/mvc/spring-mvc.xsd
		 http://www.springframework.org/schema/beans
		 http://www.springframework.org/schema/beans/spring-beans.xsd
		 http://www.springframework.org/schema/context
		 http://www.springframework.org/schema/context/spring-context.xsd">

	 <!-- 开启扫描器 -->
	  <context:component-scan base-package="com.wedu.ssm.controller" />

	 <!-- mvc 注解驱动 并添加json ⽀持 -->
	 <mvc:annotation-driven>
		 <mvc:message-converters>
		 <!-- 返回信息为字符串时 处理 -->
			 <bean
			class="org.springframework.http.converter.StringHttpMessageConverter"/>
			 <!-- 将对象转换为json 对象 -->
			 <bean
			class="org.springframework.http.converter.json.MappingJackson2HttpMessageConverter"/>
		 </mvc:message-converters>
	 </mvc:annotation-driven>

	 <!-- 使⽤默认的 Servlet 来响应静态⽂件 -->
	 <mvc:default-servlet-handler/>

	 <!-- 配置视图解析器 -->
	 <bean class="org.springframework.web.servlet.view.InternalResourceViewResolver"
	 id="internalResourceViewResolver">

	 <!-- 前缀:在WEB-INF⽬录下的jsp⽬录下 -->
	 <property name="prefix" value="/WEB-INF/jsp/"/>

	 <!-- 后缀:以.jsp结尾的资源 -->
	 <property name="suffix" value=".jsp"/>
	 </bean>

	 <!-- ⽂件上传 -->
	 <bean id="multipartResolver"
	 class="org.springframework.web.multipart.commons.CommonsMultipartResolver">

	 <!-- 允许⽂件上传的最⼤尺⼨ -->
	 <property name="maxUploadSize">
		 <value>104857600</value>
	 </property>
	 <!--
	 设置⽂件放⼊临时⽂件夹的最⼤⼤⼩限制。
	 此值是阈值,低于此值,则保存在内存中,如⾼于此值,则⽣成硬盘上的临时⽂件。
	 -->
	 <property name="maxInMemorySize">
		 <value>4096</value>
	 </property>
	 </bean>
 </beans>

- 配置 spring.xml
在项⽬的 src/main/resources 下创建 spring.xml ⽂件, 内容如下
<?xml version="1.0" encoding="UTF-8"?>
<beans xmlns="http://www.springframework.org/schema/beans"
		 xmlns:xsi="http://www.w3.org/2001/XMLSchema-instance"
		xmlns:context="http://www.springframework.org/schema/context"
		 xmlns:aop="http://www.springframework.org/schema/aop"
		xmlns:tx="http://www.springframework.org/schema/tx"
		 xsi:schemaLocation="http://www.springframework.org/schema/beans
		 http://www.springframework.org/schema/beans/spring-beans.xsd
		 http://www.springframework.org/schema/context
		 http://www.springframework.org/schema/context/spring-context.xsd
		 http://www.springframework.org/schema/aop
		 http://www.springframework.org/schema/aop/spring-aop.xsd
		 http://www.springframework.org/schema/tx
		 http://www.springframework.org/schema/tx/spring-tx.xsd">

 <!-- 扫描基本包 -->
 <context:component-scan base-package="com.xxxx.ssm" >
		 <!-- context:exclude-filter标签:排除对某个注解的扫描 (过滤controller层) -->
		 <context:exclude-filter type="annotation"
		 expression="org.springframework.stereotype.Controller"
		/>
 </context:component-scan>

 <!-- 加载properties 配置⽂件 -->
 <context:property-placeholder location="classpath:db.properties" />

 <!-- aop -->
 <aop:aspectj-autoproxy />

 <!-- 配置c3p0 数据源 -->
 <bean id="dataSource" class="com.mchange.v2.c3p0.ComboPooledDataSource">
		 <property name="driverClass" value="${jdbc.driver}"></property>
		 <property name="jdbcUrl" value="${jdbc.url}"></property>
		 <property name="user" value="${jdbc.username}"></property>
		 <property name="password" value="${jdbc.password}"></property>
 </bean>

 <!-- 配置事务管理器 -->
 <bean id="txManager"
	 class="org.springframework.jdbc.datasource.DataSourceTransactionManager">
	 <property name="dataSource" ref="dataSource"></property>
 </bean>

 <!-- 设置事物增强 -->
 <tx:advice id="txAdvice" transaction-manager="txManager">
	 <tx:attributes>
			 <tx:method name="add*" propagation="REQUIRED" />
			 <tx:method name="insert*" propagation="REQUIRED" />
			 <tx:method name="update*" propagation="REQUIRED" />
			 <tx:method name="delete*" propagation="REQUIRED" />
	 </tx:attributes>
 </tx:advice>

 <!-- aop 切⾯配置 -->
 <aop:config>
	 <aop:pointcut id="servicePointcut"
	 expression="execution(* com.xxxx.ssm.service..*.*(..))" />
	 <aop:advisor advice-ref="txAdvice" pointcut-ref="servicePointcut" />
 </aop:config>

 <!-- 配置 sqlSessionFactory -->
 <bean id="sqlSessionFactory" class="org.mybatis.spring.SqlSessionFactoryBean">
		 <property name="dataSource" ref="dataSource"></property>
		 <property name="configLocation" value="classpath:mybatis.xml" />
		 <property name="mapperLocations" value="classpath:com/xxxx/ssm/mapper/*.xml"
		/>
 </bean>

	 <!-- 配置扫描器 -->
	 <bean id="mapperScanner"
		class="org.mybatis.spring.mapper.MapperScannerConfigurer">

		 <!-- 扫描com.xxxx.ssm.dao这个包以及它的⼦包下的所有映射接⼝类 -->
		 <property name="basePackage" value="com.xxxx.ssm.dao" />
		 <property name="sqlSessionFactoryBeanName" value="sqlSessionFactory" />
	 </bean>
</beans>

- 配置 mybatis.xml
在项⽬的 src/main/resources 下创建 mybatis.xml ⽂件, 内容如下
<?xml version="1.0" encoding="UTF-8" ?>
<!DOCTYPE configuration
		 PUBLIC "-//mybatis.org//DTD Config 3.0//EN"
		 "http://mybatis.org/dtd/mybatis-3-config.dtd">
<configuration>
		 <typeAliases>
			 <package name="com.xxxx.ssm.po"/>
		 </typeAliases>
		 <plugins>
		 	<plugin interceptor="com.github.pagehelper.PageInterceptor"></plugin>
		 </plugins>
</configuration>
- 配置 db.properties
在项⽬的 src/main/resources 下创建 db.properties ⽂件,内容如下(mysql 创建数据库ssm)
jdbc.driver=com.mysql.cj.jdbc.Driver
jdbc.url=jdbc:mysql://localhost:3306/ssm?
useUnicode=true&characterEncoding=utf8&serverTimezone=GMT%2B8&useSSL=false
jdbc.username=root
jdbc.password=root
- 添加 log4j.properties
在项⽬的 src/main/resources 下创建 log4j.properties ⽂件,内容如下
log4j.rootLogger=DEBUG, Console
# Console
log4j.appender.Console=org.apache.log4j.ConsoleAppender
log4j.appender.Console.layout=org.apache.log4j.PatternLayout
log4j.appender.Console.layout.ConversionPattern=%d [%t] %-5p [%c] - %m%n
log4j.logger.java.sql.ResultSet=INFO
log4j.logger.org.apache=INFO
log4j.logger.java.sql.Connection=DEBUG
log4j.logger.java.sql.Statement=DEBUG
log4j.logger.java.sql.PreparedStatement=DEBUG
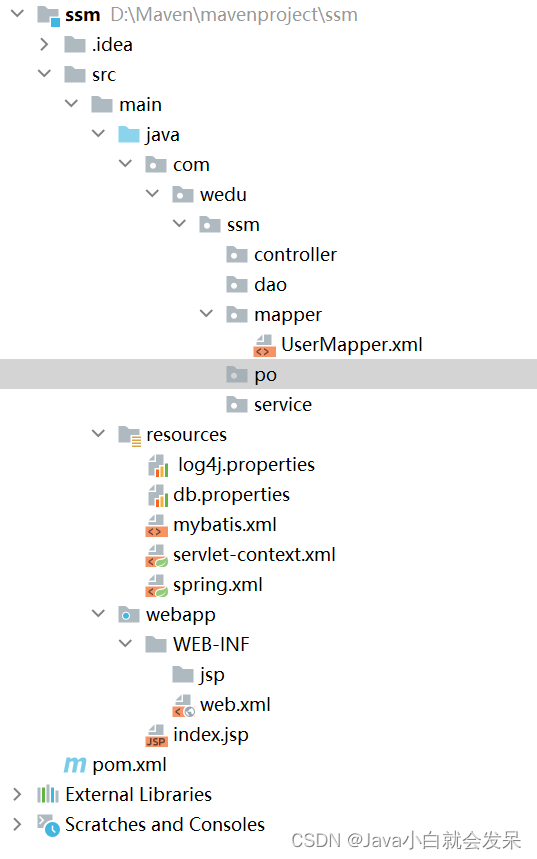
启动,查看配置环境是否有问题
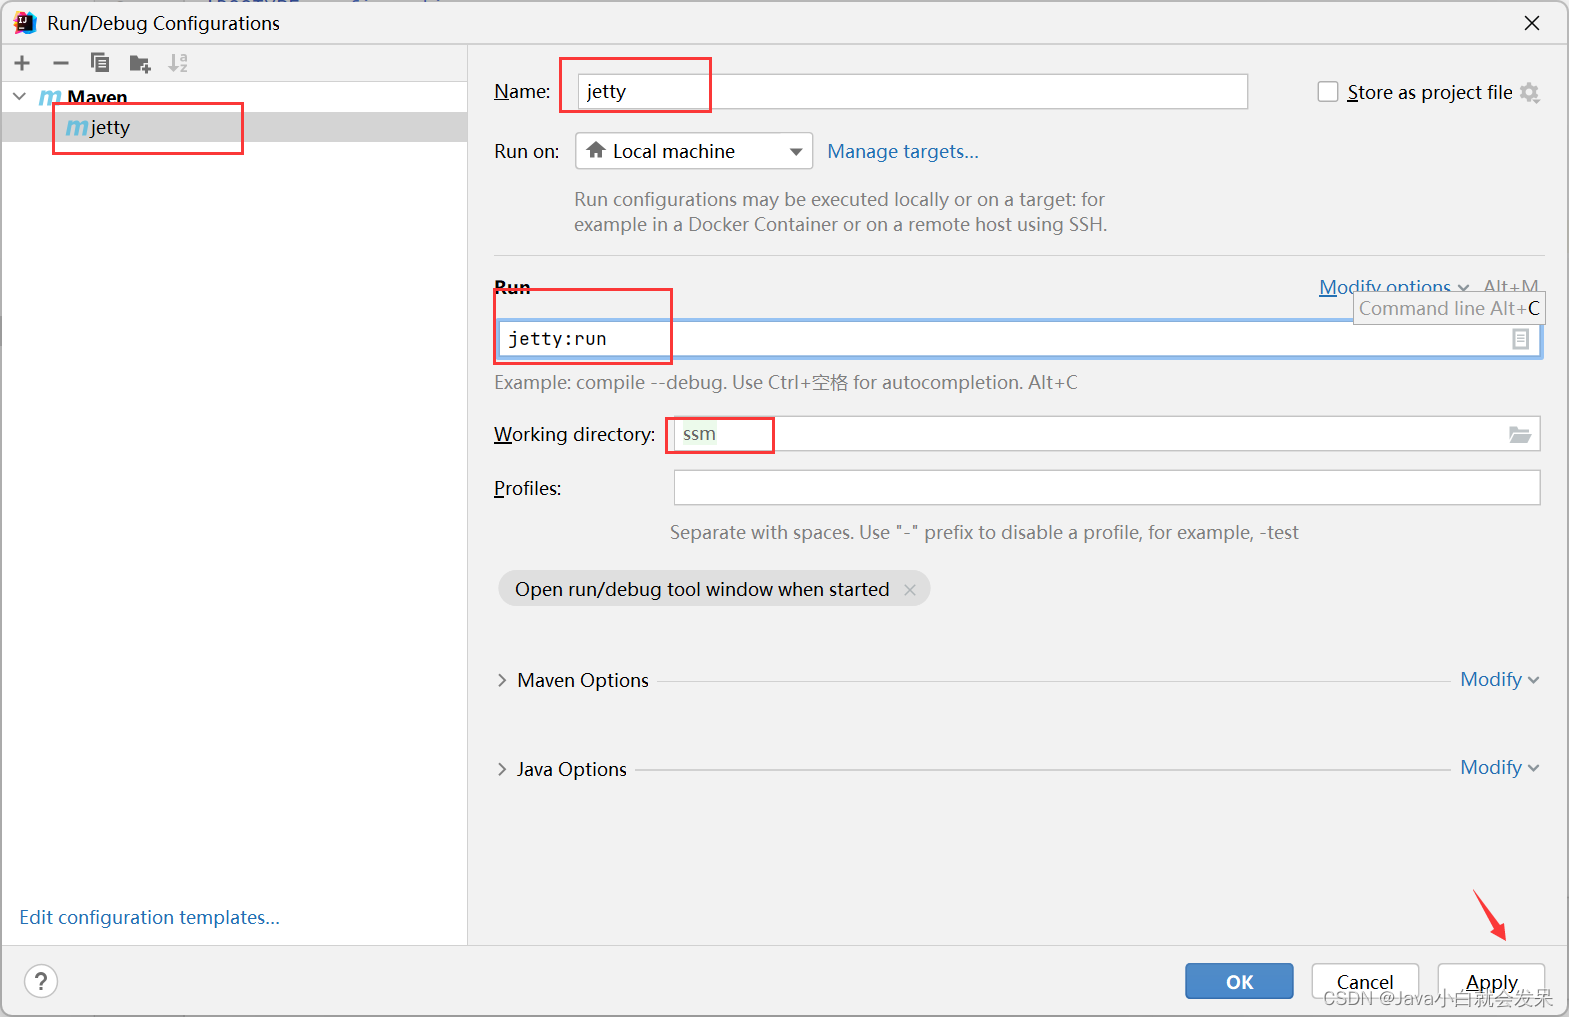
添加源代码
- 添加UserMapper.xml 映射⽂件
UserMapper.xml ⽂件,提供select 查询标签配置
<?xml version="1.0" encoding="UTF-8" ?>
<!DOCTYPE mapper
 PUBLIC "-//mybatis.org//DTD Mapper 3.0//EN"
 "http://mybatis.org/dtd/mybatis-3-mapper.dtd">
<mapper namespace="com.xxxx.ssm.dao.UserDao">

 <select id="queryUserByUserId" parameterType="int"
		resultType="com.xxxx.ssm.po.User">
			 select user_id as userId,user_name as userName,user_pwd as userPwd
			 from tb_user
			 where user_id = #{
   userId}
 </select>
</mapper>
- 添加 User.java
在 po 包下创建 JavaBean ⽂件 User.java (数据库字段对应如下)
private Integer userId;
 private String userName;
 private String userPwd;
 private String userEmail;
 private Date createDate;
 private Date updateDate;

 /**
 set get ⽅法省略
 **/
- 添加UserDao.java 接⼝
dao 包下创建 UserDao.java ⽂件,提供对应的⽤户详情查询功能
public interface UserDao {

 User queryUserByUserId(Integer userId);
}
- 添加 UserService.java
service 包下创建UserService.java ⽂件,提供⽤户详情查询⽅法
@Service
public class UserService {

		 @Autowired
		 private UserDao userDao;
		 public User queryUserByUserId(Integer userId){

		 return userDao.queryUserByUserId(userId);
 }
}
- 添加 HelloController.java
.controller 包下创建 HelloController.java ⽂件
@Controller
public class HelloController {

		 // 注⼊userService
		 @Autowired
		 private UserService userService;

		 @RequestMapping("/hello")
		 public ModelAndView hello(){

		 ModelAndView mv = new ModelAndView();
		 // 调⽤service 层查询⽅法
		 User user = userService.queryUserByUserId(1);
		 mv.addObject("user", user);
		 mv.setViewName("hello");
		 return mv;
 }
}
- 添加 hello.jsp 视图⽂件,然后Idea 下配置 jetty 启动命令
在src/main/webapp/WEB-INF 创建jsp ⽬录,并在该⽬下创建hello.jsp ,展示查询的⽤户信息
<body>
 欢迎你,${
   user.userName}
</body>


