《OpenShift / RHEL / DevSecOps 汇总目录》
请先根据《Red Hat Satellite - 导入订阅清单》一文完成向 Red Hat Satellite 导入分配的订阅订单。
本文中的相关概念请参见《Red Hat Satellite - 核心概念篇》。
文章目录
配置 Repository 并同步
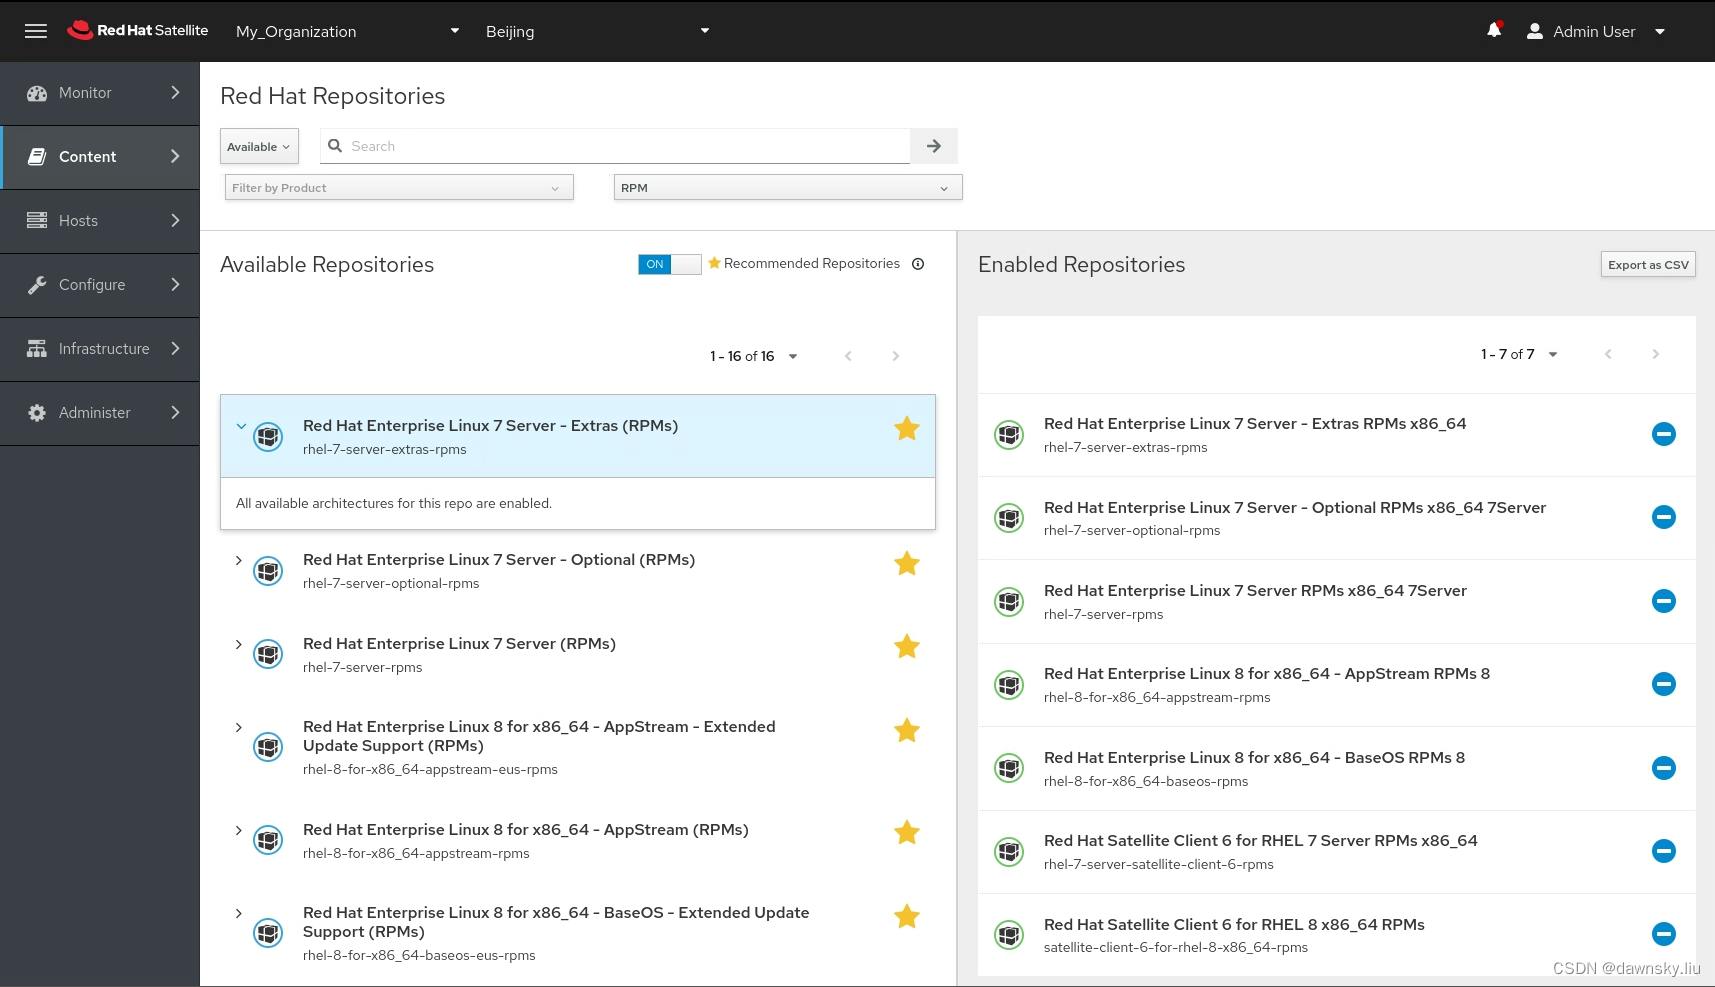
- 在 Satellite 控制台中进入 Content > Red Hat Repositories 菜单,然后从左边 Available Repositories 中选出以下 7 个存储库到 Enabled Repositories。
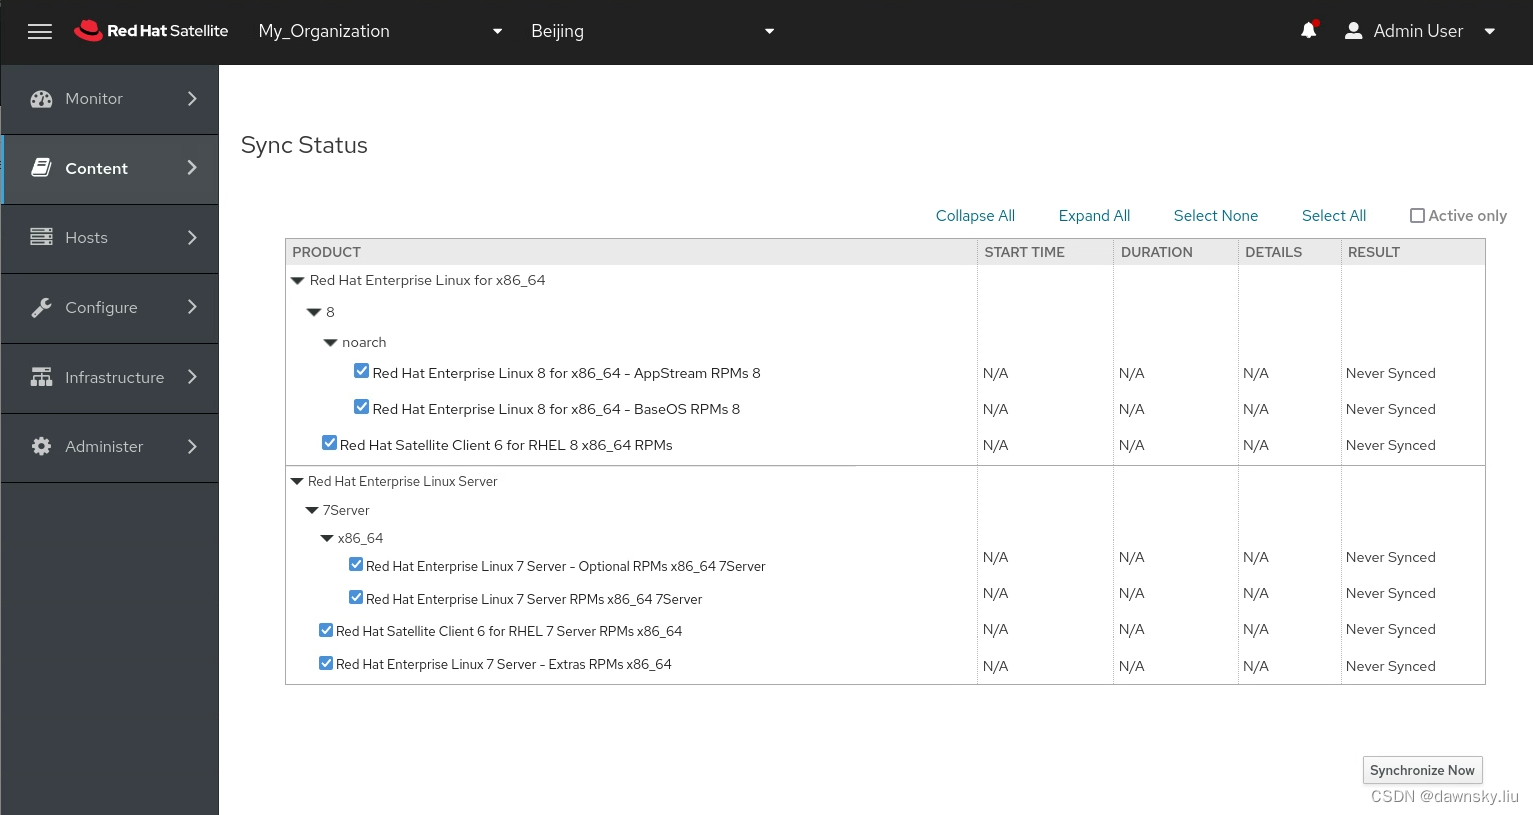
- 在 Satellite 控制台中进入 Content > Sync Status 菜单,然后分别点击 Expand All 和 Select All 选中所有项目,最后点击 Synchronize Now 按钮。同步过程需要一定时间,完成后 RESULT 会显示 Syncing Complete。
配置生命周期的环境路径
- 在 Satellite 控制台中进入 Content > Lifecycle Environments 菜单会显示下图。其中 Library 是 Satellite 缺省环境,所有下载的 Repositories 都会在 Library 中。

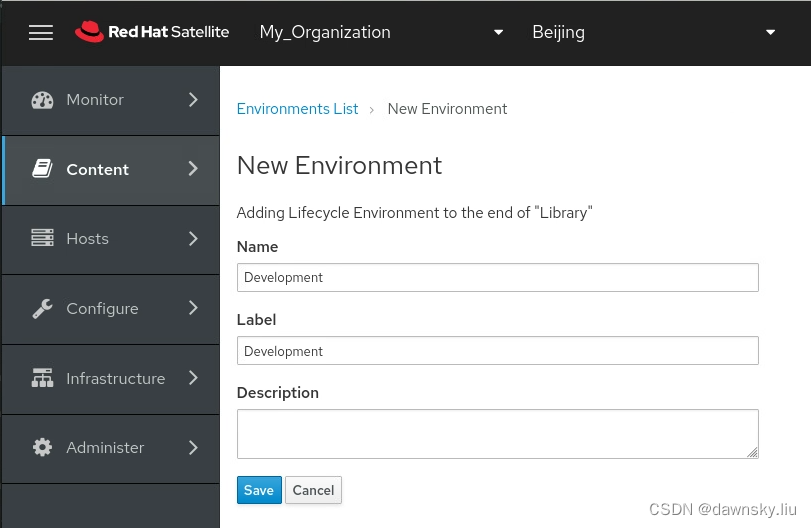
- 点击上图的 Create Environment Path,然后在 New Environment 页面中按照下图创建名为 Development 环境。
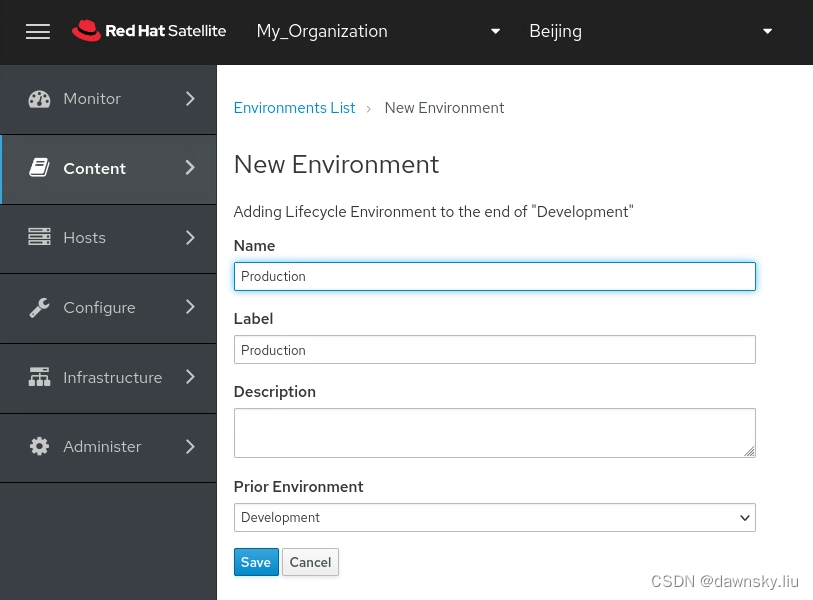
- 再点击 +Add New Environment 按钮,然后创建名为 Production 的环境。
- 最后在 Lifecycle Environment Paths 页面中会显示下图。说明:如果想删除一个 Environment,可以先在下图点击进入它,然后再点击 Remove Environment 即可。

- 也可执行以下命令查看生命周期包含的环境以及先后顺序
$ hammer lifecycle-environment list
---|-------------|------------
ID | NAME        | PRIOR
---|-------------|------------
2  | Development | Library
1  | Library     |
3  | Production  | Development
---|-------------|------------
配置内容视图
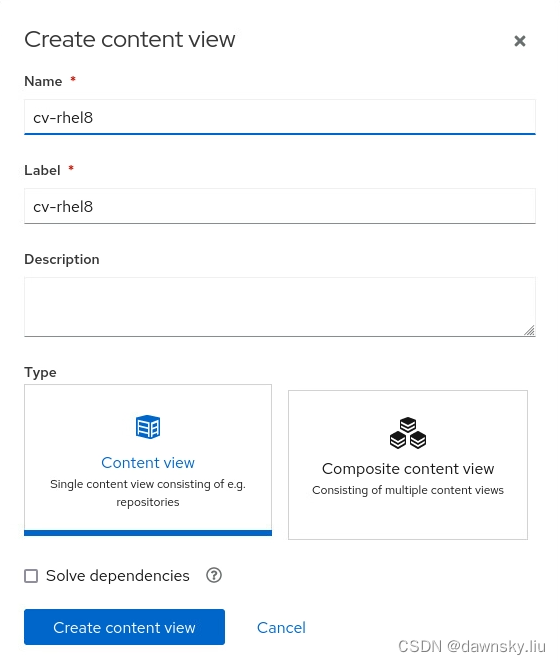
- 在 Satellite 控制台中进入 Content > Content Views 菜单,然后点击 Create content view 按钮。在下图的 Create content view 弹出窗口中填入 Name 和 Label,最后点击 Create content view 按钮。
- 完成后在 Content views 页面中可以看到名为 cn-rhel8 的内容视图。
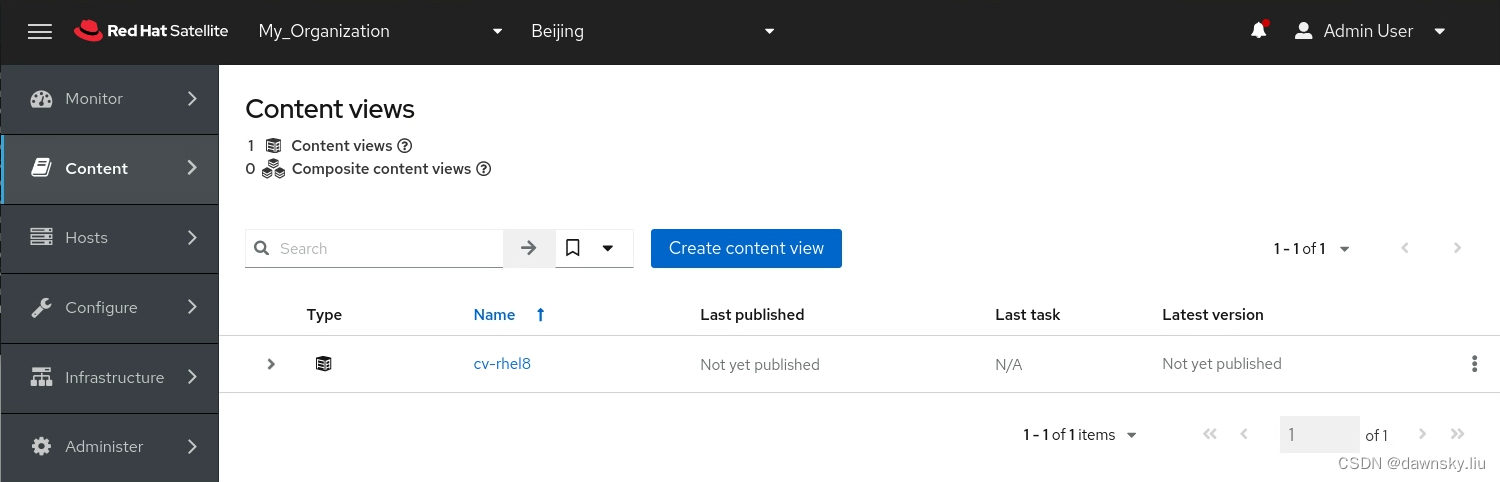
- 在 cv-rhel8 页面中点击 Show repositories 按钮。

- 在下图的选中以下 3 个和 RHEL 8 相关的 Repositories,然后点击 Add repositories 按钮。
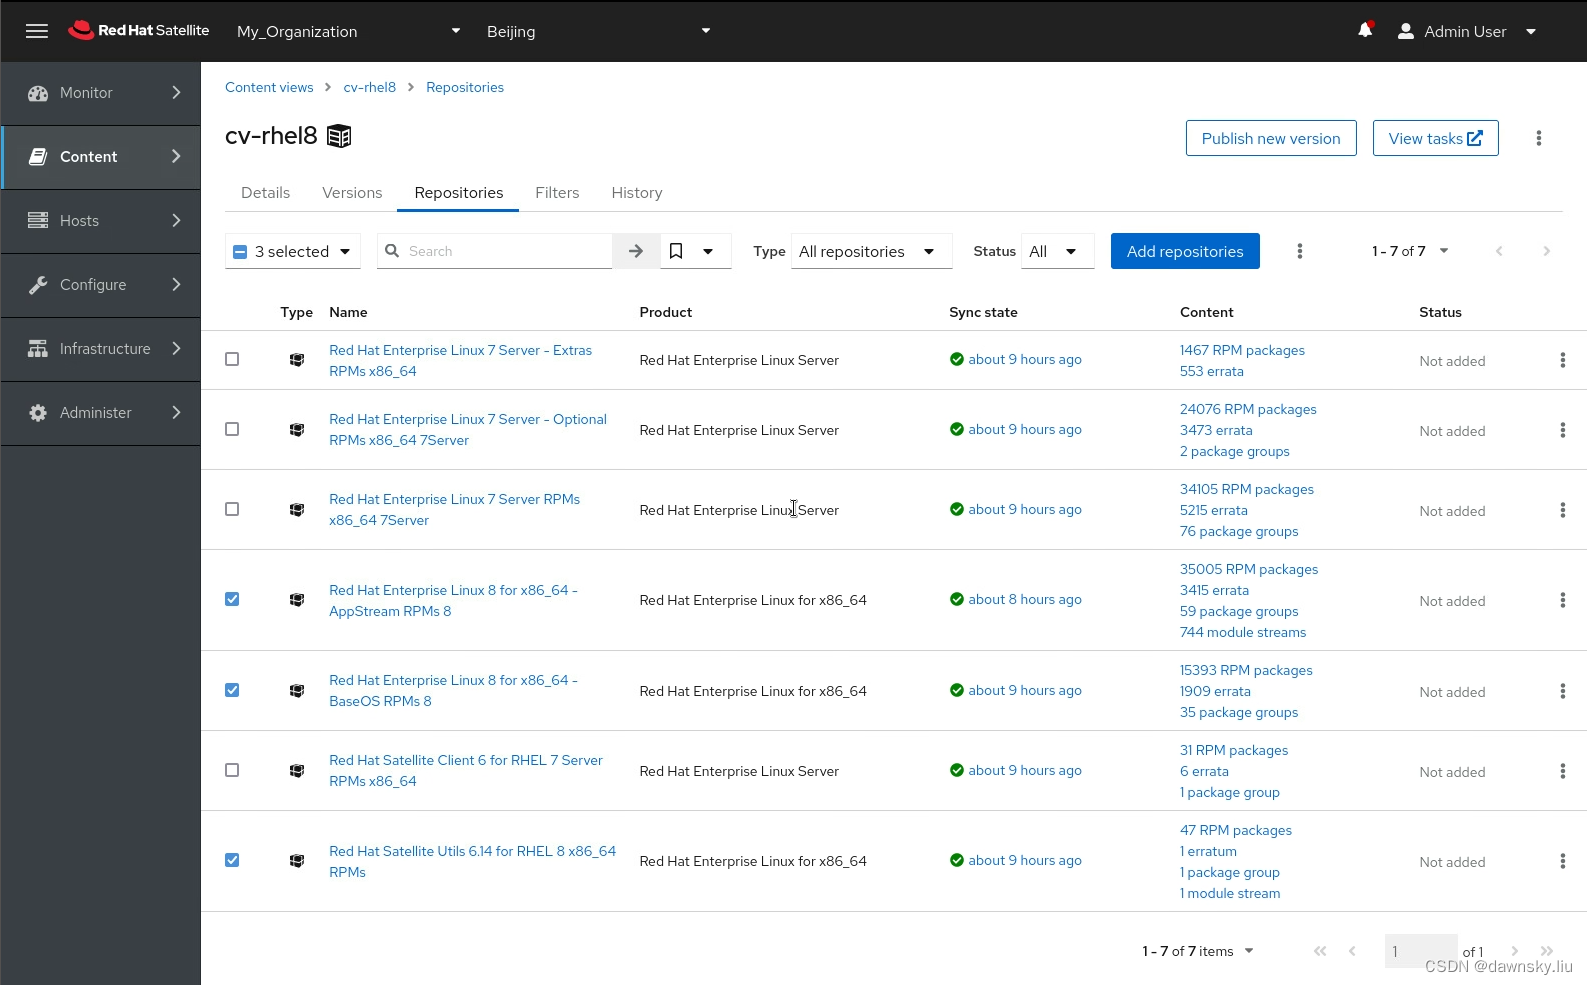
- 最后可以看到名为 cv-rhel8 内容视图包含的 Repositories 如下图。

发布内容视图到生命周期的指定环境
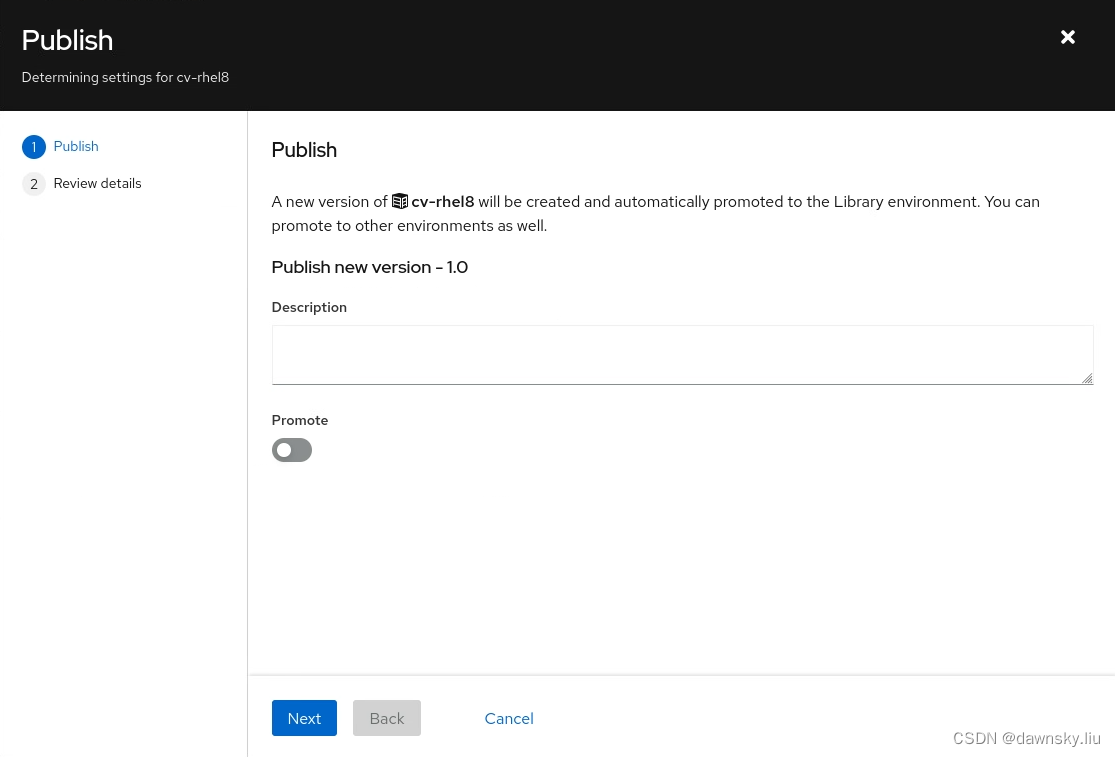
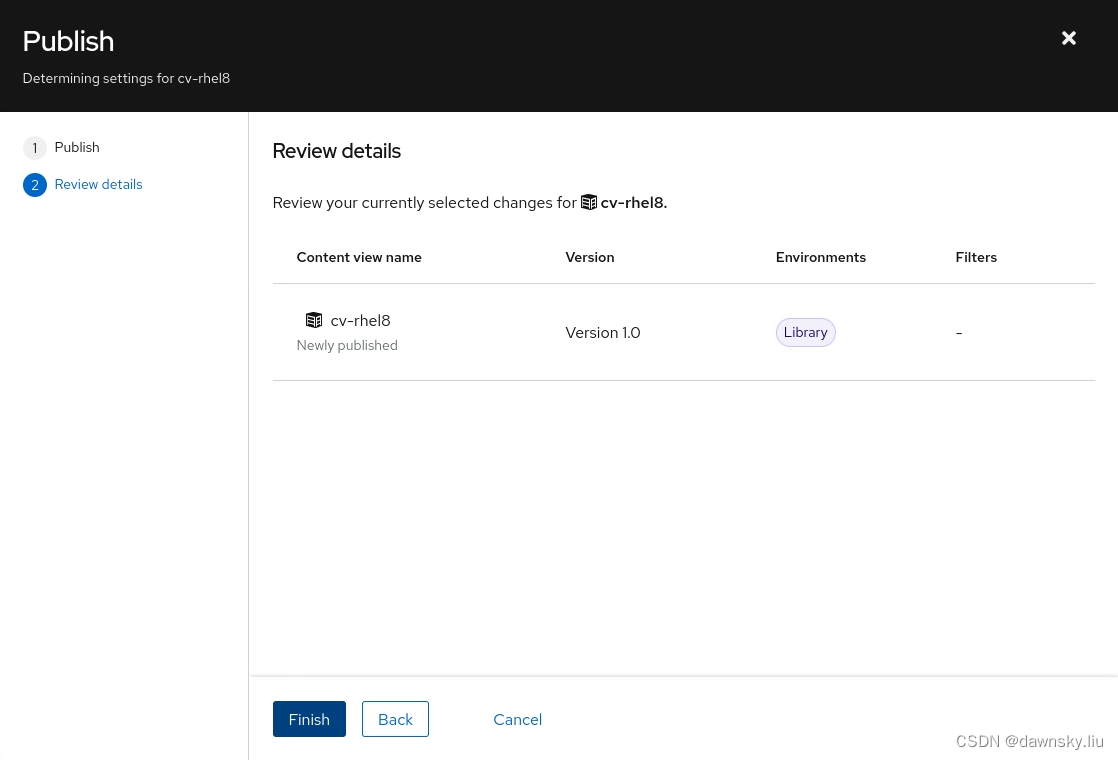
- 在上图中的内容视图页面中点击 Publish new version 按钮会弹出下图的 Publish 窗口。先点击 Next,在点击 Finish 即可将当前在 cv-rhel8 中的内容打包发布为 version-1.0,且该版本的内容可以在 Library 环境中被使用。
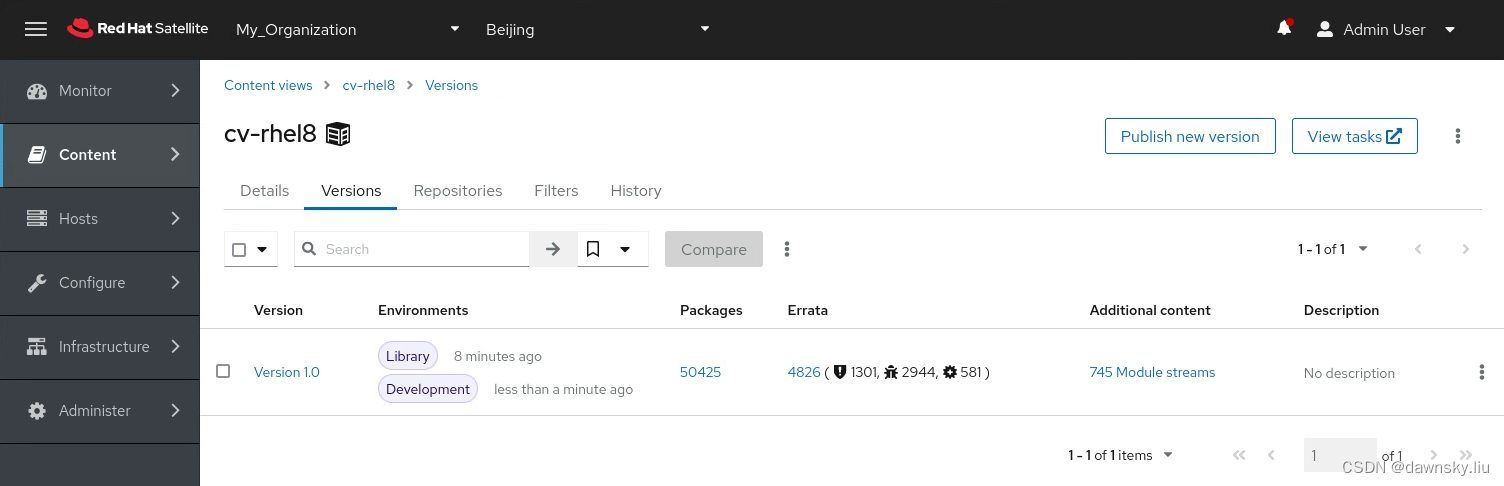
- 在 cv-rhel8 的 Versions 中可以看到 Version 1.0 中包含的存储库。

- 点击上图的 Promote,然后在下图的弹出窗口选中生命周期的 Development 环境,然后点击 Promote 按钮。
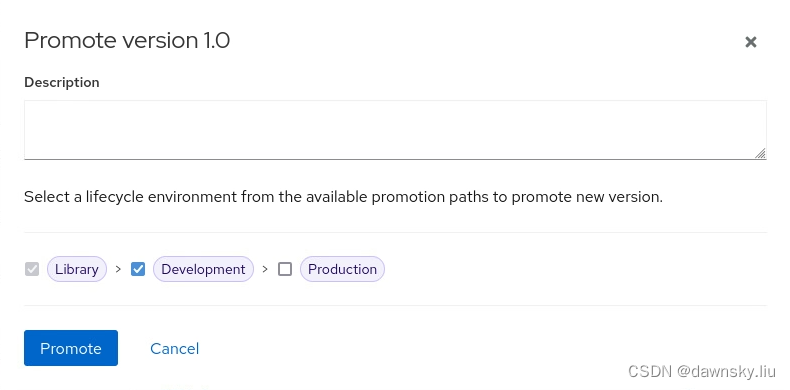
- 这样就可在处于 Library 和 Development 的环境中使用 Version 1.0 的内容了。
配置激活秘钥
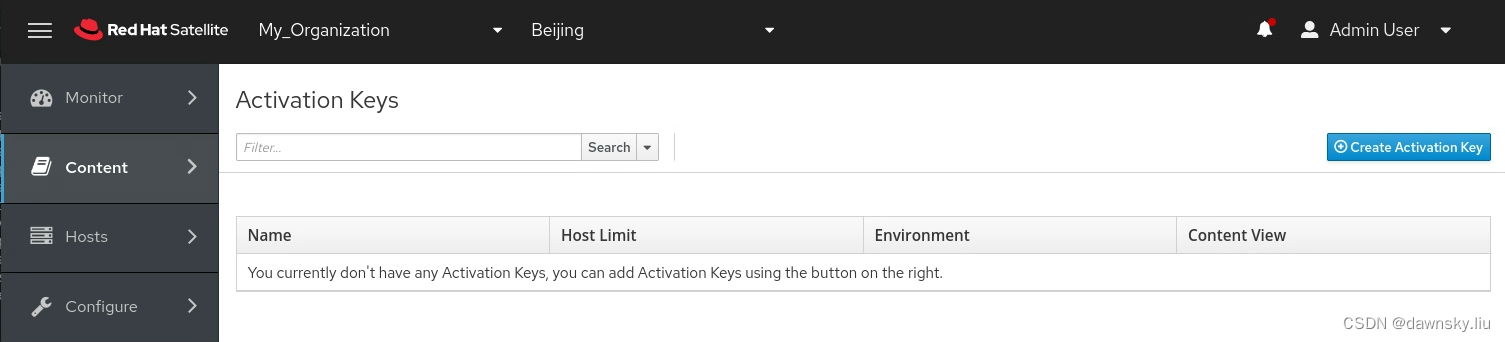
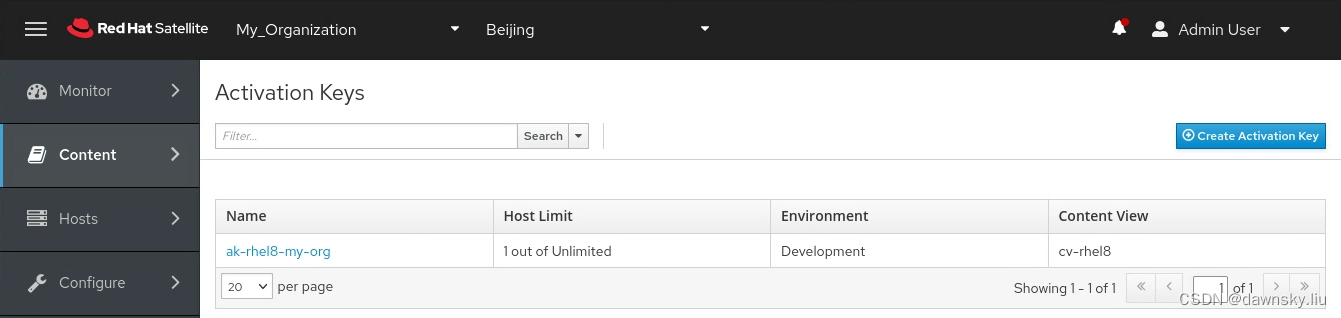
- 在 Satellite 控制台中进入 Content > Activation Keys 菜单,然后在下图页面中点击 Create Activation Key。
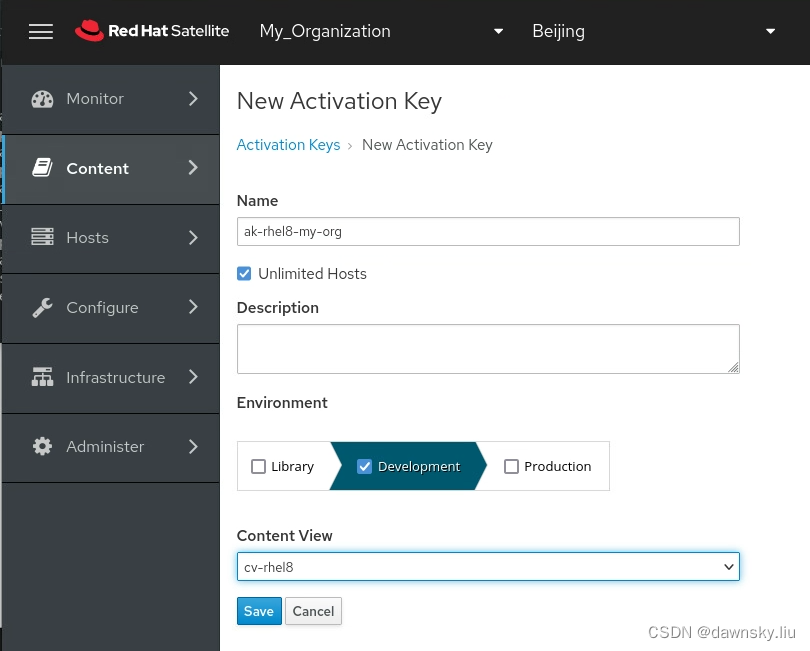
- 在 New Activation Key 页面中按下图填写然后 Save。以下配置说明使用该激活秘钥注册的主机将能使用 Development 环境的 cv-rhel8 内容视图所配置的存储库。注意:在这里没有限制激活秘钥能注册的主机数量,如果需要限制,可以去掉 Unlimited Hosts 选项,并填写 Limit 数量即可。
- 在下图 Activation Key 的详细页面中设置 Release Version 为 8,然后保存。

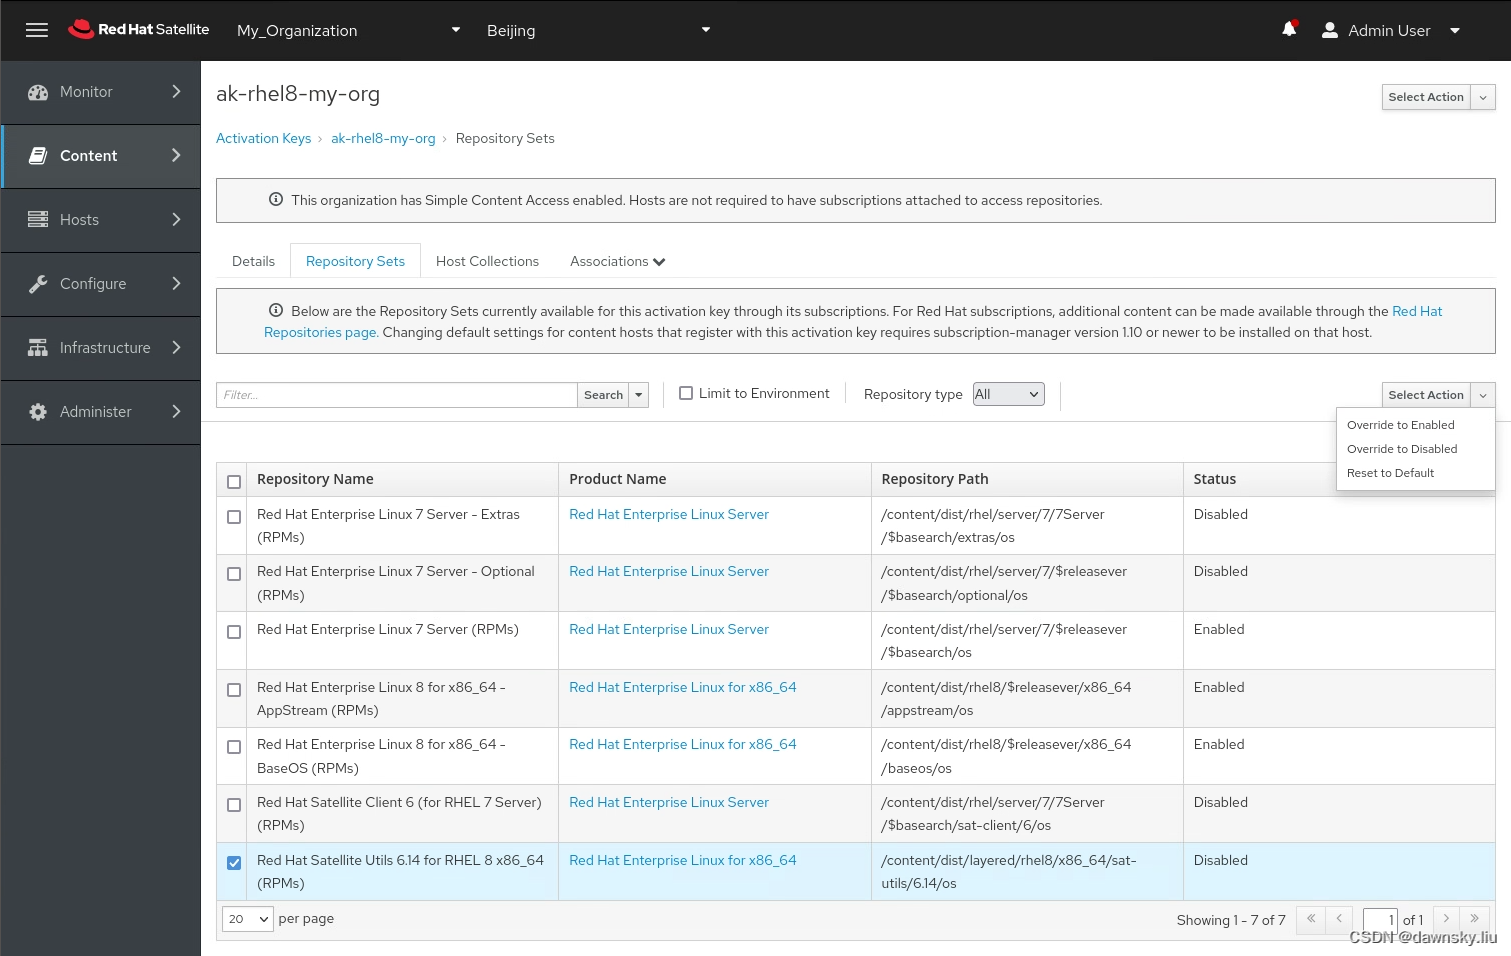
- 另外还可在 Repository Sets 中调整注册主机可以使用的存储库。
注册和注销主机
可以使用以下三种方法实现向 Satellite 注册主机:
- 使用 Satellite 的 Register Host 功能生成的 curl 命令注册,这是官方推荐的方法。
- 使用上图 Activation Key 页面生成的 subscription-manager 命令注册。由于这种注册方法不能为主机指定 Location(只能在注册后手动调整主机所属 Localtion),所以官方已经不推荐了。
- 使用 <SATELLITE_SERVER>/pub/bootstrap.py 提供的 Python 脚本注册,这种方法官方也不再推荐了。
另外在向 Satellite 注册主机过程中,如果主机所属的组织配置有 “SCA - 简单内容访问”,则注册过程无需再为主机配置所使用的订阅。如果是非 SCA 的组织,还需要手动为主机配置所使用的订阅。
以下使用 curl 方法分别介绍如何向 SCA 组织和非 SCA 组织注册主机。
向 SCA 类型的组织注册主机
- 在需要注册的主机上执行命令,查看当前主机的状态注册。
$ subscription-manager status
+-------------------------------------------+
   System Status Details
+-------------------------------------------+
Overall Status: Unknown

System Purpose Status: Unknown
- 在 Satellite 控制台中进入 Hosts > Register Host 菜单,然后在 Register Host 页面中按照下图选择主机相关的配置,最后点击 Generate。

- 复制生成的 Registration command,然后再要注册的主机上以 root 用户执行该命令。
$ curl -sS --insecure 'https://satellite.example.local/register?activation_keys=ak-rhel8-my-org&location_id=2&organization_id=1&update_packages=false' -H 'Authorization: Bearer eyJhbGciOiJIUzI1NiJ9.eyJ1c2VyX2lkIjo0LCJpYXQiOjE3MDE5MTQ4NDEsImp0aSI6ImI4Y2JhMTY5MzFiOWJlZTVmMmQwNWQwNjhiNzIzZjIwZWU1NTkyNmZjOTU3Nzg4Y2Q0NmY0MjgwYzQ2YWRlNmYiLCJleHAiOjE3MDE5MjkyNDEsInNjb3BlIjoicmVnaXN0cmF0aW9uI2dsb2JhbCByZWdpc3RyYXRpb24jaG9zdCJ9.SBatG8EqAlaT5_2oLmDAe0wndBMzGZDZ6ZgqsO00140' | bash
- 再次查看主机的注册状态。
$ subscription-manager status
+-------------------------------------------+
   System Status Details
+-------------------------------------------+
Overall Status: Disabled
Content Access Mode is set to Simple Content Access. This host has access to content, regardless of subscription status.

System Purpose Status: Disabled

$ subscription-manager identity
system identity: 653290c4-5552-4e8b-9929-db6467a8e422
name: rhel-1
org name: My_Organization
org ID: My_Organization
environment name: Development/cv-rhel8
- 查看注册主机可用的内容存储库。
$ subscription-manager repos --list
+----------------------------------------------------------+
    Available Repositories in /etc/yum.repos.d/redhat.repo
+----------------------------------------------------------+
Repo ID:   rhel-8-for-x86_64-appstream-rpms
Repo Name: Red Hat Enterprise Linux 8 for x86_64 - AppStream (RPMs)
Repo URL:  https://satellite.example.local/pulp/content/My_Organization/Development/cv-rhel8/content/dist/rhel8/$releasever/x86_64/appstr
           eam/os
Enabled:   1

Repo ID:   satellite-utils-6.14-for-rhel-8-x86_64-rpms
Repo Name: Red Hat Satellite Utils 6.14 for RHEL 8 x86_64 (RPMs)
Repo URL:  https://satellite.example.local/pulp/content/My_Organization/Development/cv-rhel8/content/dist/layered/rhel8/x86_64/sat-utils/
           6.14/os
Enabled:   0

Repo ID:   rhel-8-for-x86_64-baseos-rpms
Repo Name: Red Hat Enterprise Linux 8 for x86_64 - BaseOS (RPMs)
Repo URL:  https://satellite.example.local/pulp/content/My_Organization/Development/cv-rhel8/content/dist/rhel8/$releasever/x86_64/baseos
           /os
Enabled:   1
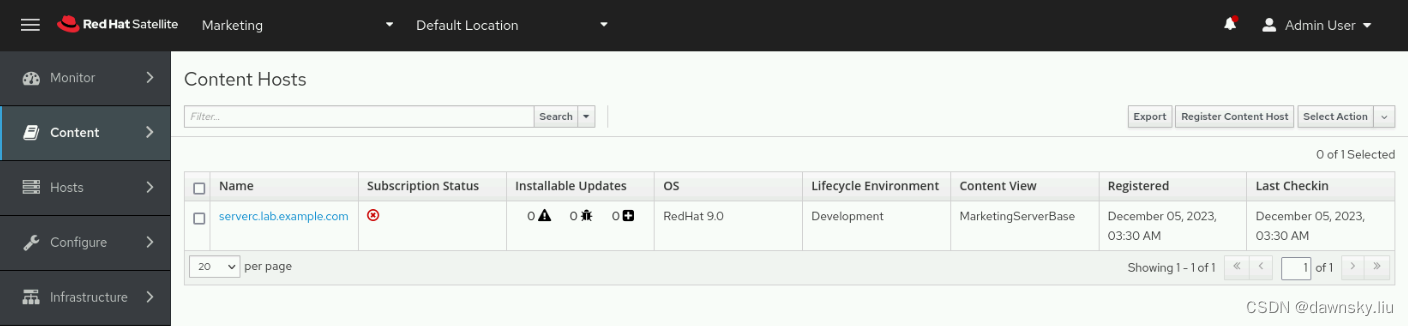
- 此时可以在 Content Hosts 页面中看到注册主机的基本配置以及可安装升级的软件包。

- 由于注册以上主机用到了名为 ak-rhel8-my-org 的激活秘钥,进入 Content > Activation Keys 页面中可以从 Host Limit 列中看到使用该激活秘钥注册的主机数量。
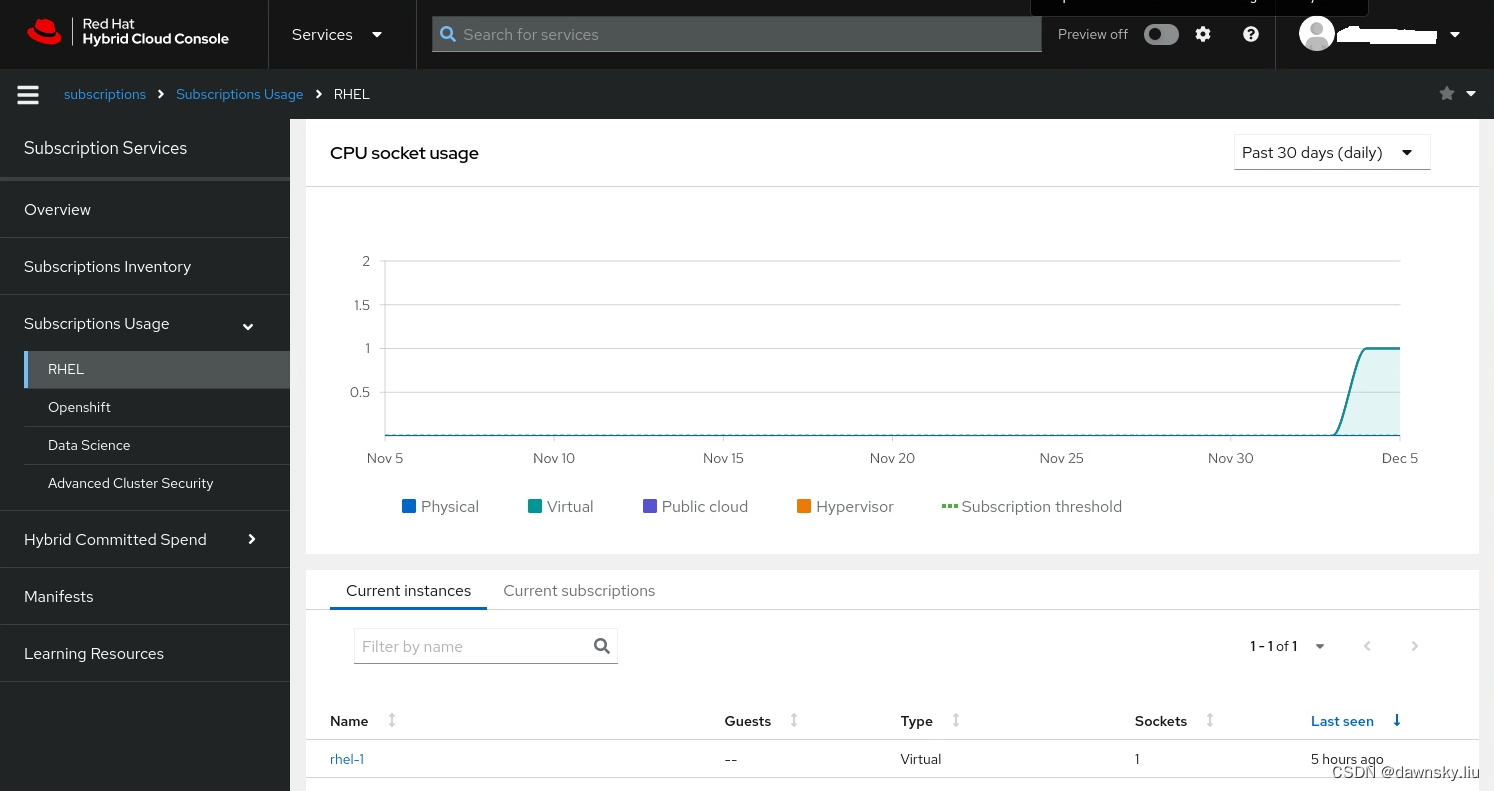
- 进入 Content > Subscription 菜单,查看订阅的消耗情况,确认 Consumed 一列为 0。这是由于 SCA 类型的组织不计算使用的订阅数量,而后面的非 SCA 组织会计算消耗的订阅。注意:SCA 不计算所使用的订阅不代表超用订阅是合规的。

- 点击上图的 View Subscription Usage 后可以访问红帽官方网站查看 RHEL 的订阅使用情况。
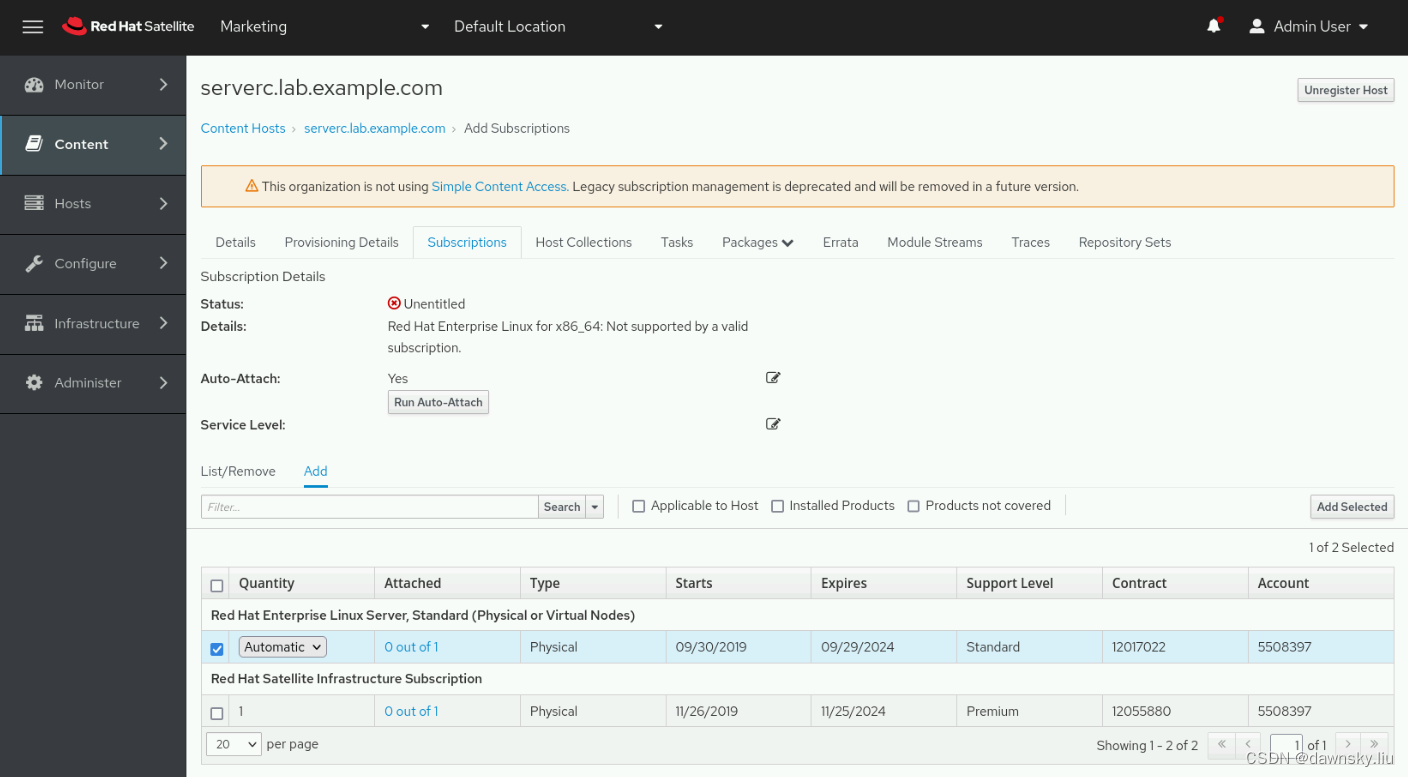
向非 SCA 类型的组织注册主机
- 执行前一节的前三步,但注册命令所关联的是非 SCA组织。
- 在 Satellite 控制台的 Content Hosts 中查看主机,其中 Subscription Status 是 Unentitled 状态。
- 进入该主机,然后进入 Subscriptions,在 Subscription Details 下方区域切换到 Add。在选择可用的订阅后点击 Add Selected。
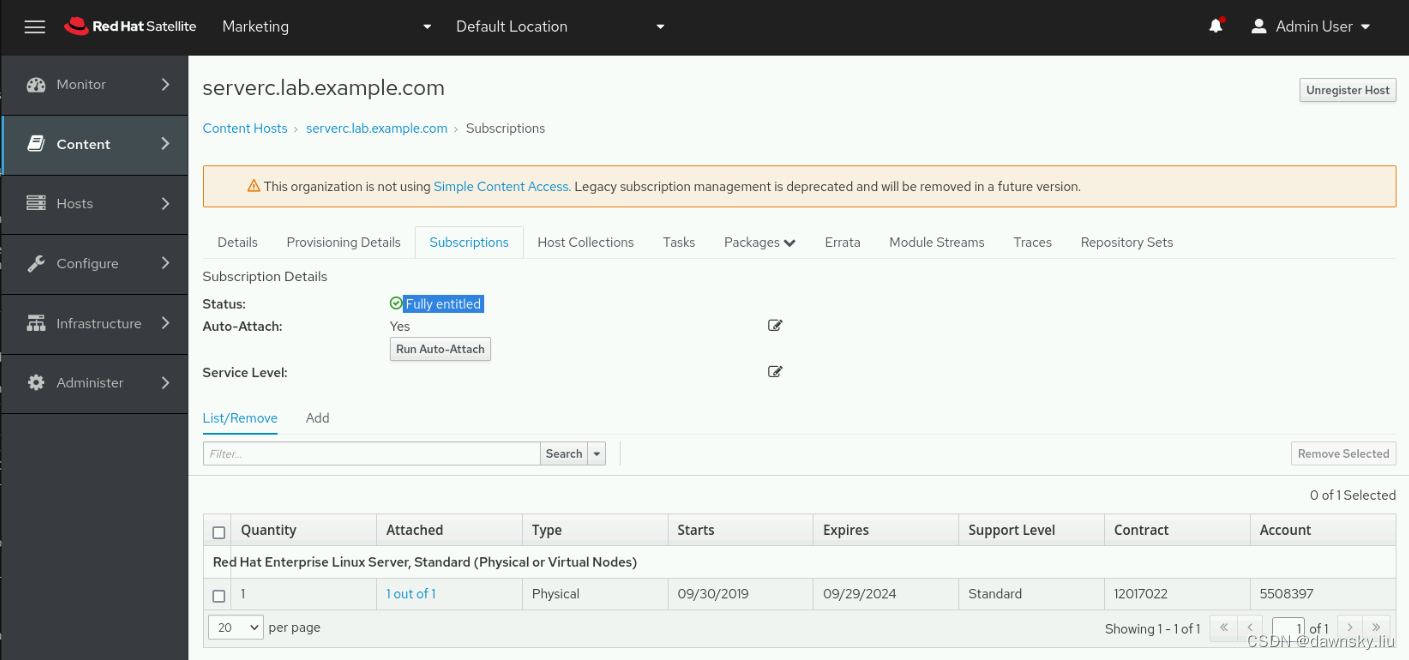
- 此时主机的订阅状态已经变为 Fully entitled。
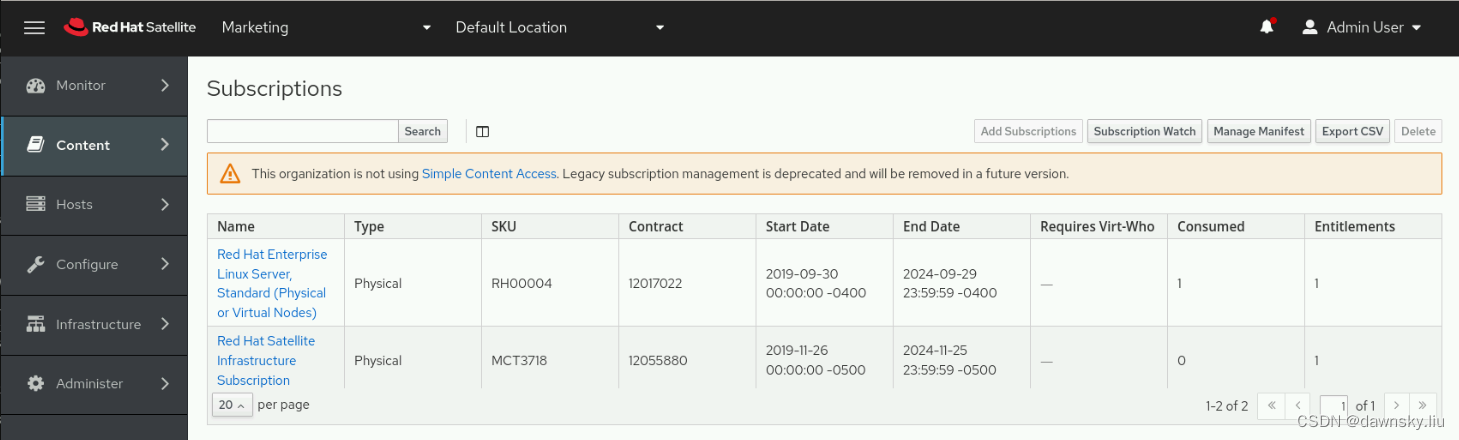
- 进入 Content > Subscription 菜单,查看订阅的消耗情况,可以看到前面注册的主机所用的订阅已经 Consumed 了一个订阅。
注销主机
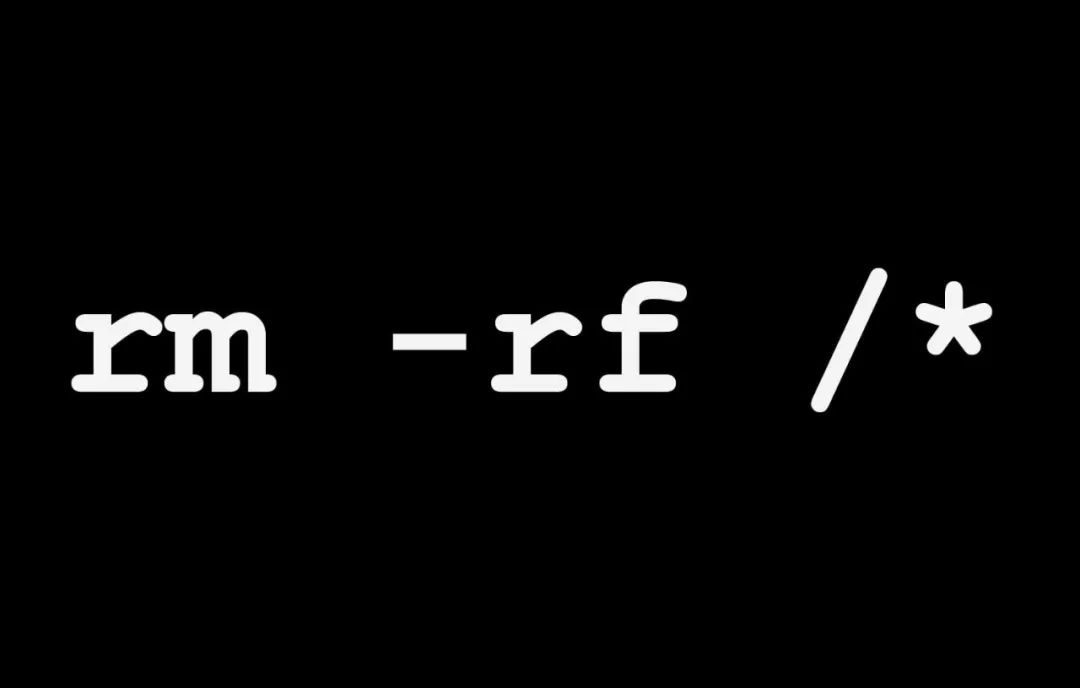
在注册主机中以 root 用户执行以下命令,可以将主机从 Satellite 注销掉。
$ dnf clean all
Updating Subscription Management repositories.
16 files removed
$ rm -rf /var/cache/dnf/

$ subscription-manager remove --all
2 local certificates have been deleted.
2 subscriptions removed at the server.

$ subscription-manager unregister
Unregistering from: satellite.lab.example.com:443/rhsm
System has been unregistered.

$ subscription-manager clean
All local data removed
查看主机和内容主机
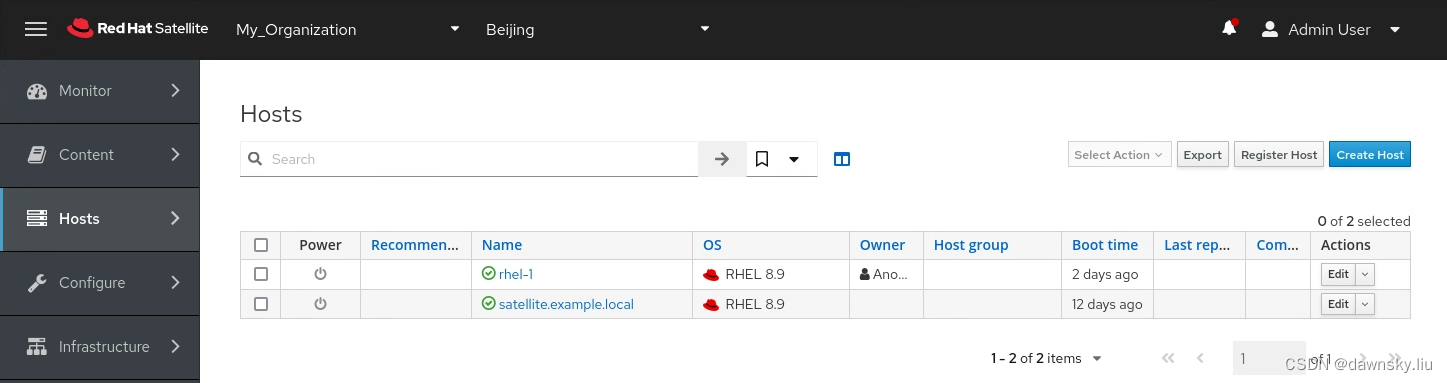
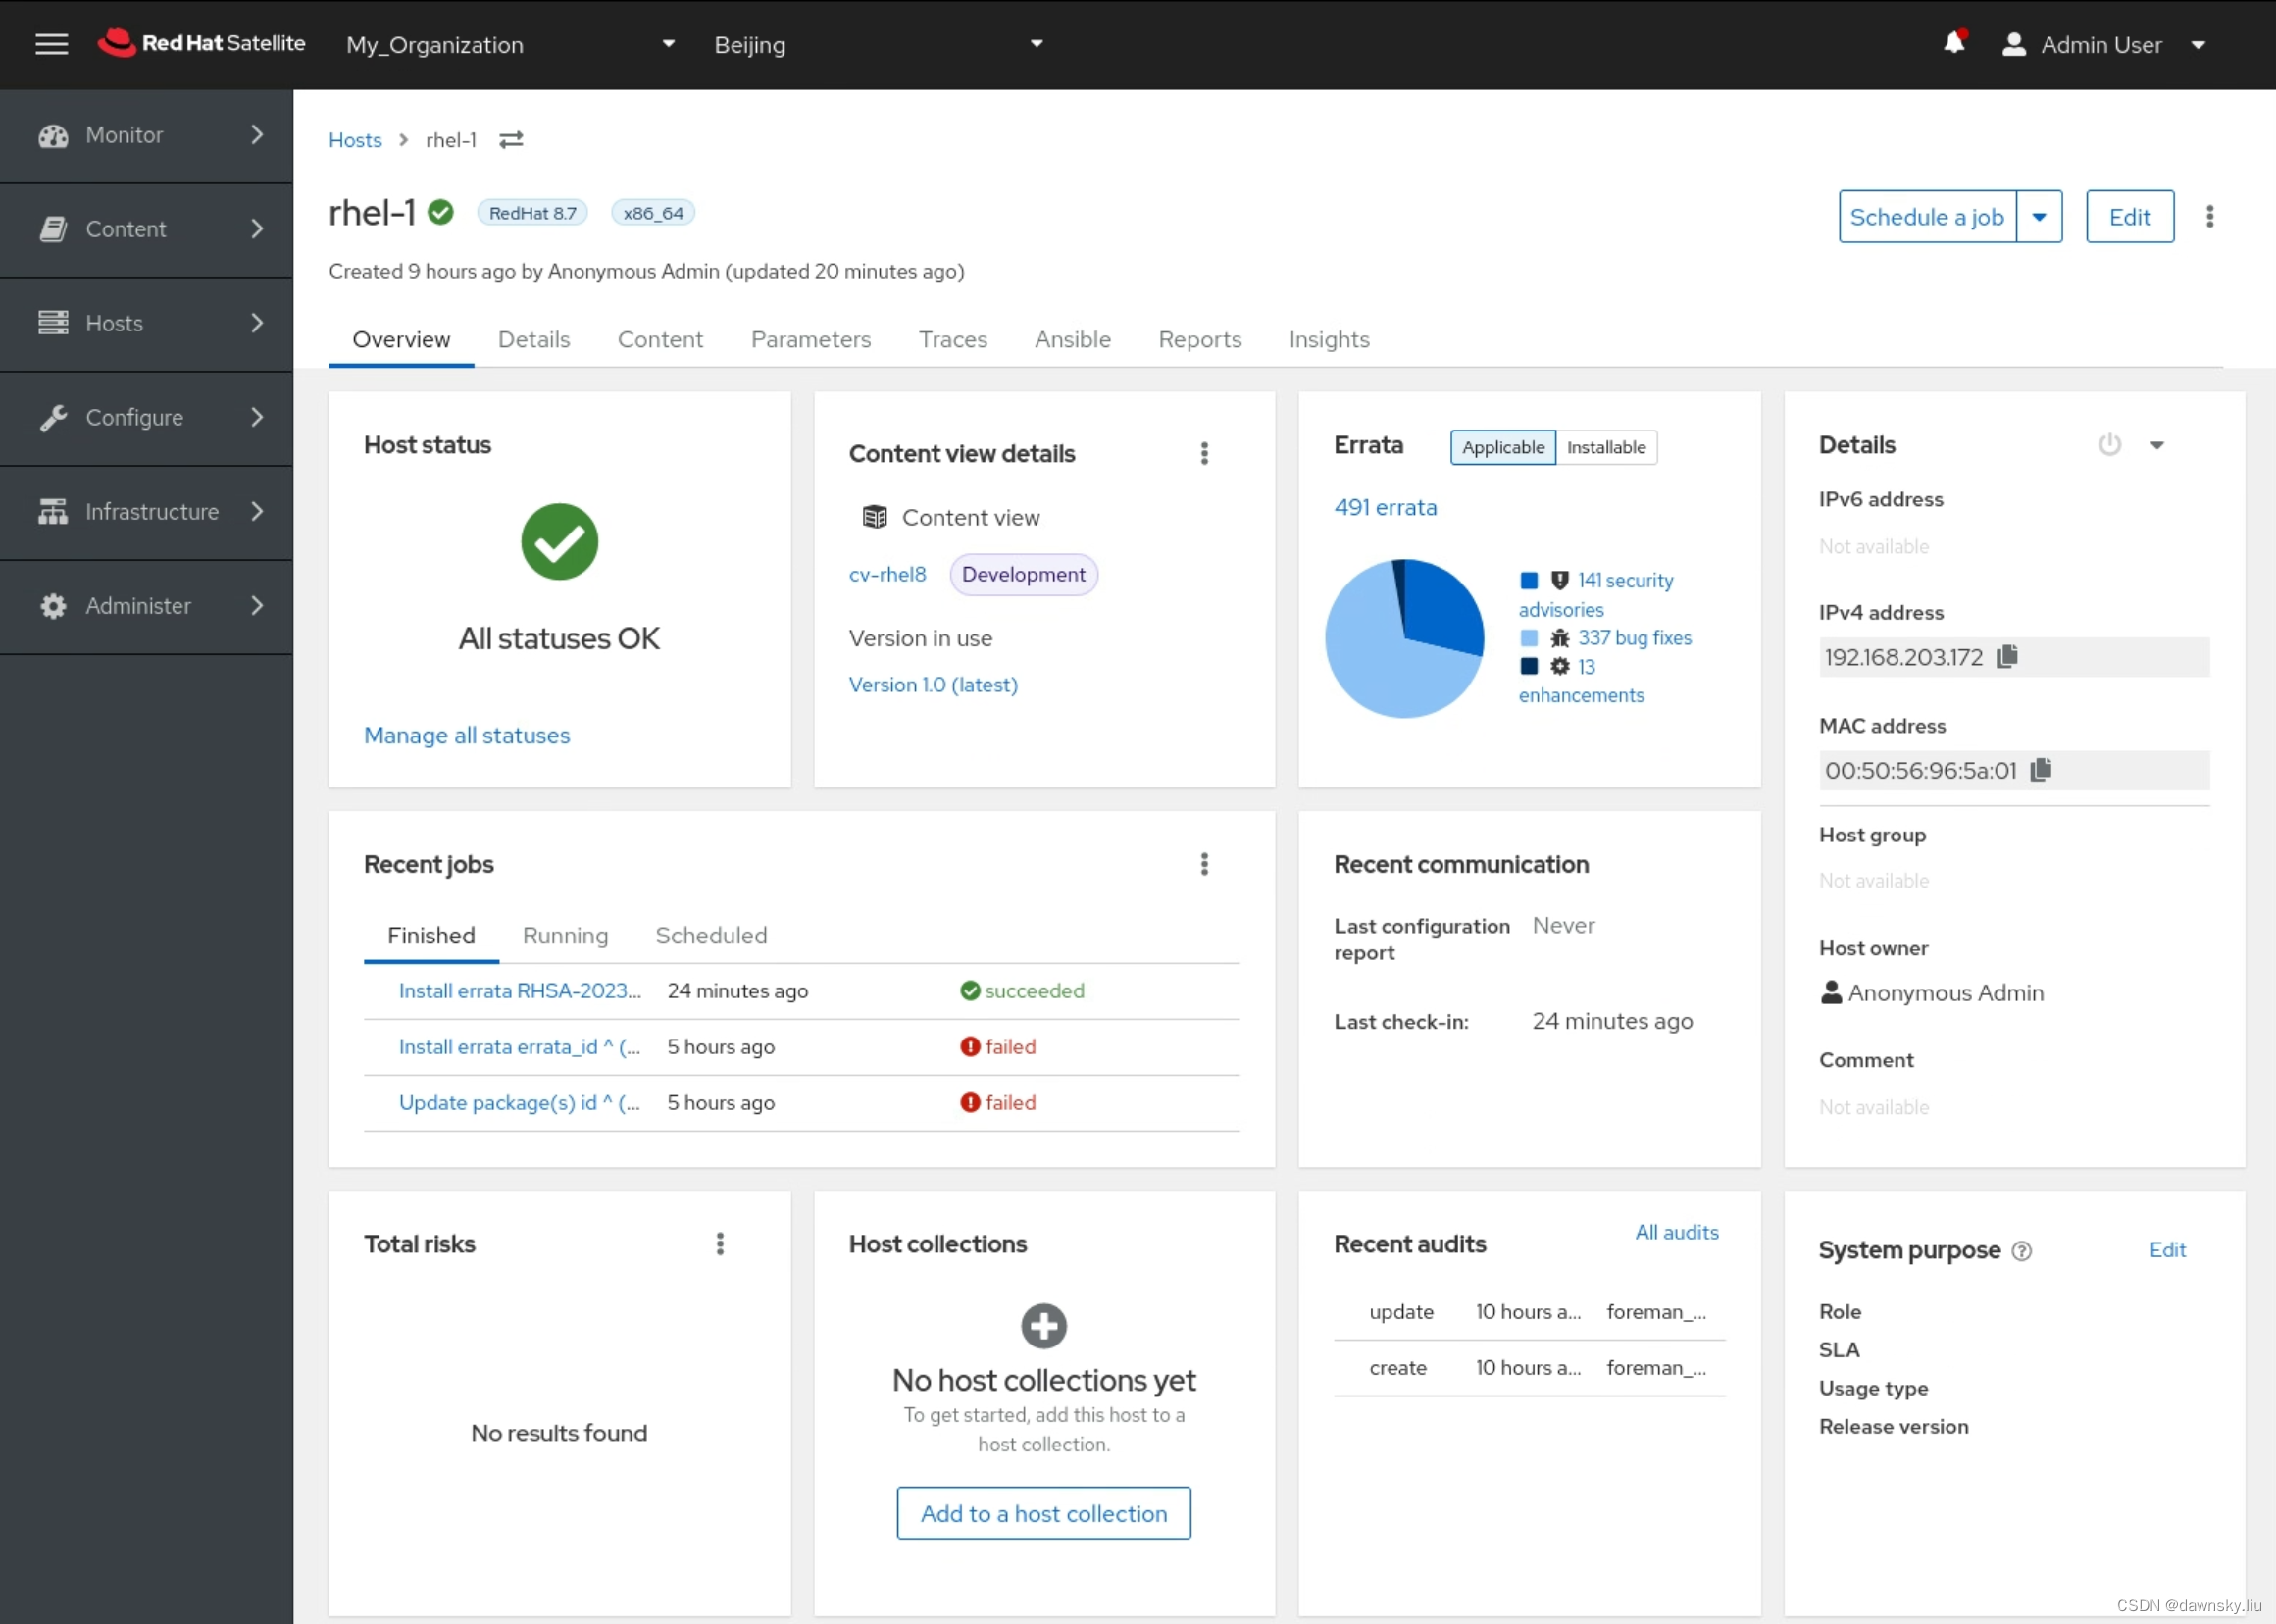
- 进入 Hosts > All Hosts 菜单可以看到 rhel-1 主机。
点击上图的 rhel-1 后可以看到下图主机的 Overview 页面。
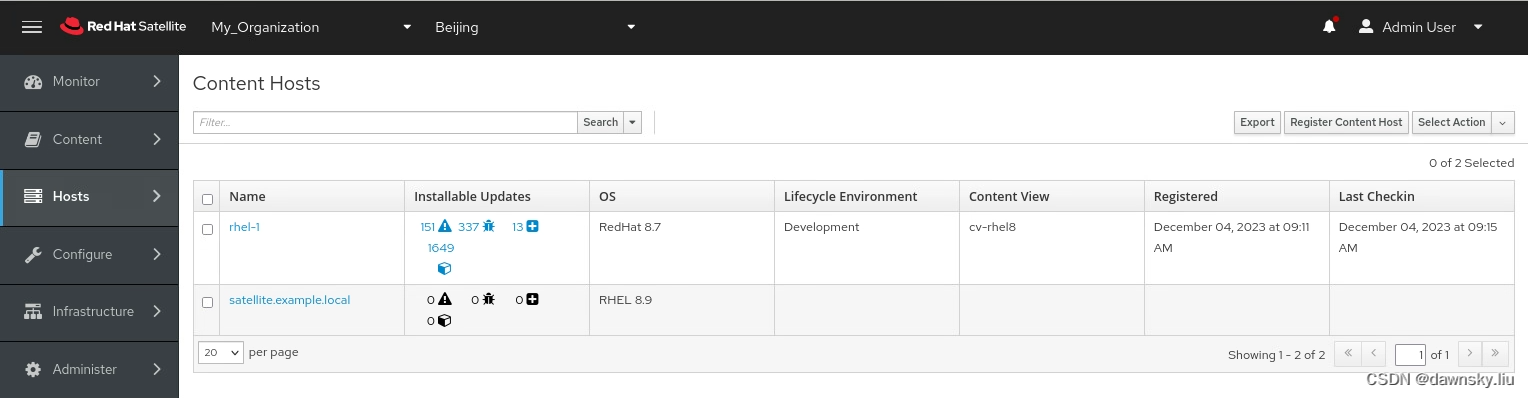
- 进入 Hosts > Content Hosts 菜单可以看到 rhel-1 主机。
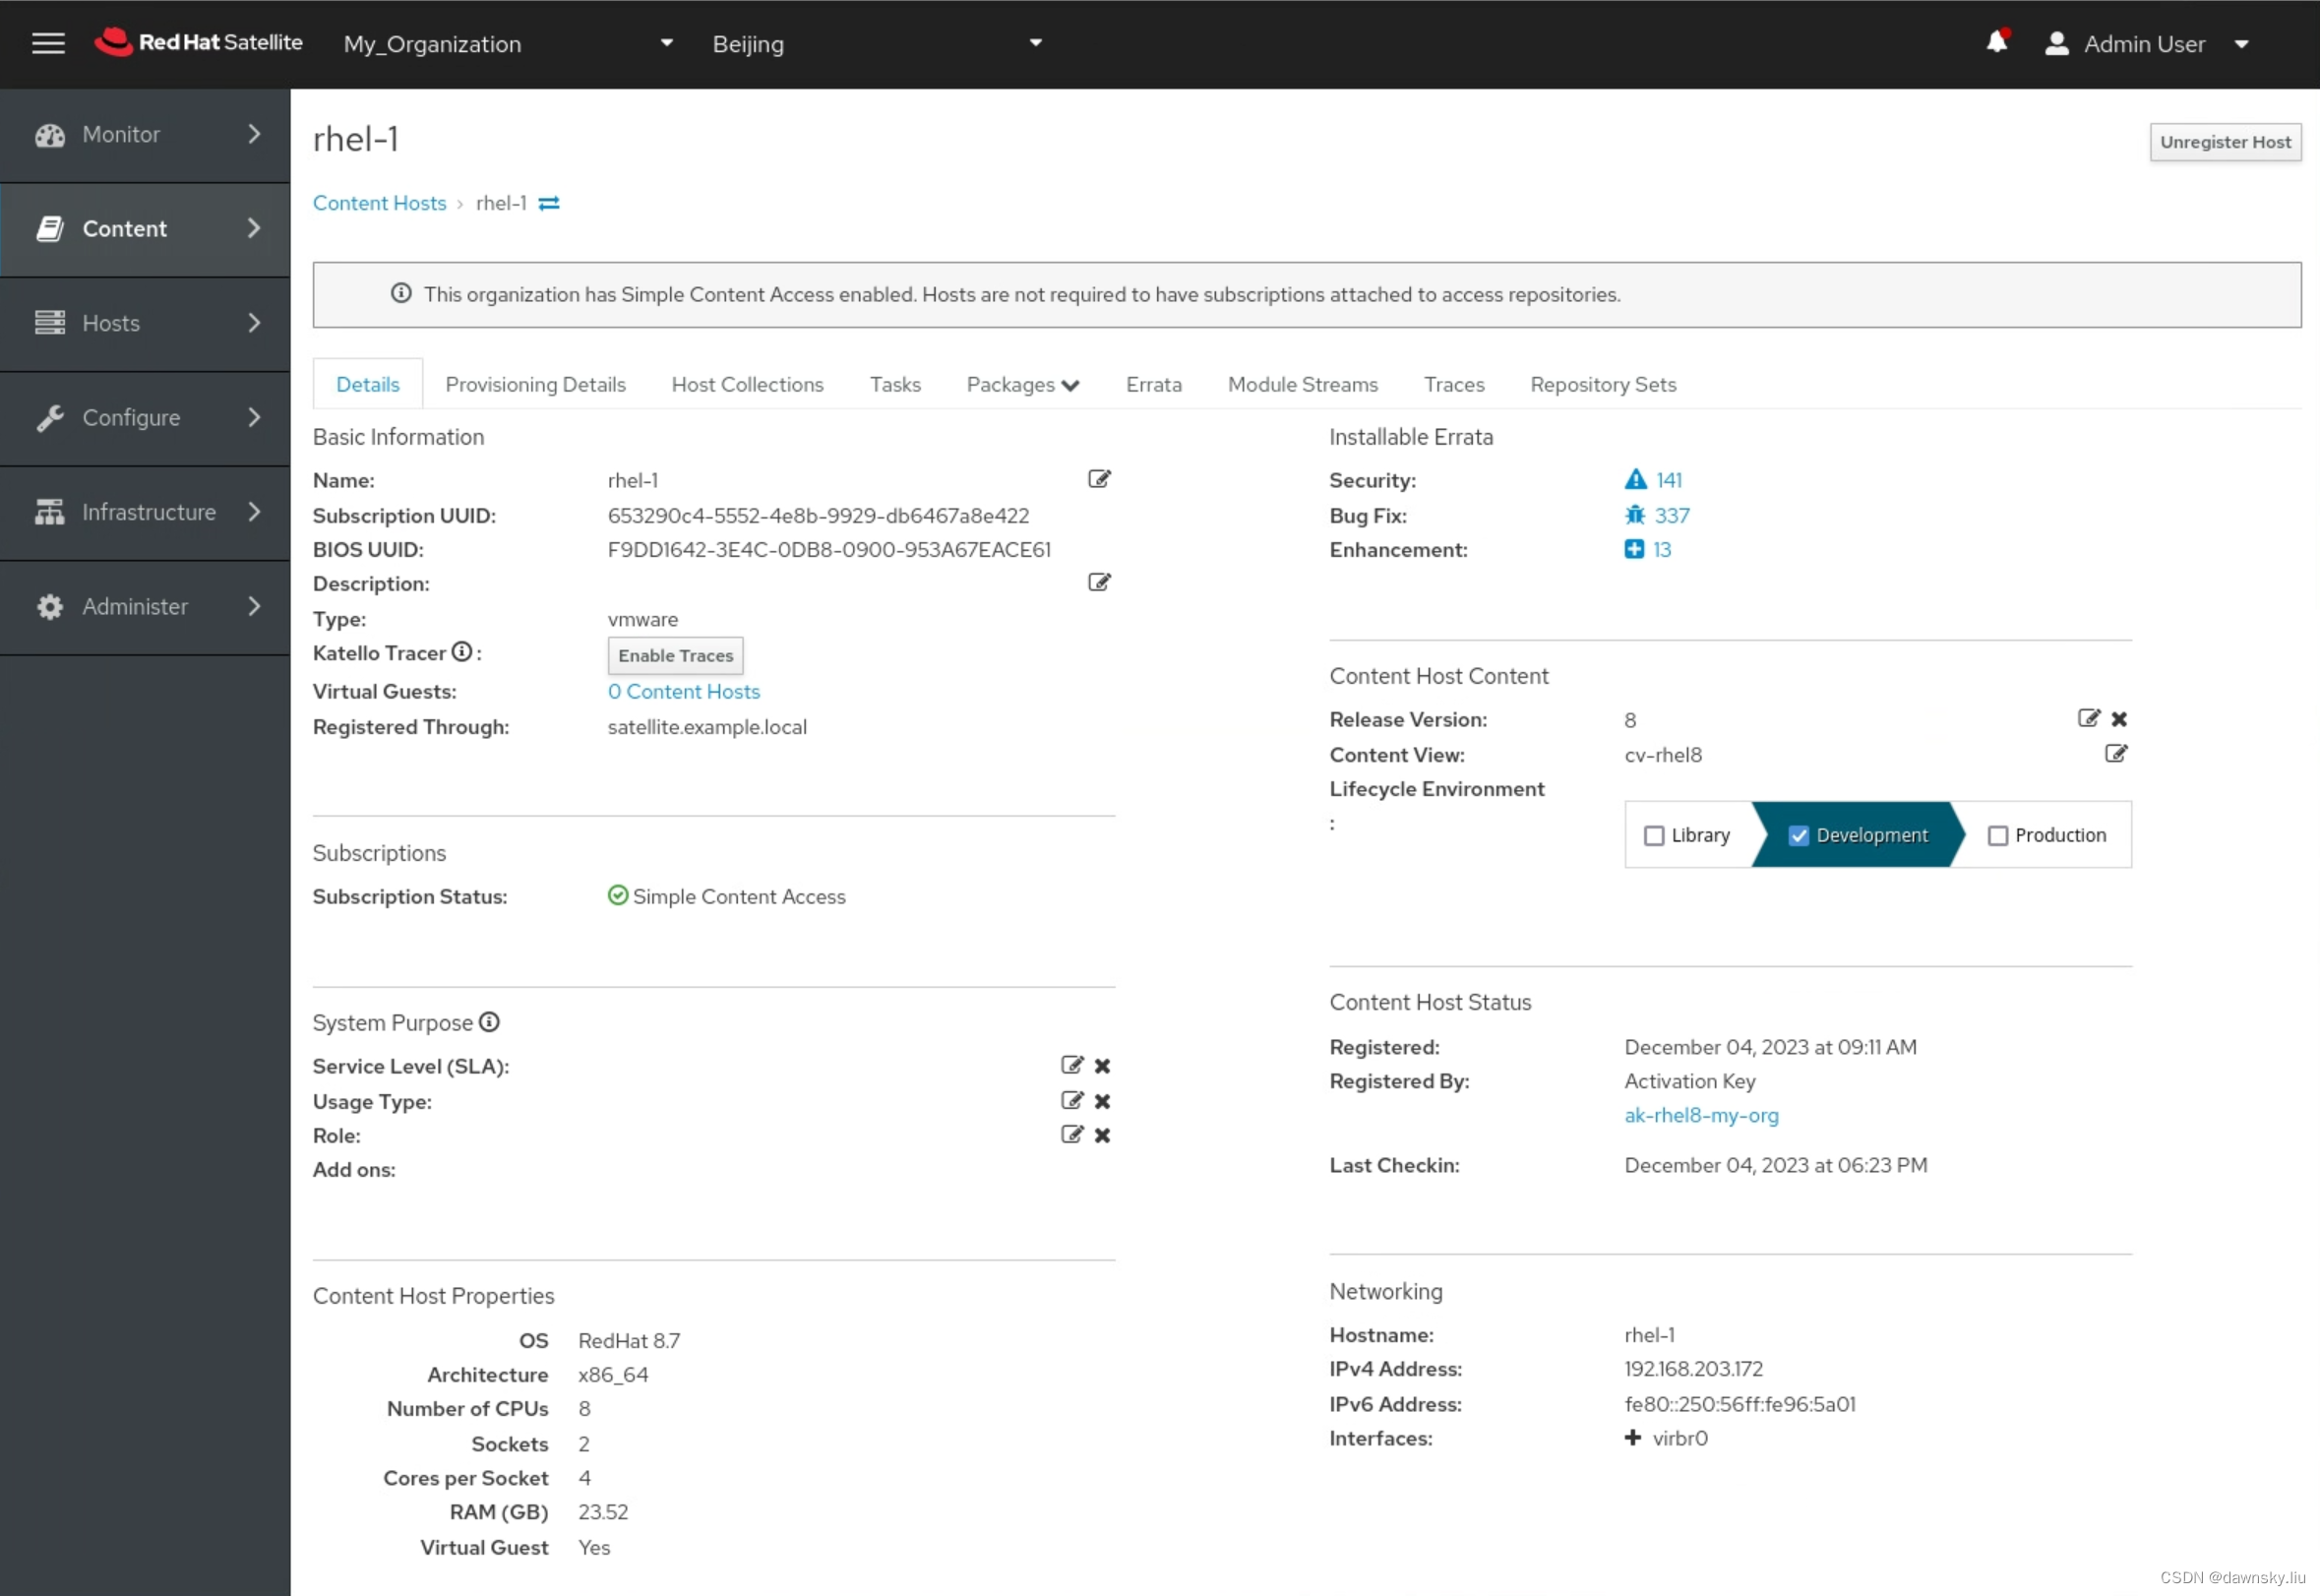
点击上图的 Installable Updates 区域,然后在点击 Details 就可看到下图。
管理主机可用 Repository
- 在被管主机上执行命令查看当前可用 Repositories。
$ subscription-manager repos --list
+----------------------------------------------------------+
    Available Repositories in /etc/yum.repos.d/redhat.repo
+----------------------------------------------------------+
Repo ID:   rhel-8-for-x86_64-baseos-rpms
Repo Name: Red Hat Enterprise Linux 8 for x86_64 - BaseOS (RPMs)
Repo URL:  https://satellite.example.local/pulp/content/My_Organization/Development/cv-rhel8/content/dist/rhel8/$rele
           asever/x86_64/baseos/os
Enabled:   1

Repo ID:   rhel-8-for-x86_64-appstream-rpms
Repo Name: Red Hat Enterprise Linux 8 for x86_64 - AppStream (RPMs)
Repo URL:  https://satellite.example.local/pulp/content/My_Organization/Development/cv-rhel8/content/dist/rhel8/$rele
           asever/x86_64/appstream/os
Enabled:   1

Repo ID:   satellite-utils-6.14-for-rhel-8-x86_64-rpms
Repo Name: Red Hat Satellite Utils 6.14 for RHEL 8 x86_64 (RPMs)
Repo URL:  https://satellite.example.local/pulp/content/My_Organization/Development/cv-rhel8/content/dist/layered/rhe
           l8/x86_64/sat-utils/6.14/os
Enabled:   0
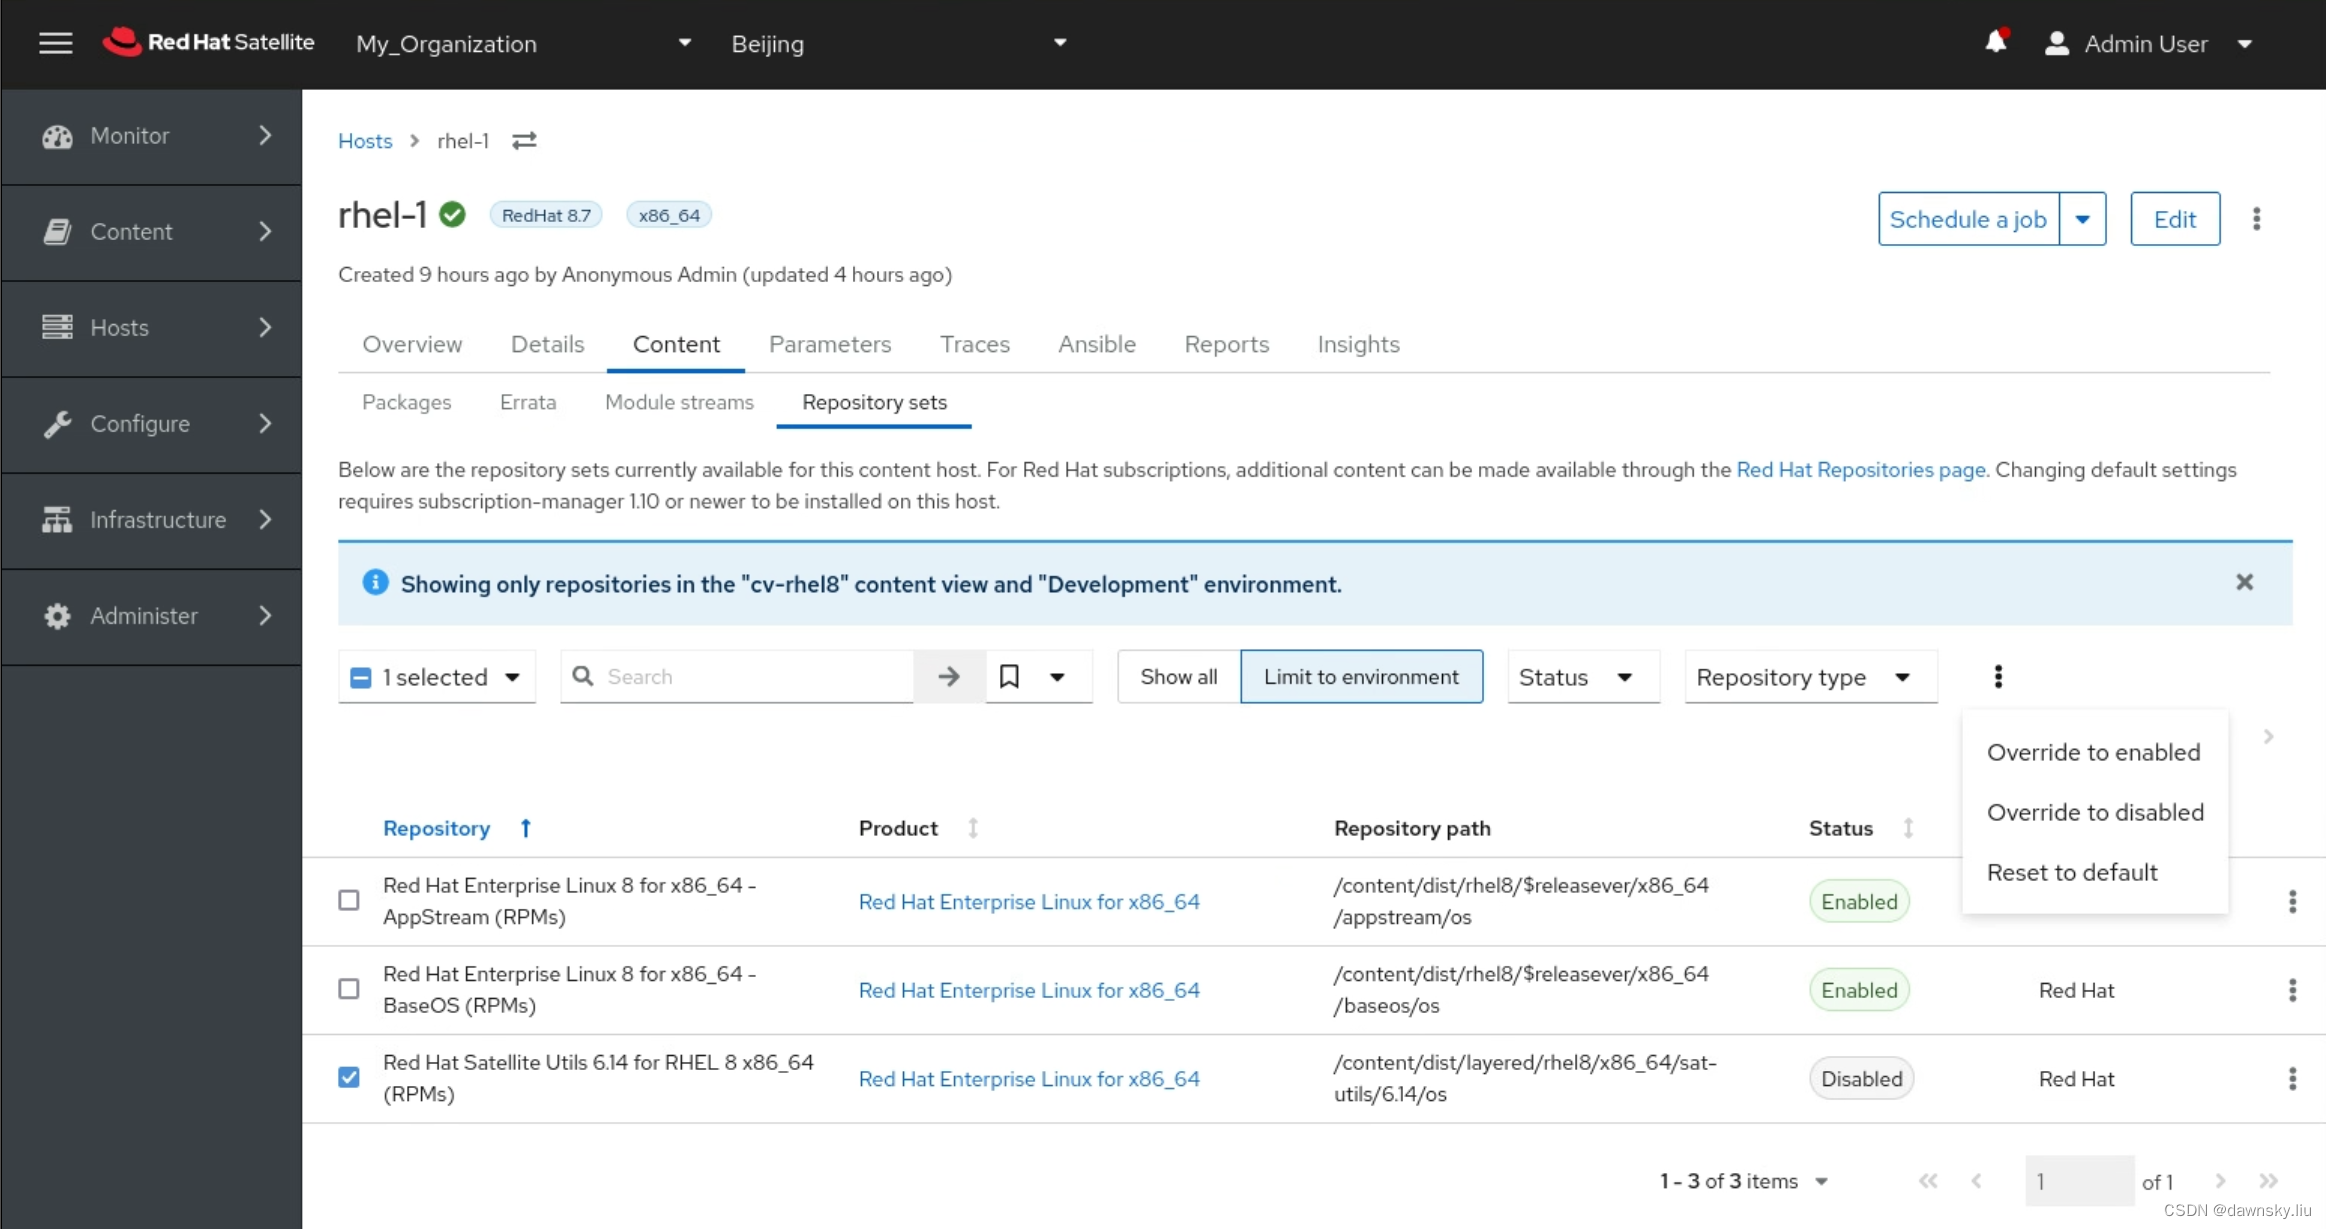
- 在 Satellite 中找到注册的被管主机,然后在其 Content > Repository Set 标签页中修改缺省可用的 Repository。
- 再次在被管主机上查看可用 Repositories,确认已经更新。
$ subscription-manager repos --list
+----------------------------------------------------------+
    Available Repositories in /etc/yum.repos.d/redhat.repo
+----------------------------------------------------------+
Repo ID:   rhel-8-for-x86_64-baseos-rpms
Repo Name: Red Hat Enterprise Linux 8 for x86_64 - BaseOS (RPMs)
Repo URL:  https://satellite.example.local/pulp/content/My_Organization/Development/cv-rhel8/content/dist/rhel8/$rele
           asever/x86_64/baseos/os
Enabled:   1

Repo ID:   rhel-8-for-x86_64-appstream-rpms
Repo Name: Red Hat Enterprise Linux 8 for x86_64 - AppStream (RPMs)
Repo URL:  https://satellite.example.local/pulp/content/My_Organization/Development/cv-rhel8/content/dist/rhel8/$rele
           asever/x86_64/appstream/os
Enabled:   1

Repo ID:   satellite-utils-6.14-for-rhel-8-x86_64-rpms
Repo Name: Red Hat Satellite Utils 6.14 for RHEL 8 x86_64 (RPMs)
Repo URL:  https://satellite.example.local/pulp/content/My_Organization/Development/cv-rhel8/content/dist/layered/rhe
           l8/x86_64/sat-utils/6.14/os
Enabled:   1
向主机安装软件包
使用 Satellite 向被管主机安装软件包需要首先在 Satellite 服务器和被管主机之间配置 root 用户免密 ssh 访问。另外 RHEL 8/9 版本缺省是禁止直接使用 root 用户登录提供的,因此还需先启用该功能。
允许 root 用户远程登录
- 修改 etc/ssh/sshd_config 文件,将 PermitRootLogin 设为 yes。
PermitRootLogin yes
- 然后重启 ssh 服务。
$ service sshd restart
为注册主机配置免密访问
- 在 Satellite 上用 root 用户执行以下命令,将公钥复制到 rhel-1 主机中。最后根据提示验证即可。
$ ssh-copy-id -i ~foreman-proxy/.ssh/id_rsa_foreman_proxy.pub root@rhel-1
/usr/bin/ssh-copy-id: INFO: Source of key(s) to be installed: "/usr/share/foreman-proxy/.ssh/id_rsa_foreman_proxy.pub"
The authenticity of host 'rhel-1 (192.168.203.172)' can't be established.
ECDSA key fingerprint is SHA256:0TULcDtHfLap5hYLgNbiAdfWdPVR9tMcp5fwNIbNk3A.
Are you sure you want to continue connecting (yes/no/[fingerprint])? yes
/usr/bin/ssh-copy-id: INFO: attempting to log in with the new key(s), to filter out any that are already installed
/usr/bin/ssh-copy-id: INFO: 1 key(s) remain to be installed -- if you are prompted now it is to install the new keys
root@rhel-1's password:

Number of key(s) added: 1

Now try logging into the machine, with:   "ssh 'root@rhel-1'"
and check to make sure that only the key(s) you wanted were added.
向注册主机安装软件包
- 进入 Content > Content Hosts 菜单,然后点击一个主机。

- 进入到主机 Errate 的标签页,选择一行后点击 Apply。

- 可查看安装 Job 的执行情况。
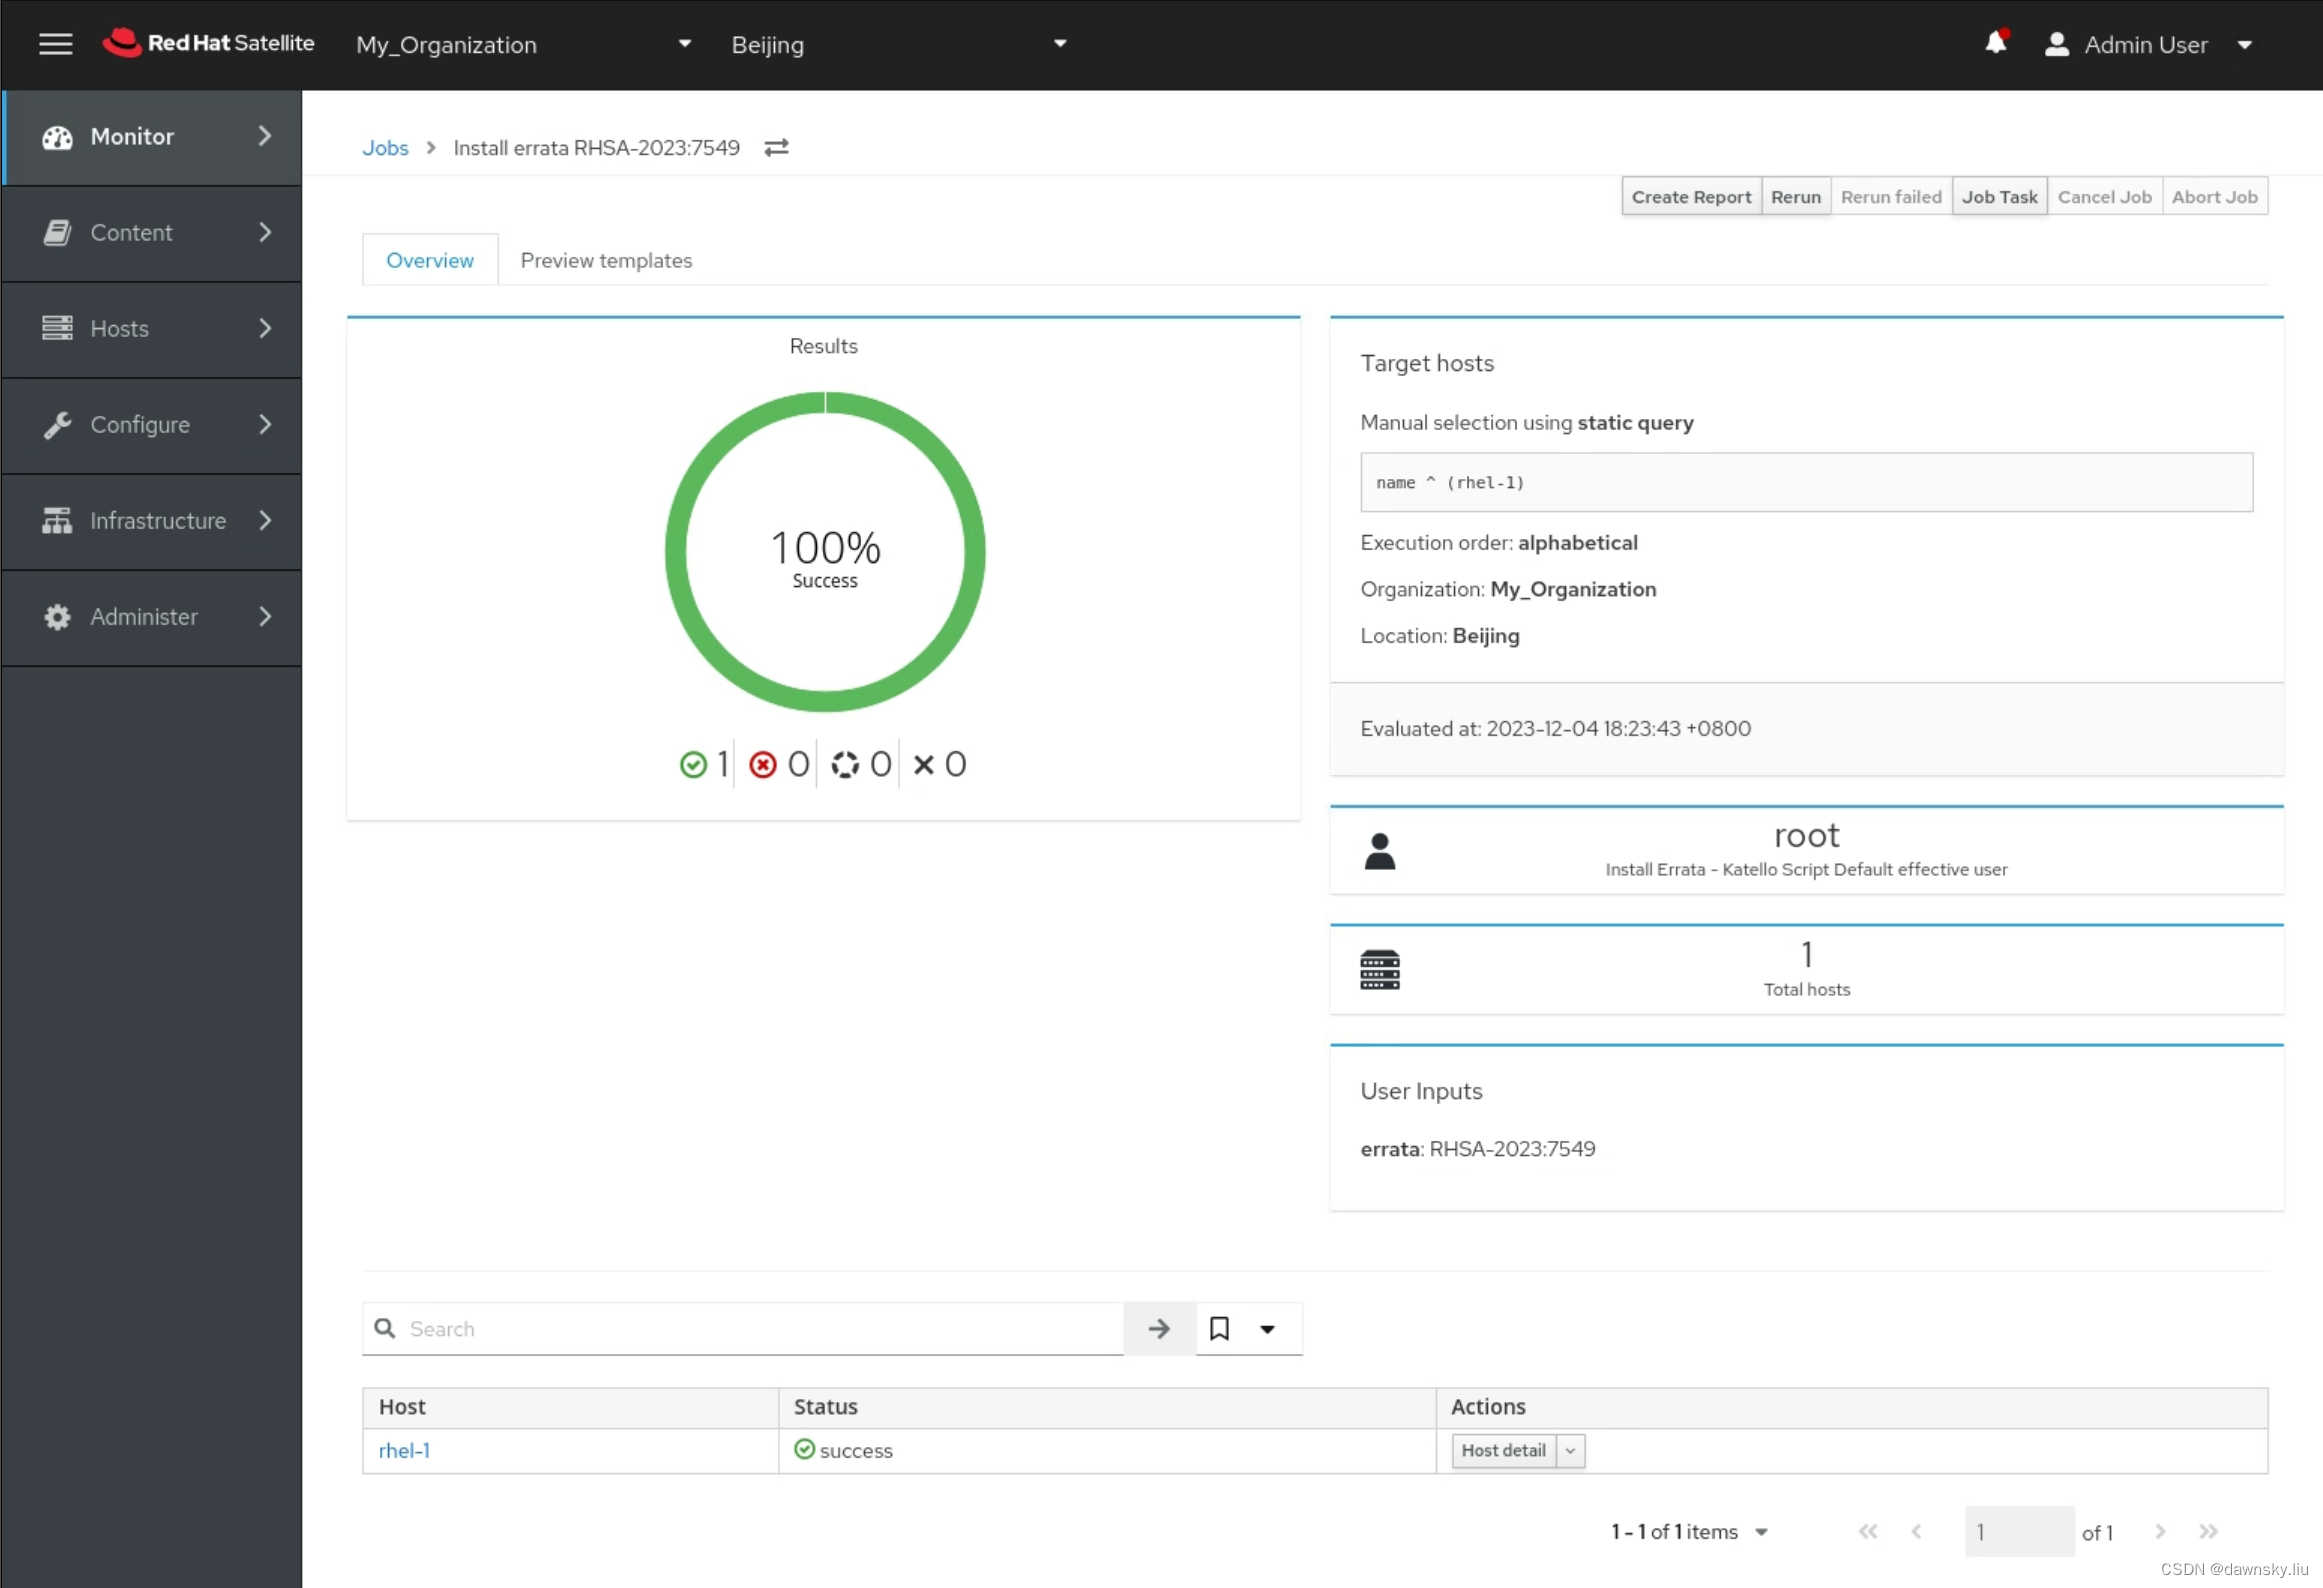
- 点击上图下方的主机名链接,可查看详细的 Job 执行日志。

参考
https://access.redhat.com/articles/4903191
https://access.redhat.com/solutions/2531791
https://redhatsummitlabs.gitlab.io/hands-on-with-satellite-6-5