1 Master 高可用架构
Kubernetes 作为容器集群系统,通过健康检查 + 重启策略实现了 Pod 故障自我修复能力,通过调度算法实现将 Pod 分布式部署,并保持预期副本数,根据 Node 失效状态自动在其他 Node 拉起 Pod,实现了应用层的高可用性。
针对 Kubernetes 集群,高可用性还应包含以下两个层面的考虑:Etcd 数据库的高可用性和 Kubernetes Master 组件的高可用性。 而 Etcd 我们已经采用 3 个节点组建集群实现高可用,本节将对 Master 节点高可用进行说明和实施。
Master 节点扮演着总控中心的角色,通过不断与工作节点上的 Kubelet 和 kube-proxy 进行通信来维护整个集群的健康工作状态。如果 Master 节点故障,将无法使用 kubectl 工具或者 API 做任何集群管理。
Master 节点主要有三个服务 kube-apiserver、kube-controller-manager 和 kube-scheduler,其中 kube-controller-manager 和 kube-scheduler 组件自身通过选择机制已经实现了高可用,所以 Master 高可用主要针对 kube-apiserver 组件,而该组件是以 HTTP API 提供服务,因此对他高可用与 Web 服务器类似,增加负载均衡器对其负载均衡即可,并且可水平扩容。
多 Master 架构图:

2 部署 Master2 Node
| 角色 | IP | 组件 |
| ops-master-1 | 10.220.43.203 | apiserver、controller、schedule、etcd |
| ops-master-1 | 10.220.43.209 | apiserver、controller、schedule |
| ops-worker-1 | 10.220.43.204 | apiserver、controller、schedule、etcd |
| ops-worker-2 | 10.220.43.205 | apiserver、controller、schedule、etcd |
现在需要再增加一台新服务器,作为 Master2 Node,IP 是 10.220.43.209。
Master2 与已部署的 Master1 所有操作一致。所以我们只需将 Master1 所有 K8s 文件拷贝过来,再修改下服务器 IP 和主机名启动即可。
2.1 设置主机名
$ hostnamectl set-hostname ops-master-22.2 设置/etc/hosts
# ops-master-1/ops-worker-1/ops-worker-2
$ echo "10.220.43.209 ops-master-2" >> /etc/hosts
# ops-master-2
$ echo "10.220.43.203 ops-master-1"  >> /etc/hosts
$ echo "10.220.43.204 ops-worker-1"  >> /etc/hosts
$ echo "10.220.43.205 ops-worker-2"  >> /etc/hosts
$ echo "10.220.43.209 ops-master-2"  >> /etc/hosts
2.3 安装docker
2.4 安装kubeadm/kubelet/kubectl
$ cat > /etc/yum.repos.d/kubernetes.repo << EOF
[k8s]
name=k8s
enabled=1
gpgcheck=0
baseurl=https://mirrors.aliyun.com/kubernetes/yum/repos/kubernetes-el7-x86_64/
EOF

#版本可以选择自己要安装的版本号
$ yum install -y kubelet-1.25.0 kubectl-1.25.0 kubeadm-1.25.0
# 此时,还不能启动kubelet,因为此时配置还不能,现在仅仅可以设置开机自启动
$ systemctl enable kubelet
2.4 添加master节点
ops-master-1:
$ kubeadm init phase upload-certs --upload-certs
I1213 22:17:30.953821   16583 version.go:254] remote version is much newer: v1.28.4; falling back to: stable-1.21
[upload-certs] Storing the certificates in Secret "kubeadm-certs" in the "kube-system" Namespace
[upload-certs] Using certificate key:
1c29abc636c01a3323f7a88253dbd813cb366e4d5ad8390cdc34def4283db714
ops-master-2:
$ kubeadm join 10.220.43.203:6443 --token 5zqcfo.te1dpy41jymwljzq --discovery-token-ca-cert-hash sha256:13c82c866ecff39980a9c649f2ace2758c84015e10e44f8bb0a2735cd9d247e5  --control-plane --certificate-key 1c29abc636c01a3323f7a88253dbd813cb366e4d5ad8390cdc34def4283db714
[preflight] Running pre-flight checks
        [WARNING IsDockerSystemdCheck]: detected "cgroupfs" as the Docker cgroup driver. The recommended driver is "systemd". Please follow the guide at https://kubernetes.io/docs/setup/cri/
[preflight] Reading configuration from the cluster...
[preflight] FYI: You can look at this config file with 'kubectl -n kube-system get cm kubeadm-config -o yaml'
error execution phase preflight:
One or more conditions for hosting a new control plane instance is not satisfied.

unable to add a new control plane instance a cluster that doesn't have a stable controlPlaneEndpoint address

Please ensure that:
* The cluster has a stable controlPlaneEndpoint address.
* The certificates that must be shared among control plane instances are provided.


To see the stack trace of this error execute with --v=5 or higher
新节点加入集群失败。
解决方案:
ops-master-1节点执行:
$ kubectl -n kube-system get cm kubeadm-config -oyaml | grep controlPlaneEndpoint
# 发现没有controlPlaneEndpoint,添加controlPlaneEndpoint
$ kubectl -n kube-system edit cm kubeadm-config
...
    kind: ClusterConfiguration
    kubernetesVersion: v1.21.0
    controlPlaneEndpoint: 10.220.43.203:6443    # 添加这一行
ops-master-2节点执行:
$ kubeadm join 10.220.43.203:6443 --token 5zqcfo.te1dpy41jymwljzq --discovery-token-ca-cert-hash sha256:13c82c866ecff39980a9c649f2ace2758c84015e10e44f8bb0a2735cd9d247e5 --control-plane --certificate-key 1c29abc636c01a3323f7a88253dbd813cb366e4d5ad8390cdc34def4283db714
[preflight] Running pre-flight checks
[WARNING IsDockerSystemdCheck]: detected "cgroupfs" as the Docker cgroup driver. The recommended driver is "systemd". Please follow the guide at https://kubernetes.io/docs/setup/cri/
[preflight] Reading configuration from the cluster...
[preflight] FYI: You can look at this config file with 'kubectl -n kube-system get cm kubeadm-config -o yaml'
[preflight] Running pre-flight checks before initializing the new control plane instance
[preflight] Pulling images required for setting up a Kubernetes cluster
[preflight] This might take a minute or two, depending on the speed of your internet connection
[preflight] You can also perform this action in beforehand using 'kubeadm config images pull'
[download-certs] Downloading the certificates in Secret "kubeadm-certs" in the "kube-system" Namespace
[certs] Using certificateDir folder "/etc/kubernetes/pki"
[certs] Generating "apiserver" certificate and key
[certs] apiserver serving cert is signed for DNS names [kubernetes kubernetes.default kubernetes.default.svc kubernetes.default.svc.cluster.local ops-master-2] and IPs [10.96.0.1 10.220.43.209 10.220.43.203]
[certs] Generating "apiserver-kubelet-client" certificate and key
[certs] Generating "front-proxy-client" certificate and key
[certs] Generating "etcd/server" certificate and key
[certs] etcd/server serving cert is signed for DNS names [localhost ops-master-2] and IPs [10.220.43.209 127.0.0.1 ::1]
[certs] Generating "apiserver-etcd-client" certificate and key
[certs] Generating "etcd/peer" certificate and key
[certs] etcd/peer serving cert is signed for DNS names [localhost ops-master-2] and IPs [10.220.43.209 127.0.0.1 ::1]
[certs] Generating "etcd/healthcheck-client" certificate and key
[certs] Valid certificates and keys now exist in "/etc/kubernetes/pki"
[certs] Using the existing "sa" key
[kubeconfig] Generating kubeconfig files
[kubeconfig] Using kubeconfig folder "/etc/kubernetes"
[kubeconfig] Writing "admin.conf" kubeconfig file
[kubeconfig] Writing "controller-manager.conf" kubeconfig file
[kubeconfig] Writing "scheduler.conf" kubeconfig file
[control-plane] Using manifest folder "/etc/kubernetes/manifests"
[control-plane] Creating static Pod manifest for "kube-apiserver"
[control-plane] Creating static Pod manifest for "kube-controller-manager"
[control-plane] Creating static Pod manifest for "kube-scheduler"
[check-etcd] Checking that the etcd cluster is healthy
[kubelet-start] Writing kubelet configuration to file "/var/lib/kubelet/config.yaml"
[kubelet-start] Writing kubelet environment file with flags to file "/var/lib/kubelet/kubeadm-flags.env"
[kubelet-start] Starting the kubelet
[kubelet-start] Waiting for the kubelet to perform the TLS Bootstrap...
[etcd] Announced new etcd member joining to the existing etcd cluster
[etcd] Creating static Pod manifest for "etcd"
[etcd] Waiting for the new etcd member to join the cluster. This can take up to 40s
[upload-config] Storing the configuration used in ConfigMap "kubeadm-config" in the "kube-system" Namespace
[mark-control-plane] Marking the node ops-master-2 as control-plane by adding the labels: [node-role.kubernetes.io/master(deprecated) node-role.kubernetes.io/control-plane node.kubernetes.io/exclude-from-external-load-balancers]
[mark-control-plane] Marking the node ops-master-2 as control-plane by adding the taints [node-role.kubernetes.io/master:NoSchedule]
This node has joined the cluster and a new control plane instance was created:
* Certificate signing request was sent to apiserver and approval was received.
* The Kubelet was informed of the new secure connection details.
* Control plane (master) label and taint were applied to the new node.
* The Kubernetes control plane instances scaled up.
* A new etcd member was added to the local/stacked etcd cluster.
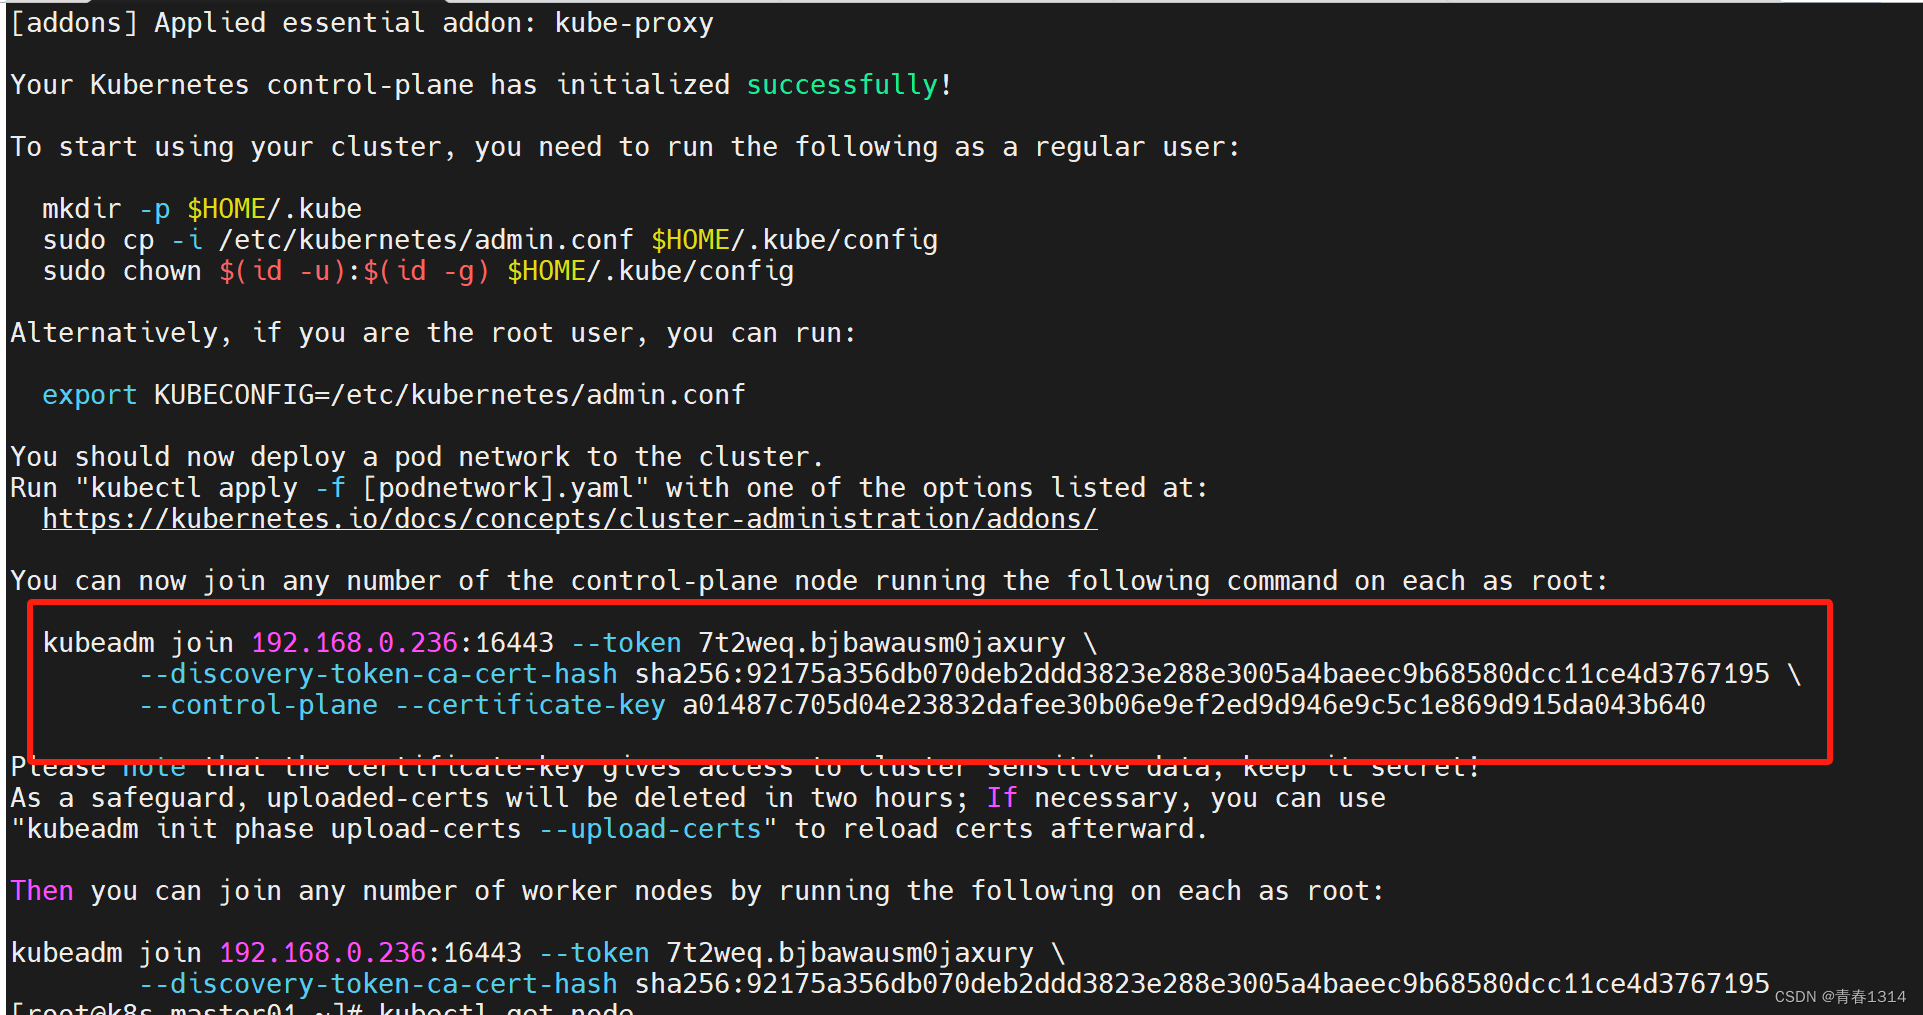
To start administering your cluster from this node, you need to run the following as a regular user:
mkdir -p $HOME/.kube
sudo cp -i /etc/kubernetes/admin.conf $HOME/.kube/config
sudo chown $(id -u):$(id -g) $HOME/.kube/config
Run 'kubectl get nodes' to see this node join the cluster.
$ mkdir -p $HOME/.kube
$ sudo cp -i /etc/kubernetes/admin.conf $HOME/.kube/config
$ sudo chown $(id -u):$(id -g) $HOME/.kube/config新节点执行加入集群成功
2.5 验证
ops-master-1节点执行:
$ kubectl get nodes
NAME           STATUS   ROLES                  AGE    VERSION
ops-master-1   Ready    control-plane,master   2d1h   v1.21.9
ops-master-2   Ready    control-plane,master   69s    v1.21.9
ops-worker-1   Ready    <none>                 2d1h   v1.21.9
ops-worker-2   Ready    <none>                 2d1h   v1.21.9
ops-master-2节点执行:
$ kubectl get nodes
NAME           STATUS   ROLES                  AGE     VERSION
ops-master-1   Ready    control-plane,master   2d1h    v1.21.9
ops-master-2   Ready    control-plane,master   8m50s   v1.21.9
ops-worker-1   Ready    <none>                 2d1h    v1.21.9
ops-worker-2   Ready    <none>                 2d1h    v1.21.9
control-plane,master:代表master节点。
![[<span style='color:red;'>Kubernetes</span>[<span style='color:red;'>K</span><span style='color:red;'>8</span><span style='color:red;'>S</span>]<span style='color:red;'>集</span><span style='color:red;'>群</span>:<span style='color:red;'>master</span>主<span style='color:red;'>节点</span>初始化]:通过Calico和Coredns网络插件方式安装](https://img-blog.csdnimg.cn/direct/b63cead751c246ae89fb3c6c379de941.png)