- 本文介绍我的开源项目 TelegramChatBot,这是一个基于 OpenAI GPT API 开发的 telegram 机器人,具有多模态交互能力,求 star!感谢大家!
- 在 telegram @jokerController_bot 立即体验!
- 欢迎对 GPT 应用开发或对 telegram 开发有兴趣的朋友和我交流
1. 项目简介
1.1 特点
- 一个由 OpenAI GPT API 驱动的 telegram 聊天机器人
- 主打催眠玩法,通过在
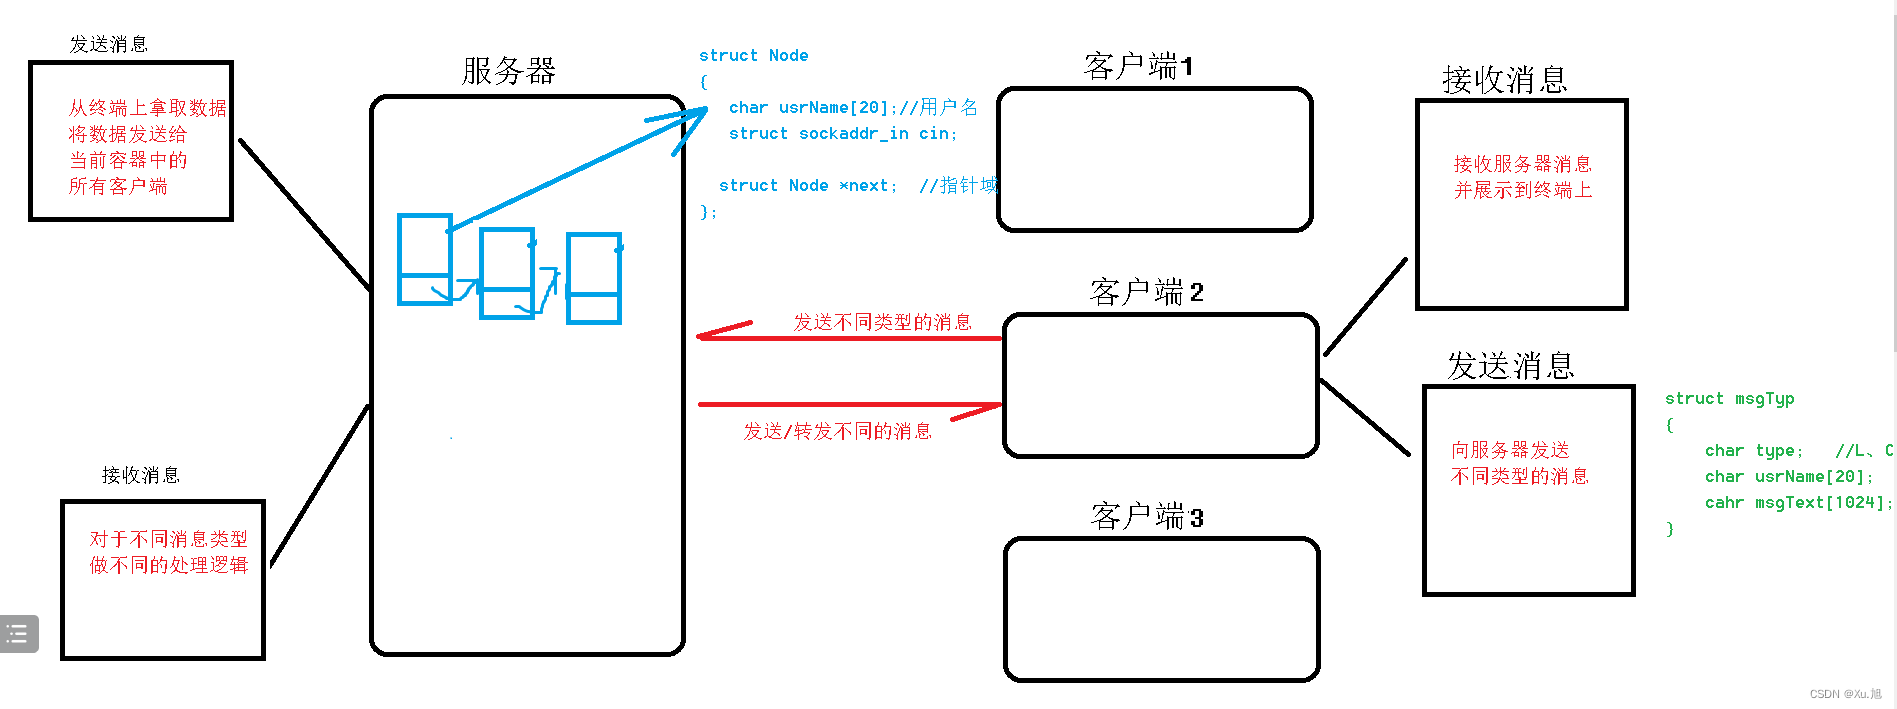
system参数中写入 “咒语” 来避免聊天时忘记催眠角色设置,支持咒语的增删查改。 - 利用多种强大的 API,该机器人具有多模态交互能力,包括图像显示、语音输入输出等。使用API包括
- Text generation: gpt-3.5-turbo & gpt-4
- Image generation: stable-diffusion-xl-1024-v1-0
- Text-to-voice: tts-1
- Voice-to-text: whisper-1
- 下图展示机器人的多模态交互能力,包括图像生成、语音输入输出以及催眠后生成风格化文本

1.2 状态机设计
机器人具有多种功能,但是 telegram bot 交互能力有限,难以像桌面软件或者 web 网页那样同时显示大量信息或布局多种功能的操作 UI。因此机器人底层设计为有限状态机以简化前端 UI,这样也更适合在移动端使用
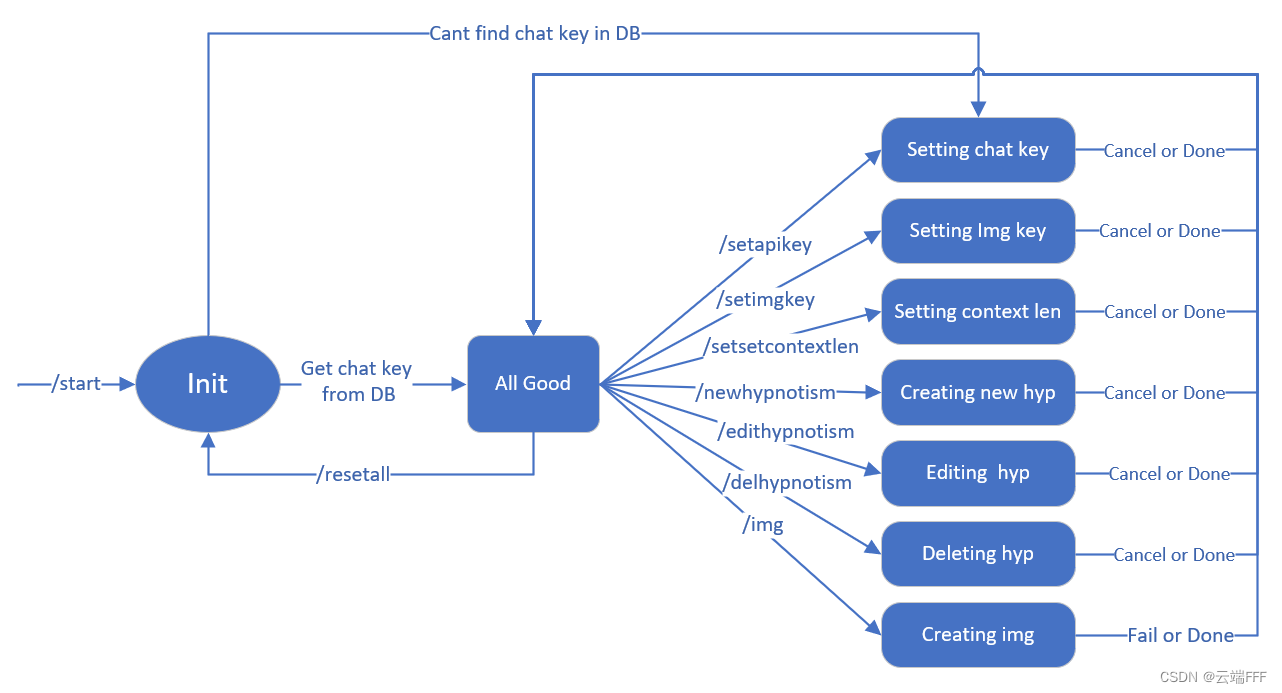
下面给出机器人的操作菜单以及部分控制界面

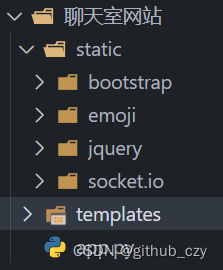
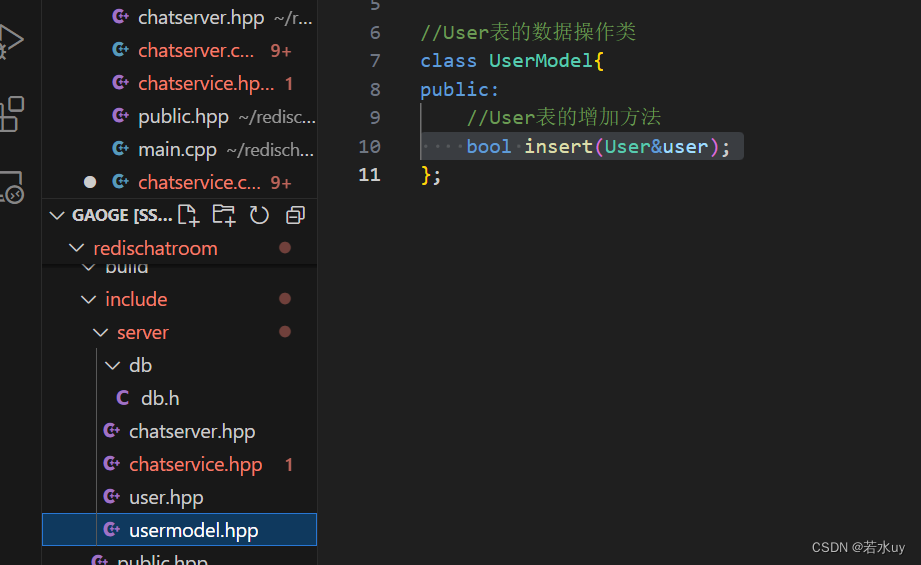
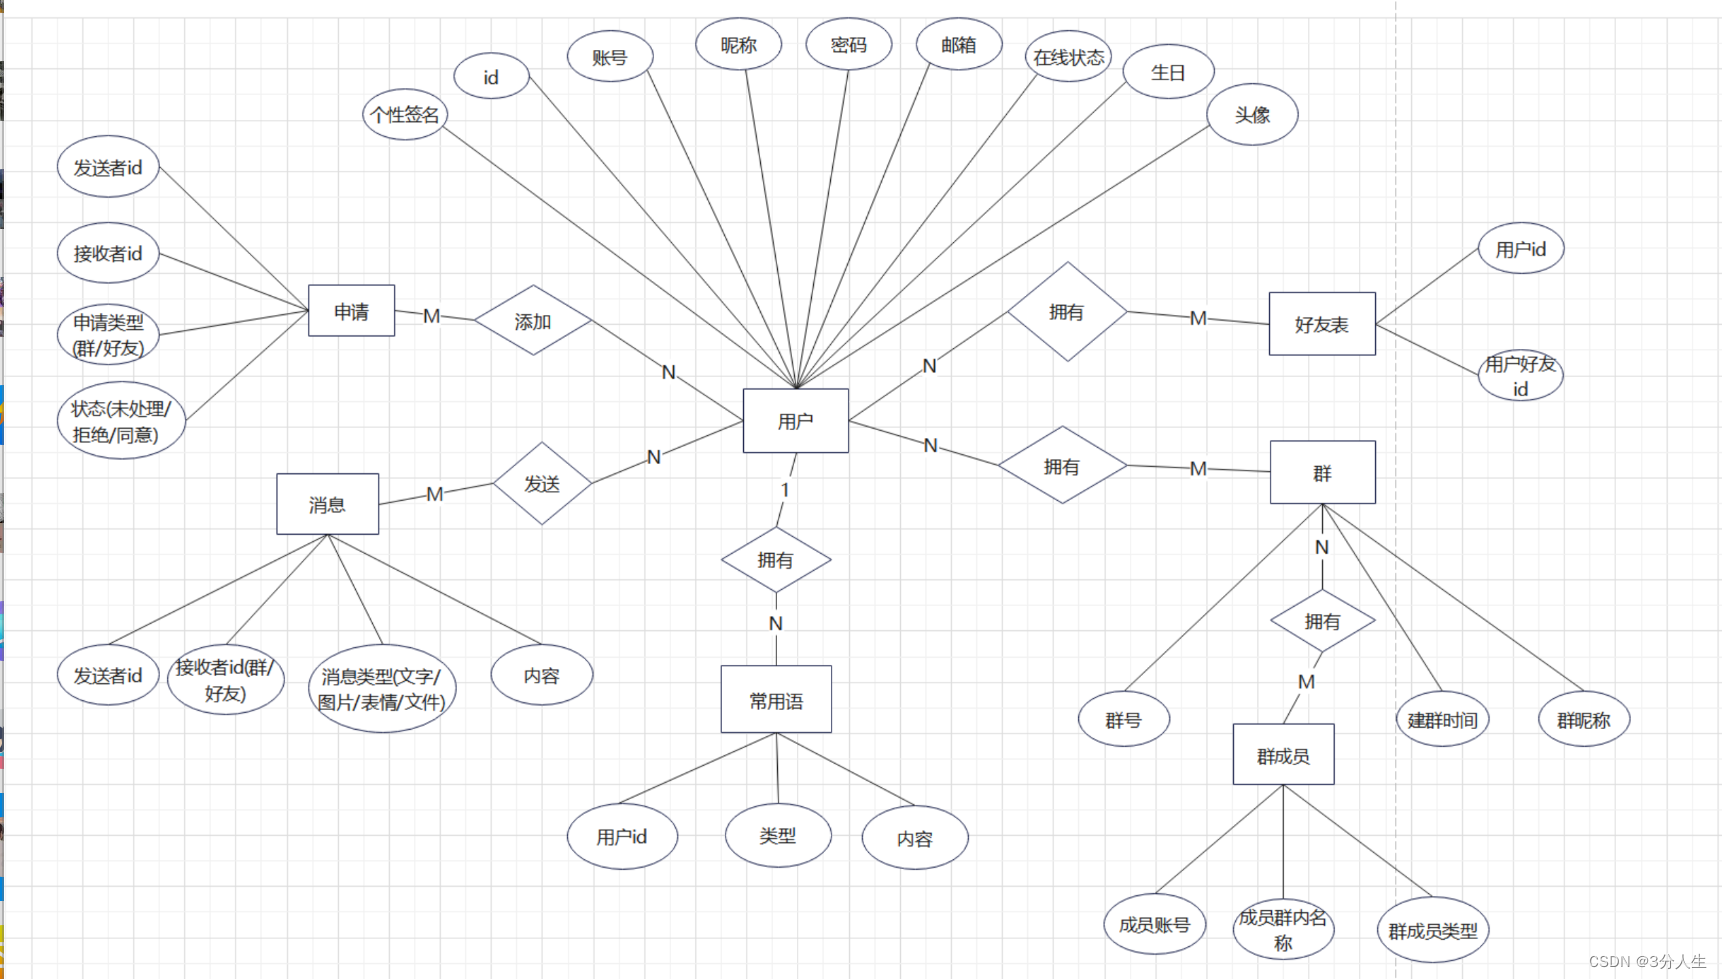
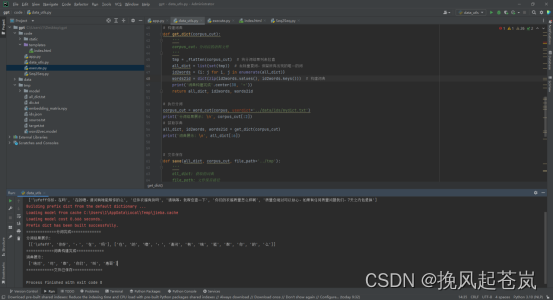
1.3 数据库设计
- 需要存储的用户信息包括用户生成文本和语音的 OpenAI API key、用于生成图像的 Stability AI API key 以及用户编辑的咒语文本,使用 MySQL 数据库进行数据持久化,表设计如下
其中 prompts 字段存储 json 格式的咒语文本CREATE TABLE IF NOT EXISTS user_info ( id INT NOT NULL AUTO_INCREMENT, user_id VARCHAR(190) NOT NULL, user_key VARCHAR(190) NOT NULL, user_img_key VARCHAR(190) NOT NULL, prompts TEXT, PRIMARY KEY (id), UNIQUE KEY (user_id) )
2. 各功能最小用例
- 本节展示机器人使用的四个 API 的最简单调用方法,读者可以利用它们开发自己的 AI 应用
2.1 文本生成
- 本项目使用 OpenAI GPT3.5 或 GPT4.0 模型生成文本,最小用例如下
from openai import OpenAI client = OpenAI(api_key='XXX') # 填入你的 api response = client.chat.completions.create( model="gpt-3.5-turbo", messages=[ { "role": "system", "content": "You are a helpful assistant."}, { "role": "user", "content": "Who won the world series in 2020?"}, { "role": "assistant", "content": "The Los Angeles Dodgers won the World Series in 2020."}, { "role": "user", "content": "Where was it played?"} ] ) print(response.choices[0].message.content) - 注意几点
- 本项目使当前(2023.11.29)使用的包版本为 openai 1.3.1,文档参考这里
messages参数需要开发者自行维护,任何时刻,模型记忆仅涵盖在 message 信息内。可以通过system字段设置模型的行为,例如设定模型的个性或是提供其行为的具体说明等。本 bot 直接将用户咒语作为system参数,并且在组合 messages 的多轮对话时,总是在用户的最后一条回复后加上“,扮演指定角色回答。”的附加内容,以保证模型永远不会忘记角色设定- 本 bot 调用以上方法时,还设置了
stream参数要求模型进行流式传输器回复内容,这样就能通过多次编辑 bot 的回复消息内容实现流式显示,详见开源代码 - 如果对回答不满意,只要不将刚刚的回复内容组合进 messages 参数列表中,就可以要求模型进行重新回答,由于 GPT 模型是概率生成模型,每次重新回答都会有所不同
- GPT 模型有上下文长度限制,如果 messages 参数列表中内容太多超出限制就会报错,因此本 bot 提供了上下文长度设置功能来限制组合进 messages 列表的对话轮数
- 有时我们希望可以语言模型可以按照一定格式进行回复,比如我们希望模型在对话过程中自主识别出用户是否有生成图像的意图,如果有就按照用户当前回复来制图,这样就需要模型在每次回复时不仅回复自然语言回答,还要回复一个 “是否生成图像” 的 bool 变量,这时可以通过设置
response_format={ "type": "json_object" }参数要求模型以 json 格式进行返回。本 bot 没有使用该功能,详见文档说明
2.2 图像生成
本项目使用 stability.ai 的 stable-diffusion-xl-1024-v1-0 模型生成图像,最小用例如下
import os
import io
import warnings
from PIL import Image
from stability_sdk import client
import stability_sdk.interfaces.gooseai.generation.generation_pb2 as generation

# Our Host URL should not be prepended with "https" nor should it have a trailing slash.
os.environ['STABILITY_HOST'] = 'grpc.stability.ai:443'

# Sign up for an account at the following link to get an API Key.
# https://platform.stability.ai/

# Click on the following link once you have created an account to be taken to your API Key.
# https://platform.stability.ai/account/keys

# Paste your API Key below.

# Set up our connection to the API.
stability_api = client.StabilityInference(
    key='XXX', # 填入你的 api
    verbose=True, # Print debug messages.
    engine="stable-diffusion-xl-1024-v1-0", # Set the engine to use for generation.
    # Check out the following link for a list of available engines: https://platform.stability.ai/docs/features/api-parameters#engine
)

# Set up our initial generation parameters.
answers = stability_api.generate(
    prompt="expansive landscape rolling greens with gargantuan yggdrasil, intricate world-spanning roots towering under a blue alien sky, masterful, ghibli",
    seed=4253978046, # If a seed is provided, the resulting generated image will be deterministic.
                     # What this means is that as long as all generation parameters remain the same, you can always recall the same image simply by generating it again.
                     # Note: This isn't quite the case for Clip Guided generations, which we'll tackle in a future example notebook.
    steps=50, # Amount of inference steps performed on image generation. Defaults to 30.
    cfg_scale=8.0, # Influences how strongly your generation is guided to match your prompt.
                   # Setting this value higher increases the strength in which it tries to match your prompt.
                   # Defaults to 7.0 if not specified.
    width=1024, # Generation width, defaults to 512 if not included.
    height=1024, # Generation height, defaults to 512 if not included.
    samples=1, # Number of images to generate, defaults to 1 if not included.
    sampler=generation.SAMPLER_K_DPMPP_2M # Choose which sampler we want to denoise our generation with.
                                                 # Defaults to k_dpmpp_2m if not specified. Clip Guidance only supports ancestral samplers.
                                                 # (Available Samplers: ddim, plms, k_euler, k_euler_ancestral, k_heun, k_dpm_2, k_dpm_2_ancestral, k_dpmpp_2s_ancestral, k_lms, k_dpmpp_2m, k_dpmpp_sde)
)

# Set up our warning to print to the console if the adult content classifier is tripped.
# If adult content classifier is not tripped, save generated images.
for resp in answers:
    for artifact in resp.artifacts:
        if artifact.finish_reason == generation.FILTER:
            warnings.warn(
                "Your request activated the API's safety filters and could not be processed."
                "Please modify the prompt and try again.")
        if artifact.type == generation.ARTIFACT_IMAGE:
            img = Image.open(io.BytesIO(artifact.binary))
            img.save(str(artifact.seed)+ ".png") # Save our generated images with their seed number as the filename.
注意几点
- 本项目当前(2023.11.29)使用的包版本为 stability-sdk 0.4.0,文档参考这里
- 这个模型是一个 text-to-image 的模型,生成图像质量会显著受到 prompt 质量影响,因此不适合直接用自然语言作为 prompt 来生成图像。本 bot 利用 GPT 模型的 in-context learning 能力,先把自然语言翻译成较高质量的 image prompt,再调用该模型生成图像,这一步输入给 GPT 模型的 prompt 如下
当然,bot 也提供了直接使用用户输入内容作为 prompt 生成图像的命令,熟悉 AI 图像生成方法的用户可以直接提供高质量的 image prompt 序列IMGPROMPT = "A prompt example for 一个童话般的宁静小镇,鸟瞰视角,动漫风格 is “a painting of a fairy tale town, serene landscape, a bird's eye view, anime style, Highly detailed, Vivid Colors.” " IMGPROMPT += "Another prompt example for 双马尾动漫少女,蓝黑色头发,颜色鲜艳 is “a painting of 1girl, blue | black hair, low twintails, anime style, with bright colors, Highly detailed.” " IMGPROMPT += "Another prompt example for 拟人化的兔子肖像,油画,史诗电影风格 is “a oil portrait of the bunny, Octane rendering, anthropomorphic creature, reddit moderator, epic, cinematic, elegant, highly detailed, featured on artstation.” " IMGPROMPT += "Another prompt example for 黄昏下,大雨中,两个持刀的海盗在海盗船上决斗 is “Two knife-wielding pirates dueling on a pirate ship, dusk, heavy rain, unreal engine, 8k, high-definition, by Alphonse Mucha and Wayne Barlowe.” " IMGPROMPT += "Now write a prompts for "
2.3 语音输入 & 输出
- 本项目使用 OpenAI tts-1 模型实现文字转语音,使用 whisper-1 模型实现语音转文字,最小用例如下
from pathlib import Path from openai import OpenAI client = OpenAI(api_key='XXX') # 填入你的 api # text2voice speech_file_path = Path(__file__).parent / "speech.ogg" response = client.audio.speech.create( model="tts-1", voice="alloy", input="Hello, World! 你好世界!", response_format='opus' ) response.stream_to_file(speech_file_path) # voice2text file_path = Path(__file__).parent / "speech.ogg" audio_file = open(file_path, "rb") transcript = client.audio.transcriptions.create( model="whisper-1", file=audio_file, response_format="text" ) print(transcript) - 本项目使当前(2023.11.29)使用的包版本为 openai 1.3.1,文档参考