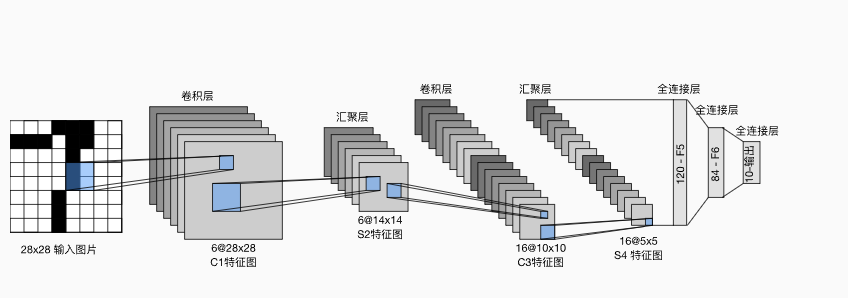
1. LeNet卷积神经网络的概念
先看看GPT的回答


有的资料中分层为

他们之间得差别就在于gpt的卷积层c5和上图中的全连接层1是同一种概念,因为该层使用的是5*5的卷积核,步长为一,根据公式可以算出输出的大小即是1X1的大小
训练参数是卷积核的大小乘以个数加上与个数相等的偏置
2. 数字识别模型的构建
1 导包
import tensorflow as tf
from tensorflow.keras import layers, models
from tensorflow.keras.datasets import mnist
from tensorflow.keras.utils import to_categorical
from tensorflow.keras.models import load_model
from tensorflow.keras.preprocessing import image
import numpy as np
import matplotlib.pyplot as plt
2 预处理数据
# 加载和预处理数据
# 加载MNIST数据集
(train_images, train_labels), (test_images, test_labels) = mnist.load_data()

# 调整数据形状并进行归一化处理
train_images = train_images.reshape((60000, 28, 28, 1)).astype('float32') / 255
test_images = test_images.reshape((10000, 28, 28, 1)).astype('float32') / 255

# 将标签转换为one-hot编码
train_labels = to_categorical(train_labels)
test_labels = to_categorical(test_labels)
3 构建LeNet模型
一开始在网上搜索资料时很多的模型使用的激活函数是sigmoid,这里使用的是relu激活函数
ReLU(Rectified Linear Unit)激活函数更为常用。ReLU激活函数在很多情况下被证明可以提高训练速度并减少梯度消失问题。因此,许多现代实现会使用ReLU替代Sigmoid。
# 构建LeNet-5模型
model = models.Sequential()

# 第一层卷积层:6个5x5的卷积核,激活函数使用ReLU,输入形状为28x28x1,使用same填充保持尺寸
model.add(layers.Conv2D(6, (5, 5), activation='relu', input_shape=(28, 28, 1), padding='same'))

# 第一层池化层:2x2的平均池化
model.add(layers.AveragePooling2D((2, 2)))

# 第二层卷积层:16个5x5的卷积核,激活函数使用ReLU,使用same填充保持尺寸
model.add(layers.Conv2D(16, (5, 5), activation='relu', padding='same'))

# 第二层池化层:2x2的平均池化
model.add(layers.AveragePooling2D((2, 2)))

# 第三层卷积层:120个5x5的卷积核,激活函数使用ReLU,使用same填充保持尺寸
model.add(layers.Conv2D(120, (5, 5), activation='relu', padding='same'))

# 将多维特征图展开成一维向量
model.add(layers.Flatten())

# 全连接层:84个神经元,激活函数使用ReLU
model.add(layers.Dense(84, activation='relu'))

# 输出层:10个神经元(对应0-9十个数字),激活函数使用softmax
model.add(layers.Dense(10, activation='softmax'))
4 编译训练保存
# 编译模型
# 使用Adam优化器,损失函数为交叉熵,评价指标为准确率
model.compile(optimizer='adam',
loss='categorical_crossentropy',
metrics=['accuracy'])
# 训练模型
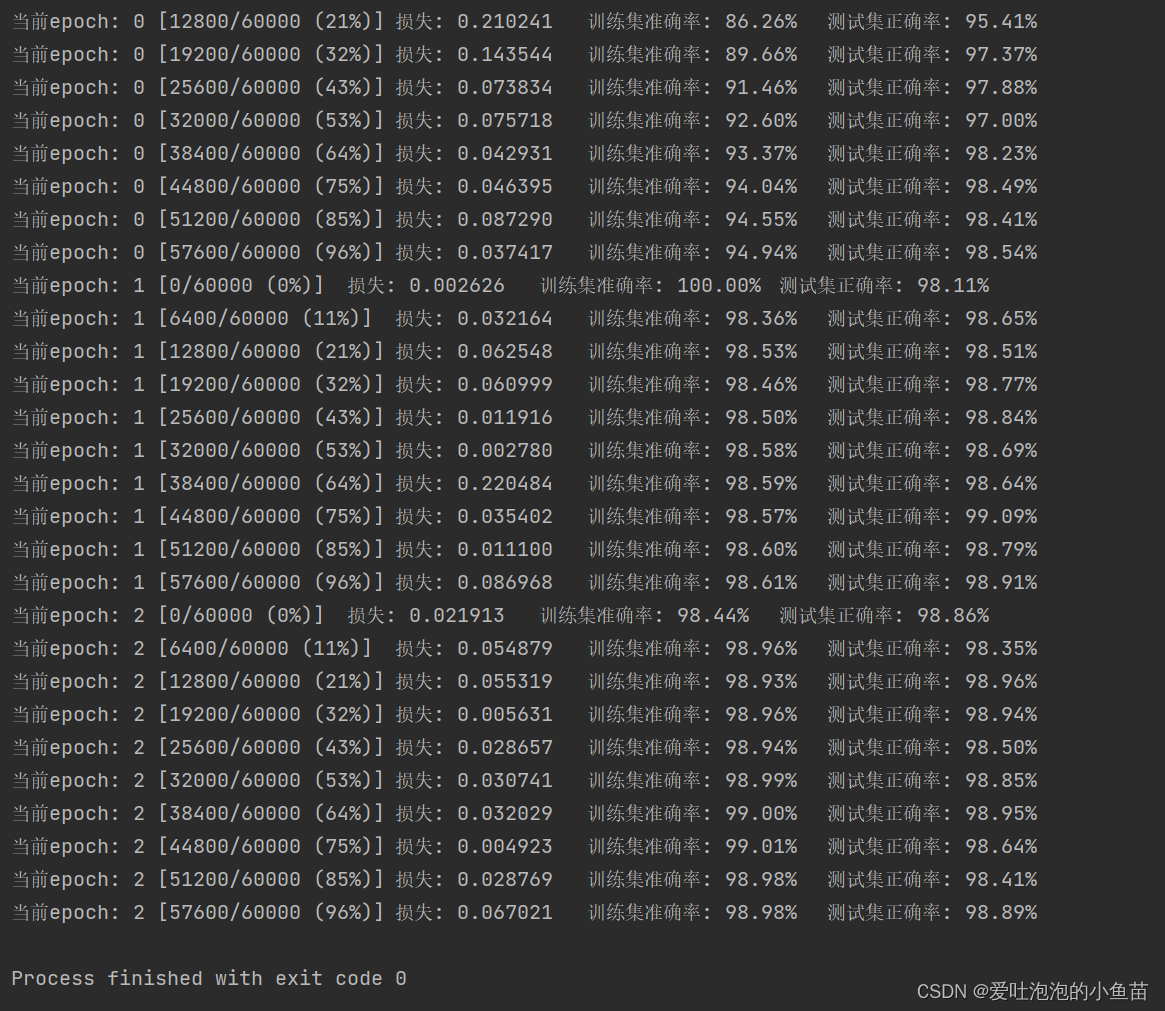
# 使用训练数据训练模型,设置迭代次数为10,批次大小为64,验证集比例为20%
model.fit(train_images, train_labels, epochs=10, batch_size=64, validation_split=0.2)
# 保存训练好的模型
model.save('lenet_mnist.h5')5 对文件夹内我自己画的图进行预测
# 定义预处理输入图片的函数
def preprocess_image(img_path):
# 加载图片,调整尺寸为28x28,并转换为灰度图
img = image.load_img(img_path, target_size=(28, 28), color_mode='grayscale')
# 将图片转换为数组并归一化处理
img_array = image.img_to_array(img)
# 将黑底白字转换为白底黑字(MNIST数据集是白底黑字)
img_array = 1 - img_array / 255.0
# 调整数组形状为(1, 28, 28, 1)
img_array = img_array.reshape((1, 28, 28, 1)).astype('float32')
return img_array
# 加载保存的模型
model = load_model('lenet_mnist.h5')
# 设置要预测的图片路径
img_path = 'image.png'
# 预处理输入图片
img_array = preprocess_image(img_path)
# 使用模型进行预测
predictions = model.predict(img_array)
# 获取预测结果(概率最大的类别)
predicted_digit = np.argmax(predictions)
# 打印预测结果
print(f'The predicted digit is: {predicted_digit}')
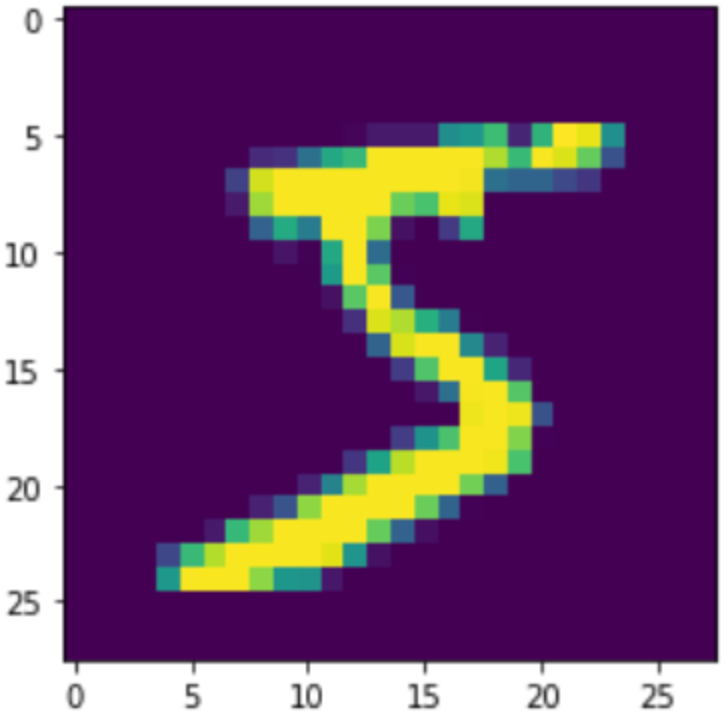
# 可视化输入图片并显示预测结果
plt.imshow(img_array.reshape(28, 28), cmap='gray')
plt.title(f'Predicted: {predicted_digit}')
plt.show()
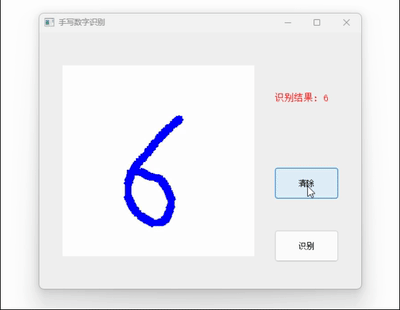
3. 利用网站仿真数字识别测试

4. 运行结果
预测值为3,与图片相符合, 还有每一轮的loss值,准确率

更换图片同样正确