开关按钮大家应该很熟悉,在设置里面经常遇到,切换时候的滑动效果比较帅气。通常说的开关按钮,有两个状态:on、off。大部分的开关按钮控件,基本上有两大类,第一类是纯代码绘制,这种对代码的掌控度要求比较高,但是灵活性比较好。第二类是贴图,专业的美工做好的各种状态的背景图片,只需要用代码将该图片画到界面上即可。下面,介绍一种实现纯代码绘制的开关按钮。想看利用贴图来实现的开关按钮请移步:https://blog.csdn.net/u012959478/article/details/140423375
一、简述
QT纯代码实现滑动开关控件。
二、 设计思路
通过继承QAbstractButton类,重写paintEvent函数来自定义绘制过程。
首先我们将滑动进度条的整体进行分块,先剖析整个按钮的实现包括的元素,分为两个外圆、一个矩形、一个内圆(白色)组成。接着我们通过QPaintEvent绘制出按钮的静止状态下的界面形状。接着,我们再剖析进度条的动态过程其动态过程为圆心在不同的时刻处在按钮中的不同位置。通过QPropertyAnimation来设置从左向右的运动实现滑动过程。
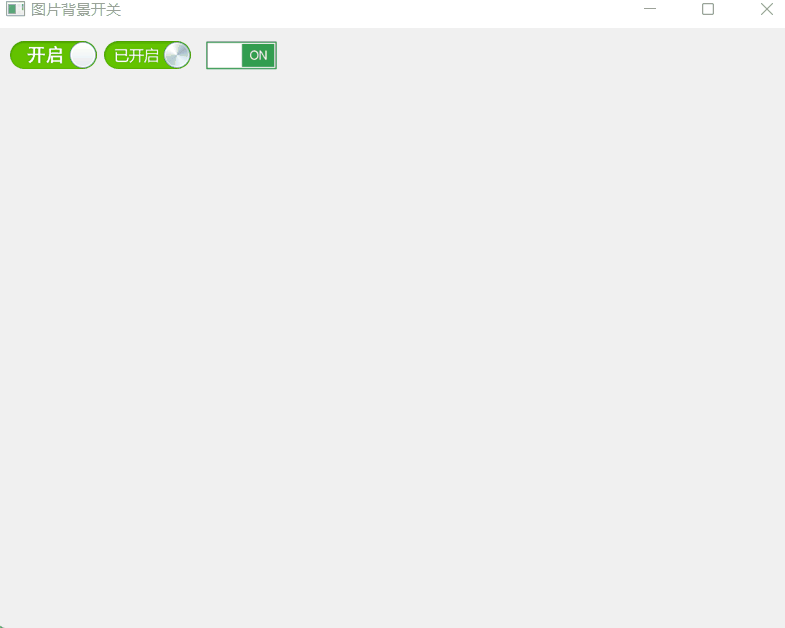
三、效果

四、核心代码
1、头文件
#ifndef SLIPBUTTON_H
#define SLIPBUTTON_H

#include <QAbstractButton>

struct SlipButtonPrivate;
class SlipButton : public QAbstractButton
{
    Q_OBJECT
    Q_PROPERTY(int offset READ offset WRITE setOffset)
    Q_PROPERTY(QColor checkedBackgroundColor READ checkedBackgroundColor WRITE setCheckedBackgroundColor)
    Q_PROPERTY(QColor uncheckedBackgroundColor READ uncheckedBackgroundColor WRITE setUncheckedBackgroundColor)
public:
    explicit SlipButton(QWidget* parent = nullptr);
    ~SlipButton() override;

    QSize sizeHint() const override;
    QSize minimumSizeHint() const override;

public slots:
    void setCheckedBackgroundColor(const QColor &color);
    QColor checkedBackgroundColor() const;

    void setUncheckedBackgroundColor(const QColor &color);
    QColor uncheckedBackgroundColor() const;

protected:
    void paintEvent(QPaintEvent* event) override;
    void enterEvent(QEvent *event) override;
    void leaveEvent(QEvent* event) override;
    void resizeEvent(QResizeEvent* event) override;

private slots:
    void onStartAnimation();
    int offset() const;
    void setOffset(int offset);

private:
    inline double widthMargin() const;
    inline double heightMargin() const;

    QScopedPointer<SlipButtonPrivate> d;
};

#endif // SLIPBUTTON_H
2、实现代码
#include "slipbutton.h"

#include <QPropertyAnimation>
#include <QtWidgets>

struct SlipButtonPrivate{
    int offset = 0;
    QColor uncheckBackgroundColor = QColor("#FFE0E0E0");
    QColor checkedBackgroundColor = QColor("#4da1ff");
    bool hover = false;
    QPropertyAnimation *animation;
};

SlipButton::SlipButton(QWidget *parent)
    : QAbstractButton(parent)
    , d(new SlipButtonPrivate)
{
    d->animation = new QPropertyAnimation(this, "offset", this);
    setCheckable(true);
    setSizePolicy(QSizePolicy::Expanding, QSizePolicy::Expanding);
    connect(this, &SlipButton::toggled, this, &SlipButton::onStartAnimation);
}

SlipButton::~SlipButton()
{
}

QSize SlipButton::sizeHint() const
{
    return QSize(100 * 1.8, 100);
}

QSize SlipButton::minimumSizeHint() const
{
    return QSize(10 * 1.8, 10);
}

void SlipButton::setCheckedBackgroundColor(const QColor& color)
{
    d->checkedBackgroundColor = color;
    update();
}

QColor SlipButton::checkedBackgroundColor() const
{
    return d->checkedBackgroundColor;
}

void SlipButton::setUncheckedBackgroundColor(const QColor &color)
{
    d->uncheckBackgroundColor = color;
    update();
}

QColor SlipButton::uncheckedBackgroundColor() const
{
    return d->uncheckBackgroundColor;
}

int SlipButton::offset() const
{
    return d->offset;
}

void SlipButton::setOffset(int offset)
{
    d->offset = offset;
    update();
}

double SlipButton::widthMargin() const
{
    return width() / 22.0;
}

double SlipButton::heightMargin() const
{
    return height() / 22.0;
}

void SlipButton::paintEvent(QPaintEvent* event)
{
    //qDebug() << offset();
    QWidget::paintEvent(event);
    QPainter painter(this);
    painter.setPen(Qt::NoPen);
    painter.setRenderHint(QPainter::Antialiasing);

    double w = width() - widthMargin() * 2;
    double h = height() - heightMargin() * 2;

    // 画背景
    QRectF rectSlot((width() - w) / 2, (height() - h) / 2, w, h);
    double slotRoundness = rectSlot.height() / 2;
    painter.setBrush(d->uncheckBackgroundColor);
    painter.drawRoundedRect(rectSlot, slotRoundness, slotRoundness);

    // 选中情况下,背景变蓝
    if(isEnabled() && isChecked()){
        QRectF rectSlotFill = rectSlot.adjusted(0, 0, offset() + h - (width() - widthMargin()), 0);
        painter.setBrush(d->checkedBackgroundColor);
        painter.drawRoundedRect(rectSlotFill, slotRoundness, slotRoundness);
    }

    QRectF rectThumb = QRectF(offset(), (height() - h) / 2, h, h);
    QColor colorThumbBorder = (d->hover) ? d->checkedBackgroundColor: QColor("#FFA8A8A8");
    painter.setBrush(colorThumbBorder);
    painter.drawEllipse(rectThumb);

    // 按钮圆点
    QColor colorThumb = isEnabled() ? QColor(Qt::white) : QColor("#FFE0E0E0");
    painter.setBrush(colorThumb);
    rectThumb.adjust(1.1, 1.1, -1.1, -1.1);
    painter.drawEllipse(rectThumb);
}

void SlipButton::enterEvent(QEvent *event)
{
    QAbstractButton::enterEvent(event);
    setCursor(Qt::PointingHandCursor);
    d->hover = true;
}

void SlipButton::leaveEvent(QEvent* event)
{
    QAbstractButton::leaveEvent(event);
    d->hover = false;
}

void SlipButton::resizeEvent(QResizeEvent *event)
{
    QAbstractButton::resizeEvent(event);
    if(isChecked()){
        double h = height() - heightMargin() * 2;
        setOffset(width() - widthMargin() - h);
    }else
        setOffset(widthMargin());
}

void SlipButton::onStartAnimation()
{
    double h = height() - heightMargin() * 2;
    double start = widthMargin();
    double end = width() - start - h;

    if(!isChecked())
        qSwap(start, end);

    // 改变参数值(offset = startValue, offset += interval_1...offset += interval_N)
    // 改变offset的同时,不断repaint(update)
    // 直到为目标值(offset = endValue)paint完成;
    d->animation->setStartValue(start);
    d->animation->setEndValue(end);
    d->animation->setDuration(120);
    d->animation->start();
}
这个自定义控件SlipButton提供了基本的开关功能,通过鼠标点击可以在开启和关闭状态之间切换。你可以根据需要对控件进行自定义和扩展。
五、使用示例
以下是一个简单的示例代码,演示了如何在Qt中使用此控件:
#include "mainwindow.h"
#include "slipbutton.h"

#include <QtWidgets>

MainWindow::MainWindow(QWidget *parent)
    : QMainWindow(parent)
{
    SlipButton *slipButton = new SlipButton(this);
    //slipButton->setFixedSize(50 * 1.8, 50);

    QWidget *widget = new QWidget(this);
    QVBoxLayout *layout = new QVBoxLayout(widget);
    layout->addWidget(slipButton);
    setCentralWidget(widget);
    resize(240, 140);
}

MainWindow::~MainWindow()
{
}
总结一下,笔者分享纯代码实现滑动开关控件的一种设计方法和流程,在此操作的基础上我们可以发挥想象开发出更多更有意思的控件,源码我放在此处以下地址。如有错误也请各位看官手下留情,欢迎评论区批评指正。
谢谢你的关注和阅读,希望我的回答能帮到你。如果还有其他问题,欢迎随时向我提问。祝你一切顺利!


![[<span style='color:red;'>Qt</span>学习笔记]<span style='color:red;'>Qt</span><span style='color:red;'>实现</span>自定义<span style='color:red;'>控</span><span style='color:red;'>件</span>SwitchButton<span style='color:red;'>开关</span>按钮](https://img-blog.csdnimg.cn/img_convert/801832b8fd6dc9749cdf111fe71e096e.webp?x-oss-process=image/format,png)