参考博客
1. https://blog.csdn.net/qq_31278903/article/details/83146031
2. https://blog.csdn.net/u014374826/article/details/134093409
3. https://blog.csdn.net/weixin_42728126/article/details/88887350
4. https://blog.csdn.net/Dreamhai/article/details/109764502
5. Ubuntu 22.04 安装 NVIDIA 显卡驱动失败笔记 - 小时百科 (wuli.wiki)
重装Ubuntu24.04系统
实验室有一台五年前的老机子,老师让我将它重新利用起来,于是我就来开始一顿捣鼓了。
1. 准备系统盘
- 一个大于8G的优盘
- 使用rufus(Index of /downloads (rufus.ie))软件制作,强推!真的非常好用!
- 下载系统镜像文件(Get Ubuntu | Download | Ubuntu),桌面版和服务器版二则选其一即可Get Ubuntu | Download | Ubuntu
2. 更改为U盘启动
把系统盘插入电脑中,然后重启电脑,这里需要进入bios界面更改为U盘启动,不同品牌电脑进入BIOS的快捷键不同,我们实验室这台机子使用F2进入。
- 重新启动电脑,开机时不停地按F2键进入BIOS界面
- 更改优先启动项为U盘最高
- 保存更改设置,然后等待提示安装系统
BIOS是英文 "Basic Input Output System" 的缩略词,直译过来后中文名称就是 "基本输入输出系统"。其实,它是一组固化到计算机内主板上一个daoROM芯片上的程序,它保存着计算机最重要的基本输入输出的程序、系统设置信息、开机后自检程序和系统自启动程序。 其主要功能是为计算机提供最底层的、最直接的硬件设置和控制。
原文链接:https://blog.csdn.net/songyuchaoshi/article/details/109639071
3. 安装系统
我安装的是Ubuntu2024.04桌面版,因此按默认的选项一直下一步就完事,安装成功之后,拔出优盘,重启系统。
配置环境
1. 重置root密码
有一些命令或者应用需要用root身份安装,我想知道新装的Ubuntu系统中默认的root用户密码是多少?新装的系统的root密码是随机生成的,我们使用密码修改命令将其修改成熟悉的密码:
qfchen@Tanlab-Server:~$ su passwd在安装系统的过程,我设置了一个用户名和密码,这个账号是具有管理员权限的,因此可以使用su命令。
2. 格式化其他磁盘
我用 lsblk 查看系统所有的硬盘使用情况发现这台机子的旧系统放在另一个磁盘(nvme0n1)上,于是我想把nvme0n1硬盘上的信息全部格式化掉。
ubuntu--vg--1-ubuntu--lv:重新安装的系统
ubuntu--vg-ubuntu--lv:以前的老系统(需要格式化)
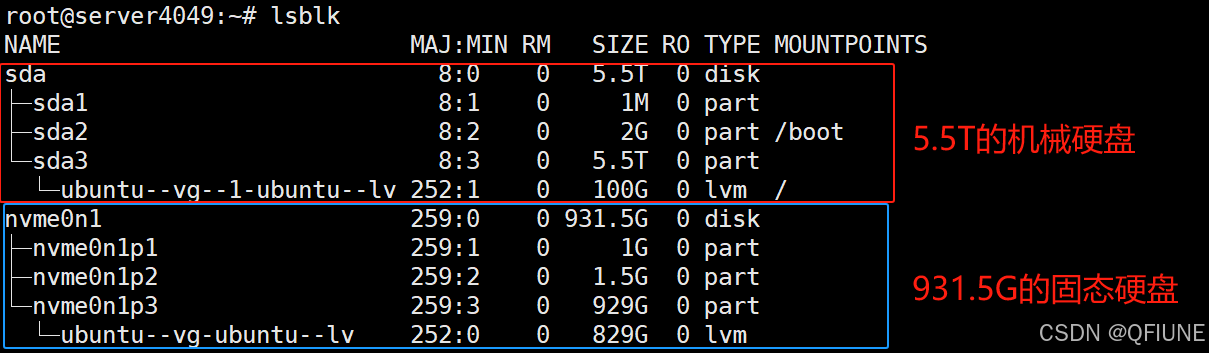
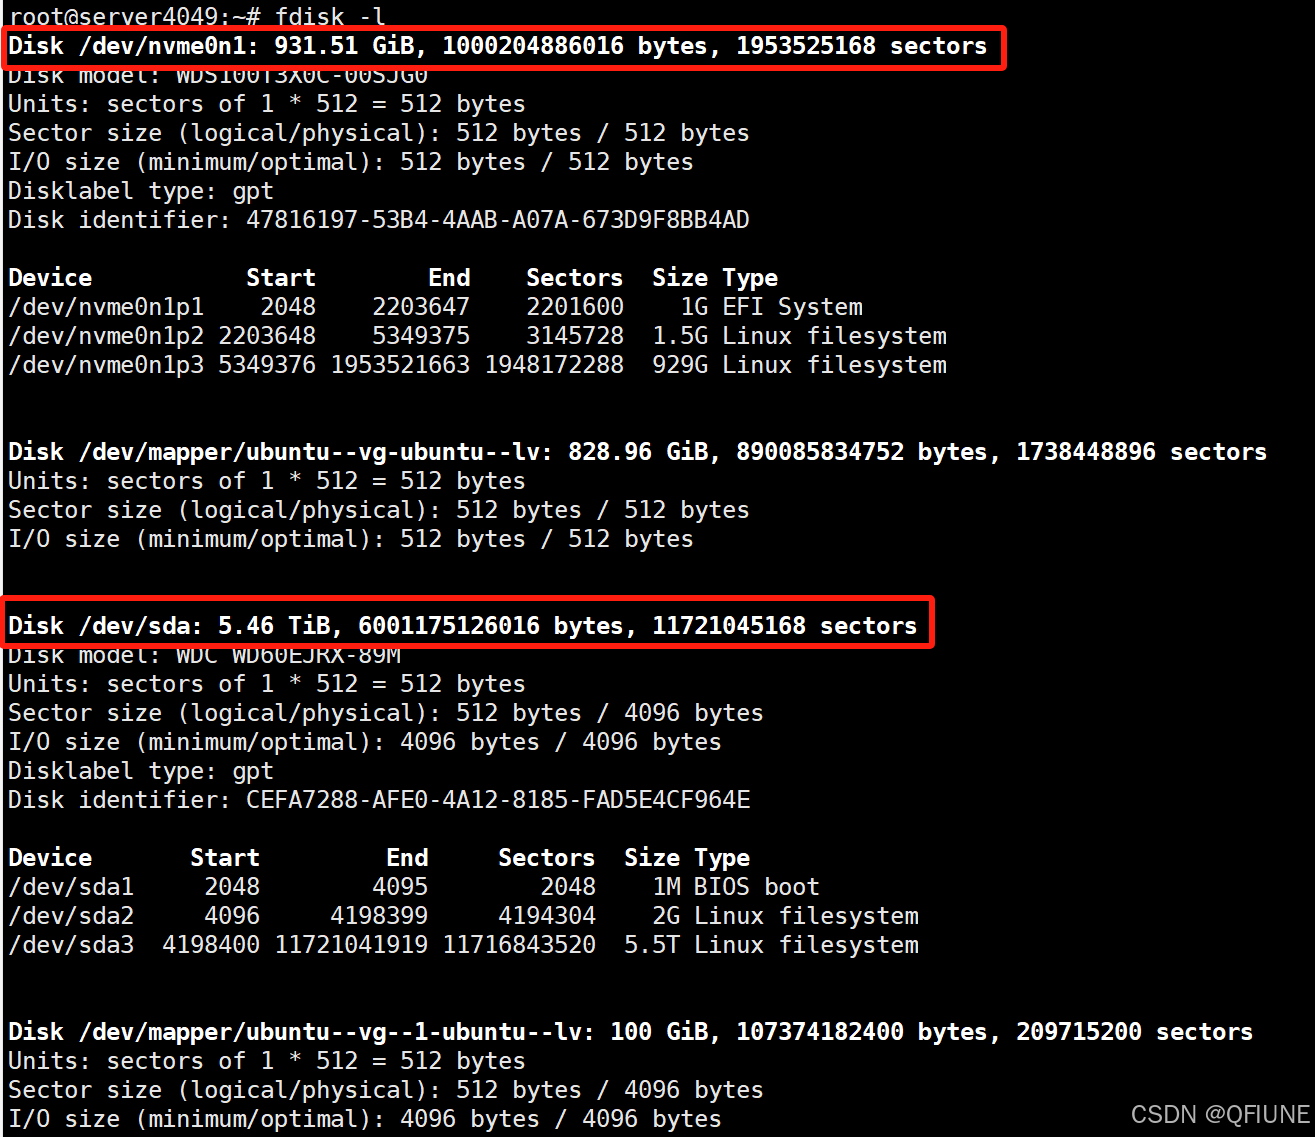
然后又用 fdisk -l 命令来查看系统里面识别到的硬盘和分区的信息
这里可以用lsblk -d -o name,rota命令区分机械硬盘(hdd)和固态硬盘(ssd):

了解到磁盘基本信息之后,我们就可以将该硬盘格式化掉啦
root@server4049:~# parted /dev/nvme0n1
GNU Parted 3.6
Using /dev/nvme0n1
Welcome to GNU Parted! Type 'help' to view a list of commands.
(parted) mklabel gpt
Warning: The existing disk label on /dev/nvme0n1 will be destroyed and all data on this disk will be lost. Do you want to continue?
Yes/No? yes
Error: Partition(s) 3 on /dev/nvme0n1 have been written, but we have been unable to inform the kernel of the change, probably because it/they are in use.  As a
result, the old partition(s) will remain in use.  You should reboot now before making further changes.
Ignore/Cancel? Ignore
(parted) print
Model: WDS100T3X0C-00SJG0 (nvme)
Disk /dev/nvme0n1: 1000GB
Sector size (logical/physical): 512B/512B
Partition Table: gpt
Disk Flags:

Number  Start  End  Size  File system  Name  Flags

(parted) mkpart primary 0 1000GB
Warning: The resulting partition is not properly aligned for best performance: 34s % 2048s != 0s
Ignore/Cancel? Ignore
Error: Partition(s) 1, 3 on /dev/nvme0n1 have been written, but we have been unable to inform the kernel of the change, probably because it/they are in use.  As a
result, the old partition(s) will remain in use.  You should reboot now before making further changes.
Ignore/Cancel? Ignore
(parted) print
Model: WDS100T3X0C-00SJG0 (nvme)
Disk /dev/nvme0n1: 1000GB
Sector size (logical/physical): 512B/512B
Partition Table: gpt
Disk Flags:

Number  Start   End     Size    File system  Name     Flags
 1      17.4kB  1000GB  1000GB               primary

(parted) quit
Information: You may need to update /etc/fstab.
root@server4049:~# mkfs.ext4 /dev/nvme0n1
mke2fs 1.47.0 (5-Feb-2023)
/dev/nvme0n1 is apparently in use by the system; will not make a filesystem here!
root@server4049:~# dmsetup status
ubuntu--vg--1-ubuntu--lv: 0 209715200 linear
ubuntu--vg-ubuntu--lv: 0 1738448896 linear
ubuntu--vg-ubuntu--lv1: 0 1738448829 linear
root@server4049:~# dmsetup remove_all
root@server4049:~# dmsetup status
ubuntu--vg--1-ubuntu--lv: 0 209715200 linear
root@server4049:~# mkfs.ext4 /dev/nvme0n1p3
mke2fs 1.47.0 (5-Feb-2023)
/dev/nvme0n1p3 contains a LVM2_member file system
Proceed anyway? (y,N) y
Discarding device blocks: done
Creating filesystem with 243521536 4k blocks and 60882944 inodes
Filesystem UUID: b6e57451-0775-400b-93eb-d581a22ac075
Superblock backups stored on blocks:
32768, 98304, 163840, 229376, 294912, 819200, 884736, 1605632, 2654208,
4096000, 7962624, 11239424, 20480000, 23887872, 71663616, 78675968,
102400000, 214990848
Allocating group tables: done
Writing inode tables: done
Creating journal (262144 blocks): done
Writing superblocks and filesystem accounting information: done 安装nvidia驱动的教程
首先我们需要检查一下这台机器是否有GPU,使用如下命令: lspci |grep -i nvidia
发现 lspci 命令不在Linux环境中,那我们来安装一个
qfchen@Tanlab-Server:~$  lspci |grep -i nvidia
Command ' lspci' not found, did you mean:
  command 'lspci' from deb pciutils (1:3.10.0-2)
Try: sudo apt install <deb name>
根据提示信息, lspci 命令位于 pciutils 包中,因此需要安装这个包才能使用 lspci 命令。
qfchen@Tanlab-Server:~$ sudo apt install pciutils
Reading package lists... Done
Building dependency tree... Done
Reading state information... Done
pciutils is already the newest version (1:3.10.0-2build1).
pciutils set to manually installed.
The following package was automatically installed and is no longer required:
  libnvidia-egl-wayland1
Use 'sudo apt autoremove' to remove it.
0 upgraded, 0 newly installed, 0 to remove and 33 not upgraded.
然后我们使用 lspci 查看,发现有GPU:GeForce RTX 2080 Ti Rev. A
root@server4049:/home/qfchen# lspci |grep -i nvidia
01:00.0 VGA compatible controller: NVIDIA Corporation TU102 [GeForce RTX 2080 Ti Rev. A] (rev a1)
01:00.1 Audio device: NVIDIA Corporation TU102 High Definition Audio Controller (rev a1)
01:00.2 USB controller: NVIDIA Corporation TU102 USB 3.1 Host Controller (rev a1)
01:00.3 Serial bus controller: NVIDIA Corporation TU102 USB Type-C UCSI Controller (rev a1)
上述信息显示是有GPU,然后:
- 第一步,打开终端,先用 nvidia-smi 查看一下,发现如下报错:
NVIDIA-SMI has failed because it couldn't communicate with the NVIDIA driver.
Make sure that the latest NVIDIA driver is installed and running.
报错信息大概意思是 nvidia-smi 无法与 NVIDIA 驱动程序通信。通常情况下,这是由于 NVIDIA 驱动程序未正确安装或未加载而导致的。这个时候需要查看一下版本是否匹配,因为NVIDIA 驱动程序具有很强的版本依赖性,需要与特定的内核版本和 CUDA 版本匹配。
我们来查看是否安装完成NVIDIA 驱动程序,输入 dpkg -l | grep nvidia
- 第二步,使用
ncvv -V检查驱动和cuda。
root@server4049:/usr/src# nvcc -V
Command 'nvcc' not found, but can be installed with:
apt install nvidia-cuda-toolkit
于是根据提示安装 apt install nvidia-cuda-toolkit,成功之后再次输入 nvcc -V显示信息如下:
root@server4049:/usr/src# nvcc -V
nvcc: NVIDIA (R) Cuda compiler driver
Copyright (c) 2005-2023 NVIDIA Corporation
Built on Fri_Jan__6_16:45:21_PST_2023
Cuda compilation tools, release 12.0, V12.0.140
Build cuda_12.0.r12.0/compiler.32267302_0
显示信息表明驱动是存在的,于是进行下一步:
- 第三步,查看已安装驱动的版本信息
root@server4049:/usr/src# ls /usr/src | grep nvidia
没有显示任何信息,那就安装驱动呗!
首先确定 Software & Updates (桌面的Ubuntu)中的 Proprietary drivers for devices (restricted) 已经勾选
sudo apt update
sudo ubuntu-drivers list
可以自动安装系统认为合适的驱动
sudo ubuntu-drivers install --gpgpusudo ubuntu-drivers install nvidia:535完成后(可能要重启)在 Software & Updates 中可以更改想要使用的驱动。
这个教程有用,倒腾了半天,用这个教程成功了,在root账号下操作。
1. 先把之前的nvidia驱动卸载干净:
apt-get remove nvidia-*
apt-get remove "*nvidia-*"
2. 删除旧内核
apt autoremove3. 在终端里输入下面的命令来查看可以选择哪些驱动
ubuntu-drivers devices4. 根据显示的推荐结果选一个,我选的是535版本,一般选择后面跟有recommend字样的版本
apt install nvidia-driver-5355. 顺利的会直接安装成功,然后再reboot以下即可生效驱动
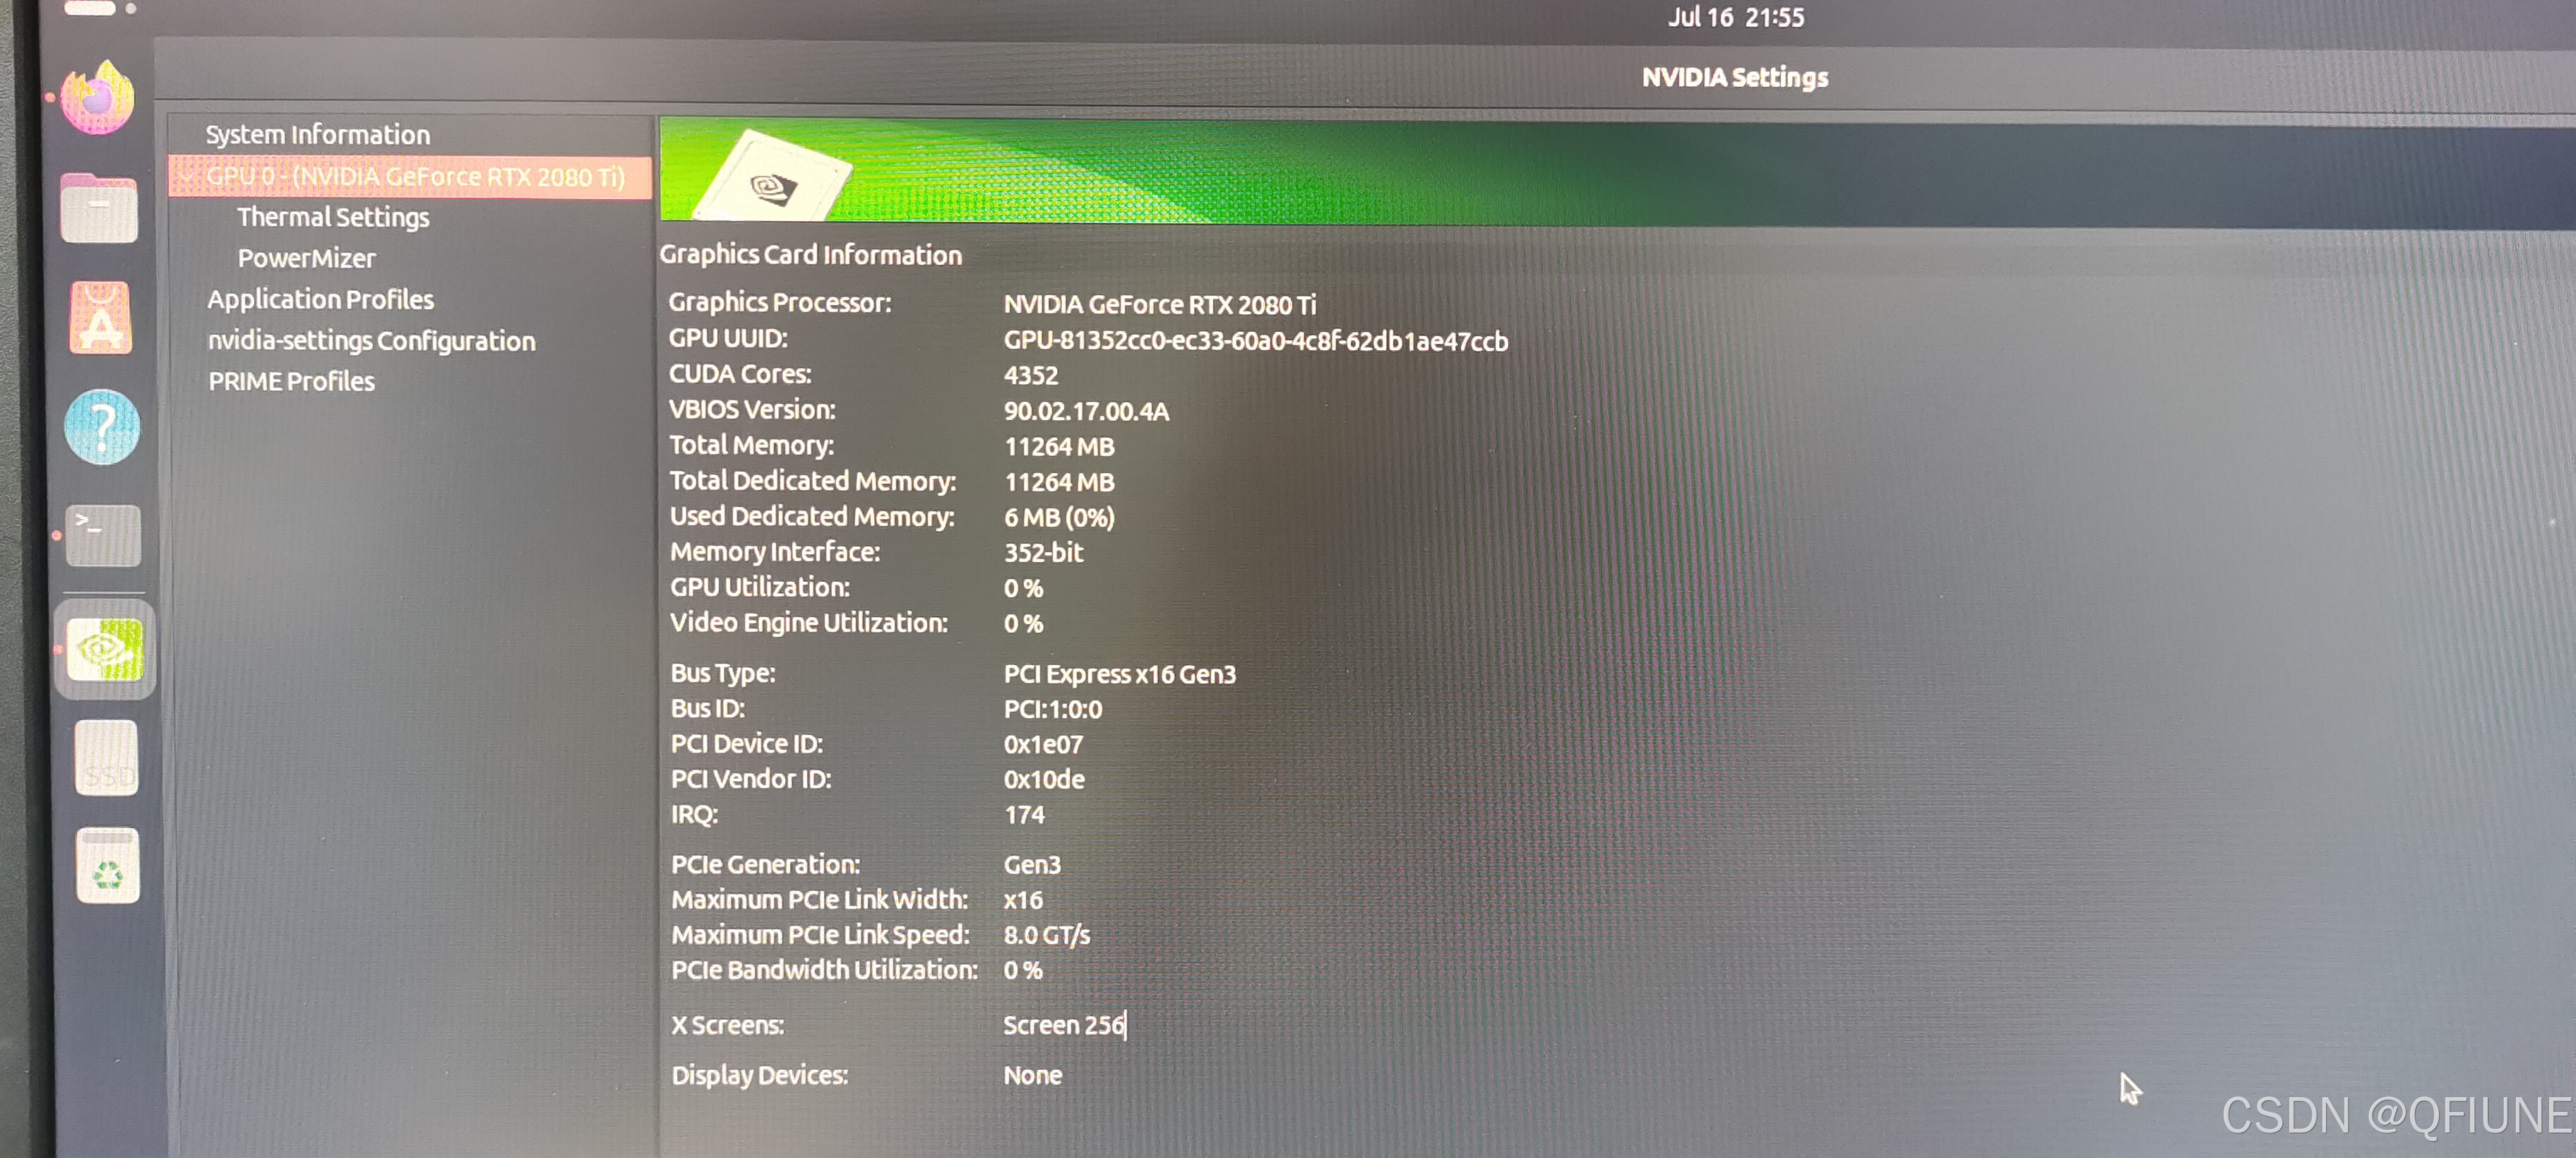
6. 查看一下显卡信息,安装NVIDIA Settings控制面板,在命令行打开控制面板或者在启动器内找到控制面板图标,打开后就可以查看显卡信息啦!
apt install nvidia-settings
nvidia-settings
结果如下所示:
后面的命令就是成功安装好 驱动之后,使用的一些基础命令查看系统信息
- uname命令
qfchen@Tanlab-Server:~$ uname --help
Usage: uname [OPTION]...
Print certain system information.  With no OPTION, same as -s.

  -a, --all                print all information, in the following order,
                             except omit -p and -i if unknown:
  -s, --kernel-name        print the kernel name
  -n, --nodename           print the network node hostname
  -r, --kernel-release     print the kernel release
  -v, --kernel-version     print the kernel version
  -m, --machine            print the machine hardware name
  -p, --processor          print the processor type (non-portable)
  -i, --hardware-platform  print the hardware platform (non-portable)
  -o, --operating-system   print the operating system
      --help        display this help and exit
      --version     output version information and exit
- Linux查看当前使用的内核版本
qfchen@Tanlab-Server:~$ uname -r
6.8.0-38-generic
- Linux查看当前操作系统的内核信息
qfchen@Tanlab-Server:~$ uname -a
Linux Tanlab-Server 6.8.0-38-generic #38-Ubuntu SMP PREEMPT_DYNAMIC Fri Jun  7 15:25:01 UTC 2024 x86_64 x86_64 x86_64 GNU/Linux
- Linux查看版本当前操作系统发行版信息
qfchen@Tanlab-Server:~$ cat /etc/issue
Ubuntu 24.04 LTS \n \l
- Linux查看cpu相关信息,包括型号、主频、内核信息等
qfchen@Tanlab-Server:~$ cat /proc/cpuinfo- Ubuntu中查看主机有多少个核
qfchen@Tanlab-Server:~$ cat /proc/cpuinfo | grep processor | wc -l
20
qfchen@Tanlab-Server:~$ nproc
20
- 查看主机名称
qfchen@Tanlab-Server:~$ hostname
Tanlab-Server
- 查看网络信息
qfchen@Tanlab-Server:~$ ifconfig
enp4s0: flags=4163<UP,BROADCAST,RUNNING,MULTICAST>  mtu 1500
        inet 10.16.27.223  netmask 255.255.128.0  broadcast 10.16.127.255
        inet6 fe80::d65d:64ff:fed1:f45d  prefixlen 64  scopeid 0x20<link>
        inet6 2001:da8:201d:1107::e562  prefixlen 128  scopeid 0x0<global>
        ether d4:5d:64:d1:f4:5d  txqueuelen 1000  (Ethernet)
        RX packets 2144728  bytes 3161595289 (3.1 GB)
        RX errors 0  dropped 9198  overruns 0  frame 0
        TX packets 958093  bytes 91054742 (91.0 MB)
        TX errors 0  dropped 0 overruns 0  carrier 0  collisions 0
        device memory 0xa5100000-a51fffff

lo: flags=73<UP,LOOPBACK,RUNNING>  mtu 65536
        inet 127.0.0.1  netmask 255.0.0.0
        inet6 ::1  prefixlen 128  scopeid 0x10<host>
        loop  txqueuelen 1000  (Local Loopback)
        RX packets 1899  bytes 414234 (414.2 KB)
        RX errors 0  dropped 0  overruns 0  frame 0
        TX packets 1899  bytes 414234 (414.2 KB)
        TX errors 0  dropped 0 overruns 0  carrier 0  collisions 0

wlo1: flags=4099<UP,BROADCAST,MULTICAST>  mtu 1500
        ether 04:33:c2:01:53:ec  txqueuelen 1000  (Ethernet)
        RX packets 0  bytes 0 (0.0 B)
        RX errors 0  dropped 0  overruns 0  frame 0
        TX packets 0  bytes 0 (0.0 B)
        TX errors 0  dropped 0 overruns 0  carrier 0  collisions 0
环境配置着配置着发现有线网卡(enp4s0)掉了,兵来将挡水来土掩,我们来启动它,root账号操作。
nmcli networking off
nmcli networking on
然后我们就会发现桌面版Ubuntu右上角的网络图标亮了,撒花撒花撒花。
接下来就是给其他小伙伴分配账号啦,大家一起愉快的玩耍。过程很曲折,结果还是算是好的,又巩固了一遍之前学的知识。
adduser test