【7天毕设速成01】最新Springboot+Vue毕设教程!跟着学跟着拷贝,0基础小白7天搞定毕设!适用于javaweb项目、管理系统、商城、预订预约、博客论坛!
【7天毕设速成02】从0搭建前端Vue项目工程
【7天毕设速成03】从0搭建后端springboot项目工程
【7天毕设速成04】后端Springboot工程配置与启动
【7天毕设速成05】前端Vue项目配置与启动
进小白交流群或者获取配套带敲视频和项目源码资料,请联系我主页左侧微信号或戳:联系我
原创项目请戳:项目
同学们,前面的课我们已经完成了前后端工程的搭建配置启动。接下来,我们先搭建前端页面框架,再写后端接口框架,最后我们做前后端交互的一个个功能模块。一步一步手把手带你做出自己的毕设。本节课开始,我们正式进入了项目开发的课程,主要实现用elmentUI搭建后台管理系统页面框架。
elementUI中文官网:https://element.eleme.cn/#/zh-CN
学习目标
(1)集成ElmentUI
(2)运用elementUI el-container 组件实现后台页面布局
需求分析
(1)集成elmentUI完成页面布局
(2)调试菜单栏和头部组件的样式
实现过程
elementUI是什么
基于 Vue 2.0 的桌面端组件库
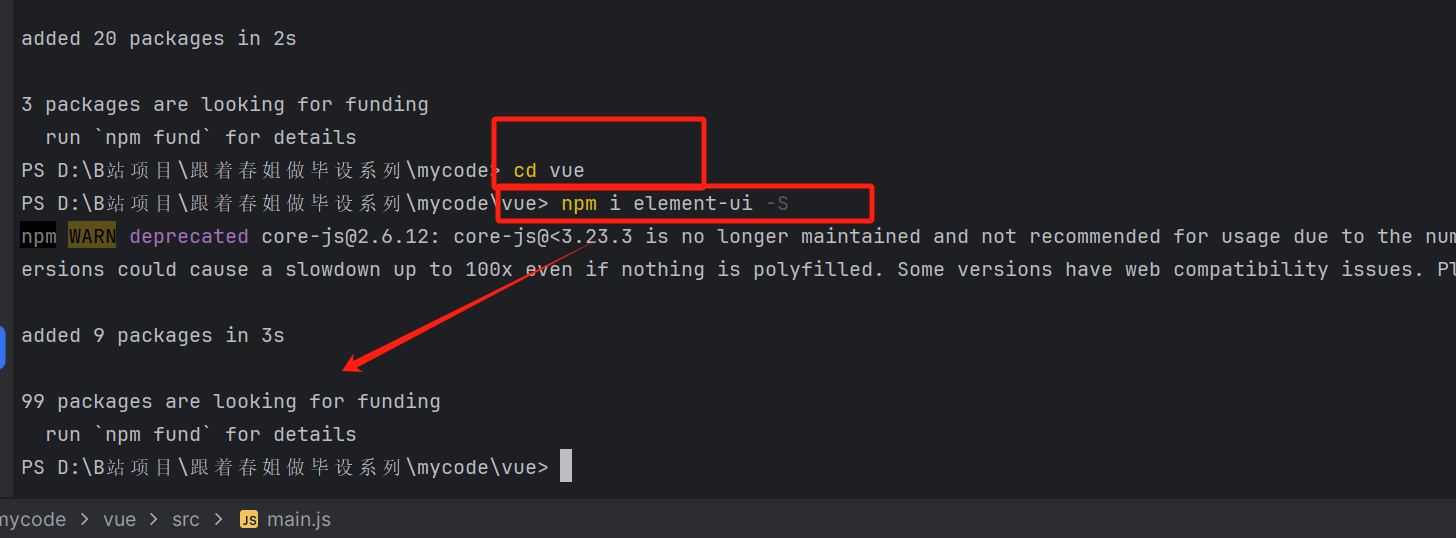
安装elementUI
npm i element-ui -S
引入elementUI
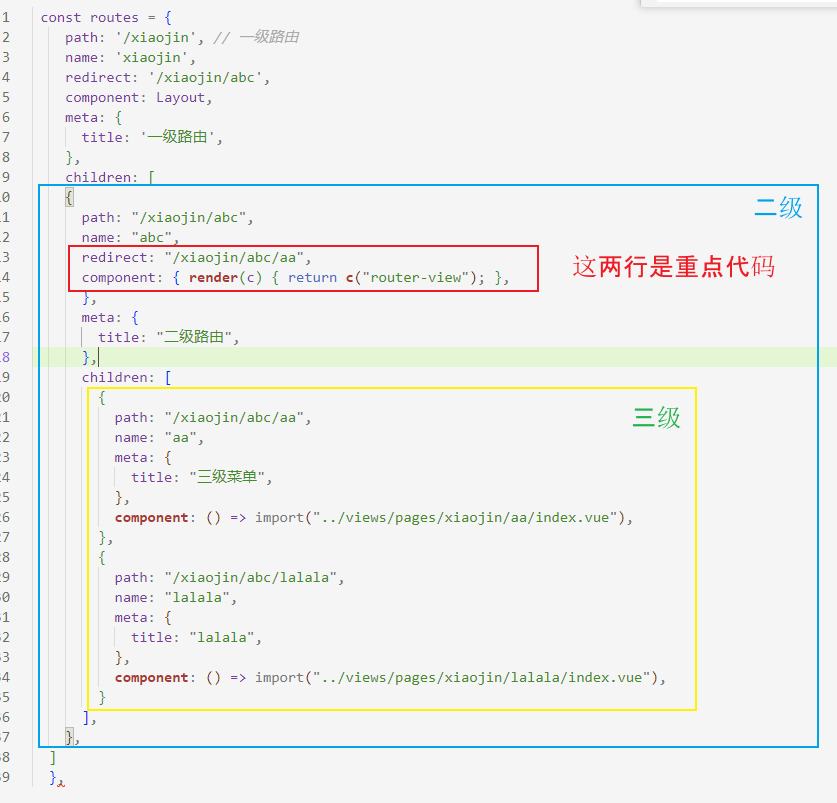
在mian.js中引入elemntUI ,在原有的代码中加下面红框里的三行代码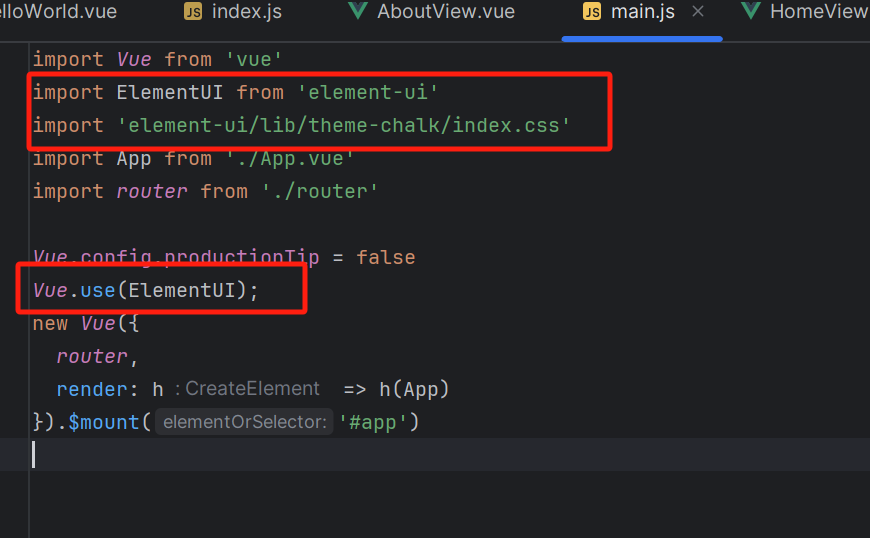
为了节省时间,大家可直接复制下面的代码替换main.js原有的代码。
import Vue from 'vue'
import ElementUI from 'element-ui'
import 'element-ui/lib/theme-chalk/index.css'
import App from './App.vue'
import router from './router'

Vue.config.productionTip = false
Vue.use(ElementUI);
new Vue({
  router,
  render: h => h(App)
}).$mount('#app')
使用elmentUI组件进行页面布局
清空原有页面样式
每个页面最终的样式是这样的,大家可以直接复制代码替换原有的样式
<template>
  <div id="app">
    <router-view/>
  </div>
</template>
<template>
  <div class="home">
  </div>
</template>
<script>

  export default {
    name: 'HomeView',
  }
</script>
<template>
  <div class="about">
  </div>
</template>
拷贝elmentUI布局样式到App.vue
到elementUI官网上找到下面的样式以及对应的代码。网址:https://element.eleme.cn/#/zh-CN/component/container
(1)找到喜欢的样式,比如下面的: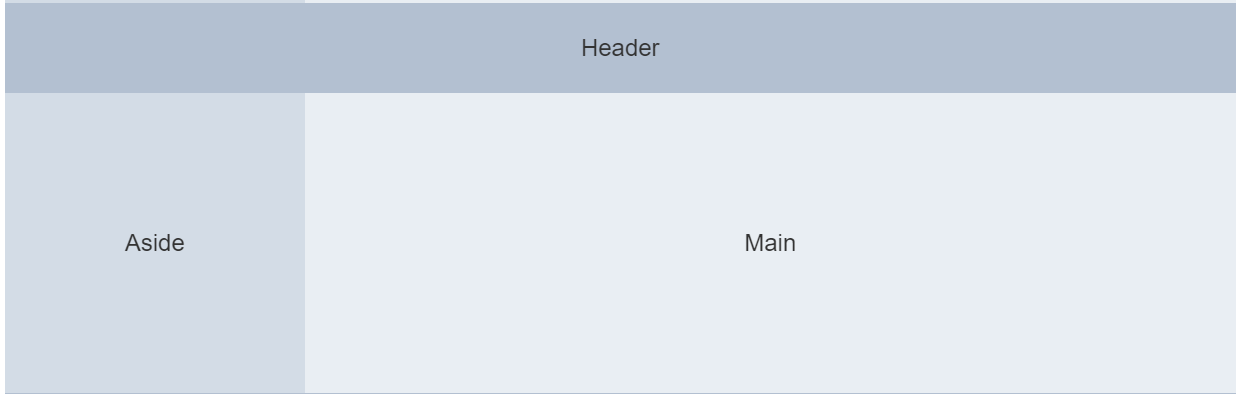
(2)再找到样式对应的代码:
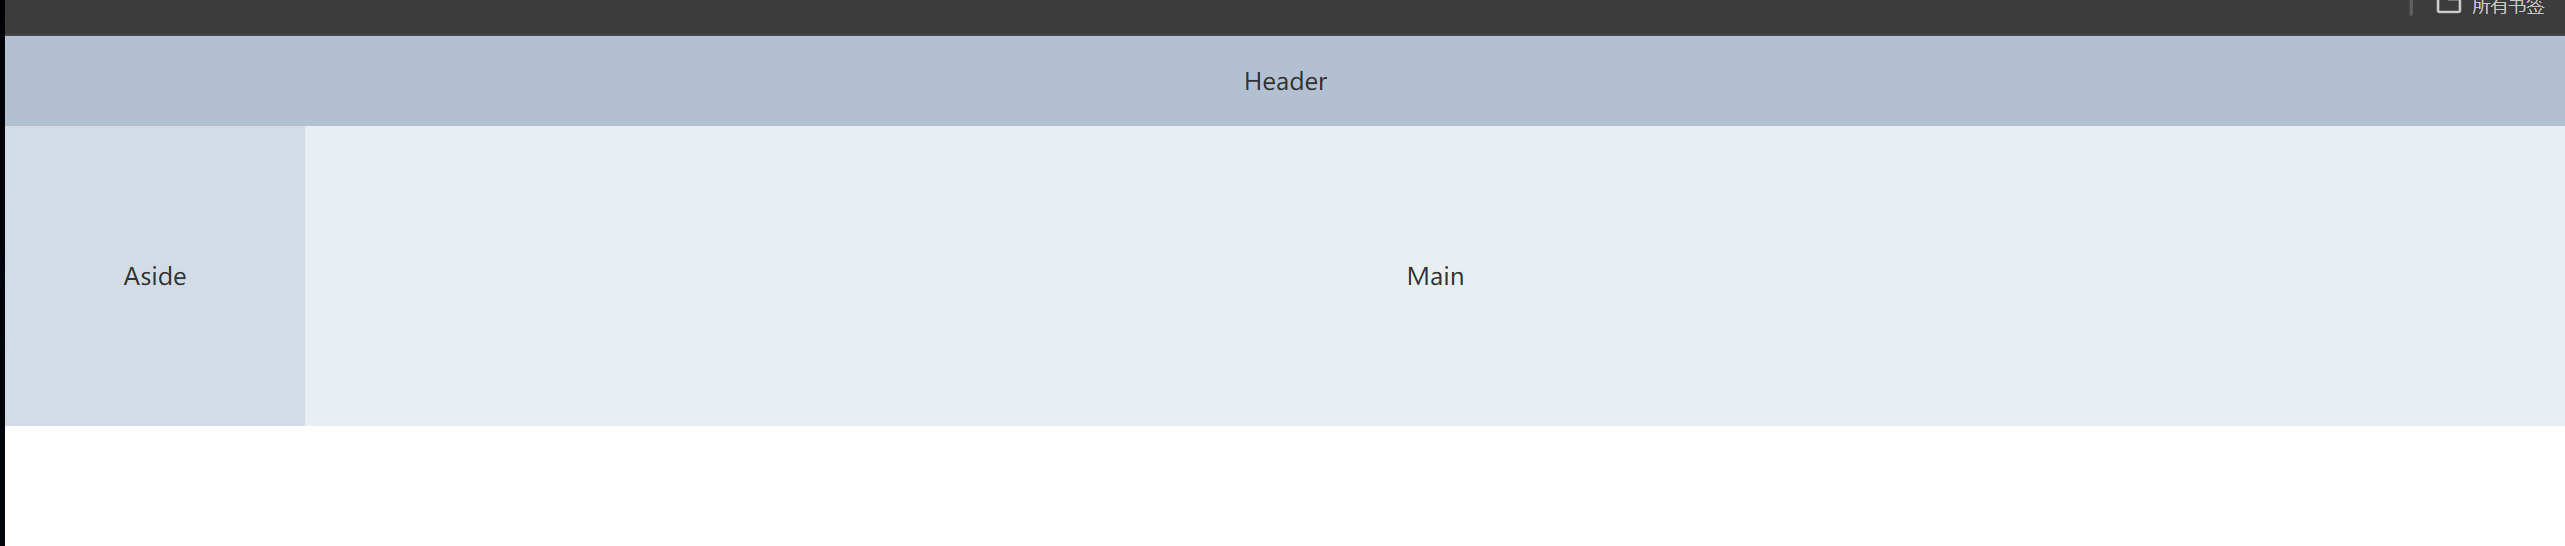
<el-container>
  <el-header>Header</el-header>
  <el-container>
    <el-aside width="200px">Aside</el-aside>
    <el-main>Main</el-main>
  </el-container>
</el-container>
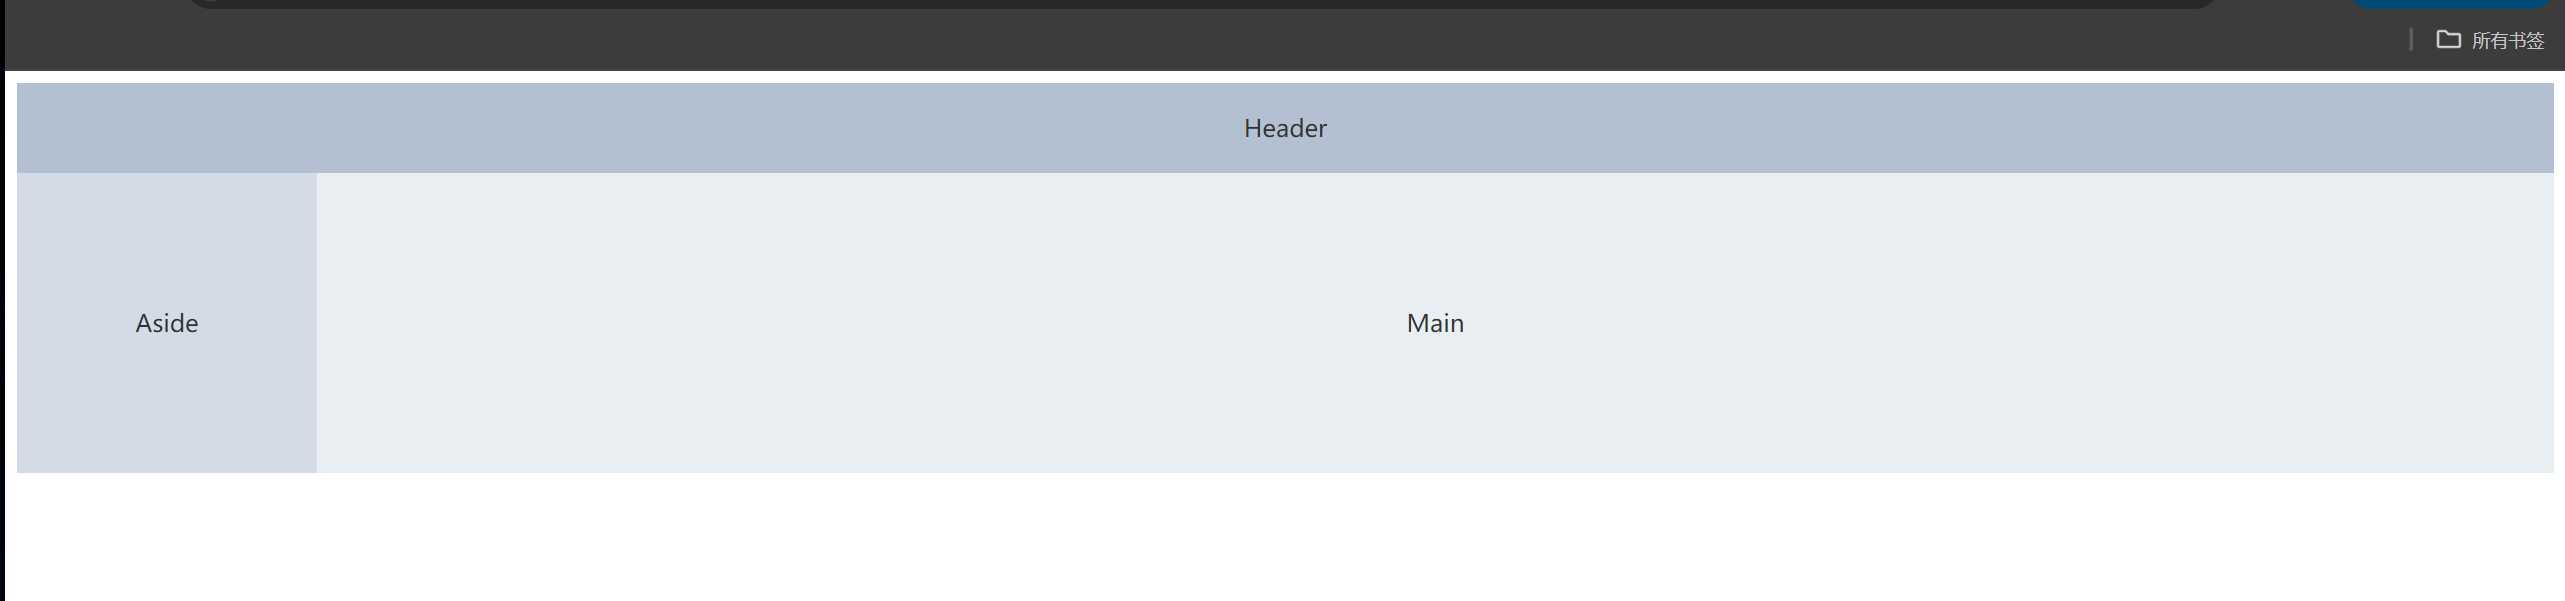
样式效果如下:这是因为我们上面只拷贝了页面html,并未拷贝样式。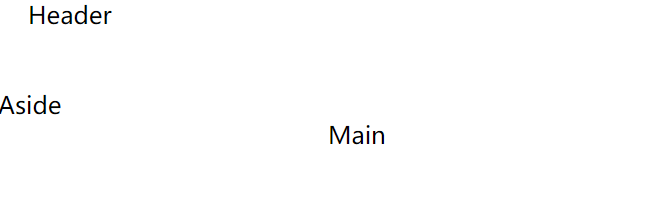
(3)拷贝样式到页面
<style>
  .el-header, .el-footer {
    background-color: #B3C0D1;
    color: #333;
    text-align: center;
    line-height: 60px;
  }

  .el-aside {
    background-color: #D3DCE6;
    color: #333;
    text-align: center;
    line-height: 200px;
  }

  .el-main {
    background-color: #E9EEF3;
    color: #333;
    text-align: center;
    line-height: 160px;
  }

  body > .el-container {
    margin-bottom: 40px;
  }

  .el-container:nth-child(5) .el-aside,
  .el-container:nth-child(6) .el-aside {
    line-height: 260px;
  }

  .el-container:nth-child(7) .el-aside {
    line-height: 320px;
  }
</style>
创建全局样式文件并引入
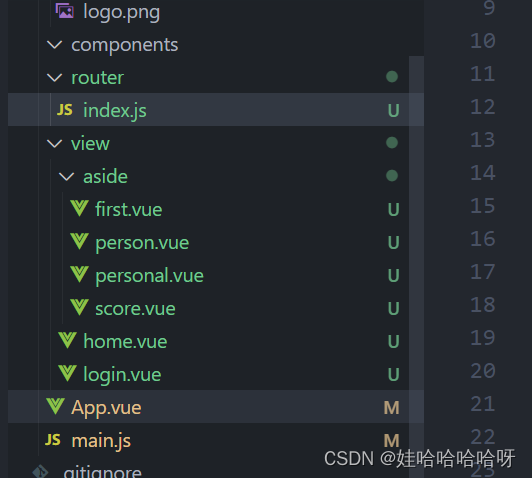
(1)创建global.css文件
上面的样式跟浏览器有间隙,我们创建一个global.css用于写全局样式。截图如下: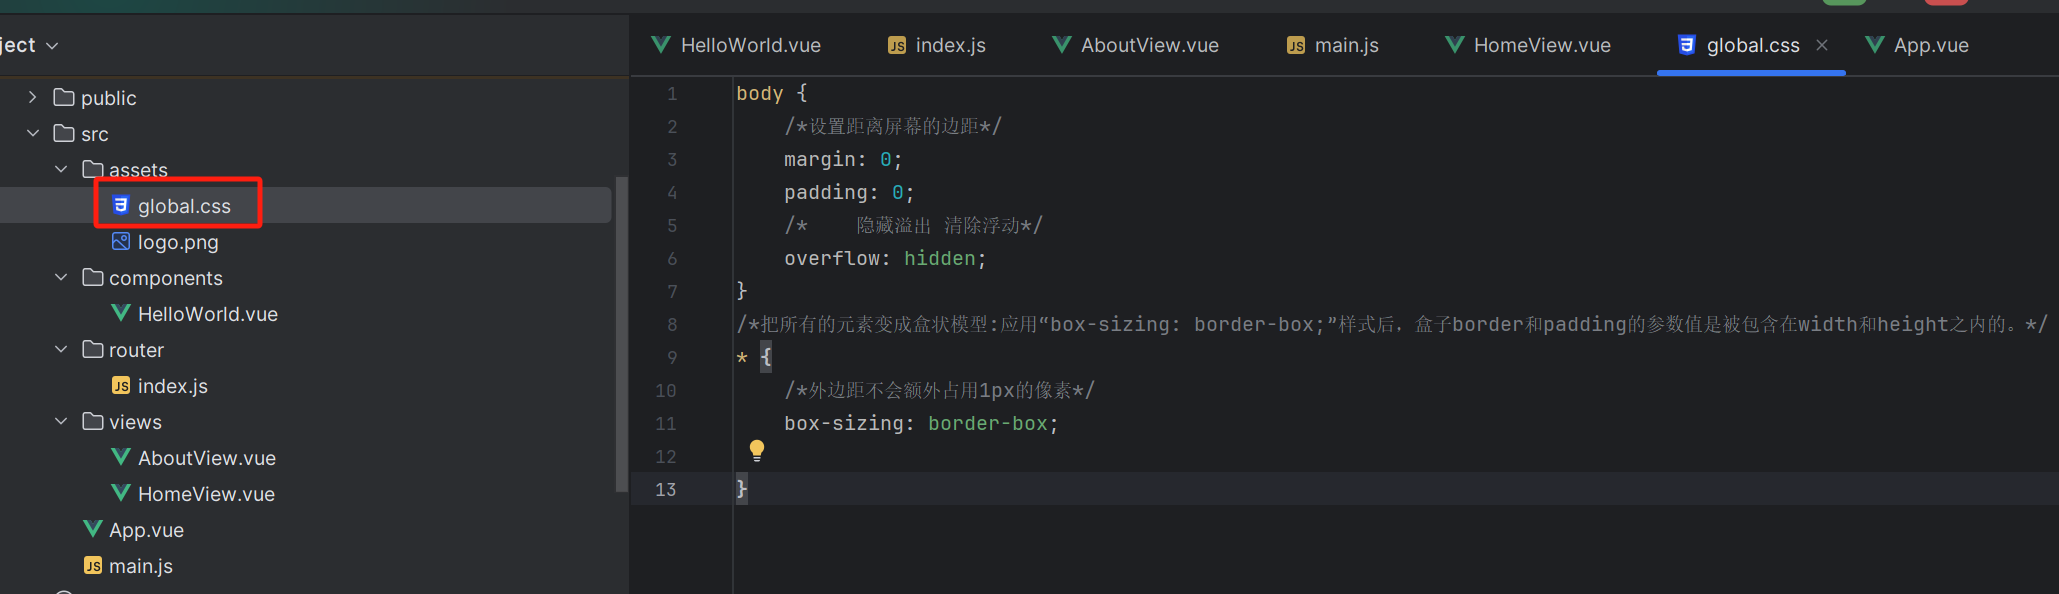
代码如下:
body {
  /*设置距离屏幕的边距*/
  margin: 0;
  padding: 0;
  /*    隐藏溢出 清除浮动*/
  overflow: hidden;
}
/*把所有的元素变成盒状模型:应用“box-sizing: border-box;”样式后,盒子border和padding的参数值是被包含在width和height之内的。*/
* {
  /*外边距不会额外占用1px的像素*/
  box-sizing: border-box;

}
(2)在main.js中引入这个css文件
代码截图如下: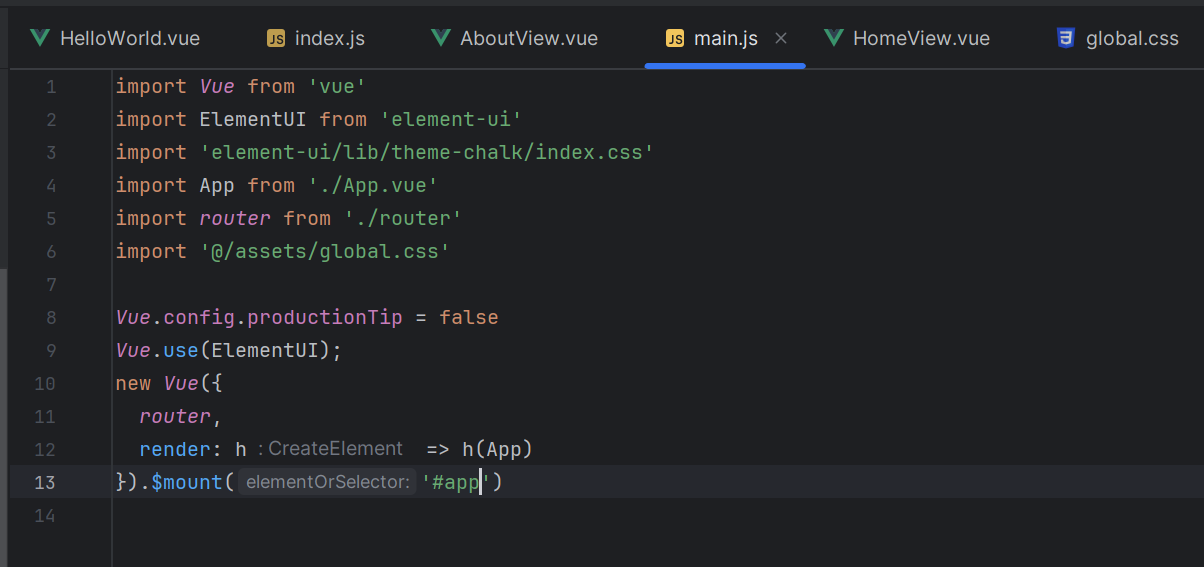
代码如下:
import '@/assets/global.css'
页面样式如下
调试侧边栏、头部、表格组件样式
好了,到这里,我们页面布局已经搭建好了,下面我们分别找组件填充aside,header,main的部分。
侧边栏和表格样式的样式链接:
侧边栏样式:https://element.eleme.cn/#/zh-CN/component/menu
表格样式:https://element.eleme.cn/#/zh-CN/component/table
大家可以找到我们喜欢的样式粘贴到对应的模块,如果没有,我们自己写一下样式。
这里,官网给我们提供了一个示例样式,我们先不讲这么复杂,可以直接拿来就用。先做好,再理解。下来跟着我复制这里的代码。
2.拷贝容器html样式到代码
<el-container style="height: 500px; border: 1px solid #eee">
  <el-aside width="200px" style="background-color: rgb(238, 241, 246)">
    <el-menu :default-openeds="['1', '3']">
      <el-submenu index="1">
        <template slot="title"><i class="el-icon-message"></i>导航一</template>
        <el-menu-item-group>
          <template slot="title">分组一</template>
          <el-menu-item index="1-1">选项1</el-menu-item>
          <el-menu-item index="1-2">选项2</el-menu-item>
        </el-menu-item-group>
        <el-menu-item-group title="分组2">
          <el-menu-item index="1-3">选项3</el-menu-item>
        </el-menu-item-group>
        <el-submenu index="1-4">
          <template slot="title">选项4</template>
          <el-menu-item index="1-4-1">选项4-1</el-menu-item>
        </el-submenu>
      </el-submenu>
      <el-submenu index="2">
        <template slot="title"><i class="el-icon-menu"></i>导航二</template>
        <el-menu-item-group>
          <template slot="title">分组一</template>
          <el-menu-item index="2-1">选项1</el-menu-item>
          <el-menu-item index="2-2">选项2</el-menu-item>
        </el-menu-item-group>
        <el-menu-item-group title="分组2">
          <el-menu-item index="2-3">选项3</el-menu-item>
        </el-menu-item-group>
        <el-submenu index="2-4">
          <template slot="title">选项4</template>
          <el-menu-item index="2-4-1">选项4-1</el-menu-item>
        </el-submenu>
      </el-submenu>
      <el-submenu index="3">
        <template slot="title"><i class="el-icon-setting"></i>导航三</template>
        <el-menu-item-group>
          <template slot="title">分组一</template>
          <el-menu-item index="3-1">选项1</el-menu-item>
          <el-menu-item index="3-2">选项2</el-menu-item>
        </el-menu-item-group>
        <el-menu-item-group title="分组2">
          <el-menu-item index="3-3">选项3</el-menu-item>
        </el-menu-item-group>
        <el-submenu index="3-4">
          <template slot="title">选项4</template>
          <el-menu-item index="3-4-1">选项4-1</el-menu-item>
        </el-submenu>
      </el-submenu>
    </el-menu>
  </el-aside>

  <el-container>
    <el-header style="text-align: right; font-size: 12px">
      <el-dropdown>
        <i class="el-icon-setting" style="margin-right: 15px"></i>
        <el-dropdown-menu slot="dropdown">
          <el-dropdown-item>查看</el-dropdown-item>
          <el-dropdown-item>新增</el-dropdown-item>
          <el-dropdown-item>删除</el-dropdown-item>
        </el-dropdown-menu>
      </el-dropdown>
      <span>王小虎</span>
    </el-header>

    <el-main>
      <el-table :data="tableData">
        <el-table-column prop="date" label="日期" width="140">
        </el-table-column>
        <el-table-column prop="name" label="姓名" width="120">
        </el-table-column>
        <el-table-column prop="address" label="地址">
        </el-table-column>
      </el-table>
    </el-main>
  </el-container>
</el-container>
拷贝后的代码样子,注意拷贝的位置放在的上面。
下面拷贝elementUI的样式到代码
<style>
  .el-header, .el-footer {
    background-color: #B3C0D1;
    color: #333;
    text-align: center;
    line-height: 60px;
  }

  .el-aside {
    background-color: #D3DCE6;
    color: #333;
    text-align: center;
    line-height: 200px;
  }

  .el-main {
    background-color: #E9EEF3;
    color: #333;
    text-align: center;
    line-height: 160px;
  }

  body > .el-container {
    margin-bottom: 40px;
  }

  .el-container:nth-child(5) .el-aside,
  .el-container:nth-child(6) .el-aside {
    line-height: 260px;
  }

  .el-container:nth-child(7) .el-aside {
    line-height: 320px;
  }
</style>
做好上面的这一步,页面展示如下的样式:
但是这样的样式,我们是不太满意的,下面我们开始调试样式。
(1)去掉默认展开第1和第三个菜单栏的样式
产出蓝色选中地方的代码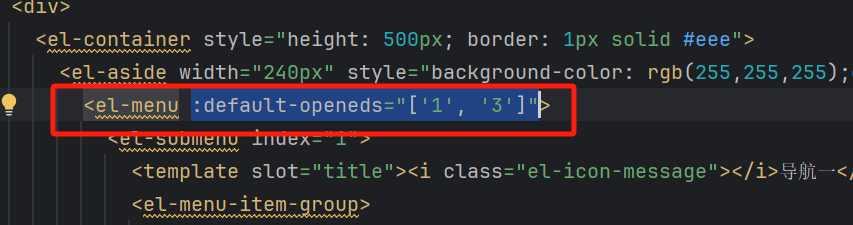
(2)左侧侧边栏向下拉满
找到截图这一行代码,加上红框框柱的代码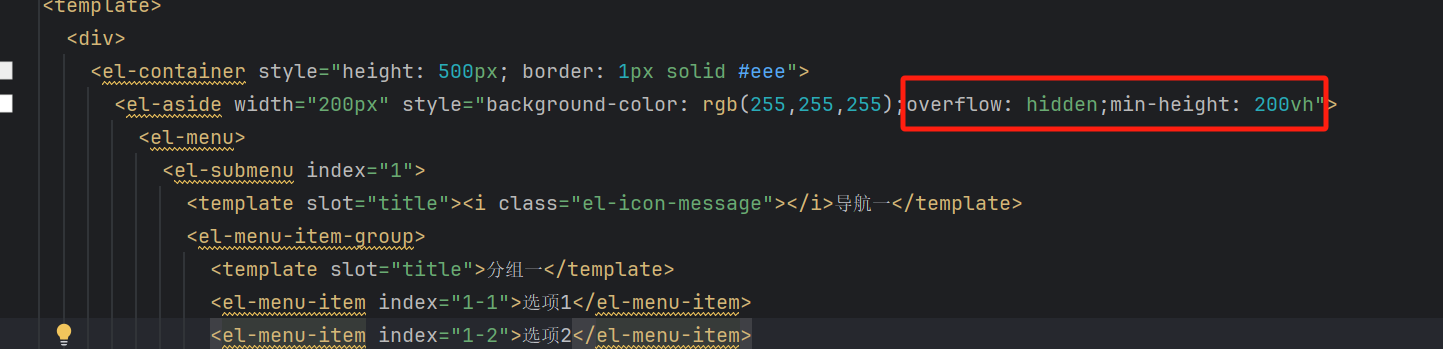
代码如下,可以直接拷贝,替换。vh是视窗高度的百分比。
<el-aside width="200px" style="background-color: rgb(255,255,255);overflow: hidden;min-height: 100vh">
(3)去布局组件的边框
删除蓝底选中的代码,上下左右都完全贴屏了。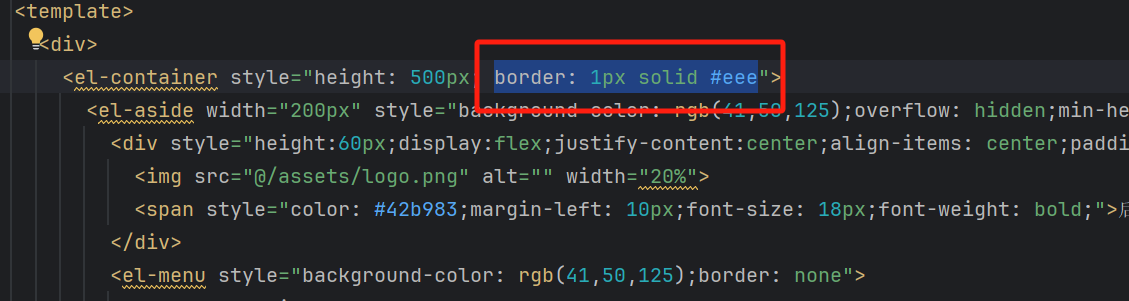
否则,当我们设置侧边栏背景颜色时,页面离屏幕会有间隙,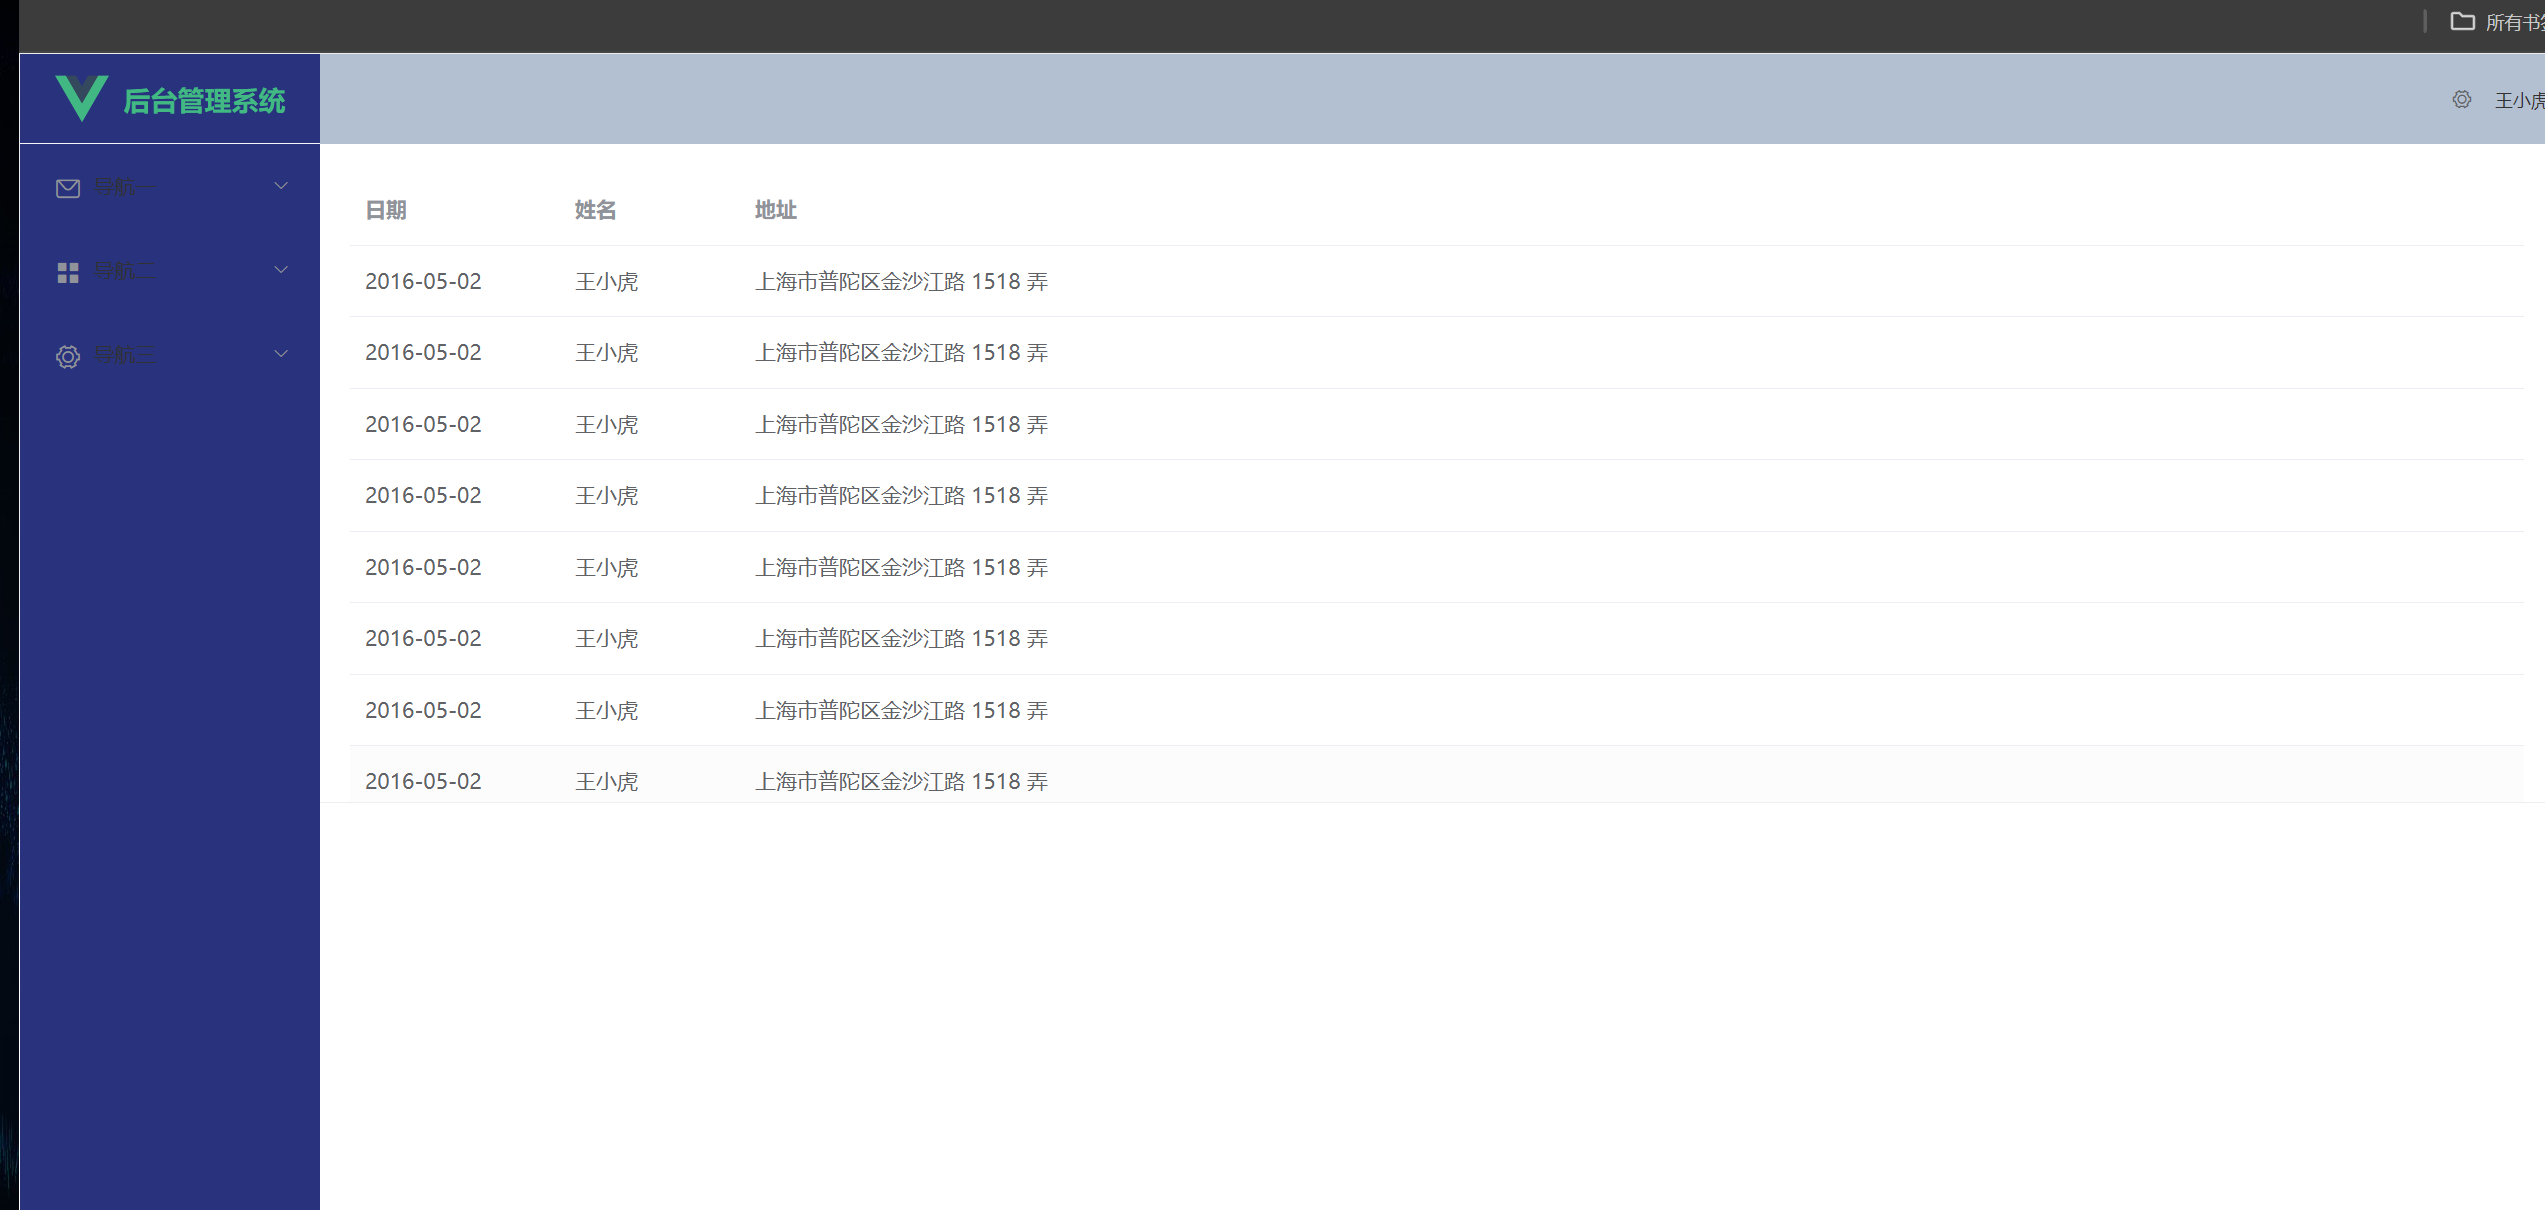
(4)创建一个manager.css文件
用于写页面样式,同样main.js中引入这个css文件。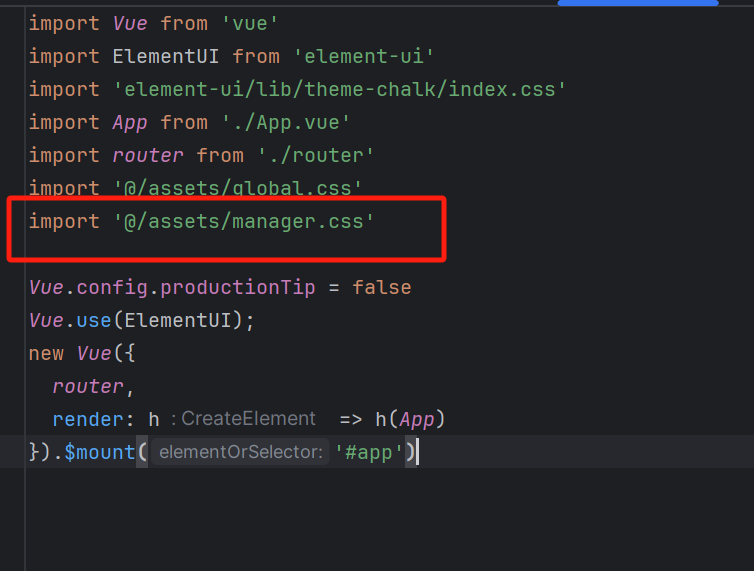
怎么调样式呢,初学者不确定那个容器上加样式,可以先在html文件里把样式调试好,调试好后拷贝到css里。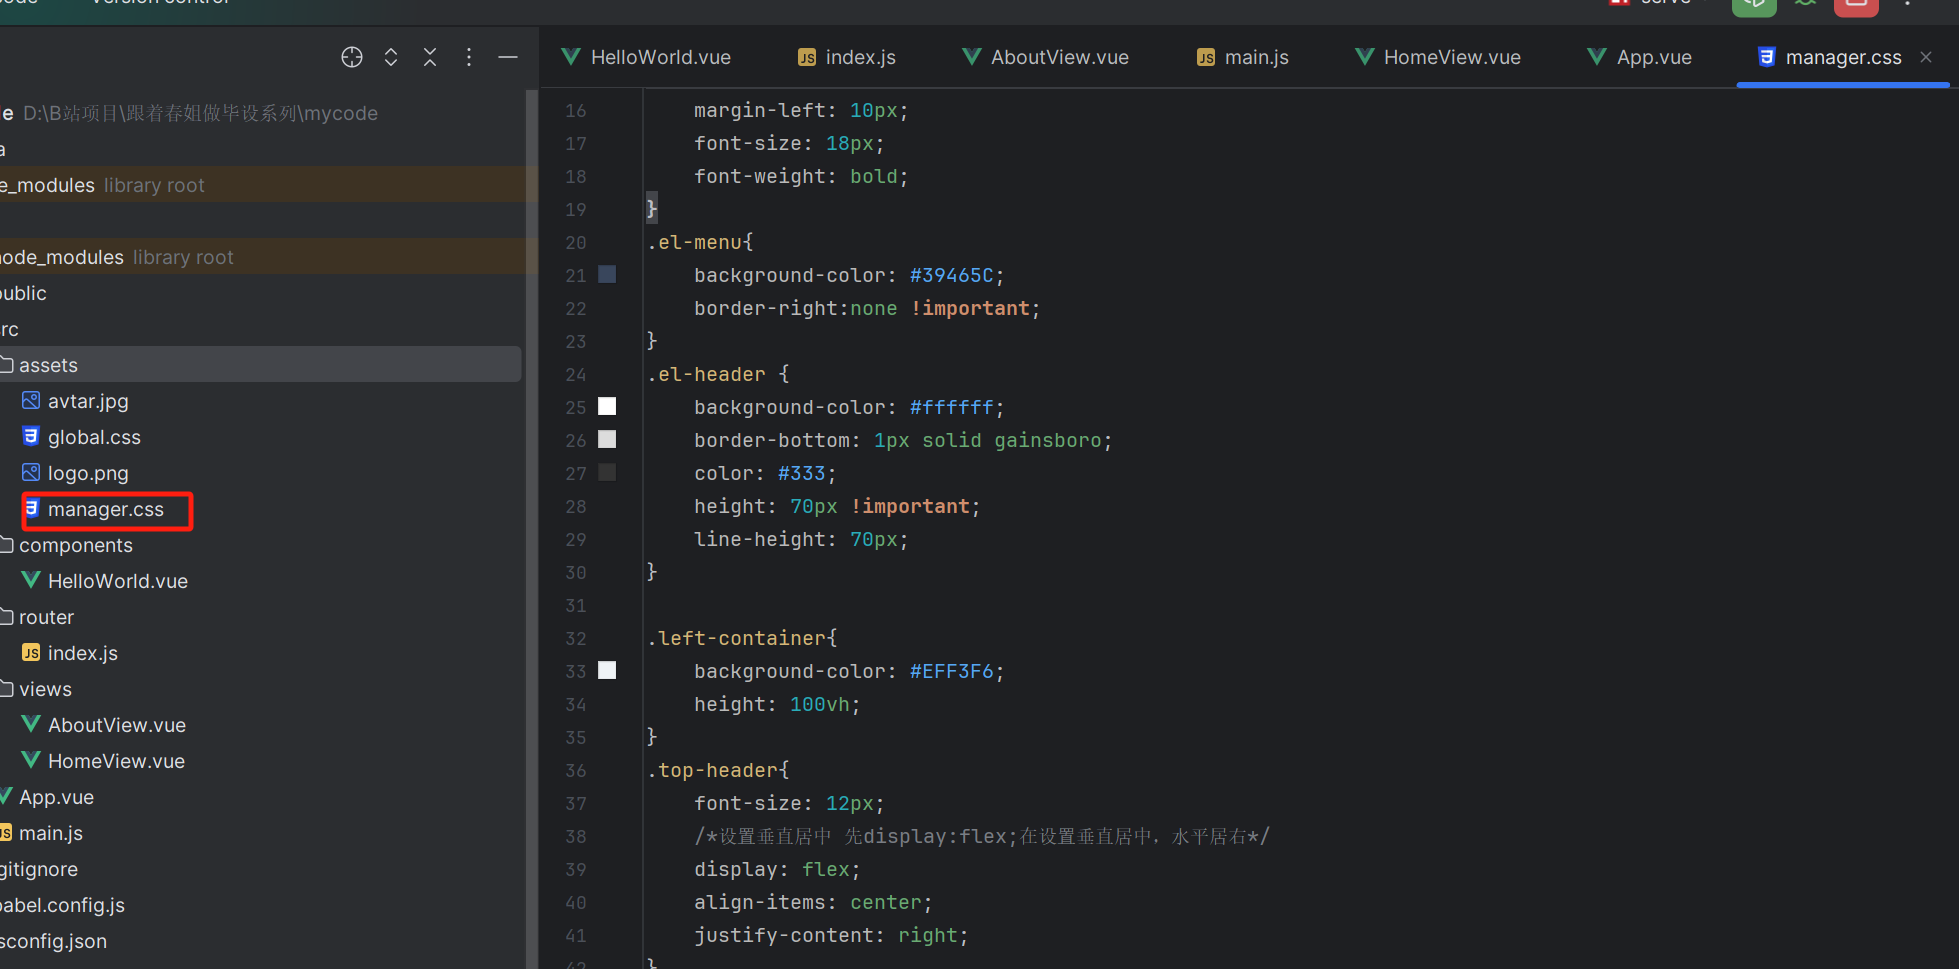
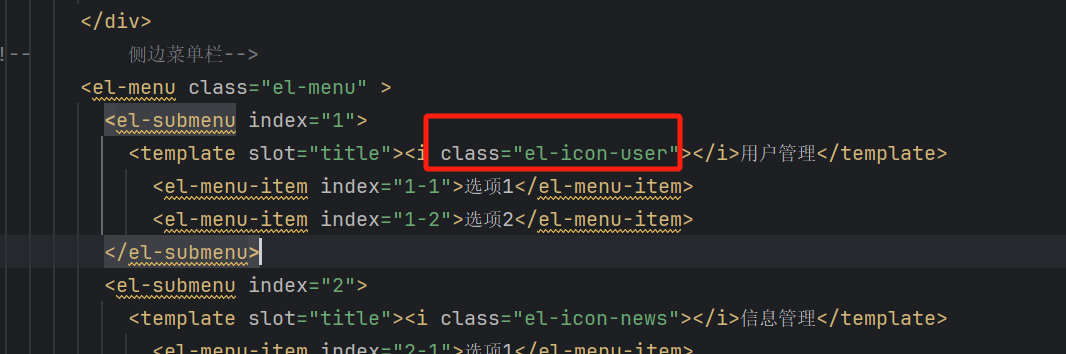
更换侧边栏图标
到这个网址https://element.eleme.cn/#/zh-CN/component/icon
找到喜欢的图标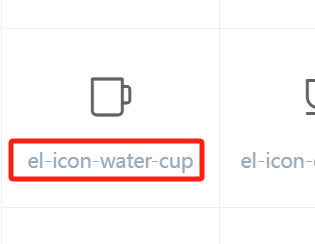
复制图标类名 更换下图红色框框的值
最终代码
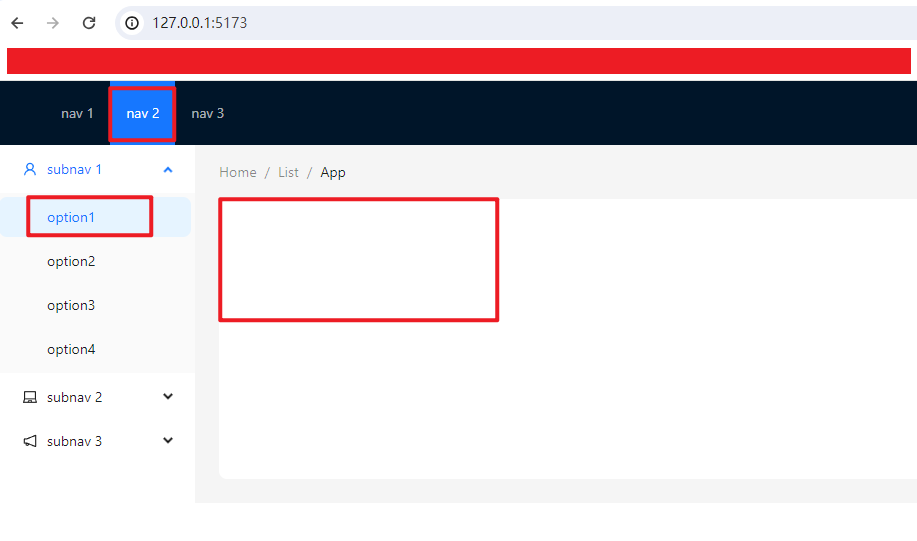
跟着我的视频一步一步调试侧边栏和头部栏。如果懒得调试可以直接复制下面的代码替换你该文件中的代码,替换之后,看看页面发生了什么改变。调试的最终页面如下:
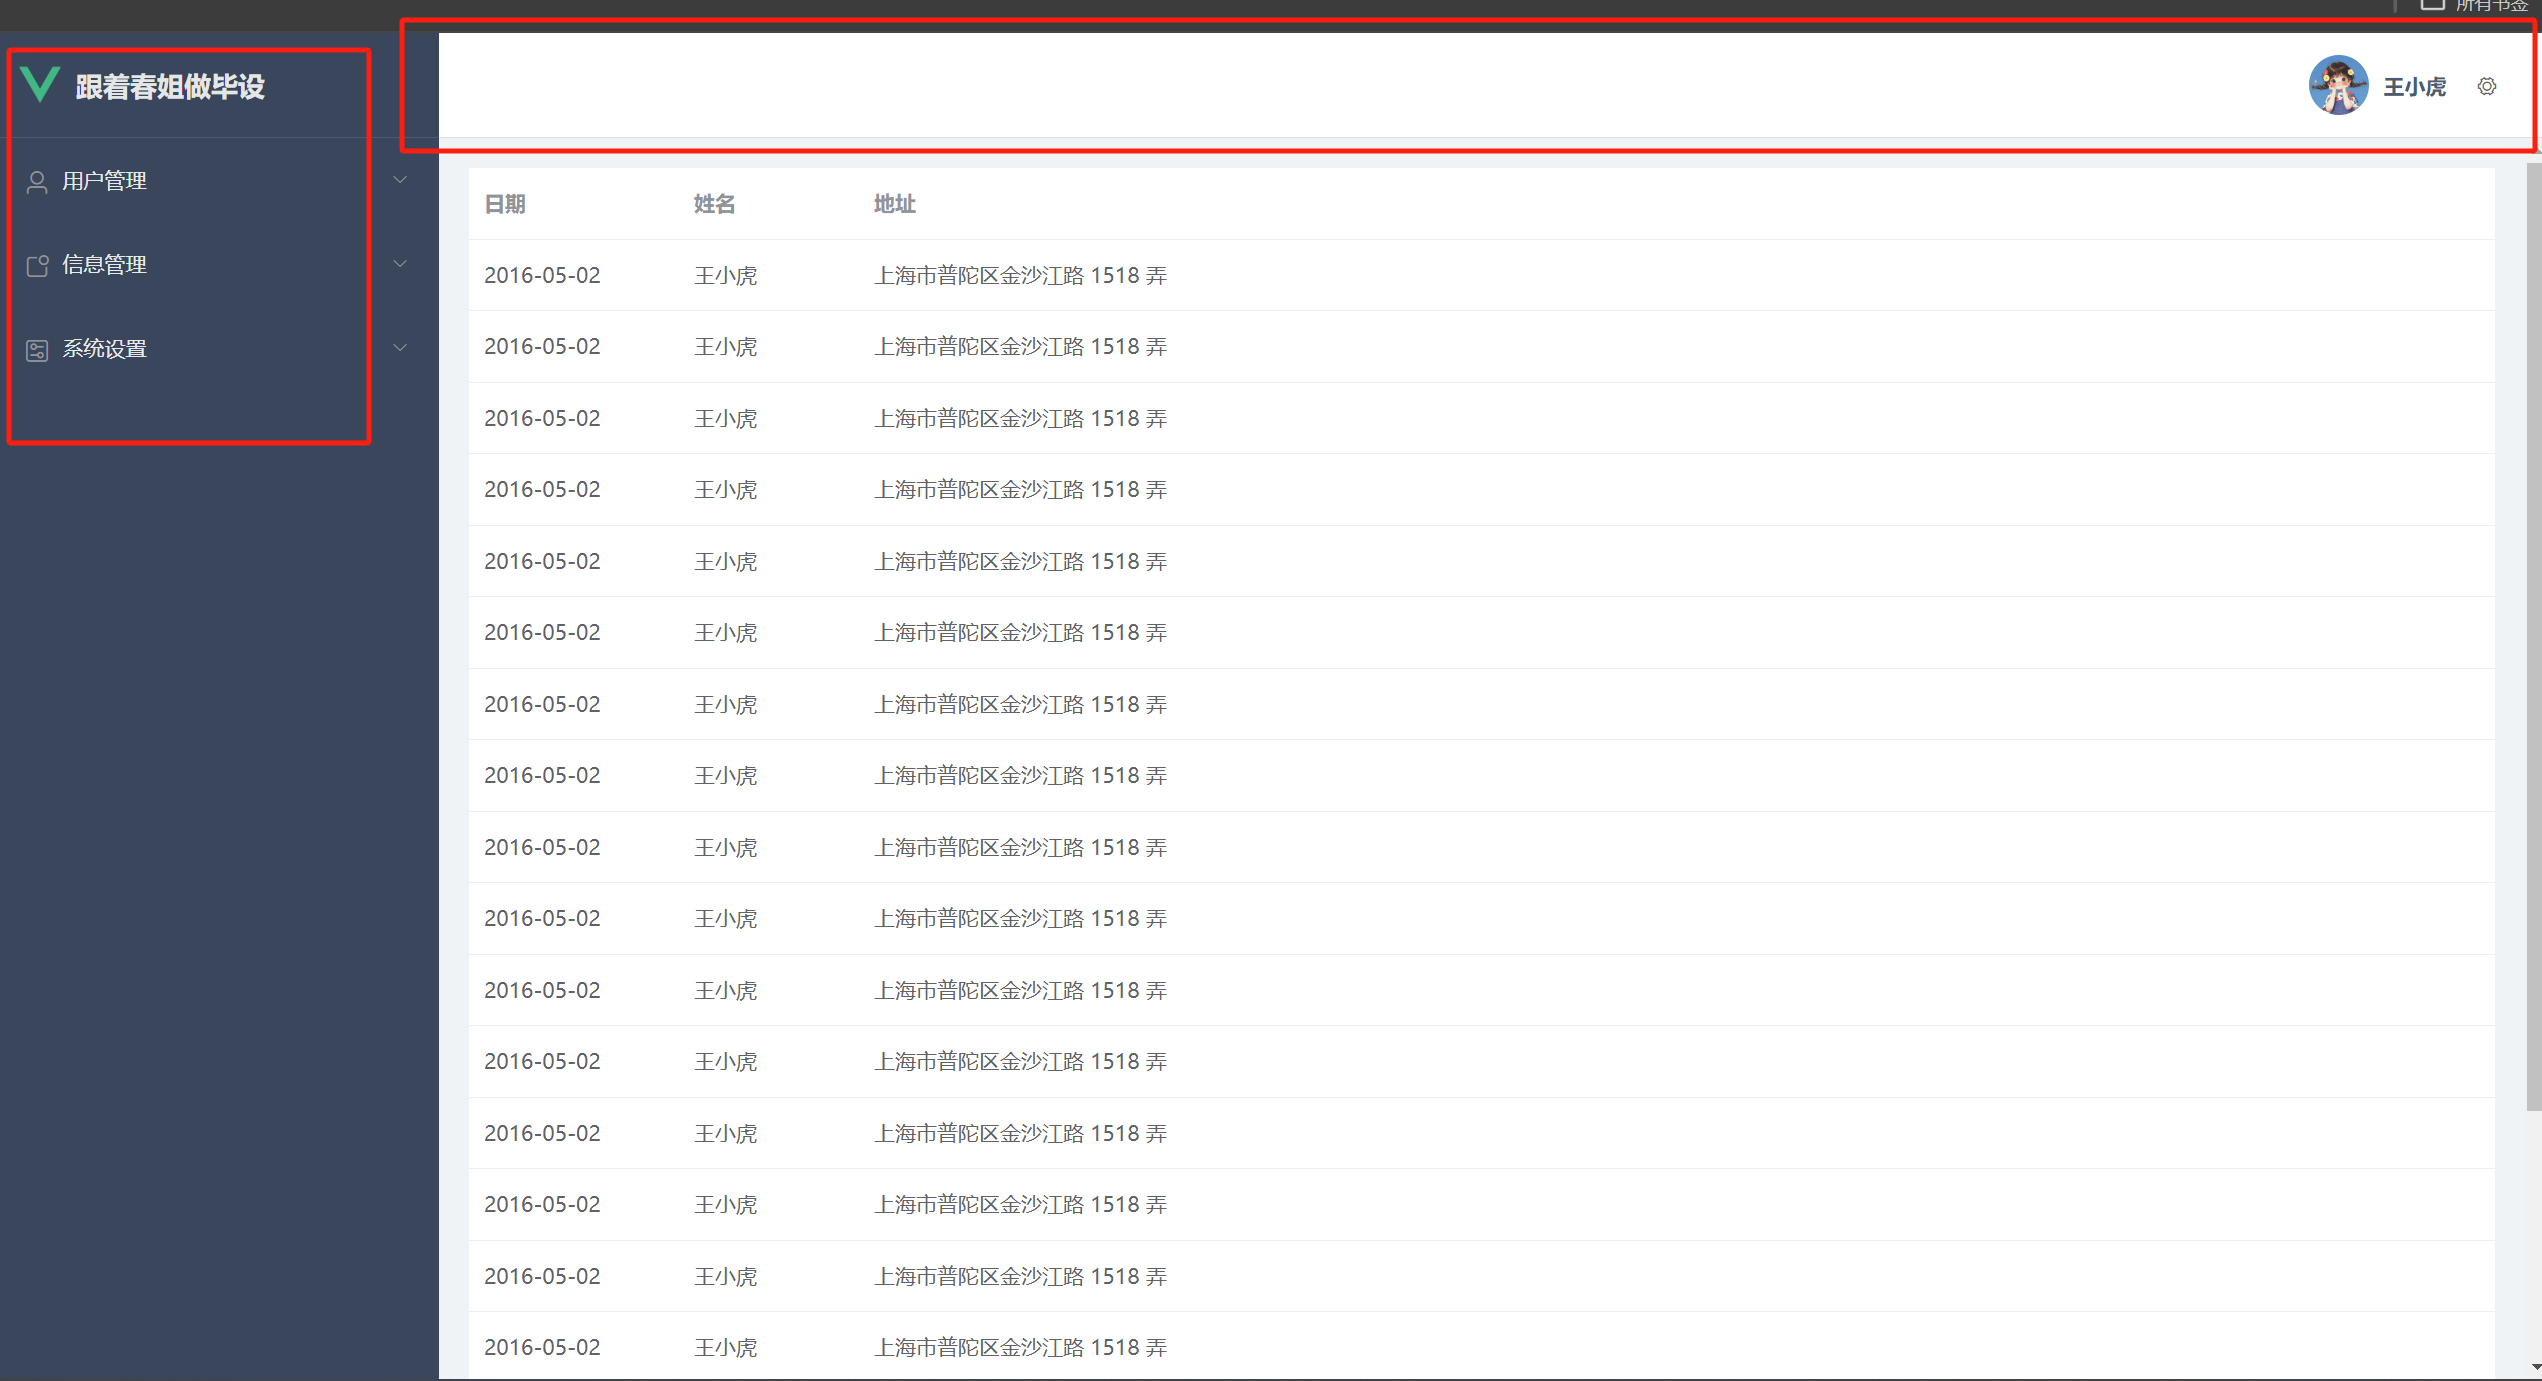
下面附上最终代码,同学们不懂的地方可反复思考调试,样式就是调试的过程,别怕慢。
<template>
  <div>
    <el-container style="height: 500px;">
      <!--      侧边栏-->
      <el-aside  class="m-aside">
        <!--        logo和系统名称-->
        <div class="m-sysName" >
          <img src="@/assets/logo.png" alt="" width="10%">
          <span class="m-nameText">跟着春姐做毕设</span>
        </div>
        <!--        侧边菜单栏-->
        <el-menu class="el-menu" >
          <el-submenu index="1">
            <template slot="title"><i class="el-icon-user"></i>用户管理</template>
            <el-menu-item index="1-1">选项1</el-menu-item>
            <el-menu-item index="1-2">选项2</el-menu-item>
          </el-submenu>
          <el-submenu index="2">
            <template slot="title"><i class="el-icon-news"></i>信息管理</template>
            <el-menu-item index="2-1">选项1</el-menu-item>
            <el-menu-item index="2-2">选项2</el-menu-item>
          </el-submenu>
          <el-submenu index="3">
            <template slot="title"><i class="el-icon-set-up"></i>系统设置</template>
            <el-menu-item index="3-1">选项1</el-menu-item>
            <el-menu-item index="3-2">选项2</el-menu-item>
          </el-submenu>
        </el-menu>
      </el-aside>
      <!--      右侧-->
      <el-container class="right-container">
        <!--        顶部菜单栏-->
        <el-header class="top-header">
          <img src="@/assets/avtar.jpg" alt="" style="width: 40px;border-radius: 50%;margin-right: 10px;">
          <span style="color: #4c5a73;font-weight: bold;font-size: 14px;margin-right: 20px">王小虎</span>
          <el-dropdown>
            <i class="el-icon-setting" style="margin-right: 15px"></i>
            <el-dropdown-menu slot="dropdown">
              <el-dropdown-item>个人中心</el-dropdown-item>
              <el-dropdown-item>退出登录</el-dropdown-item>
            </el-dropdown-menu>
          </el-dropdown>

        </el-header>
        <!--表单-->
        <el-main >
          <el-table :data="tableData">
            <el-table-column prop="date" label="日期" width="140">
            </el-table-column>
            <el-table-column prop="name" label="姓名" width="120">
            </el-table-column>
            <el-table-column prop="address" label="地址">
            </el-table-column>
          </el-table>
        </el-main>
      </el-container>
    </el-container>
    <router-view/>
  </div>
</template>

<script>
  export default {
    data() {
      const item = {
        date: '2016-05-02',
        name: '王小虎',
        address: '上海市普陀区金沙江路 1518 弄'
      };
      return {
        tableData: Array(20).fill(item)
      }
    }
  };
</script>
所有样式的代码如下,每个类都写了设置的是哪里的样式,基础差的同学,可以先修改颜色、高度等参数,看看页面样式有什么变化。
/*左侧边栏*/
.m-aside{
  width:270px;
  background-color: #39465C;
  overflow: hidden;
  min-height: 100vh;
}
/*侧边栏上面logo*/
.m-sysName{
  height:70px;
  display:flex;
  align-items: center;
  padding-left: 20px;
  border-bottom: 1px solid #4c5a73;
}
/*侧边栏上面的文字*/
.m-nameText{
  color: #e4e7e6;
  margin-left: 10px;
  font-size: 18px;
  font-weight: bold;
}
/*侧边栏菜单栏*/
.el-menu{
  background-color: #39465C;
  border-right:none !important;
}
/*头部栏样式*/
.el-header {
  background-color: #ffffff;
  border-bottom: 1px solid gainsboro;
  color: #333;
  height: 70px !important;
  line-height: 70px;
}
/* 右侧背景颜色*/
.right-container{
  background-color: #EFF3F6;
  height: 100vh;
}
/*顶部居中*/
.top-header{
  font-size: 12px;
  /*设置垂直居中 先display:flex;在设置垂直居中,水平居右*/
  display: flex;
  align-items: center;
  justify-content: right;
}
/*侧边栏菜单一级字体颜色*/
.el-submenu__title{
  color: #e9e9e9;
}
/*侧边栏菜单悬浮背景颜色*/
.el-menu-item:hover, .el-submenu__title:hover {
  background: rgba(92, 113, 147, 0.24);

}
/*侧边栏二级字体颜色*/
.el-menu-item {
  color: #e9e9e9;
}
/*二级菜单选中背景和颜色设置*/
.el-menu-item.is-active {
  color: #11cfd2;
  font-size: 14px;
  background: rgba(92, 113, 147, 0.24);
}
![[Vue3:Vite构建<span style='color:red;'>项目</span>]:安装router<span style='color:red;'>实现</span>登录<span style='color:red;'>页面</span><span style='color:red;'>路</span><span style='color:red;'>由</span><span style='color:red;'>跳</span><span style='color:red;'>转</span>](https://img-blog.csdnimg.cn/direct/df23c3d1a5934886b92c1447432880b5.png)