Arduino PID整定
Introduction to Tuning an Arduino PID
例如,我们可能想把一箱水加热到华氏 100 度。 我们需要能够在不同的条件下实现这一目标,例如房间的环境(周围)温度。 此外,我们可能会不时将冷水放入水箱,或将热水取出。 我们需要控制器作出反应,使温度尽快恢复到设定点,并保持在设定点。 我们不希望出现波动。 一个简单的温度开关就可以做到这一点。 请记住,我们的目标是提供足够的输出,将温度保持在我们想要的位置。 在本文,我们将以加热过程为例。 这将是一个使用独立(传统)PID 公式的前向作用过程。) 我们将使用启发式方法进行调整,对于大多数使用 Arduino 的人来说,这通常是最简单的方法。
PID Terminology
At this point, let’s discuss the different terms you need to be familiar with when tuning a PID loop.现在,让我们来讨论一下在调整 PID 循环时需要熟悉的不同术语。
General Termiology
Process Varialble (Input) — This is the feedback we get from the system. This could be temperature or pressure, etc, depending on the process. The feedback can provide anywhere from 0 to 5 volts to an analog input pin. We just need to know the scaling. For example: 0v might represent a temperature of 50 degrees. Likewise, 5v might represent a temperature of 150 degrees. In this example, our input will be A0 (Analog Input 0). In the Arduino, a 0v signal will give us a 0 on the analog input channel. 5v will give us a value of 1023. In other words, with this setup, a value of 0 to 1023 represents the value of 50 to 150 degrees.
Control Variable (Output) — This is the output that the Arduino sends from a PWM pin. If you need a true analog output, you will need to set up a low pass filter with a capacitor and resistor. Basically, if you convert the pin to true analog output, then the Arduino will send a value of 0 to the output to get 0v through the low pass filter. A value of 255 would give you 5v out of the low pass filter.
过程变量(输入)–这是我们从系统中获得的反馈。这可能是温度或压力等,具体取决于过程。反馈可为模拟输入引脚提供 0 至 5 伏的电压。我们只需要知道比例。例如:0 伏可能代表 50 度的温度。同样,5 伏可能代表 150 度的温度。在这个例子中,我们的输入将是 A0(模拟输入 0)。在 Arduino 中,0V 信号将在模拟输入通道上显示 0。5v 信号将产生 1023 的值。换句话说,在这种设置下,0 至 1023 的值代表 50 至 150 度。 控制变量(输出) - 这是 Arduino 从 PWM 引脚发送的输出。如果需要真正的模拟输出,则需要用电容器和电阻器设置一个低通滤波器。基本上,如果您将引脚转换为真正的模拟输出,那么 Arduino 将向输出发送一个 0 值,以便通过低通滤波器获得 0 伏电压。如果数值为 255,则低通滤波器的输出电压为 5V。
SetPoint — This is the value we desire the process variable (input) to be.
Error — This is the difference between the SetPoint and the Process Variable (Input). In other words, this is the difference between where we are, and where we want to be.设定点 - 我们希望过程变量(输入)达到的值。 误差 - 设定点与过程变量(输入)之间的差值。 换句话说,这就是我们所处的位置与我们希望达到的位置之间的差值。
P, I, and D Terminology
Proportional
We base the output from proportional solely on the amount of error (and our gain). The higher our gain is, the more output we will have for a given error. If we are at the set point, then there is no error. Therefore, there is no output. In a non-integrating process, this means that your process variable will drop. The process variable will continue to drop until there is enough error to provide enough output to make up for your losses.我们的比例输出完全基于误差量(和我们的增益)。 增益越高,给定误差下的输出就越大。 如果我们处于设定点,则没有误差。 因此,也就没有输出。 在非积分过程中,这意味着过程变量将下降。 过程变量将继续下降,直到有足够的误差来提供足够的输出以弥补损失。
Integral
We calculate integral based on time and error. Let’s say, we set the Ki tuning parameter to 0.1 repeats per second. For the time being, let’s also assume that we have 10% error. To understand this easier, let’s also say that the process variable is not changing. Our error remains at 10% for now regardless of the output.
Since we have 0.1 repeats per second, after 10 seconds, we will have 1 full repeat. Remember, our error remained at 10. In other words after 10 seconds, we will add 10% to the output. If we assume we started with Kp=1, then the output from proportional is 10% also. Basically, this means that after 10 seconds, our output would increase to 20%. After 20 Seconds, our output would be 30%, and so on. If our setting was .05 repeats per second, then we make the integral less aggressive. After 20 seconds, we would only have 1 full repeat, which means it takes 20 seconds to get to a total of 30% output (counting proportional).
我们根据时间和误差计算积分。 比方说,我们将 Ki 调整参数设置为每秒重复 0.1 次。 同时,假设误差为 10%。 为了更容易理解,我们也假设过程变量没有变化。 由于每秒重复 0.1 次,10 秒后我们将有 1 次完整的重复。 请记住,我们的误差仍然是 10。 换句话说,10 秒后,我们的输出将增加 10%。 如果我们假设开始时 Kp=1,那么比例输出也是 10%。 基本上,这意味着 10 秒后,我们的输出将增加到 20%。 20 秒后,我们的输出将达到 30%,以此类推。 如果我们的设置是每秒重复 0.05 次,那么积分的强度就会降低。 20 秒后,我们将只有 1 次完整的重复,这意味着需要 20 秒才能达到总输出的 30%(按比例计算)。
Derivative
Finally, we have derivative. We base derivative on the rate of change of error. However, since most input values are a bit noisy, we don’t use derivative most of the time. This would cause excessive control action. The derivative setting is how far we look into the future to expect the error to be for a given slope. You can think of derivative as opposition to a change in the process variable. Keep in mind though, this opposition is in both directions. Derivative tries to prevent the process variable from falling so much, but also resists the process variable coming back up to the set point.
最后是导数。 我们的导数基于误差变化率。 不过,由于大多数输入值都有一定的噪声,我们在大多数情况下都不使用导数。 这会导致过度的控制动作。 导数设置是指在给定斜率的情况下,我们对未来误差的预期。 您可以将导数视为过程变量变化的对立面。 但请记住,这种对立是双向的。 导数试图阻止过程变量大幅下降,但同时也阻止过程变量回升到设定点。
Begin Tuning an Arduino PID
At this point, let’s take a look at a simple sketch that I put into the Arduino. Attached to the Arduino, I have a PID simulator that I put together with another Arduino build.现在,让我们来看看我在 Arduino 中安装的一个简单草图。 我在 Arduino 上安装了一个 PID 模拟器,这是我用另一个 Arduino 制作的。
/********************************************************
 * PID Basic Example
 * Reading analog input 0 to control analog PWM output 3
 ********************************************************/

#include <PID_v1.h>

#define PIN_INPUT 0
#define PIN_OUTPUT 3

long CurrentMillis = 0;
long LastMillis = 0;
//Define Variables we'll be connecting to
double Setpoint, Input, Output;

//Specify the links and initial tuning parameters
double Kp = 5, Ki = 0, Kd = 0;
PID myPID(&Input, &Output, &Setpoint, Kp, Ki, Kd, DIRECT);

void setup() {
  //initialize the variables we're linked to
  Input = analogRead(PIN_INPUT);
  Setpoint = 400;

  //turn the PID on
  myPID.SetMode(AUTOMATIC);
  Serial.begin(9600);
}

void loop() {
  CurrentMillis = millis();
  Input = analogRead(PIN_INPUT);
  myPID.Compute();
  analogWrite(PIN_OUTPUT, Output);

  // Serial Plotter Data
  if ((CurrentMillis - LastMillis) > 500){
      Serial.print("Input:");
      Serial.print(Input);
      Serial.print(",");
      Serial.print("Output:");
      Serial.println(Output);
      Serial.print(",");
      Serial.print("MinValue:");
      Serial.print(0);
      Serial.print(",");
      Serial.print("MaxValue:");
      Serial.print(600);
      Serial.print(",");
      LastMillis = CurrentMillis;
    }
}
As you can see, Kp is 5, and I’ve set the other values at 0 for Ki and Kd temporarily.
Tuning the Arduino PID for Proportional
First, we need to find out the minimum value of Kp causes instability. The loop is unstable when it continues to oscillate. Let’s look at this on the serial plotter.首先,我们需要找出导致不稳定的 Kp 最小值。 当环路持续振荡时,它就是不稳定的。 让我们在串行绘图仪上看看这个问题。
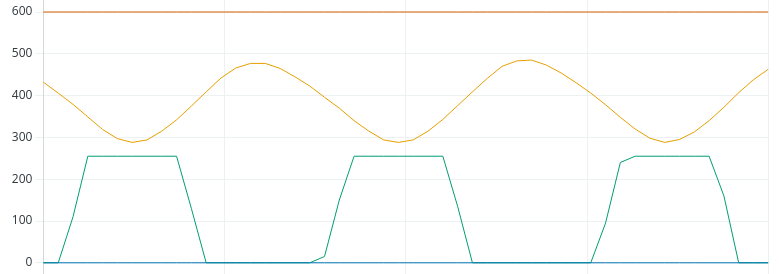
As you can see, the loop is unstable, and the output is saturating at 255, which is the max value. Let’s reduce Kp to 2.正如您所看到的,环路不稳定,输出在最大值 255 时达到饱和。 让我们将 Kp 降为 2。
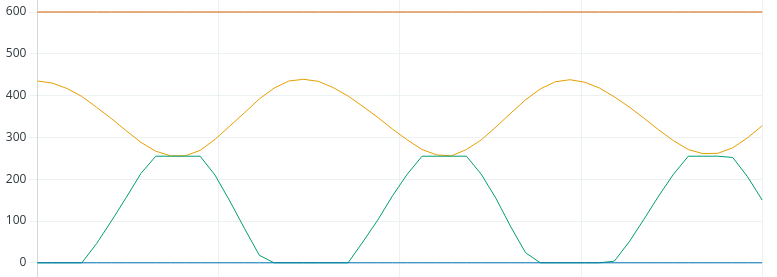
That helped, but we’re still unstable, and saturating again at times. Let’s try 1.这有所帮助,但我们仍然不稳定,有时会再次饱和。 让我们试试 1.
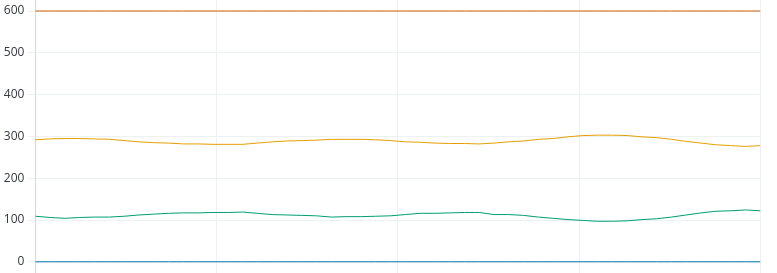
We’re fairly stable at 1, so let’s try 1.5:
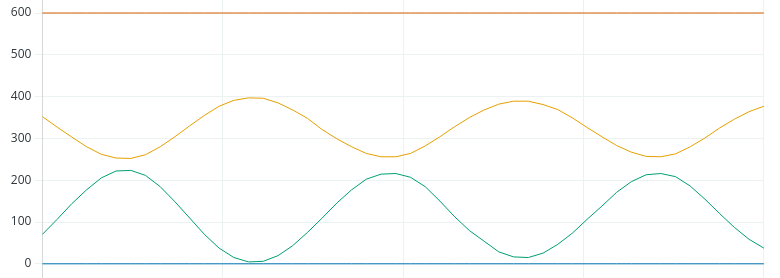
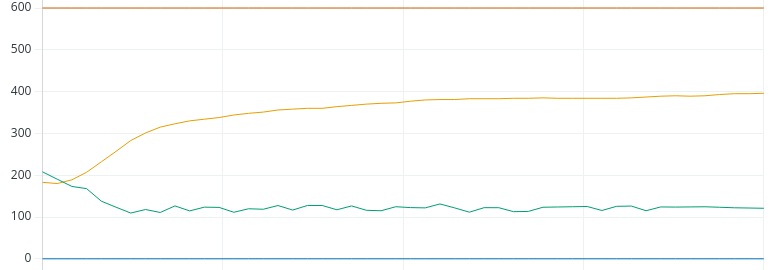
As you can see, we went into constant oscillation. You can narrow this down further if you like, but we’ll run with this value. The definition of instability is when the process variable continues to oscillate with the same amplitude, or gets worse.
At this point, we need to write down the amount of time peak to peak, or trough to trough. It looks like this will be about 10 seconds.Additionally, since Kp is unstable at 1.5, we need to cut this in half. Our new Kp will be .75. Let’s see what our chart looks like with this new Kp.
如您所见,我们进入了持续振荡状态。 如果您愿意,还可以进一步缩小范围,但我们将使用这个值。 不稳定性的定义是过程变量以相同的振幅持续振荡,或振幅越来越大。 此时,我们需要写下峰值到峰值或谷值到谷值的时间。 此外,由于 Kp 在 1.5 时不稳定,我们需要将其减半。 新的 Kp 将是 0.75。 让我们看看使用新 Kp 后的图表效果。
Tuning an Arduino PID for Integral
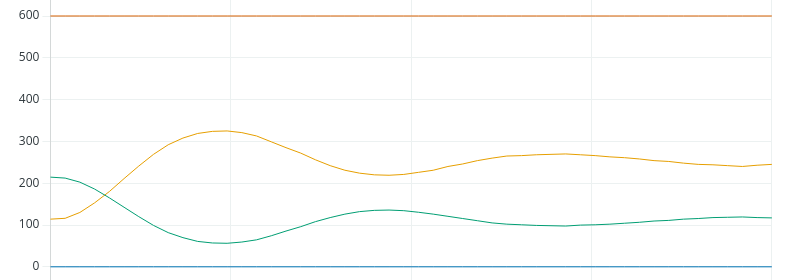
Now that we found the value for Kp, the Integral is easy. For Ki, we’ll just take Kp divided by the natural period. This will be 0.75 / 10 seconds. Let’s try a Ki with 0.075, and let’s see if we get up to the setpoint.
Remember, our Set Point was 400.现在我们找到了 Kp 的值,积分就很容易了。 对于 Ki,我们只需用 Kp 除以自然周期。 这将是 0.75 / 10 秒。 记住,我们的设定点是 400。
Looks like we landed it!
Tuning an Arduino PID for Derivative
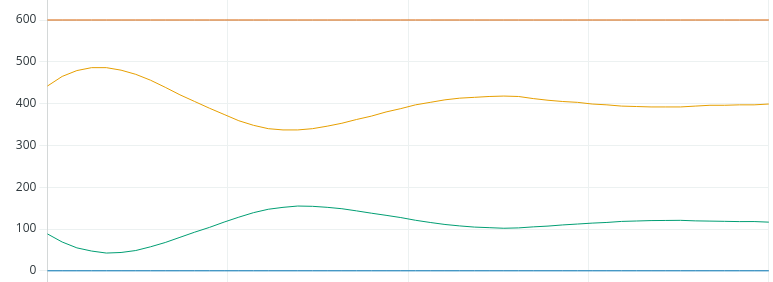
Now that we are confident, let’s see what will happen if we add derivative. To calculate derivative, we’ll take Kp * (1/8th of the natural period). In this case, that will be 0.75 * 1.25. Therefore, let’s try a Kd of 0.938.现在我们有信心了,让我们看看如果加上导数会发生什么。 计算导数时,我们取 Kp *(自然周期的 1/8)。 在这种情况下,就是 0.75 * 1.25。 因此,让我们试试 0.938 的 Kd 值。
As you can see, we did achieve the set point, and it appears to be stable. However, we do see a lot more control action, although small. If this was a valve, you would be performing more maintenance on the valve due to the constant control action. One solution is to dampen the PV by using an average. However, by doing this, you also simulate more process lag, and cannot tune your loop quite as tight.如您所见,我们确实达到了设定点,而且似乎很稳定。 不过,我们确实看到了更多的控制动作,尽管很小。 如果这是一个阀门,由于持续的控制动作,您需要对阀门进行更多的维护。 一种解决方案是使用平均值来抑制 PV。 不过,这样做也会模拟出更多的过程滞后,无法将环路调整得非常紧凑。
Summary
In short, increase Kp until your loop becomes unstable. At that point, record the natural period. Cut Kp in half, then use Kp / natural period for your Ki variable. If you use derivative, it will be Kp * (1/8th of the natural period). Please provide your feedback and corrections below. I’m sure there are some details of this post that need refined! There are other tuning methods out there using different procedures. You can just do a google search to find them, and choose whichever method works best for you!
For more information, visit the intermediate Arduino Page!
简而言之,增大 Kp 直到回路变得不稳定。此时,记录自然周期。将 Kp 减半,然后使用 Kp / 自然周期作为 Ki 变量。如果使用导数,则为 Kp *(自然周期的 1/8)。请在下面提供反馈和更正。我相信这篇文章中还有一些细节需要改进!还有其他使用不同程序的调谐方法。您只需在谷歌上搜索即可找到,然后选择最适合您的方法!如欲了解更多信息,请访问 Arduino 中级页面! - Ricky Bryce


![AGI 之 【Hugging Face】 的【问答系统】的 [评估并改进问答Pipeline] / [ 生成式问答 ] 的简单整理](https://i-blog.csdnimg.cn/direct/c453bcc5f4694a0e90c905a82216a783.png)