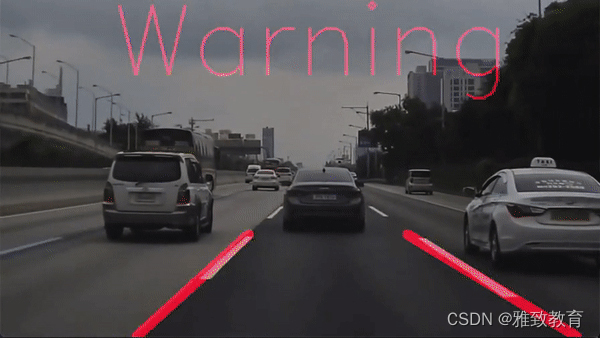
本项目旨在开发一个集车道检测与物体检测功能于一体的智能视觉分析系统,利用先进的计算机视觉技术和深度学习模型,实现实时的道路场景理解和目标识别。系统主要依托OpenCV这一强大的计算机视觉库,以及Python作为编程语言,融合了车道检测算法和YOLO(You Only Look Once)物体检测算法,以期达到高效、精准的视觉分析效果。


1. 车道检测
车道检测部分主要采用基于图像处理的技术,具体步骤包括:
预处理:对输入的图像进行灰度化、高斯模糊、Canny边缘检测等操作,以增强图像的对比度和减少噪声干扰。
兴趣区域提取:通过多边形掩模,只保留包含车道线的区域,忽略无关背景。
霍夫变换:利用霍夫直线变换检测车道线,将边缘图像转换到参数空间,寻找直线的参数。
后处理:对检测到的车道线进行拟合和平滑,确保车道线的连续性和准确性。
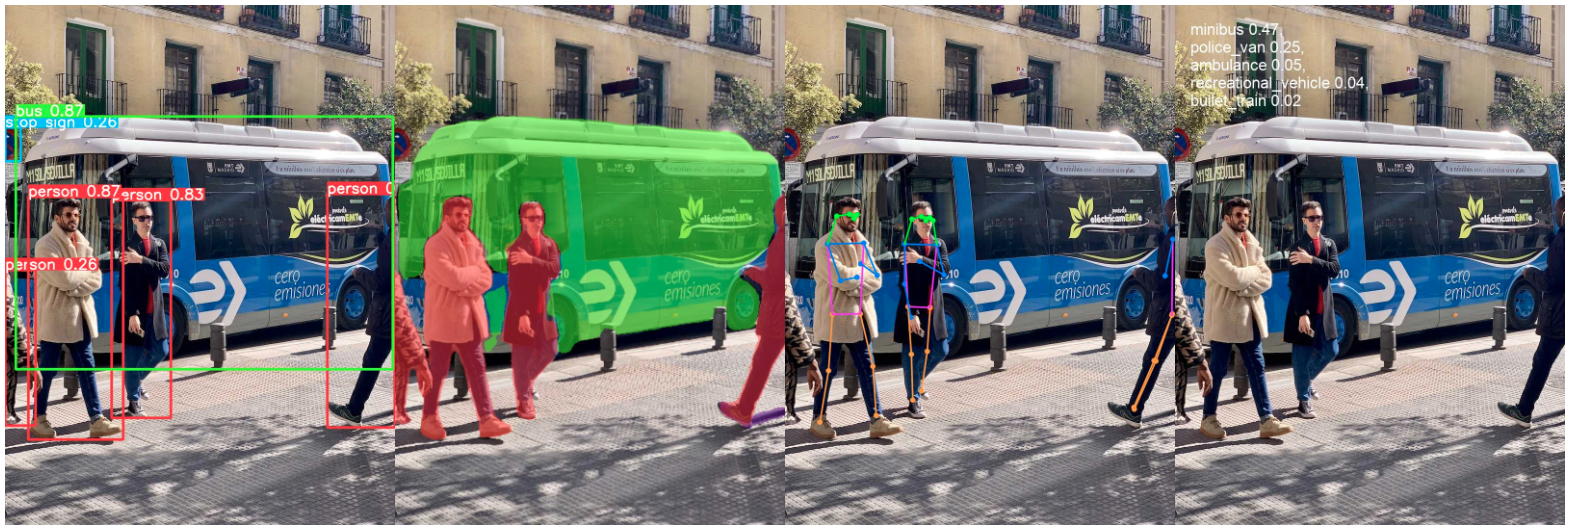
2. 物体检测(YOLO)
YOLO算法是一种实时的目标检测框架,其核心特点是在一次前向传播中同时预测物体的位置和类别,大幅提高了检测速度。本项目中,我们采用YOLOv4或YOLOv5作为基础模型,针对特定场景进行微调和优化,以提高检测精度和泛化能力。
实现流程
数据准备:收集大量的道路场景图像和视频,包括不同天气、光照条件下的样本,进行标注,构建训练数据集。
模型训练:使用标注好的数据集,训练车道检测模型和YOLO模型,调整超参数,优化模型性能。
系统集成:将车道检测和物体检测两个子系统整合到一起,设计合理的输入输出接口,确保两者的无缝协作。
测试与评估:在多种场景下测试系统性能,包括但不限于城市街道、高速公路、夜间环境等,评估检测精度、实时性和稳定性。
部署与优化:根据实际应用需求,将系统部署到目标平台,如自动驾驶车辆、监控系统等,并持续收集反馈,进行迭代优化。
应用前景
本项目成果可广泛应用于智能交通、自动驾驶、安防监控等领域,为实现更加安全、高效的交通系统提供技术支持。例如,在自动驾驶车辆中,车道检测与物体检测的结合可以帮助车辆实时理解周围环境,做出准确的决策;在城市监控系统中,则能辅助警察和安保人员快速识别异常情况,提升公共安全水平。
结语
通过融合车道检测与物体检测两大核心技术,本项目致力于打造一个全面、智能的视觉分析系统,推动计算机视觉技术在实际应用中的创新与发展。
关键代码部分
import numpy as np
import cv2
from utils import *
import os
import time
import argparse

parser = argparse.ArgumentParser()
parser.add_argument('--model_cfg', type = str, default = '',
                    help = 'Path to config file')
parser.add_argument('--model_weights', type=str,
                    default='',
                    help='path to weights of model')
parser.add_argument('--video', type=str, default='',
                    help='path to video file')
parser.add_argument('--src', type=int, default=0,
                    help='source of the camera')
parser.add_argument('--output_dir', type=str, default='',
                    help='path to the output directory')
args = parser.parse_args()

# print the arguments
print('----- info -----')
print('[i] The config file: ', args.model_cfg)
print('[i] The weights of model file: ', args.model_weights)
print('[i] Path to video file: ', args.video)
print('###########################################################\n')
frameWidth= 640
frameHeight = 480


net = cv2.dnn.readNet(args.model_weights, args.model_cfg)
classes = []
with open("coco.names", "r") as f:
    classes = [line.strip() for line in f.readlines()] # we put the names in to an array

layers_names = net.getLayerNames()
output_layers = [layers_names[i[0] -1] for i in net.getUnconnectedOutLayers()]
colors = np.random.uniform(0, 255, size = (len(classes), 3))

font = cv2.FONT_HERSHEY_PLAIN
frame_id = 0
cameraFeed= False
#videoPath = 'road_car_view.mp4'
cameraNo= 1
#frameWidth= 640
#frameHeight = 480


if cameraFeed:intialTracbarVals = [24,55,12,100] #  #wT,hT,wB,hB
else:intialTracbarVals = [42,63,14,87]   #wT,hT,wB,hB

output_file = ''
if cameraFeed:
    cap = cv2.VideoCapture(cameraNo)
    cap.set(3, frameWidth)
    cap.set(4, frameHeight)
else:
    cap = cv2.VideoCapture(args.video)
    output_file = args.video[:-4].rsplit('/')[-1] + '_Detection.avi'
count=0
noOfArrayValues =10
#global arrayCurve, arrayCounter
arrayCounter=0
arrayCurve = np.zeros([noOfArrayValues])
myVals=[]
initializeTrackbars(intialTracbarVals)


#fourcc = cv2.VideoWriter_fourcc(*'XVID')
#video_writer = cv2.VideoWriter('output.avi', fourcc, 20.0, (640,480))
video_writer = cv2.VideoWriter('output2.avi', cv2.VideoWriter_fourcc(*'XVID'),
    cap.get(cv2.CAP_PROP_FPS), (2 * frameWidth,frameHeight))
starting_time = time.time()
while True:

    success, img = cap.read()
    if not success:
        print('[i] ==> Done processing!!!')
        print('[i] ==> Output file is stored at', os.path.join(args.output_dir, output_file))
        cv2.waitKey(1000)
        break

    #img = cv2.imread('test3.jpg')
    if cameraFeed== False:img = cv2.resize(img, (frameWidth, frameHeight), None)
    imgWarpPoints = img.copy()
    imgFinal = img.copy()
    imgCanny = img.copy()

    imgUndis = undistort(img)
    imgThres,imgCanny,imgColor = thresholding(imgUndis)
    src = valTrackbars()
    imgWarp = perspective_warp(imgThres, dst_size=(frameWidth, frameHeight), src=src)
    imgWarpPoints = drawPoints(imgWarpPoints, src)
    imgSliding, curves, lanes, ploty = sliding_window(imgWarp, draw_windows=True)

    try:
        curverad =get_curve(imgFinal, curves[0], curves[1])
        lane_curve = np.mean([curverad[0], curverad[1]])
        imgFinal = draw_lanes(img, curves[0], curves[1],frameWidth,frameHeight,src=src)

        # Average
        currentCurve = lane_curve // 50
        if  int(np.sum(arrayCurve)) == 0:averageCurve = currentCurve
        else:
            averageCurve = np.sum(arrayCurve) // arrayCurve.shape[0]
        if abs(averageCurve-currentCurve) >200: arrayCurve[arrayCounter] = averageCurve
        else :arrayCurve[arrayCounter] = currentCurve
        arrayCounter +=1
        if arrayCounter >=noOfArrayValues : arrayCounter=0
        cv2.putText(imgFinal, str(int(averageCurve)), (frameWidth//2-70, 70), cv2.FONT_HERSHEY_DUPLEX, 1.75, (0, 0, 255), 2, cv2.LINE_AA)

    except:
        lane_curve=00
        pass

    imgFinal= drawLines(imgFinal,lane_curve)

    # Object detection
    success, frame = cap.read()

    frame = cv2.resize(frame, (frameWidth, frameHeight), None)
    frame_id += 1
    height, width, channels = frame.shape
    # Detect image
    blob = cv2.dnn.blobFromImage(frame, 0.00392, (320, 320), (0,0,0), swapRB = True, crop = False)
    net.setInput(blob)
    start = time.time()
    outs = net.forward(output_layers)

    # Showing informations on the screen
    class_ids = []
    confidences = []
    boxes = []
    for out in outs:
        for detection in out:
            scores = detection[5:]
            class_id = np.argmax(scores)
            confidence = scores[class_id]
            if confidence > 0.5:
                #Object detected
                center_x = int(detection[0] * width)
                center_y = int(detection[1] * height)
                w = int(detection[2] * width)
                h = int(detection[3] * height)

                # Rectangle coordinates
                x = int(center_x - w / 2)
                y = int(center_y -h / 2)
                #cv2.rectangle(img, (x,y), (x+w, y+h), (0, 255, 0))

                boxes.append([x, y, w, h])
                confidences.append(float(confidence))
                # Name of the object
                class_ids.append(class_id)

    indexes = cv2.dnn.NMSBoxes(boxes, confidences, 0.5, 0.3)

    for i in range(len(boxes)):
        if i in indexes:
            x, y, w, h = boxes[i]
            label = "{}: {:.2f}%".format(classes[class_ids[i]], confidences[i]*100)
            color = colors[i]
            cv2.rectangle(frame, (x,y), (x+w, y+h), color, 2)
            cv2.putText(frame, label, (x,y+10), font, 2, color, 2)

    elapsed_time = time.time() - starting_time
    fps = frame_id / elapsed_time
    cv2.putText(frame, "FPS:" + str(fps), (10,30), font, 2, (0, 0, 0), 1)
    imgBlank = np.zeros_like(img)

    imgStacked = stackImages(0.7, ([imgUndis,frame],
                                         [imgColor, imgCanny],
                                         [imgWarp,imgSliding]
                                         ))

    #final_frame = cv2.hconcat((frame,imgCanny))
    #video_writer.write(final_frame)
    #cv2.imshow('frame',final_frame)
    cv2.imshow("Image", frame)
    cv2.imshow("PipeLine",imgStacked)
    cv2.imshow("Result", imgFinal)
识别道路边界的过程,即道路检测管道,主要包括以下步骤:
相机校准矩阵计算:首先,使用OpenCV库中的
cv2.findChessboardCorners()函数计算相机的校准矩阵,以消除由镜头产生的畸变。这一校准步骤确保了车道检测算法能够适应不同类型的相机,提高算法的通用性。校准后,将校准矩阵应用于原始图像,进行畸变校正。图像边缘检测与阈值处理:接着,通过一组基于梯度和颜色的阈值处理技术,使用
cv2.Sobel和cv2.cvtColor函数检测图像中的边缘,生成二值化的边缘图像。这一步骤有助于突出图像中的车道线条,为后续的车道边界识别奠定基础。透视变换:为了更方便地提取车道边界,接下来会对处理后的图像进行透视变换,将其转换为鸟瞰视角。这种变换使得车道边界在图像中呈现出更为直观和易于识别的形式。
车道像素扫描与拟合:在鸟瞰图的基础上,系统会扫描整个图像,寻找属于车道边界的像素点。找到足够的像素点后,通过曲线拟合算法将它们拟合成车道边界。之后,再将检测到的车道边界反向映射回原始图像中,实现车道的可视化标识。
道路属性估算:最后,系统还会估算一些重要的道路属性,比如道路的曲率以及车辆在车道内的相对位置。这些信息对于自动驾驶车辆来说至关重要,能够帮助车辆更好地理解自身在道路上的位置和方向。
整个过程的快照可以这样描述:从原始图像开始,经过一系列精心设计的图像处理步骤,最终在图像中标记出清晰的车道边界,并提供关于道路状况的关键信息。这一系列操作构成了一个高效、准确的道路边界识别系统,是实现自动驾驶和智能交通系统的重要组成部分。