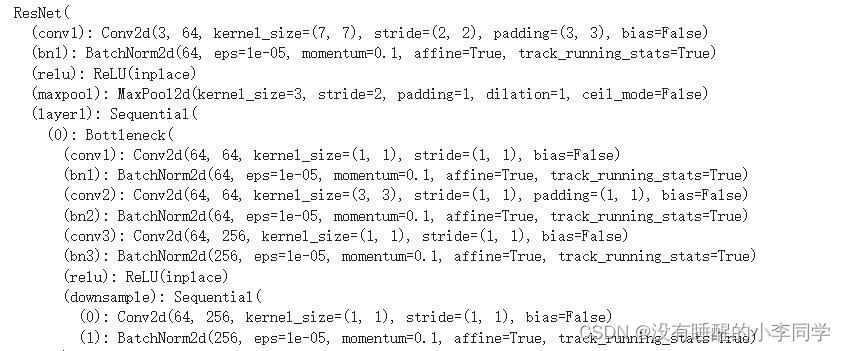
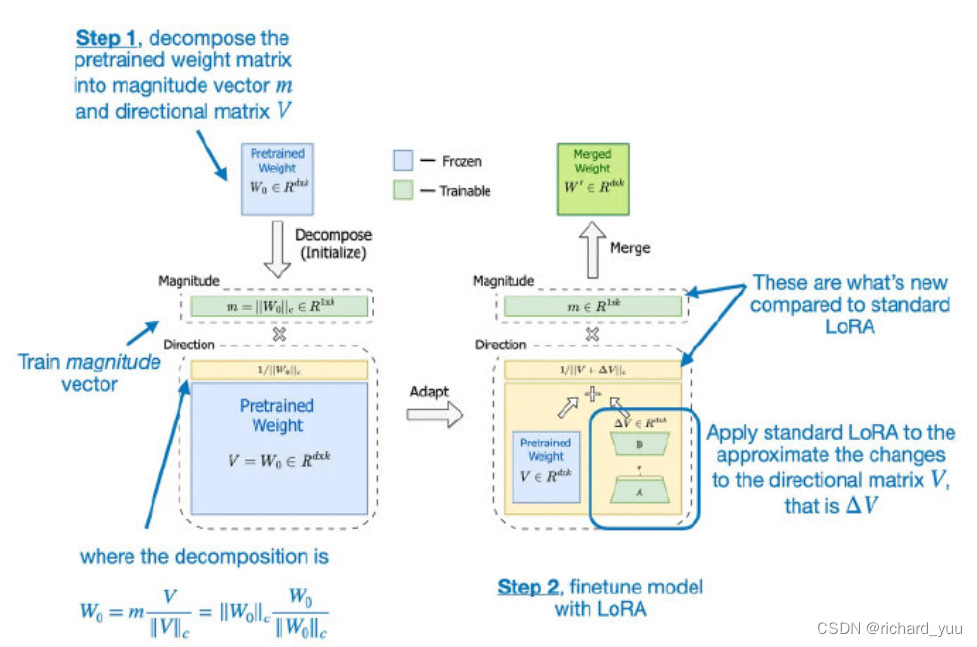
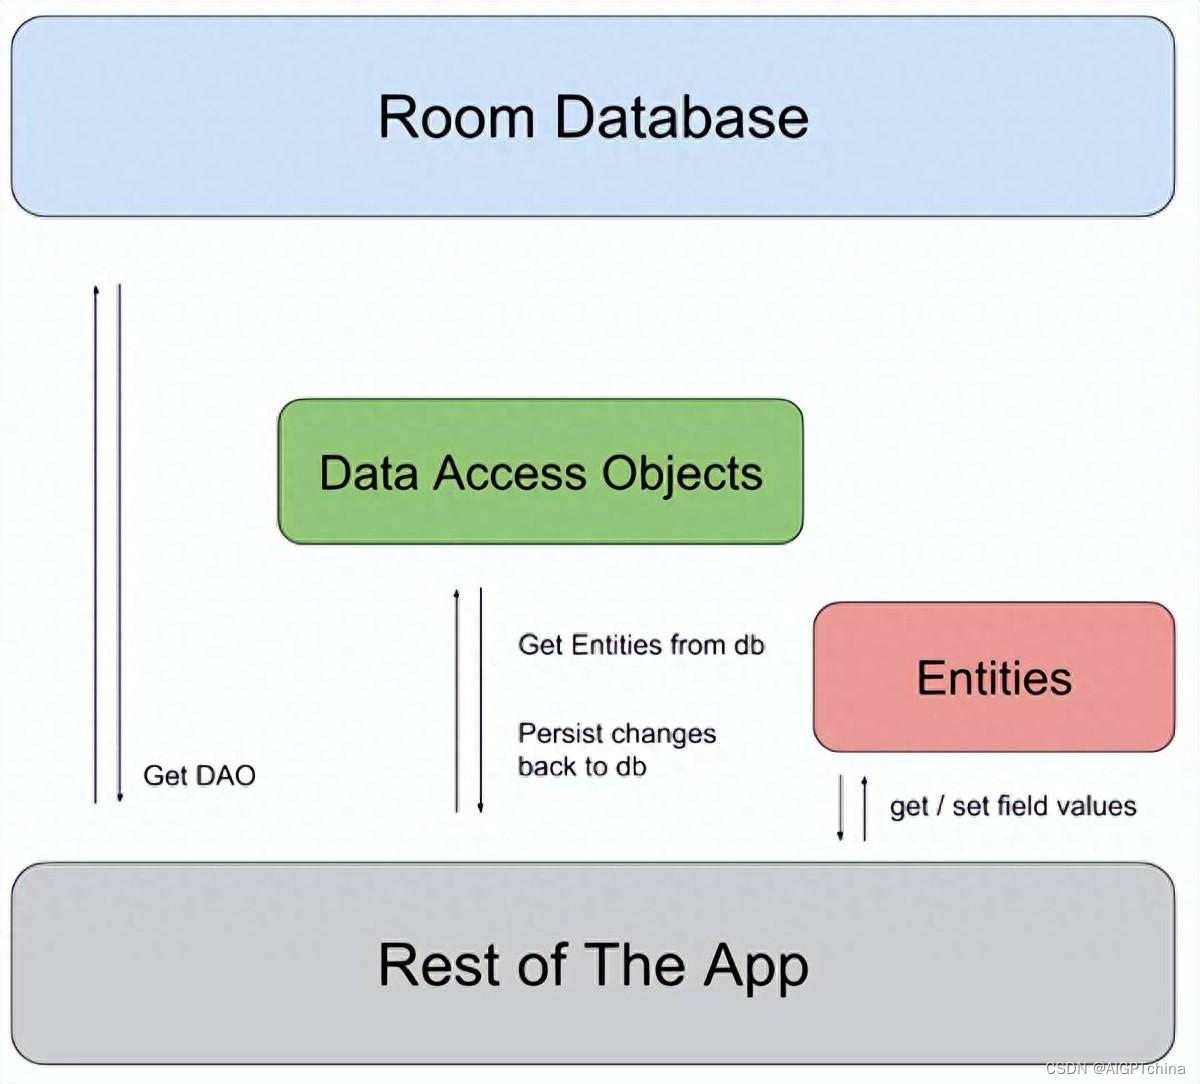
ThreeJS 官方案例学习(webgl_effects_stereo)
1.效果图

2.源码
<template>
<div>
<div id="container"></div>
</div>
</template>
<script>
import * as THREE from 'three';
import { OrbitControls } from 'three/examples/jsm/controls/OrbitControls';
import { RoomEnvironment } from 'three/examples/jsm/environments/RoomEnvironment.js';
import Stats from 'three/examples/jsm/libs/stats.module.js';
import { GLTFLoader } from 'three/examples/jsm/loaders/GLTFLoader'
import { DRACOLoader } from 'three/examples/jsm/loaders/DRACOLoader'
import { GUI } from 'three/examples/jsm/libs/lil-gui.module.min.js';
import gsap from 'gsap';
import { StereoEffect } from 'three/examples/jsm/effects/StereoEffect.js';
const path = '/textures/cube/Park3Med/'
const format = '.jpg'
const urls = [
path + 'px' + format, path + 'nx' + format,
path + 'py' + format, path + 'ny' + format,
path + 'pz' + format, path + 'nz' + format
]
const textureCube = new THREE.CubeTextureLoader().load(urls);
export default {
data() {
return {
container: null,
scene: null,
camera: null,
renderer: null,
controller: null,
stats: null,
mixer: null,
model: null,
clock: new THREE.Clock(),
spheres: [],
mouseX: 0,
mouseY: 0,
windowHalfX: 0,
windowHalfY: 0,
effect: null,
};
},
mounted() {
this.init()
this.animate()
window.addEventListener("resize", this.onWindowSize)
window.addEventListener('mousemove', this.onDocumentMouseMove);
},
beforeUnmount() {
console.log('beforeUnmount===============');
this.container = null
this.scene = null
this.camera = null
this.renderer = null
this.controller = null
this.stats = null
this.mixer = null
this.model = null
},
methods: {
init() {
this.container = document.getElementById('container')
this.windowHalfX = this.container.clientWidth / 2;
this.windowHalfY = this.container.clientHeight / 2;
this.setScene()
this.setCamera()
this.setRenderer()
this.setEffect()
this.setController()
this.addHelper()
this.setPMREMGenerator()
this.setLight()
this.setMesh()
this.addStatus()
},
setScene() {
this.scene = new THREE.Scene()
this.scene.background = textureCube;
},
setCamera() {
this.camera = new THREE.PerspectiveCamera(60, this.container.clientWidth / this.container.clientHeight, 1, 100000)
this.camera.position.set(0, 0, 3200)
this.camera.aspect = this.container.clientWidth / this.container.clientHeight;
this.camera.updateProjectionMatrix();
this.camera.lookAt(new THREE.Vector3(0, 0, 0))
this.scene.add(this.camera)
},
setRenderer() {
this.renderer = new THREE.WebGLRenderer({
antialias: true,
logarithmicDepthBuffer: true,
})
this.renderer.setSize(this.container.clientWidth, this.container.clientHeight);
this.renderer.setPixelRatio(window.devicePixelRatio);
this.container.appendChild(this.renderer.domElement);
},
setEffect() {
this.effect = new StereoEffect(this.renderer)
this.effect.setSize(this.container.clientWidth, this.container.clientHeight);
},
setController() {
this.controller = new OrbitControls(this.camera, this.renderer.domElement);
this.controller.enableDamping = true;
this.controller.dampingFactor = 0.04;
},
addHelper() {
let helper = new THREE.CameraHelper(this.camera);
let axisHelper = new THREE.AxesHelper(150);
this.scene.add(axisHelper)
let gridHelper = new THREE.GridHelper(100, 30, 0x2C2C2C, 0x888888);
this.scene.add(gridHelper);
},
setPMREMGenerator() {
const pmremGenerator = new THREE.PMREMGenerator(this.renderer);
this.scene.environment = pmremGenerator.fromScene(new RoomEnvironment(this.renderer), 0.04).texture;
},
setLight() {
const ambientLight = new THREE.AmbientLight(0x404040, 4);
const directionalLight = new THREE.DirectionalLight(0xffffff, 1.0);
const test = new THREE.PointLight("#ffffff", 10, 2);
const testHelperMap = new THREE.PointLightHelper(test);
},
addStatus() {
this.stats = new Stats();
this.container.appendChild(this.stats.dom);
},
setMesh() {
textureCube.mapping = THREE.CubeRefractionMapping;
const geometry = new THREE.SphereGeometry(100, 32, 16);
const material = new THREE.MeshBasicMaterial({
color: 0xffffff,
envMap: textureCube,
refractionRatio: 0.95,
})
for (let i = 0; i < 500; i++) {
const mesh = new THREE.Mesh(geometry, material)
mesh.position.x = Math.random() * 10000 - 5000
mesh.position.y = Math.random() * 10000 - 5000
mesh.position.z = Math.random() * 10000 - 5000
mesh.scale.x = mesh.scale.y = mesh.scale.z = Math.random() * 3 + 1
this.scene.add(mesh)
this.spheres.push(mesh)
}
},
onWindowSize() {
this.windowHalfX = this.container.clientWidth / 2;
this.windowHalfY = this.container.clientHeight / 2;
this.camera.aspect = this.container.clientWidth / this.container.clientHeight;
this.camera.updateProjectionMatrix();
this.effect.setSize(this.container.clientWidth, this.container.clientHeight);
},
onDocumentMouseMove(event) {
this.mouseX = (event.clientX - this.windowHalfX) * 10;
this.mouseY = (event.clientY - this.windowHalfY) * 10;
},
animate() {
const timer = 0.0001 * Date.now();
this.camera.position.x += (this.mouseX - this.camera.position.x) * .05;
this.camera.position.y += (- this.mouseY - this.camera.position.y) * .05;
this.camera.lookAt(this.scene.position);
for (let i = 0; i < this.spheres.length; i++) {
const sphere = this.spheres[i];
sphere.position.x = 5000 * Math.cos(timer + i);
sphere.position.y = 5000 * Math.sin(timer + i * 1.1);
}
const delta = this.clock.getDelta();
if (this.mixer) {
this.mixer.update(delta);
}
requestAnimationFrame(this.animate);
this.controller.update(delta);
this.stats.update();
this.effect.render(this.scene, this.camera);
},
},
};
</script>
<style>
#container {
position: absolute;
width: 100%;
height: 100%;
}
</style>
.lookAt(x, y, z)
this.controller.update(delta);
this.stats.update();
this.effect.render(this.scene, this.camera);
},
},
};
</script>
<style>
#container {
position: absolute;
width: 100%;
height: 100%;
}
</style>