本文是结合实践中和学习技术文章总结出来的笔记(个人使用),如有雷同纯属正常((✿◠‿◠))
喜欢的话点个赞,谢谢! 有问题欢迎指正!!
前面已经讲了基本的Vue生命周期和入门知识,本篇重点介绍Vue3的一些进阶知识
1. vue-router路由
Vue的路由对比React真是舒服太多了,路由守卫不需要自己配置,还可以方便自己添加一些自定义逻辑,比如在
beforeEach加载进度条之类的,这里以Hash路由为例:
安装vue-router
yarn add vue-router配置router.ts
import { createRouter, createWebHashHistory } from 'vue-router'
import store from '@/store'
import nprogress from 'nprogress'
import 'nprogress/nprogress.css'

const router = createRouter({
    history: createWebHashHistory(), // 路由模式
    routes: [
        {
            path: '/',
            name: 'layout',
            component: () => import('../layout/index.vue'),
            children: [
                {
                    path: '/',
                    name: 'home',
                    component: () => import('../views/home/index.vue')
                },
                //省略更多
                ....
            ]
        },
        {
            path: '/login',
            name: 'login',
            component: () => import('../views/login/index.vue')
        },
        {
            path: '/user',
            name: 'user',
            component: () => import('../views/login/user.vue')
        },
        {
            path: '/404',
            name: '404',
            component: () => import('../views/error/404.vue')
        }
    ] // 路由规则
})

export default router
在main.ts中引入
import { createApp } from 'vue'
import './style.css'
import App from './App.vue'
import router from './router/index'
import 'ant-design-vue/dist/reset.css'
import Antd from 'ant-design-vue'
import * as antdIcons from '@ant-design/icons-vue'
import store from './store'
import pinia from './store/pinia'

// 创建对象
const app = createApp(App)
Object.keys(antdIcons).forEach((key: any) => {
    app.component(key, antdIcons[key as keyof typeof antdIcons])
})

app.config.globalProperties.$antdIcons = antdIcons

app.use(router)
    .use(Antd)
    .use(store)
    .use(pinia)
    .mount('#app')
在App.vue中使用
<script setup lang="ts">
</script>
<template>
  <!-- 路由页面入口 -->
  <router-view></router-view>
</template>
<style scoped></style>
路由守卫校验
router.beforeEach((to, _from) => {
    nprogress.start() // 开始加载进度条
    // 用户登录失效
    if (to.meta.requiresAuth && !store.state.login.UserInfo.name) {
    // 此路由需要授权,请检查是否已登录
    // 如果没有,则重定向到登录页面
        return {
            path: '/login',
            // 保存我们所在的位置,以便以后再来
            query: { redirect: to.fullPath }
        }
    }
    // 如果页面不存在
    if (!to.name && to.path !== '/404') {
        return {
            path: '/404'
        }
    }
})
// 结束加载进度条
router.afterEach(() => {
    nprogress.done() // 加载进度条
})在beforeEach中我们可以处理登录校验和页面重定向等逻辑,非常方便,在afterEach里可以处理路由加载后的一些逻辑,比如进度条结束
2. 插槽
Vue实现了一套内容分发的api,将<slot>元素作为内容分发的出口,使用插槽可以让组件设计变得更加灵活
2.1. 基本使用
<script setup lang="ts">
import Child from './test.vue'
</script>
<template>
  <Child>
    <template #heard />
  </Child>
</template>
<style lang='less' scoped></style>
<script setup lang='ts'>
</script>
<template>
<div>
<slot name="heard">
我是头部
</slot>
</div>
</template>
<style lang='less' scoped>
</style>
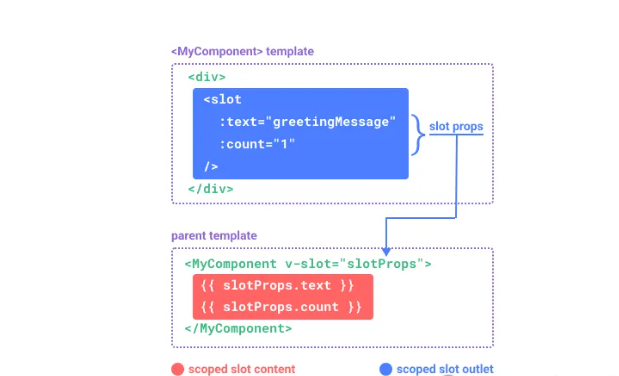
2.2. 插槽传值
我们使用插槽的时候,可以通过插槽传值的方法让父组件可以访问到子组件的属性,这就是常说的插槽透传
父组件:
<script setup lang="ts">
import Child from './test.vue'
</script>
<template>
  <Child>
    <template #heard="soltProps">
      {{ soltprops.title }}
    </template>
  </Child>
</template>
<style lang='less' scoped></style>
子组件:
<script setup lang='ts'>
</script>
<template>
  <div>
    <slot
      name="heard"
      title="我是title"
    >
      我是头部
    </slot>
  </div>
</template>
<style lang='less' scoped>
</style>
小结:我们可以为<solt>定义一个soltProps,这样就可以接收到子组件插槽传过来的所有数据,可以实现子父通信,也可以实现子组件传递组件给父组件,极大地提高了开发效率
3. 状态管理
时下Vue3最热门的状态管理库是Pinia和Vuex, Vuex由于官方不在更新,这里将着重介绍Pinia
3.1. 简单介绍
在我们实际项目开发中,往往会遇到跨组件通信、数据集中管理等需求,单靠手动管理状态会拙荆见肘。特别是在大型项目中会影响开发效率,会遇到以下需求点:
- 更强的团队协作约定
- 与Vue DevTools集成,包括时间轴、组件内部审查和时间旅行测试
- 模块化更新(HMR)
- 服务端渲染(SSR)
Pinia解决了以上问题,它是由Vue官方维护和更新,兼容Vue2 和Vue3版本,据官网描述,Pinia是为了探索Vuex下一个版本Vuex5而生,,它简单上手、对Typescript支持更友好提供了更完善的类型引导, Vue官方已经将其作为新的官方推荐状态管理库
3.2. 基本使用
安装
yarn add pinia创建store
import { createPinia } from 'pinia'
// 创建store
const store = createPinia()
// 对外暴露,安装仓库
export default store
注册
...
import pinia from './store/pinia'

...

app.use(router)
    .use(Antd)
    .use(store)
+   .use(pinia)
    .mount('#app')
添加models
import { defineStore } from 'pinia'
const Store = defineStore('test', {
    state: () => {
        return {
            count: 0
        }
    },
    actions: {
        add (count:number) {
            this.count = this.count + count
        }
    },
    getters: {

    }
})
export default Store
页面显示
<script setup lang="ts">
import infostore from '@/store/piniamodels'
import Child from './test.vue'
const store = infostore()
const add = () => {
    store.add(1)
}
</script>
<template>
  父组件显示:{{ store.count }}
  <button :onclick="add">
    +
  </button>
  子组件显示:
  <Child />
</template>
<style lang='less' scoped></style>
子组件:
<script setup lang='ts'>
import infostore from '@/store/piniamodels/index'
const store = infostore()
</script>
<template>
  {{ store.count }}
</template>
<style lang='less' scoped>
</style>
3.3. Pinia对比Vuex
Pinia可以说是Vuex的改进版,其他的地方都一样,但是弥补了Vuex的缺点:
- 简化了状态管理代码,在actions中直接使用this来替代state,不再需要接收state
- store的actions被视为常规调用,不再需要dispatch方法来触发,更加方便
- 完整的Typescript语法支持,对比Vuex添加TS更加容易
(未完待续)


![【YOLOv8改进[CONV]】轻量级架构AKConv助力YOLOv8目标检测效果 + 含全部代码和详细修改方式 + 手撕结构图 + 有效涨点](https://img-blog.csdnimg.cn/direct/6f752716dc764a75955917b7f35a4bcd.png)

