概述
API是连接前后端的前梁,当然前端既可以是UI web的前端,也可以是client端,API的测试和构建一样重要。
FastAPI 是一个用python构建API非常不错的框架,如何确保在客户端或服务器发生错误时 API 返回有用的响应?您应该针对真实数据进行测试还是模拟测试?
在本文中,介绍构建增删改查API(增加(Create)、检索(Retrieve)、更新(Update)和删除(Delete))使用FastAPI、SQLite并使用fixture等对pytest进行测试。
这里介绍构建Rest API - 从数据库创建、读取、更新、删除用户。
目标
结合本文,从以下几个方面介绍
- 开发一个增删改查使用FastAPI框架在Python中实现Rest API
- 使用SQLAIchemy ORM 工具和SQLite数据库交互
- 使用pytest为FastAPI 进行单测
- 处理错误和响应
- 使用 FastAPI 的内置Swagger 记录REST API
对于API这里不在赘述,我们了解下FastAPI
FASTAPI 介绍
FastAPI是一个高性能的python web框架,可以轻松构建 API,最初由Sebastian Ramirez于18年创建,并在2019年发布。它是建立在Python 库之上:Starlette和Pydantic,其中Starlette 是提供底层 Web 应用程序框架,而 Pydantic 是用于数据验证和序列化的库。FastAPI的设计注重易用性,和性能,同时还内置了async/await的支持,使其比传统的同步线程模型更高效。
CRUD API
它是包括了HTTP方法(POST、GET、PUT、DELETE)的设计原则,用于对数据库DB系统中的数据维护的基本操作。广泛用于 Web 开发,用于实现内容管理和维护
项目设置
项目中,我们创建一个增删改查使用API从的关系型数据库(使用SQLite)创建、读取、更新和删除用户,项目名称这里叫fastapi_curdapi
fastapi_curdapi
├── app
│   ├── __init__.py
│   ├── database.py
│   ├── main.py
│   ├── models.py
│   ├── schemas.py
│   └── user.py
├── pyest.ini
├── pyproject.toml
├── requirements.txt
├── tests
│   ├── __init__.py
│   ├── conftest.py
│   └── test_curd_api.py
其中app目录下包含源代码如下所示:
- database.py — 创建数据库引擎和 SQLite 设置。
- main.py — 创建 FastAPI 客户端、健康检查器和中间件。
- models.py - 数据库架构。
- schemas.py — 用户基础架构和响应架构。
- user.py — API 路由和响应格式。
- tests目录包含 API 的单元测试。
文件中列出了依赖项 pyproject.toml,或者说使用requirement.txt 这里使用pip3进行维护
fastapi==0.111.0
pydantic==2.7.3
SQLAlchemy==2.0.30
SQLAlchemy_Utils==0.41.2
对于项目生成requirement.txt,常用有两种方法
freeze
- 应用场景:在单一虚拟环境下,可以使用这种方式。
- 优点:这种方式会把当前环境下的所有依赖包都整理出来。
- 缺点:不是针对某个项目生成,如果当前环境下有多个项目,那么会生成大量无关的依赖信息。
pip freeze > requirements.txt
- 但是用这个方法,可以实现一个功能:删除当前环境的所有python依赖。
pip uninstall -r requirements.txt -y
pipreqs
- 应用场景:针对单个项目生成 requirements.txt
- 优点:使用 pipreqs 可以自动检索到当前项目下的所有组件及其版本,并生成 requirements.txt 文件,极大方便了项目迁移和部署的包管理。
- 缺点:相比直接用 freeze 命令,能直接隔离其它项目的包生成。
pipreqs ./ --encoding=utf-8
#强制执行命令 --force ,覆盖原有的 requirements.txt 文件
pipreqs ./ --encoding=utf-8 --force
所以这里使用pipreqps
代码介绍
database.py是创建数据库引擎和SQLite设置的代码
#!/usr/bin/env python
# -*- coding: utf-8 -*-
# This module is ***
# @Time : 2024/6/6 09:54
# @Author :
# function :
# @File : database.py
from sqlalchemy import create_engine
from sqlalchemy.ext.declarative import declarative_base
from sqlalchemy.orm import sessionmaker

SQLITE_DATABASE_URL = "sqlite:///./user.db"

engine = create_engine(SQLITE_DATABASE_URL, echo=True, connect_args={"check_same_thread": False})

SessionLocal = sessionmaker(autocommit=False, autoflush=False, bind=engine)

Base = declarative_base()

def get_db():
    db = SessionLocal()
    try:
        yield db
    finally:
        db.close()
SQLite作为内存数据库,使用起来较为简便,当然还可以使用PostgreSQL、MySQL等数据库。而get_db函数是一个依赖项,将会为注入的每个请求创建一个新的数据库会话session。
models.py-数据库架构
#!/usr/bin/env python
# -*- coding: utf-8 -*-
# This module is ***
# @Time : 2024/6/6 09:54
# @Author :
# function :
# @File : models.py
import uuid

from sqlalchemy import Column, String, Boolean, TIMESTAMP
from sqlalchemy_utils import UUIDType
from sqlalchemy.sql import func

from app.database import Base


class User(Base):
    __tablename__ ="users"

    # Primary key and GUID type
    id = Column(UUIDType(binary=False), primary_key=True, default=uuid.uuid4())

    # String types with appropriate non0null constraints
    first_name = Column(
        String(255), nullable=False, index=True
    )  # Index for faster searches

    last_name = Column(
        String(255), nullable=False, index=True
    )  # Index for faster searches

    address = Column(String(255), nullable=True)

    # Boolean type with a deafult value
    activated = Column(Boolean, nullable=False, default=True)

    # Timestamp with timezone support
    createAt = Column(
        TIMESTAMP(timezone=True), nullable=False, server_default=func.now()
    )

    udpatedAt = Column(TIMESTAMP(timezone=True), default=None, onupdate=func.now())
本例中的数据模型非常简单 - 一个包含列的User表- id、first_name、last_name、address、activated、createdAt、updatedAt
使用SQLAlchemy ORM,我们定义表模式和列。
现在我们有了数据库模型,让我们使用Pydantic User创建和响应模型。
schemas.py — 用户基础架构和响应架构
from enum import Enum
from datetime import datetime
from typing import List
from pydantic import BaseModel, Field
from uuid import UUID


class UserBaseSchema(BaseModel):

    id: UUID = None
    first_name: str = Field(
        ..., description="The first name of the user", example="John"
    )
    last_name: str = Field(..., description="The last name of the user", example="Doe")
    address: str = None
    activated: bool = False
    createdAt: datetime = None
    updatedAt: datetime = None

    class Config:
        from_attributes = True
        populate_by_name = True
        arbitrary_types_allowed = True


class Status(Enum):
    Success = "Success"
    Failed = "Failed"


class UserResponse(BaseModel):
    Status: Status
    User: UserBaseSchema


class GetUserResponse(BaseModel):
    Status: Status
    User: UserBaseSchema


class ListUserResponse(BaseModel):
    status: Status
    results: int
    users: List[UserBaseSchema]


class DeleteUserResponse(BaseModel):
    Status: Status
    Message: str
上面的用法中使用到了 Pydantic 模型,用于在API路由中验证请求和响应负载信息
user.py- API路由和响应信息
import app.schemas as schemas
import app.models as models
from sqlalchemy.orm import Session
from sqlalchemy.exc import IntegrityError
from fastapi import Depends, HTTPException, status, APIRouter
from app.database import get_db

router = APIRouter()


@router.post(
    "/", status_code=status.HTTP_201_CREATED, response_model=schemas.UserResponse
)
def create_user(payload: schemas.UserBaseSchema, db: Session = Depends(get_db)):
    try:
        # Create a new user instance from the payload
        new_user = models.User(**payload.model_dump())
        db.add(new_user)
        db.commit()
        db.refresh(new_user)

    except IntegrityError as e:
        db.rollback()
        # Log the error or handle it as needed
        raise HTTPException(
            status_code=status.HTTP_409_CONFLICT,
            detail="A user with the given details already exists.",
        ) from e
    except Exception as e:
        db.rollback()
        # Handle other types of database errors
        raise HTTPException(
            status_code=status.HTTP_500_INTERNAL_SERVER_ERROR,
            detail="An error occurred while creating the user.",
        ) from e

    # Convert the SQLAlchemy model instance to a Pydantic model
    user_schema = schemas.UserBaseSchema.from_orm(new_user)
    # Return the successful creation response
    return schemas.UserResponse(Status=schemas.Status.Success, User=user_schema)


@router.get(
    "/{userId}", status_code=status.HTTP_200_OK, response_model=schemas.GetUserResponse
)
def get_user(userId: str, db: Session = Depends(get_db)):
    user_query = db.query(models.User).filter(models.User.id == userId)
    db_user = user_query.first()

    if not db_user:
        raise HTTPException(
            status_code=status.HTTP_404_NOT_FOUND,
            detail=f"No User with this id: `{userId}` found",
        )

    try:
        return schemas.GetUserResponse(
            Status=schemas.Status.Success, User=schemas.UserBaseSchema.model_validate(db_user)
        )
    except Exception as e:
        raise HTTPException(
            status_code=status.HTTP_500_INTERNAL_SERVER_ERROR,
            detail="An unexpected error occurred while fetching the user.",
        ) from e


@router.patch(
    "/{userId}",
    status_code=status.HTTP_202_ACCEPTED,
    response_model=schemas.UserResponse,
)
def update_user(
    userId: str, payload: schemas.UserBaseSchema, db: Session = Depends(get_db)
):
    user_query = db.query(models.User).filter(models.User.id == userId)
    db_user = user_query.first()

    if not db_user:
        raise HTTPException(
            status_code=status.HTTP_404_NOT_FOUND,
            detail=f"No User with this id: `{userId}` found",
        )

    try:
        update_data = payload.dict(exclude_unset=True)
        user_query.update(update_data, synchronize_session=False)
        db.commit()
        db.refresh(db_user)
        user_schema = schemas.UserBaseSchema.model_validate(db_user)
        return schemas.UserResponse(Status=schemas.Status.Success, User=user_schema)
    except IntegrityError as e:
        db.rollback()
        raise HTTPException(
            status_code=status.HTTP_409_CONFLICT,
            detail="A user with the given details already exists.",
        ) from e
    except Exception as e:
        db.rollback()
        raise HTTPException(
            status_code=status.HTTP_500_INTERNAL_SERVER_ERROR,
            detail="An error occurred while updating the user.",
        ) from e


@router.delete(
    "/{userId}",
    status_code=status.HTTP_202_ACCEPTED,
    response_model=schemas.DeleteUserResponse,
)
def delete_user(userId: str, db: Session = Depends(get_db)):
    try:
        user_query = db.query(models.User).filter(models.User.id == userId)
        user = user_query.first()
        if not user:
            raise HTTPException(
                status_code=status.HTTP_404_NOT_FOUND,
                detail=f"No User with this id: `{userId}` found",
            )
        user_query.delete(synchronize_session=False)
        db.commit()
        return schemas.DeleteUserResponse(
            Status=schemas.Status.Success, Message="User deleted successfully"
        )
    except Exception as e:
        db.rollback()
        raise HTTPException(
            status_code=status.HTTP_500_INTERNAL_SERVER_ERROR,
            detail="An error occurred while deleting the user.",
        ) from e


@router.get(
    "/", status_code=status.HTTP_200_OK, response_model=schemas.ListUserResponse
)
def get_users(
    db: Session = Depends(get_db), limit: int = 10, page: int = 1, search: str = ""
):
    skip = (page - 1) * limit

    users = (
        db.query(models.User)
        .filter(models.User.first_name.contains(search))
        .limit(limit)
        .offset(skip)
        .all()
    )
    return schemas.ListUserResponse(
        status=schemas.Status.Success, results=len(users), users=users
    )
上述代码定了 C R U D用户的API路由信息,可以更具需要再处理错误信息,日志记录,响应格式等方面的复杂功能。主要围绕4条信息开展的,也是我么日常使用较多的错误码类型。
create_user- 创建新用户。201成功或409发生冲突时返回状态代码。get_user- 通过 ID 获取用户。如果200成功则返回状态代码,404如果未找到则返回状态代码。update_user- 通过 ID 更新用户。202成功或409发生冲突时返回状态代码。delete_user- 根据 ID 删除用户。如果202成功则返回状态代码,404如果未找到则返回状态代码。get_users- 获取用户列表。200成功时返回状态代码。
main.py — 创建 FastAPI 客户端、健康检查器和中间件
#!/usr/bin/env python
# -*- coding: utf-8 -*-
# This module is ***
# @Time : 2024/6/6 09:54
# @Author :
# function :
# @File : main.py
from app import models, user
from fastapi import FastAPI
from fastapi.middleware.cors import CORSMiddleware
from app.database import engine

models.Base.metadata.create_all(bind=engine)

app = FastAPI()

origins = [
    "http://localhost:3000",
]

app.add_middleware(
    CORSMiddleware,
    allow_origins=origins,
    allow_credentials=True,
    allow_methods=["*"],
    allow_headers=["*"],
)


app.include_router(user.router, tags=["Users"], prefix="/api/users")


@app.get("/api/healthchecker")
def root():
    return {"message": "The API is LIVE!!"}
上面的信息创建了FastAPI client,设置了 CORS中间件并定义了API路由user.py
run API
要拉起服务,执行如下cli命令
uvicorn app.main:app --host localhost --port 8000 --reload

在浏览器输入:http://localhost:8000/docs
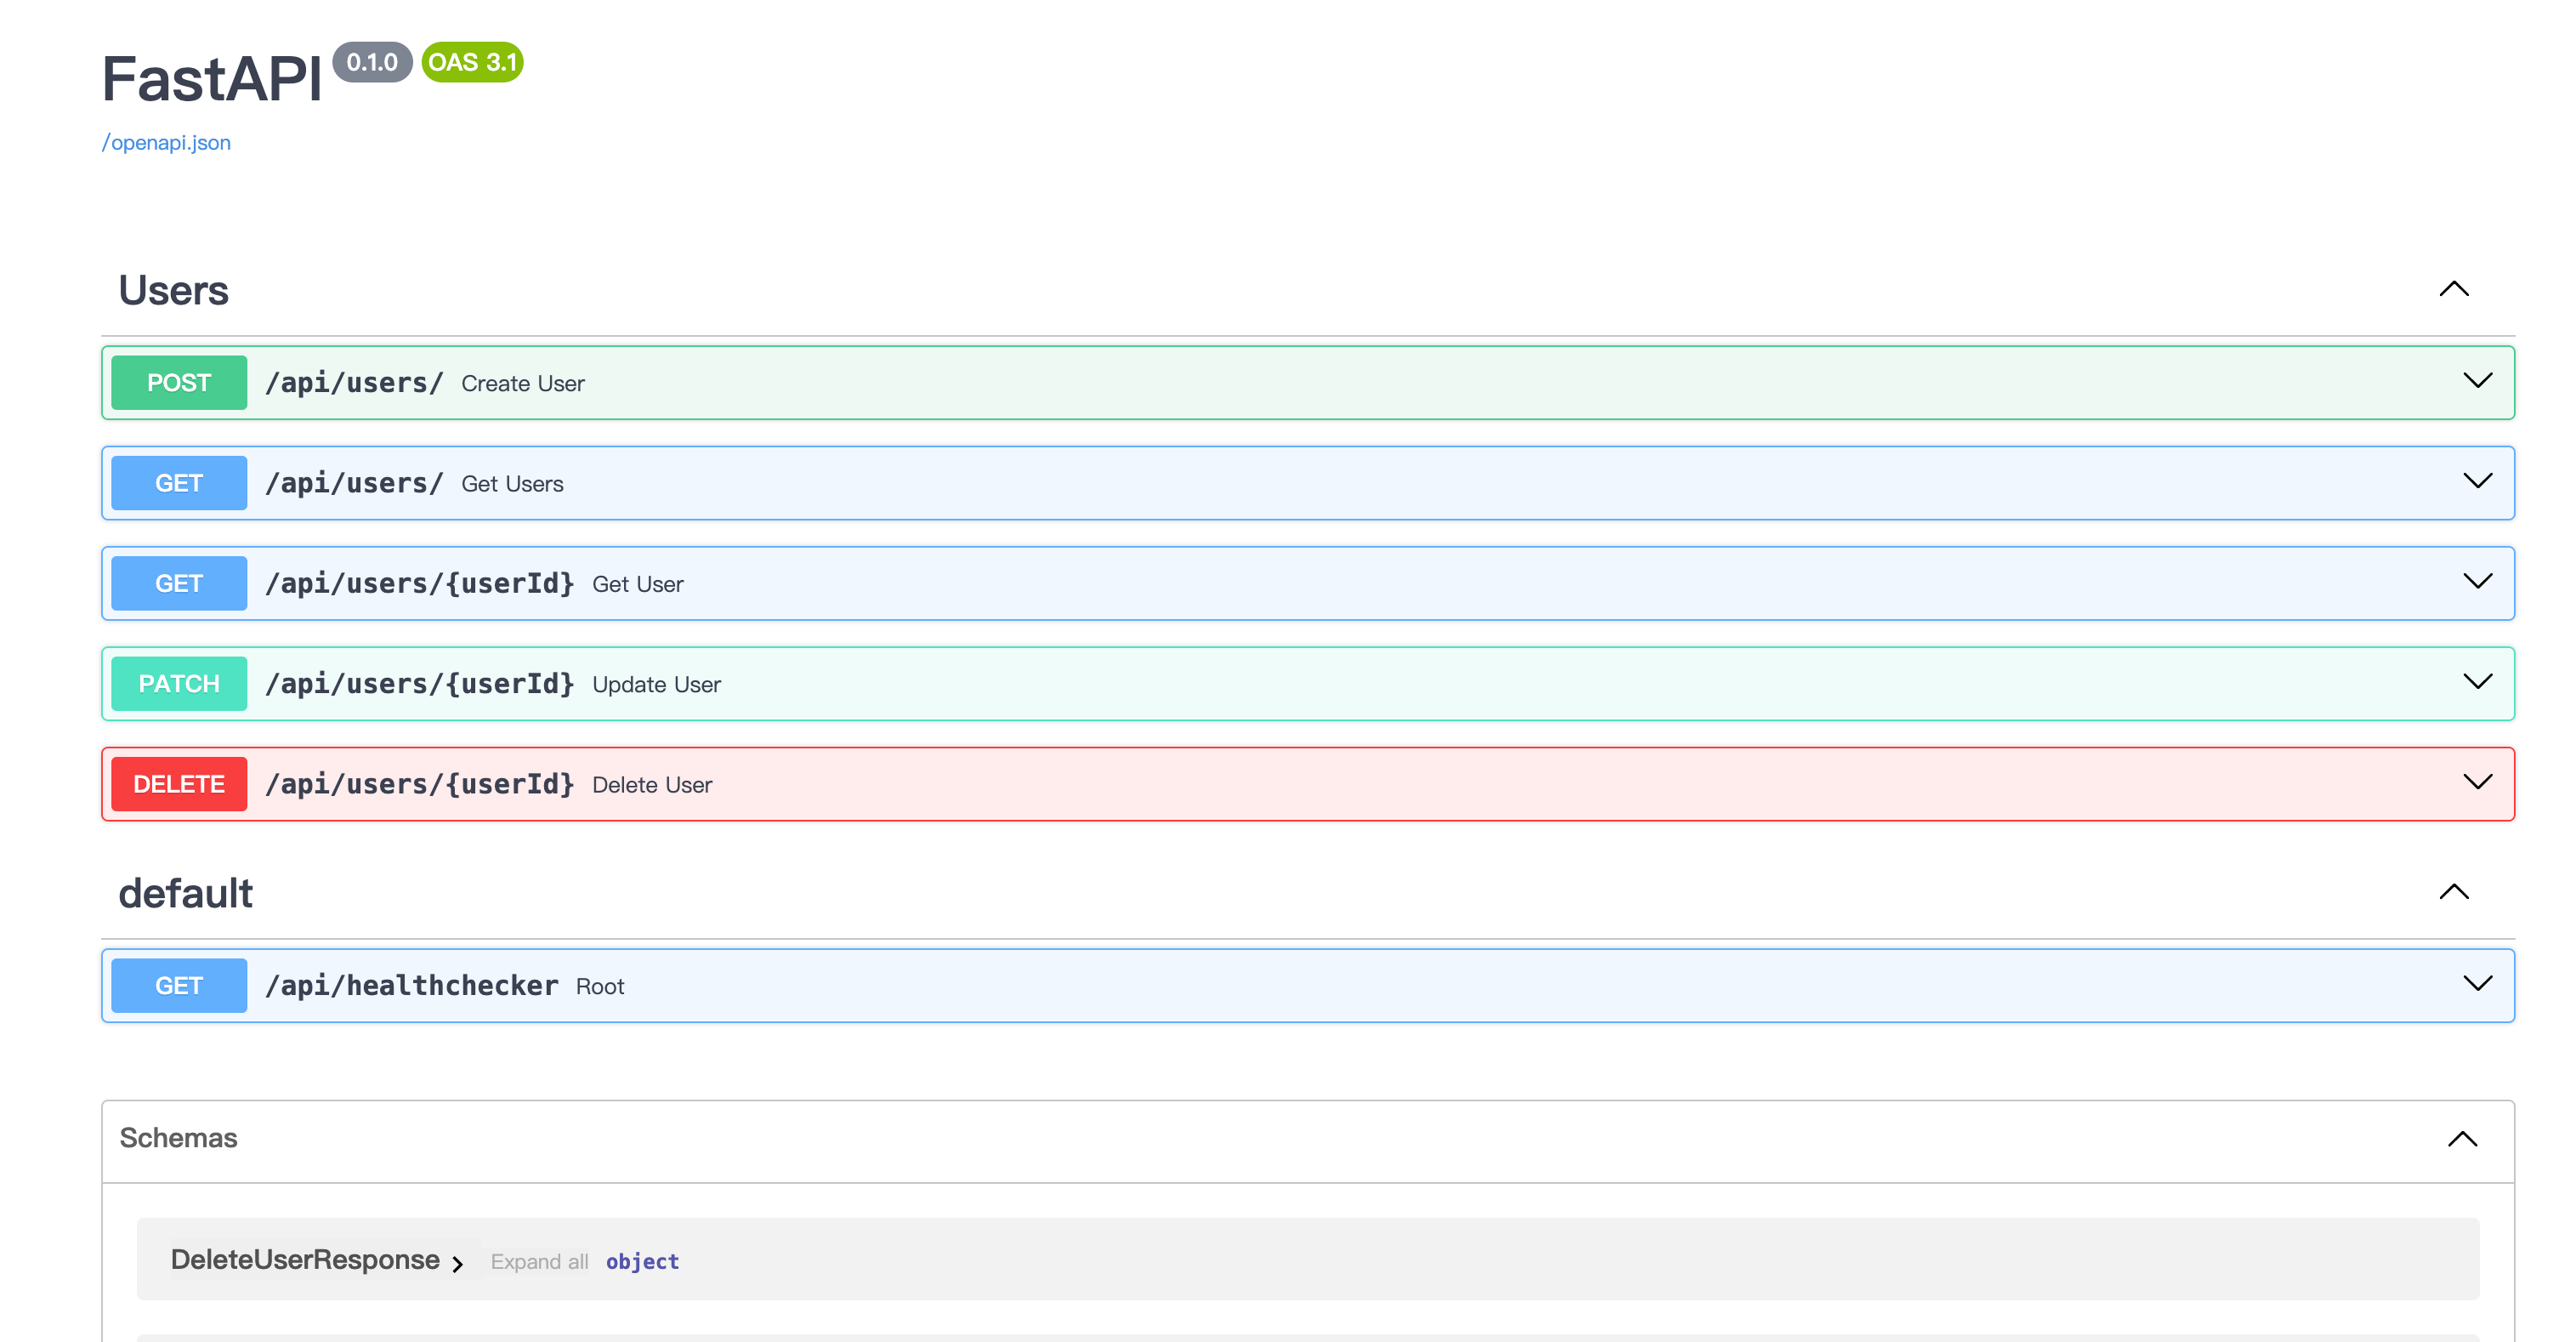
通过使用不同接口完成测试。
pytest测试
tests使用conftest.py完成封装,使用test_curd_api完成业务测试。在conftest.py中
#!/usr/bin/env python
# -*- coding: utf-8 -*-
# This module is ***
# @Time : 2024/6/6 09:54
# @Author :
# function :
# @File : conftest.py
import pytest
import uuid
from sqlalchemy import create_engine
from sqlalchemy.orm import sessionmaker
from sqlalchemy.pool import StaticPool
from fastapi.testclient import TestClient
from app.main import app
from app.database import Base, get_db

# SQLite database URL for testing
SQLITE_DATABASE_URL = "sqlite:///./test_db.db"

# Create a SQLAlchemy engine
engine = create_engine(
    SQLITE_DATABASE_URL,
    connect_args={"check_same_thread": False},
    poolclass=StaticPool,
)

# Create a sessionmaker to manage sessions
TestingSessionLocal = sessionmaker(autocommit=False, autoflush=False, bind=engine)

# Create tables in the database
Base.metadata.create_all(bind=engine)


@pytest.fixture(scope="function")
def db_session():
    """Create a new database session with a rollback at the end of the test."""
    connection = engine.connect()
    transaction = connection.begin()
    session = TestingSessionLocal(bind=connection)
    yield session
    session.close()
    transaction.rollback()
    connection.close()


@pytest.fixture(scope="function")
def test_client(db_session):
    """Create a test client that uses the override_get_db fixture to return a session."""

    def override_get_db():
        try:
            yield db_session
        finally:
            db_session.close()

    app.dependency_overrides[get_db] = override_get_db
    with TestClient(app) as test_client:
        yield test_client


# Fixture to generate a random user id
@pytest.fixture()
def user_id() -> uuid.UUID:
    """Generate a random user id."""
    return str(uuid.uuid4())


# Fixture to generate a user payload
@pytest.fixture()
def user_payload(user_id):
    """Generate a user payload."""
    return {
        "id": user_id,
        "first_name": "John",
        "last_name": "Doe",
        "address": "123 Farmville",
    }


@pytest.fixture()
def user_payload_updated(user_id):
    """Generate an updated user payload."""
    return {
        "first_name": "Jane",
        "last_name": "Doe",
        "address": "321 Farmville",
        "activated": True,
    }
接着进行测试用例的编写
tests/test_crud_api.py
#!/usr/bin/env python
# -*- coding: utf-8 -*-
# This module is ***
# @Time : 2024/6/6 09:55
# @Author :
# function :
# @File : test_curd_api.py
import time


def test_root(test_client):
    response = test_client.get("/api/healthchecker")
    assert response.status_code == 200
    assert response.json() == {"message": "The API is LIVE!!"}


def test_create_get_user(test_client, user_payload):
    response = test_client.post("/api/users/", json=user_payload)
    response_json = response.json()
    assert response.status_code == 201

    # Get the created user
    response = test_client.get(f"/api/users/{user_payload['id']}")
    assert response.status_code == 200
    response_json = response.json()
    assert response_json["Status"] == "Success"
    assert response_json["User"]["id"] == user_payload["id"]
    assert response_json["User"]["address"] == "123 Farmville"
    assert response_json["User"]["first_name"] == "John"
    assert response_json["User"]["last_name"] == "Doe"


def test_create_update_user(test_client, user_payload, user_payload_updated):
    response = test_client.post("/api/users/", json=user_payload)
    response_json = response.json()
    assert response.status_code == 201

    # Update the created user
    time.sleep(
        1
    )  # Sleep for 1 second to ensure updatedAt is different (datetime precision is low in SQLite)
    response = test_client.patch(
        f"/api/users/{user_payload['id']}", json=user_payload_updated
    )
    response_json = response.json()
    assert response.status_code == 202
    assert response_json["Status"] == "Success"
    assert response_json["User"]["id"] == user_payload["id"]
    assert response_json["User"]["address"] == "321 Farmville"
    assert response_json["User"]["first_name"] == "Jane"
    assert response_json["User"]["last_name"] == "Doe"
    assert response_json["User"]["activated"] is True
    assert (
        response_json["User"]["updatedAt"] is not None
        and response_json["User"]["updatedAt"] > response_json["User"]["createdAt"]
    )


def test_create_delete_user(test_client, user_payload):
    response = test_client.post("/api/users/", json=user_payload)
    response_json = response.json()
    assert response.status_code == 201

    # Delete the created user
    response = test_client.delete(f"/api/users/{user_payload['id']}")
    response_json = response.json()
    assert response.status_code == 202
    assert response_json["Status"] == "Success"
    assert response_json["Message"] == "User deleted successfully"

    # Get the deleted user
    response = test_client.get(f"/api/users/{user_payload['id']}")
    assert response.status_code == 404
    response_json = response.json()
    assert response_json["detail"] == f"No User with this id: `{user_payload['id']}` found"


def test_get_user_not_found(test_client, user_id):
    response = test_client.get(f"/api/users/{user_id}")
    assert response.status_code == 404
    response_json = response.json()
    assert response_json["detail"] == f"No User with this id: `{user_id}` found"


def test_create_user_wrong_payload(test_client):
    response = test_client.post("/api/users/", json={})
    assert response.status_code == 422


def test_update_user_wrong_payload(test_client, user_id, user_payload_updated):
    user_payload_updated["first_name"] = (
        True  # first_name should be a string not a boolean
    )
    response = test_client.patch(f"/api/users/{user_id}", json=user_payload_updated)
    assert response.status_code == 422
    response_json = response.json()
    assert response_json == {
        "detail": [
            {
                "type": "string_type",
                "loc": ["body", "first_name"],
                "msg": "Input should be a valid string",
                "input": True,
            }
        ]
    }


def test_update_user_doesnt_exist(test_client, user_id, user_payload_updated):
    response = test_client.patch(f"/api/users/{user_id}", json=user_payload_updated)
    assert response.status_code == 404
    response_json = response.json()
    assert response_json["detail"] == f"No User with this id: `{user_id}` found"
执行测试用例的时候,可以直接点击ide,这里使用的是macOs pycharm中的三角,也可以执行
pytest
F&Q
执行为macOS Sonoma 14.0 python3.9.6
# python3 -V
Python 3.9.6
1.执行uvicorn app.main:app --host localhost --port 8000 --reload 报错 zsh: /usr/local/bin/uvicorn: bad interpreter
- 查看python路径
% which python3
/usr/bin/python3
- 检修uvicorn脚本的Shebang行
which uvicorn
/Python/3.9/bin/uvicorn
既然报错解释器相关的问题,进入到文件中,将第一行解释器的路径修改为
#!/usr/bin/python3
保存退出即可。
2.生成requirement.txt时,pip3 list pipreqs有,但是执行pipreqs提示command not found
- 查询pipreqs命令
ffastapi_curdapi % which pipreqs
pipreqs not found
fastapi_curdapi % pip3 list| grep pipreqs
pipreqs                   0.5.0
fastapi_curdapi % pipreqs
zsh: command not found: pipreqs
fastapi_curdapi %
bfastapi_curdapi % which python3
/usr/bin/python3
如果which中找不到,则说明不在$PATH中,这里看到Python位于/usr/bin/下,而macOS中一般客户手动安装的路径位于/usr/local/bin/下,查询pipreqs的安装路径
fastapi_curdapi % pip3 show pipreqs | grep Location
Location: ~/Library/Python/3.9/lib/python/site-packages
重点关注输出中的Location字段,它会显示该包的安装路径。全局安装的包一般位于/usr/local/lib/pythonX.Y/site-packages(X.Y代表你的Python版本),而用户级安装的包通常位于~/Library/Python/X.Y/lib/python/site-packages
在用户级目录下发现
bin % pwd
***/Library/Python/3.9/bin
bin % ls | grep pipreqs
pipreqs
需要将对应的路径添加到PATH中,添加到用户PATH中,一般有~/.bash_profile和~/.zshrc两个文件,
~/.bash_profile 和 ~/.zshrc 是两种不同Shell的配置文件,它们分别用于Bash和Zsh这两种Unix/Linux shell环境中。它们存储着用户自定义的设置和环境变量,使得用户可以在启动shell时应用自己的个性化配置。下面是两者的具体区别:
~/.bash_profile
- 用途: 主要用于Bash shell。它是Bash在登录(login)模式下读取的第一个配置文件。当用户通过终端登录或者使用ssh远程登录时,Bash会执行这个文件来设置环境变量(如PATH)、别名(aliases)以及其他一些初始化设置。
- 特点: 适合放置那些只需要在登录时执行一次的配置,比如环境变量设置、启动程序等。
- 兼容性: 由于Bash是大多数Linux发行版和macOS的默认shell,所以这个文件在这些系统中非常常见。
~/.zshrc
- 用途: 专用于Zsh shell。无论是在交互式登录还是非登录shell中,Zsh都会读取这个文件。这意味着每次你打开一个新的Zsh终端窗口或tab时,~/.zshrc中的配置都会被应用。
- 特点: 由于Zsh提供了比Bash更多的功能和定制性,~/.zshrc可以包含更复杂的配置,如插件管理(如oh-my-zsh)、主题设置、自定义函数、别名等。
- 兼容性: 自macOS Catalina开始,Apple将Zsh设为默认shell,因此在较新的macOS系统中,~/.zshrc成为用户配置shell环境的主要文件
如果你正在使用macOS并且主要使用的是Zsh(尤其是在Catalina及以后的版本),那么你应当关注/.zshrc的配置。如果你在某些场景下仍然使用Bash(或者系统默认是Bash),则需要维护/.bash_profile。两者都非常重要,因为它们决定了你的shell环境如何响应你的命令以及提供哪些功能。在一些情况下,用户可能需要在这两个文件中都做一些配置,特别是当他们同时在Bash和Zsh环境中工作时。而且macOS Catalina是Mac的第16个主要版本,版本号为macOS 10.15,从 2019.10.8 开始,所以可以认为只需要维护~/.zshrc即可。
# 使用的macos的默认python,位于/usr/bin下,而用户级一般位于/usr/local/bin下,因此需要将用户级安装目录加入到PATH中
export PATH="自己的目录地址/Library/Python/3.9/bin:$PATH"
保存退出后,执行
source ~/.zshrc
这里大家会好奇机器明明Sonoma 14.0为什么要修改 .zshrc呢,当然是确定本机的默认Shell已经从Bash是否切换到了Zsh。执行命令
% echo $SHELL
/bin/zsh
发现这里已经切换到zsh,所以上面需要修改~/.zshrc