一、Spring概述
Spring是一款主流的Java EE轻量级开源框架。
Spring的核心模块:IoC(控制反转,指把创建对象过程交给Spring管理 )、AOP(面向切面编程,在不修改源代码的基础上增强代码功能)
二、Spring入门
2.1 入门案例开发步骤
- 引入spring相关依赖
- 创建类,定义属性和方法
- 按照spring要求创建配置文件
- 在spring配置文件中配置相关信息
- 进行测试
2.2 案例开发实例
创建一个spring maven项目名为Spring6,再在Spring6下面创建一个名为Spring-first的模块,在此模块下的pom.xml里增加依赖。
<dependencies>
        <!-- 第2.1个spring context依赖(这是spring的基础依赖) -->
        <dependency>
            <groupId>org.springframework</groupId>
            <artifactId>spring-context</artifactId>
            <version>5.3.7</version>
        	<!--如果是JDK17及以上的,就写6.0.0版本+-->
        </dependency>

        <!--第2.2个spring junit依赖 -->
        <dependency>
            <groupId>junit</groupId>
            <artifactId>junit</artifactId>
            <version>4.13.2</version>
<!--            <scope>test</scope>-->
        </dependency>
    </dependencies>
复制之后,点击m小图标进行联网下载。

创建一个User类,里面创建一个add方法。
public class User {
    public void add(){
        System.out.println("添加。。。");
    }
}
创建一个bean.xml,添加配置文件信息
<?xml version="1.0" encoding="UTF-8"?>
<beans xmlns="http://www.springframework.org/schema/beans"
       xmlns:xsi="http://www.w3.org/2001/XMLSchema-instance"
       xsi:schemaLocation="http://www.springframework.org/schema/beans http://www.springframework.org/schema/beans/spring-beans.xsd">

<!--    完成user对象创建-->
<!--    id属性:唯一标识-->
<!--    class属性:要创建的对象所在类的全路径-->
    <bean id="user" class="com.hbnu.spring6.User"/>
</beans>
再写一个测试类,测试方法调用
public class TestUser {
//这里的注解要导入 import org.junit.Test;
    @Test
    public void testUser(){
        //加载spring配置文件,创建对象
        ApplicationContext applicationContext=new ClassPathXmlApplicationContext("bean.xml");

        //获取创建的对象
        User user = (User) applicationContext.getBean("user");//getBean --> xml文件里的id值
        System.out.println(user);

        //使用对象调用方法进行测试
        user.add();
    }
}
如果是利用反射创建对象呢?
//利用反射创建对象
    public void testUserObject1() throws Exception {
        Class clazz=Class.forName("com.hbnu.spring6.User");
        //调用方法创建对象
        User user = (User) clazz.getDeclaredConstructor().newInstance();
        System.out.println(user);

        user.add();
    }
三、容器:IoC
IoC是Inversion of Control的简写,译为”控制反转”,是一种设计思想(不是一种技术),是一个重要的面向对象编程法则,是Spring框架中最重要的核心组件之一。
Spring通过IoC容器来管理所有的Java对象的实例化和初始化,控制对象与对象之间的依赖关系。我们将由IoC容器管理的Java对象称为Spring Bean,它与new一个对象没有区别。
控制反转,反转的是什么?
- 将对象的创建权力交出去,交给第三方容器负责
- 将对象和对象之间关系的维护权交出去,交给第三方容器负责
控制反转这种思想如何实现?
- DI :依赖注入
3.1 依赖注入
指Spring创建对象的过程中,将对象依赖属性通过配置进行注入
常见方式包括两种:
- set注入
- 构造注入
3.2 IoC容器在Spring的实现
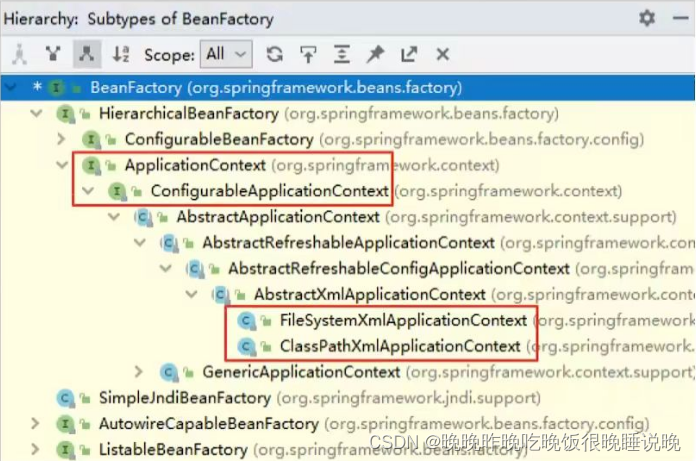
IoC容器中管理的组件也叫做bean,在创建bean之前,首先要创建IoC容器。Spring提供了两种实现方式:
BeanFactory 是IoC容器的基本实现,是Spring内部使用的接口,面向Spring本身,不提供给开发人员
ApplicationContext 是BeanFactory的子接口,提供了更多高级特性,面向Spring的使用者
ApplicationContext的主要实现类:
3.3 基于xml管理bean
1.获取bean
xml文件里配置id值
<bean id="user" class="com.hbnu.spring6.User"/>
①根据id获取
public void test1(){
	ApplicationContext ac=new ClassPathXmlApplicationContext("bean.xml");
	User user = (User) applicationContext.getBean("user");
}
②根据id和类型获取
public void test2(){
	ApplicationContext ac=new ClassPathXmlApplicationContext("bean.xml");
	User user = applicationContext.getBean("user",User.class);
}
③根据类型获取
public void test3(){
	ApplicationContext ac=new ClassPathXmlApplicationContext("bean.xml");
	User user = applicationContext.getBean(User.class);
}
且当根据类型获取bean的时候,要求ioc容器里指定类型(class)的bean只允许有一个,配置了两个会报错。即下面两行是错的。
<bean id="user" class="com.hbnu.spring6.User"/>
<bean id="user1" class="com.hbnu.spring6.User"/>
注意:①如果组件类实现了接口,根据接口类型可以获取bean吗?可以,前提是bean唯一 ②如果一个接口有多个实现类,这些实现类都配置了bean,根据接口类型可以获取bean吗?不行,因为bean不唯一
以下是错误的:
<!--    一个接口实现类获取过程-->
    <bean id="UserDaoImpl" class="com.hbnu.spring6.bean.UserDaoImpl"/>

    <bean id="PersonDaoImpl" class="com.hbnu.spring6.bean.PersonDaoImpl"/>
		ApplicationContext applicationContext=new ClassPathXmlApplicationContext("bean.xml");
        UserDao userDao = applicationContext.getBean(UserDao.class);
        System.out.println(userDao);
        userDao.run();
2.依赖注入
如果是原生Java,set方法和构造器方法怎么注入?
		//set方法注入
        Book book=new Book();
        book.setAuthor("牛顿");

        //通过构造器注入
        Book book1=new Book("1","鹤");
接着看用配置文件如何注入。。。
①根据set方法注入
创建一个Book类,定义属性,生成属性set方法之后,在spring配置文件里配置。。。
<!--    1.set方法完成注入-->
    <bean id="book" class="com.hbnu.spring6.DI.Book">
        <property name="bname" value="spring"/>
        <property name="author" value="小唐"/>
    </bean>
    <!--name对应Book类里面的属性-->
测试一下set方法注入:
@Test
    public void testSet(){
        ApplicationContext applicationContext=new ClassPathXmlApplicationContext("bean-DI.xml");
        Book book = (Book)applicationContext.getBean("book");
        System.out.println(book);//Book{bname='spring', author='小唐'}
    }
输出Book类里重写的toString
②根据构造器注入
创建一个Book类,定义属性,生成有参数的构造方法,在spring配置文件里配置。。。
<!--    2.有参构造注入-->
    <bean id="bookCons" class="com.hbnu.pojo.Book">
        <constructor-arg name="author" value="小李"/>
        <constructor-arg name="name" value="Spring学习之有参构造注入"/>
    </bean>
测试跟上面一样,只是配置文件里写的内容不一样了
3.特殊值处理
①字面量赋值
②null值 用null标签表示空值
③xml实体 用<>表示大小尖括号
④CDATA节 <![CDATA[a<b]]>
4.为对象类型属性赋值
创建两个类对象:dept和emp
在emp类里写一个work方法
public class Emp {

    //对象类型属性:员工属于某个部门
    private Dept dept;
    private String ename;
    private String age;

    public void work(){
        System.out.println(ename+" is working...");
        dept.info();
    }
    ...
  }
①引用外部bean
    1.引用外部bean注入
    <bean id="dept" class="com.hbnu.DITest.Dept">
        <property name="dname" value="安保部"/>
    </bean>
    <bean id="emp" class="com.hbnu.DITest.Emp">
<!--        普通类型属性注入-->
        <property name="ename" value="lucy"/>
        <property name="age" value="23"/>
<!--        对象类型属性注入-->
<!--        表示引入外部bean,这里的ref是上面id为dept的值-->
        <property name="dept" ref="dept"/>
    </bean>
②使用内部bean
<!--    2.使用内部bean注入-->

    <bean id="emp" class="com.hbnu.DITest.Emp">
        <property name="age" value="25"/>
        <property name="ename" value="joey"/>
        <property name="dept">
            <bean id="dept" class="com.hbnu.DITest.Dept">
                <property name="dname" value="财务部"/>
            </bean>
        </property>
    </bean>
③ 使用级联赋值
<!--    3.级联赋值-->
    <bean id="emp" class="com.hbnu.DITest.Emp">
        <property name="ename" value="mary"/>
        <property name="age" value="25"/>
        <property name="dept" ref="dept"/>
        <property name="dept.dname" value="测试部"/>
    </bean>
    <bean id="dept" class="com.hbnu.DITest.Dept">

    <!--这一行可要可不要,仅作参考,上面已经给部门名称赋值为了测试部-->
        <property name="dname" value="技术部"/>
    </bean>
测试
@Test
    public void testemp(){
        ApplicationContext applicationContext=new ClassPathXmlApplicationContext("bean-ditest.xml");
        Emp emp=applicationContext.getBean("emp",Emp.class);
        emp.work();
    }
5.复杂类型注入
①数组类型注入
在 Emp 类里面加一个数组属性private String[] hobbies;后生成get、set方法,编写xml文件
<!--    数组类型赋值-->
    <bean id="dept" class="com.hbnu.DITest.Dept"/>
    <bean id="emp" class="com.hbnu.DITest.Emp">
        <property name="ename" value="tom"/>
        <property name="age" value="34"/>
        <property name="dept" ref="dept"/>
        <property name="hobbies">
            <array>
                <value>抽烟</value><value>喝酒</value><value>烫头</value>
            </array>
        </property>
    </bean>
②集合类型注入
在Dept类里加一个员工listprivate List<Emp> empList;,一个部门里可以有多个员工
<!--    为list集合赋值-->
    <bean id="emp1" class="com.hbnu.DITest.Emp">
            <property name="ename" value="tom1"/>
            <property name="age" value="31"/>
    </bean>
    <bean id="emp2" class="com.hbnu.DITest.Emp">
        <property name="ename" value="tom2"/>
        <property name="age" value="32"/>
    </bean>
    <bean id="dept" class="com.hbnu.DITest.Dept">
        <property name="dname" value="技术部"/>
        <property name="empList">
            <list>
                <ref bean="emp1"></ref>
                <ref bean="emp2"></ref>
            </list>
        </property>
    </bean>
输出技术部里的员工:
Dept{dname='技术部', empList=[Emp{dept=null, ename='tom1', age='31', hobbies=null}, Emp{dept=null, ename='tom2', age='32', hobbies=null}]}
③map类型注入
创建Student和Teacher类
对于学生来说,一个学生对应多个讲师
<!--    map类型注入-->
    <bean id="teacherone" class="com.hbnu.DITest.Teacher">
        <property name="tid" value="121"/>
        <property name="tname" value="莉莉"/>
    </bean>
    <bean id="teachertwo" class="com.hbnu.DITest.Teacher">
        <property name="tid" value="122"/>
        <property name="tname" value="小月"/>
    </bean>
    <bean id="student" class="com.hbnu.DITest.Student">
        <property name="sid" value="111"/>
        <property name="sname" value="张三"/>
        <property name="teacherMap">
            <map>
                <entry>
                    <key>
                        <value>10010</value>
                    </key>
                    <ref bean="teacherone"></ref>
                </entry>
                <entry>
                    <key>
                        <value>10011</value>
                    </key>
                    <ref bean="teachertwo"></ref>
                </entry>
            </map>
        </property>
    </bean>
输出{10010=Teacher{Tname='莉莉', Tid='121'}, 10011=Teacher{Tname='小月', Tid='122'}}
④引用集合类型的bean
创建一个Lesson类(getter、setter、重写toString),再在Student类里面加一个 public List<Lesson> lessonList;,一个学生有多个老师,选多门课
<bean id="lesson1" class="com.hbnu.DITest.Lesson">
        <property name="lessonname" value="前端开发"/>
    </bean>
    <bean id="lesson2" class="com.hbnu.DITest.Lesson">
        <property name="lessonname" value="java开发"/>
    </bean>

    <bean id="teacher1" class="com.hbnu.DITest.Teacher">
        <property name="tname" value="张老师"/>
        <property name="tid" value="001"/>
    </bean>
    <bean id="teacher2" class="com.hbnu.DITest.Teacher">
        <property name="tname" value="王老师"/>
        <property name="tid" value="002"/>
    </bean>

    <bean id="student" class="com.hbnu.DITest.Student">
        <property name="sid" value="1000"/>
        <property name="sname" value="lucy"/>

<!--        注入list、map类型属性-->
        <property name="lessonList" ref="lessonlist"/>
        <property name="teacherMap" ref="teachermap"/>
    </bean>

    <util:list id="lessonlist">
        <ref bean="lesson1"/>
        <ref bean="lesson2"/>
    </util:list>
    <util:map id="teachermap">
        <entry>
            <key>
                <value>10010</value>
            </key>
            <ref bean="teacher1"/>
        </entry>
        <entry>
            <key>
                <value>10011</value>
            </key>
            <ref bean="teacher2"/>
        </entry>
    </util:map>
</beans>
xml文件的头部:
<?xml version="1.0" encoding="UTF-8"?>
<beans xmlns="http://www.springframework.org/schema/beans"
       xmlns:xsi="http://www.w3.org/2001/XMLSchema-instance"
       xmlns:util="http://www.springframework.org/schema/util"
       xsi:schemaLocation="http://www.springframework.org/schema/util
       http://www.springframework.org/schema/util/spring-util.xsd
       http://www.springframework.org/schema/beans
       http://www.springframework.org/schema/beans/spring-beans.xsd">
输出:
{10010=Teacher{Tname='张老师', Tid='001'}, 10011=Teacher{Tname='王老师', Tid='002'}}
[Lesson{lessonname='前端开发'}, Lesson{lessonname='java开发'}]
脱离数据库思想注入复杂类型,创建一个dataType类,里面拥有private String[] arr;private List<String> lists;private Map<String,String> maps;private Properties properties;属性,编写xml文件:
<!-- 注入复杂类型-->
<bean id="dataType" class="com.hbnu.pojo.DataType">
<!-- 1.注入数组类型-->
<property name="arr">
<list>
<value>斯蒂芬金</value>
<value>毛姆</value>
<value>陀思妥耶夫斯基</value>
<value>茨威格</value>
</list>
</property>
<!-- 2.注入list集合类型-->
<property name="lists">
<list>
<value>马克吐温</value>
<value>马克吐温</value>
<value>马克吐温</value>
<value>马克吐温</value>
</list>
</property>
<!-- 3.注入map集合类型-->
<property name="maps">
<map>
<entry key="username" value="雨果"/>
<entry key="age" value="1984"/>
</map>
</property>
<!-- 4.注入properties-->
<property name="properties">
<props>
<prop key="driverClass">com.mysql.cj.jdbc.Driver</prop>
<prop key="url">jdbc:mysql://localhost:3306/class2110?serverTimezone=GMT&useSSL=false</prop>
<prop key="username">root</prop>
<prop key="password">123456</prop>
</props>
</property>
</bean>
6.p命名空间
<!--    p命名空间注入-->
    <bean id="studentp" class="com.hbnu.DITest.Student"
    p:sid="100" p:sname="mary" p:lessonList-ref="lessonlist" p:teacherMap-ref="teachermap">
头部加一行
xmlns:p="http://www.springframework.org/schema/p"
7.bean的作用域
概念
在Spring中可以通过配置bean标签的scope属性来指定bean的作用域范围
| 取值 | 含义 | 创建对象的时机 |
|---|---|---|
| singleton | 在IOC容器中,这个bean的对象始终为单实例 | IOC容器初始化时 |
| prototype | 这个bean在IOC容器中有多个实例 | 获取bean时 |
    @Test
    public void testOrders(){
        ApplicationContext applicationContext=new ClassPathXmlApplicationContext("bean-ditest.xml");
        Orders orders=applicationContext.getBean("orders",Orders.class);
        Orders orders2=applicationContext.getBean("orders",Orders.class);
        System.out.println(orders);
        System.out.println(orders2);
    }
8.bean的生命周期
1.bean对象创建(调用无参数构造)
2.给bean对象设置相关属性
3.bean后置处理器(初始化之前)
4.bean对象初始化(调用指定初始化方法)
5.bean后置处理器(初始化之后)
6.bean对象创建完成
7.bean对象销毁(配置指定销毁的方法)
8.IoC容器关闭
3.4 基于注解管理bean
步骤:1.引入依赖 2.开启组件扫描 3.使用注解定义bean 4.依赖注入
1.开启组件扫描
开启组件扫描(开启此功能后,spring就会自动从扫描指定的包,及其子包下的所有类。如果类上使用了@Component注解,就将该类装配到容器中)
<context:component-scan base-package="com.hbnu"></context:component-scan>
2.使用注解定义bean
| 注解 | 说明 |
|---|---|
| @Component | 该注解用于描述Spring中的bean,仅仅表示容器中的一个组件,并且可以作用在应用的任何层次,例如Service层,Dao层。 |
| @Repository | 该注解用于将数据访问层(Dao层)的类标识为S加粗样式pring中的bean,其功能与@Component相同 |
| @Service | 该注解通常作用在业务层(Service层),用于将业务层的类标识为Spring中的bean,其功能与@Component相同 |
| @Controller | 该注解通常作用在控制层(如SpringMVC中的Controller),用于将控制层的类标识为Spring中的bean,其功能与@Component相同 |
3.@Autowired注入
注入可以理解为导包,注入后就可以调用方法
在controller里注入service,在service里注入dao
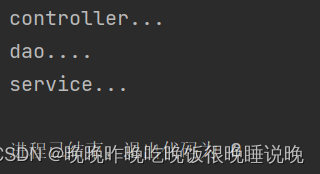
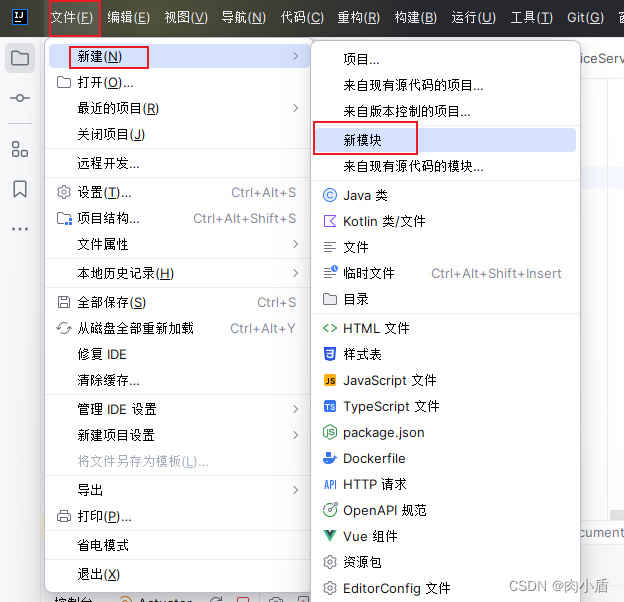
写个测试感受一下@Autowired注入…项目结构如下:
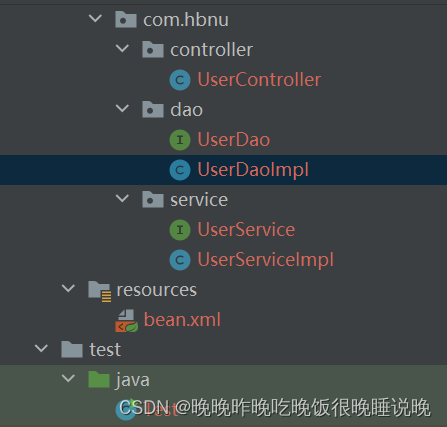
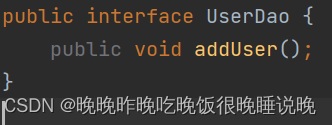
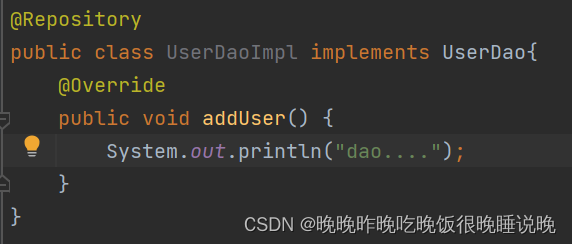
首先在bean.xml里编写代码进行包扫描,然后创建UserDao以及其实现类,
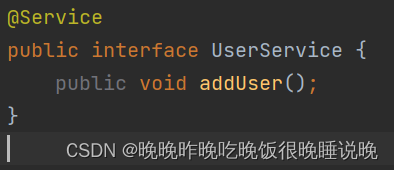
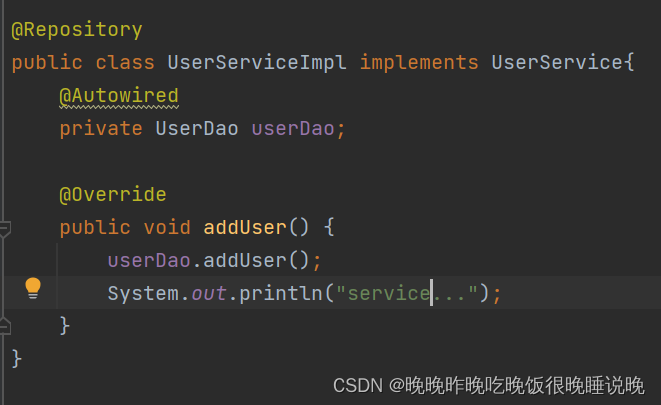
接着创建UserService以及其实现类,并将UserDao注入到UserService中。
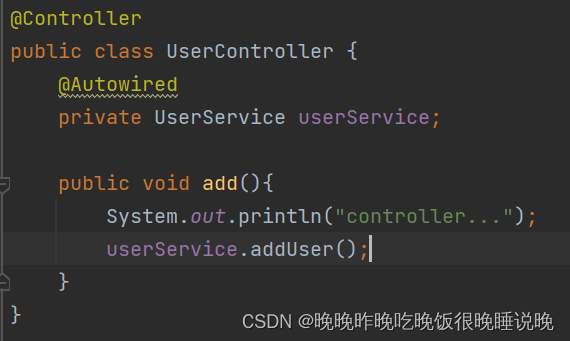
最后创建UserController,将UserService注入后进行测试。
public class Test {
    public static void main(String[] args) {
        ApplicationContext applicationContext=new ClassPathXmlApplicationContext("bean.xml");
        UserController userController=applicationContext.getBean(UserController.class);
        userController.add();
    }
}