1. Adapter(适配器模式)
适配器模式是一种结构型设计模式,它允许将一个类的接口转换成客户端所期望的另一个接口。这种模式通常用于解决接口不兼容的情况,使得原本由于接口不匹配而无法工作的类可以一起工作。
在 C++ 中,适配器模式可以通过类适配器和对象适配器两种方式来实现。
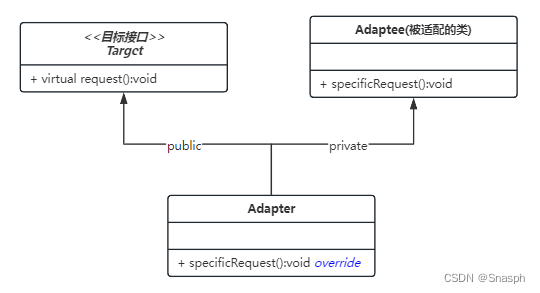
1.1 类适配器
使用多重继承实现适配器类,使其既继承目标接口,又继承被适配的类。
以下是模式示例:
#include <iostream>

// 目标接口
class Target {
public:
    virtual void request() = 0;
};

// 被适配的类
class Adaptee {
public:
    void specificRequest() {
        std::cout << "Specific request from Adaptee" << std::endl;
    }
};

// 类适配器,继承目标接口和被适配类
class Adapter : public Target, private Adaptee {
public:
    void request() override {
        specificRequest(); // 调用被适配类的方法
    }
};

int main() {
    Target* target = new Adapter();
    target->request();

    delete target;
    return 0;
}
1.2 对象适配器
使用对象组合实现适配器类,使其持有被适配的对象实例。

以下是模式示例:
#include <iostream>

// 目标接口
class Target {
public:
    virtual void request() = 0;
};

// 被适配的类
class Adaptee {
public:
    void specificRequest() {
        std::cout << "Specific request from Adaptee" << std::endl;
    }
};

// 对象适配器,持有被适配类的对象实例
class Adapter : public Target {
private:
    Adaptee* adaptee;

public:
    Adapter(Adaptee* adaptee) : adaptee(adaptee) {}

    void request() override {
        adaptee->specificRequest(); // 调用被适配类的方法
    }
};

int main() {
    Adaptee* adaptee = new Adaptee();
    Target* target = new Adapter(adaptee);
    target->request();

    delete target;
    delete adaptee;
    return 0;
}
无论是类适配器还是对象适配器,都可以实现将目标接口和被适配类进行适配,使得客户端可以统一调用目标接口的方法,而无需直接与被适配类打交道。
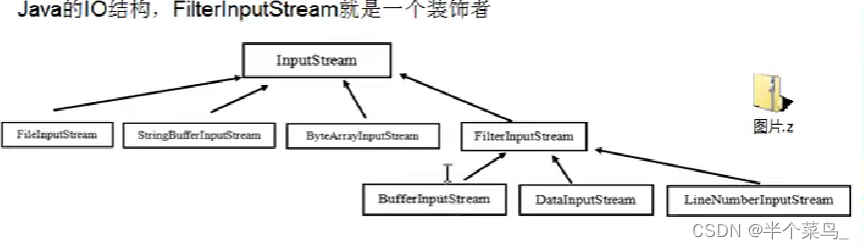
2. Decorator(装饰器模式)
装饰器模式是一种结构型设计模式,它允许向现有对象添加新功能,同时又不改变其结构。这种模式通过创建包装类(装饰器)来实现,在包装类中包含一个指向被包装对象的引用,并且实现与被包装对象相同的接口。
2.1 使用继承实现装饰器模式

以下是模式示例:
#include <iostream>

// 抽象组件
class Component {
public:
    virtual void operation() = 0;
};

// 具体组件
class ConcreteComponent : public Component {
public:
    void operation() override {
        std::cout << "Concrete Component operation" << std::endl;
    }
};

// 抽象装饰器
class Decorator : public Component {
protected:
    Component* component;

public:
    Decorator(Component* comp) : component(comp) {}

    void operation() override {
        if (component != nullptr) {
            component->operation();
        }
    }
};

// 具体装饰器A
class ConcreteDecoratorA : public Decorator {
public:
    ConcreteDecoratorA(Component* comp) : Decorator(comp) {}

    void operation() override {
        Decorator::operation();
        addBehaviorA();
    }

    void addBehaviorA() {
        std::cout << "Added behavior A" << std::endl;
    }
};

// 具体装饰器B
class ConcreteDecoratorB : public Decorator {
public:
    ConcreteDecoratorB(Component* comp) : Decorator(comp) {}

    void operation() override {
        Decorator::operation();
        addBehaviorB();
    }

    void addBehaviorB() {
        std::cout << "Added behavior B" << std::endl;
    }
};

int main() {
    Component* component = new ConcreteComponent();
    Component* decoratedA = new ConcreteDecoratorA(component);
    Component* decoratedB = new ConcreteDecoratorB(decoratedA);

    decoratedB->operation();

    delete decoratedB;
    delete decoratedA;
    delete component;

    return 0;
}
2.2 使用组合实现装饰器模式
当使用组合实现装饰器模式时,装饰器类将持有一个对被装饰对象的引用,并在其基础上添加额外的功能
#include <iostream>

// 抽象组件
class Component {
public:
    virtual void operation() = 0;
};

// 具体组件
class ConcreteComponent : public Component {
public:
    void operation() override {
        std::cout << "Concrete Component operation" << std::endl;
    }
};

// 抽象装饰器
class Decorator : public Component {
protected:
    Component* component;

public:
    Decorator(Component* comp) : component(comp) {}

    void operation() override {
        if (component != nullptr) {
            component->operation();
        }
    }
};

// 具体装饰器A
class ConcreteDecoratorA : public Decorator {
public:
    ConcreteDecoratorA(Component* comp) : Decorator(comp) {}

    void operation() override {
        Decorator::operation();
        addBehaviorA();
    }

    void addBehaviorA() {
        std::cout << "Added behavior A" << std::endl;
    }
};

// 具体装饰器B
class ConcreteDecoratorB : public Decorator {
public:
    ConcreteDecoratorB(Component* comp) : Decorator(comp) {}

    void operation() override {
        Decorator::operation();
        addBehaviorB();
    }

    void addBehaviorB() {
        std::cout << "Added behavior B" << std::endl;
    }
};

int main() {
    Component* component = new ConcreteComponent();
    Decorator* decoratedA = new ConcreteDecoratorA(component);
    Decorator* decoratedB = new ConcreteDecoratorB(decoratedA);

    decoratedB->operation();

    delete decoratedB;
    delete decoratedA;
    delete component;

    return 0;
}
 3. Proxy(代理模式)
代理模式是一种结构型设计模式,它允许通过一个代理对象控制对另一个对象的访问。代理模式可以用于各种场景,例如:远程代理、虚拟代理、保护代理等,以实现对目标对象的访问控制、延迟加载、缓存等功能。
在 C++ 中,代理模式可以通过以下方式实现:
①. 虚拟代理(Virtual Proxy):延迟加载对象,在需要时才真正创建对象。
②. 保护代理(Protection Proxy):控制对象的访问权限,提供额外的安全性。
③. 远程代理(Remote Proxy):在不同地址空间中代表对象,实现远程通信。
以下是模式示例:
#include <iostream>
#include <string>

// 抽象主题
class Subject {
public:
    virtual void request() = 0;
};

// 具体主题
class RealSubject : public Subject {
public:
    void request() override {
        std::cout << "Real Subject request" << std::endl;
    }
};

// 代理类
class Proxy : public Subject {
private:
    RealSubject* realSubject;
    bool initialized;

public:
    Proxy() : realSubject(nullptr), initialized(false) {}

    void request() override {
        if (!initialized) {
            lazyInit();
        }
        realSubject->request();
    }

    void lazyInit() {
        std::cout << "Proxy initializing..." << std::endl;
        realSubject = new RealSubject();
        initialized = true;
    }
};

int main() {
    Proxy proxy;
    proxy.request();

    return 0;
}
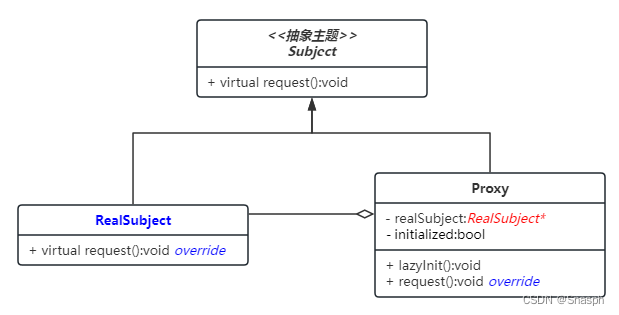
在上面的示例中,Subject 是抽象主题类,定义了对实际主题进行操作的接口。RealSubject 是具体主题类,实现了真正的业务逻辑。Proxy 是代理类,延迟初始化 RealSubject 对象,并在需要时调用其方法。
当运行主函数时,代理对象首先进行了延迟初始化(虚拟代理的特性),然后通过代理对象调用实际主题的方法,实现了对实际主题的代理访问。
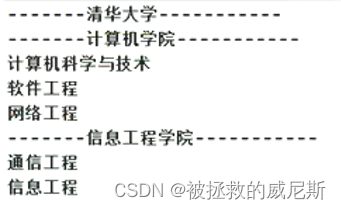
4. Composite(组合模式)
组合模式是一种结构型设计模式,它允许将对象组合成树形结构以表示“部分-整体”的层次关系。组合模式使得客户端可以统一处理单个对象和对象组合,从而使得客户端代码更加简单且具有一致性。
在 C++ 中,组合模式通常涉及以下几个角色:
①. Component(组件):是组合中的对象声明接口,在适当的情况下,实现所有类共有接口的缺省行为。可以是抽象类或接口。
②. Leaf(叶子节点):是组合中的叶节点对象,它没有子节点。
③. Composite(复合节点):是组合中的复合对象,它有子节点。通常实现了在 Component 接口中定义的操作,这些操作可以通过递归调用子节点来实现。

以下是模式示例:
#include <iostream>
#include <string>
#include <vector>

// 抽象组件类
class Component {
public:
    virtual void operation() const = 0;
};

// 叶子节点类
class Leaf : public Component {
private:
    std::string name;

public:
    Leaf(const std::string& name) : name(name) {}

    void operation() const override {
        std::cout << "Leaf " << name << " operation" << std::endl;
    }
};

// 复合节点类
class Composite : public Component {
private:
    std::vector<Component*> children;

public:
    void add(Component* component) {
        children.push_back(component);
    }

    void remove(Component* component) {
        // 省略移除逻辑
    }

    void operation() const override {
        for (Component* child : children) {
            child->operation();
        }
    }
};

int main() {
    Leaf leafA("A");
    Leaf leafB("B");

    Composite composite;
    composite.add(&leafA);
    composite.add(&leafB);

    composite.operation();

    return 0;
}
在上述示例中,我们定义了 Component 抽象组件类,Leaf 叶子节点类和 Composite 复合节点类。叶子节点表示组合中的最终节点,而复合节点表示可以包含子节点的节点。在 main 函数中,我们创建了两个叶子节点 leafA 和 leafB,然后将它们添加到了复合节点 composite 中,最后通过复合节点的 operation 方法调用了所有子节点的 operation 方法,实现了对整个组合结构的统一处理。
5. Facade(外观模式)
外观模式是一种结构型设计模式,它提供了一个统一的接口,用于访问子系统中的一群接口。外观模式定义了一个高层接口,这个接口使得子系统更容易使用。
在 C++ 中,外观模式通常包括以下几个角色:
①. Facade(外观):对客户端提供简单的接口,隐藏了系统的复杂性,提供了对子系统的统一访问接口。
②. Subsystems(子系统):包含了一组相关的类和接口,实现了系统的功能。

以下是模式示例:
#include <iostream>

// 子系统A
class SubsystemA {
public:
    void operationA() const {
        std::cout << "SubsystemA operation" << std::endl;
    }
};

// 子系统B
class SubsystemB {
public:
    void operationB() const {
        std::cout << "SubsystemB operation" << std::endl;
    }
};

// 子系统C
class SubsystemC {
public:
    void operationC() const {
        std::cout << "SubsystemC operation" << std::endl;
    }
};

// 外观类
class Facade {
private:
    SubsystemA subsystemA;
    SubsystemB subsystemB;
    SubsystemC subsystemC;

public:
    void operation() const {
        subsystemA.operationA();
        subsystemB.operationB();
        subsystemC.operationC();
    }
};

int main() {
    Facade facade;
    facade.operation();

    return 0;
}
6. Bridge(桥接模式)
桥接模式是一种结构型设计模式,它将抽象部分与其实现部分分离,使它们可以独立变化,从而达到解耦的目的。桥接模式通过组合而不是继承的方式来实现这种分离。
在 C++ 中,桥接模式通常涉及以下几个角色:
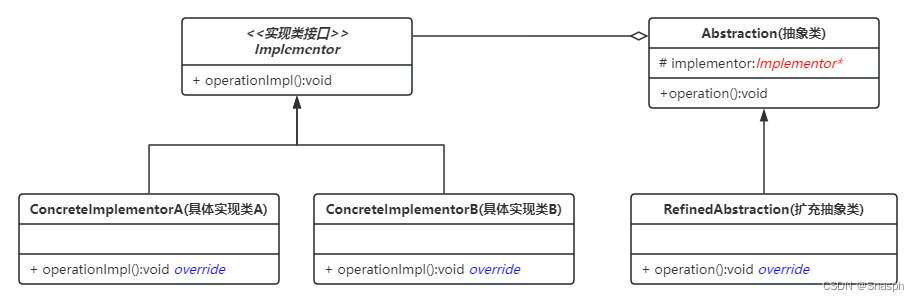
①. Abstraction(抽象类):定义抽象部分的接口,并维护一个对实现部分对象的引用。
②. Implementor(实现类接口):定义实现部分的接口,它与抽象部分接口保持一致。
③. ConcreteImplementor(具体实现类):实现实现类接口,提供具体的实现。
④. RefinedAbstraction(扩充抽象类):扩展抽象部分的接口,通常通过组合的方式来调用实现部分的方法。
以下是模式示例:
#include <iostream>

// 实现类接口
class Implementor {
public:
    virtual void operationImpl() const = 0;
};

// 具体实现类A
class ConcreteImplementorA : public Implementor {
public:
    void operationImpl() const override {
        std::cout << "Concrete Implementor A operation" << std::endl;
    }
};

// 具体实现类B
class ConcreteImplementorB : public Implementor {
public:
    void operationImpl() const override {
        std::cout << "Concrete Implementor B operation" << std::endl;
    }
};

// 抽象类
class Abstraction {
protected:
    Implementor* implementor;

public:
    Abstraction(Implementor* impl) : implementor(impl) {}

    virtual void operation() const = 0;
};

// 扩充抽象类
class RefinedAbstraction : public Abstraction {
public:
    RefinedAbstraction(Implementor* impl) : Abstraction(impl) {}

    void operation() const override {
        implementor->operationImpl();
    }
};

int main() {
    Implementor* implA = new ConcreteImplementorA();
    Implementor* implB = new ConcreteImplementorB();

    Abstraction* abs1 = new RefinedAbstraction(implA);
    Abstraction* abs2 = new RefinedAbstraction(implB);

    abs1->operation();
    abs2->operation();

    delete abs2;
    delete abs1;
    delete implB;
    delete implA;

    return 0;
}
在上述示例中,定义了 Implementor 实现类接口和两个具体实现类 ConcreteImplementorA 和 ConcreteImplementorB。然后定义了抽象类 Abstraction,它维护了一个对实现类的引用,并定义了抽象方法 operation。最后,定义了扩充抽象类 RefinedAbstraction,它通过组合的方式调用了实现类的方法。
在 main 函数中,创建了具体实现类的对象,并将其传递给扩充抽象类,通过调用 operation 方法来间接调用具体实现类的方法,从而实现了抽象部分与实现部分的解耦。
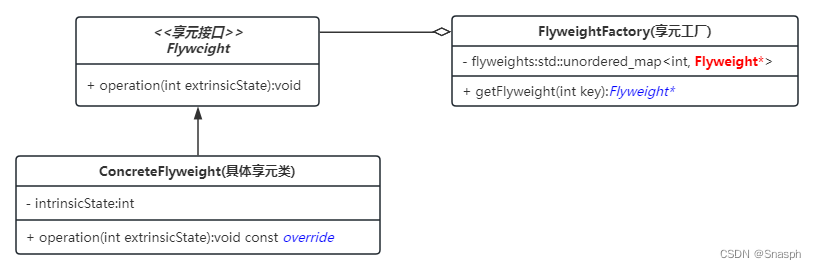
7. Flyweight(享元模式)
享元模式(Flyweight Pattern)是一种结构型设计模式,它旨在通过共享对象来减少内存使用和提高性能。该模式适用于存在大量相似对象,且这些对象可以共享部分状态的情况。
在 C++ 中,享元模式通常涉及以下几个角色:
①. Flyweight(享元接口):定义共享对象的接口,可以接受外部状态作为参数。
②. ConcreteFlyweight(具体享元类):实现享元接口,并存储内部状态。具体享元类通常是可共享的。
③. UnsharedConcreteFlyweight(非共享具体享元类):如果享元对象不可共享,则创建非共享具体享元类。
④. FlyweightFactory(享元工厂):用于创建和管理享元对象,通常实现了享元对象的池化管理。
以下是模式示例:
#include <iostream>
#include <unordered_map>

// 享元接口
class Flyweight {
public:
    virtual void operation(int extrinsicState) const = 0;
};

// 具体享元类
class ConcreteFlyweight : public Flyweight {
private:
    int intrinsicState;

public:
    ConcreteFlyweight(int intrinsicState) : intrinsicState(intrinsicState) {}

    void operation(int extrinsicState) const override {
        std::cout << "Concrete Flyweight with intrinsic state " << intrinsicState;
        std::cout << " and extrinsic state " << extrinsicState << std::endl;
    }
};

// 享元工厂
class FlyweightFactory {
private:
    std::unordered_map<int, Flyweight*> flyweights;

public:
    Flyweight* getFlyweight(int key) {
        if (flyweights.find(key) != flyweights.end()) {
            return flyweights[key];
        } else {
            // 通过共享具有相同内部状态的享元对象,可以减少内存使用和提高性能;
            Flyweight* flyweight = new ConcreteFlyweight(key);
            flyweights[key] = flyweight;
            return flyweight;
        }
    }

    ~FlyweightFactory() {
        for (auto& pair : flyweights) {
            delete pair.second;
        }
        flyweights.clear();
    }
};

int main() {
    FlyweightFactory factory;

    Flyweight* flyweight1 = factory.getFlyweight(1);
    flyweight1->operation(100);

    Flyweight* flyweight2 = factory.getFlyweight(2);
    flyweight2->operation(200);

    Flyweight* flyweight3 = factory.getFlyweight(1);
    flyweight3->operation(300);

    delete flyweight3;
    delete flyweight2;
    delete flyweight1;

    return 0;
}