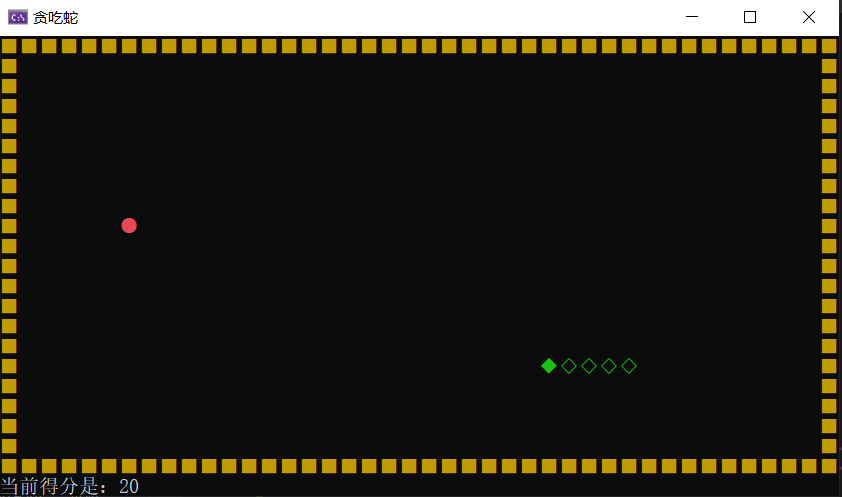
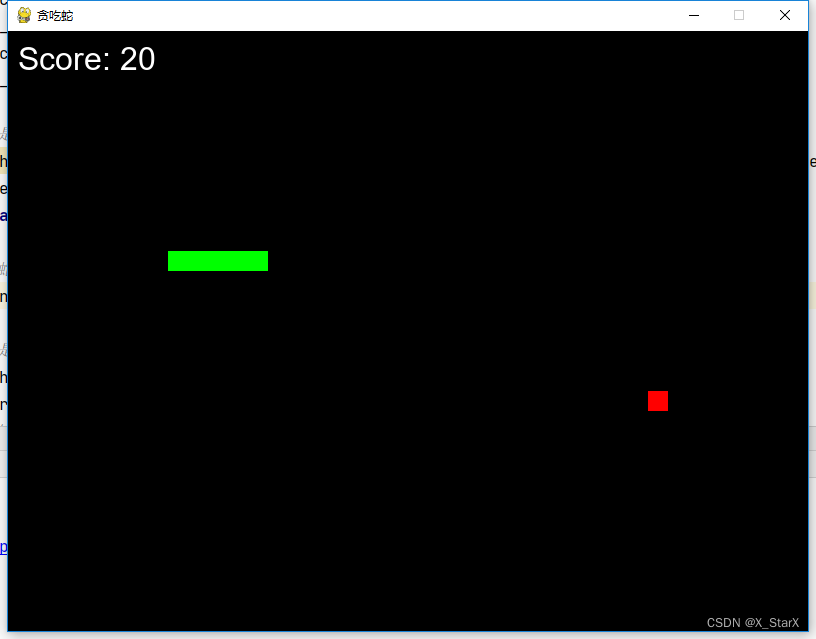
It's excited to show you how to code the “Snake Game” in Rust! I feel that Snake is the perfect program to showcase your skills. This Snake game has multiple different components.
本文将向您展示如何用 Rust 编写“贪吃蛇游戏”!我觉得贪吃蛇游戏是展示你技能的完美程序,它由多个不同的组件组成。
Basic information about the Components of the Game
有关游戏组件的基本信息
🐍 The Snake can move in all directions. If our Snake eats an apple, it will grow by one “point”. When we push an arrow button, the head will move up or down or left or right. The Snake cannot touch itself. For example, if it’s going to the left and I push the right key, it won’t be able to go backward, this would cause the game to enter a fail state because the Snake cannot actually touch itself. If the Snake touches itself, it dies and we have to restart the game. Also, if the Snake hits the wall, it dies. Those are the two main failure states for the game.
🐍 蛇可以向各个方向移动。如果我们的蛇吃了一个苹果,它就会增长一个“点”。当我们按下箭头按钮时,头部会向上、向下、向左或向右移动。蛇无法触及自己。例如,如果它向左移动,而我按了右键,它就无法后退,这会导致游戏进入失败状态,因为蛇实际上无法触及自己。如果蛇碰到了自己,它就会死,我们必须重新开始游戏。另外,如果蛇撞到墙上,它就会死。这是游戏的两个主要失败状态。
🍎 The second component is the Apple. In most Snake games, the Apple appears at random places. With this game, you’ll notice that the Apple appears at the same place every time we start the game. The same with the Snake. The Snake will appear at a fixed place every time we restart it.
🍎 第二个组件是Apple。在大多数贪吃蛇游戏中,苹果出现在随机位置。在这个游戏中,你会注意到每次我们启动游戏时苹果都会出现在同一个地方。与蛇相同。每次我们重新启动时,蛇都会出现在固定的位置。
🧱 The third component is the walls. The walls will be represented as a rectangle that goes around the entire border of our game board. The Snake cannot pass through the walls.
🧱 第三个组成部分是墙壁。墙壁将表示为围绕游戏板整个边界的矩形。蛇不能穿过墙壁。
🕹️ Finally, we have the game board itself. This will be a 2D plane that the Snake moves along and that the Apple spawns in.
🕹️最后,我们有了游戏板本身。这将是一个 2D 平面,蛇会沿着该平面移动,苹果会在其中生成。
You’ll need to create these 4 files:
您需要创建这 4 个文件:
- main.rs
- draw.rs
- snake.rs
- game.rs
Dependencies 依赖关系
Cargo.toml
In the Cargo file, we want to add two dependencies.
在 Cargo 文件中,我们要添加两个依赖项。
rand = "0.8.5"
piston_window = "0.131.0"
The first dependency is rand (for random), this is a library that will allow us to deal with the random numbers for our Apple.
第一个依赖项是 rand (随机),这是一个库,允许我们处理 Apple 的随机数。
The second dependency is piston_window. This will allow us to render our elements with a UI as well as deal with some of the game logic.
第二个依赖项是 piston_window 。这将使我们能够使用 UI 渲染元素并处理一些游戏逻辑。
Tip: When you write the dependencies you can use inside the quotes an asterisk for the version numbers. Then go to the terminal, typecargo updateand this will update all of your dependencies in thecargo.lockfile. If we go to thelockfile, we can search out the two libraries, then copy the number and replace the asterisk back in thetomlfile.
提示:编写依赖项时,可以在引号内使用星号来表示版本号。然后转到终端,输入 cargo update ,这将更新 cargo.lock 文件中的所有依赖项。如果我们转到 lock 文件,我们可以搜索出这两个库,然后复制数字并将星号替换回 toml 文件中。
rand = "*"
piston_window = "*"
The reason it’s important to use static versions is just in case the library actually changes. If the syntax changes, then the game will not work properly anymore because we will be behind the API. Normally, libraries try to keep a consistent API, but sometimes it does change.
使用静态版本很重要的原因是为了防止库实际发生变化。如果语法发生变化,那么游戏将无法正常运行,因为我们将落后于 API。通常,库会尝试保持一致的 API,但有时它确实会发生变化。
main.rs
In the main we'll have: rand and piston_window crate.
在 main 中,我们将有: rand 和 piston_window 箱子。
extern crate piston_window;
extern crate rand;
draw.rs
Add draw.rs to the main.rs -> mod draw;
将draw.rs添加到main.rs -> mod draw;
Now let’s start working on some helper functions!
现在让我们开始研究一些辅助函数!
The imports that we want to make inside our draw file are about piston_window.
我们想要在 draw 文件中进行的导入是关于 piston_window 的。
use piston_window::{rectangle, Context, G2d};
use piston_window::types::Color;
Now, the first thing we want to do is to create a BLOCK_SIZE constant. Constants in Rust, like many other programming languages, require that we use uppercase letters and we need to specify the type annotation and what the value is equal to. In this case, we want it to be equal to 25. This means our blocks will scale up 25 pixels.
现在,我们要做的第一件事是创建一个 BLOCK_SIZE 常量。 Rust 中的常量与许多其他编程语言一样,要求我们使用大写字母,并且需要指定类型注释以及值等于什么。在本例中,我们希望它等于 25。这意味着我们的块将放大 25 个像素。
const BLOCK_SIZE: f64 = 25.0;
Functions: to_coord , draw_block and draw_rectangle
函数: to_coord 、 draw_block 和 draw_rectangle
Now we want to create a function to_coord, this will take in a game coordinate which will be an i32 and then we want to return an f64. So what we're just doing with this helper function is taking in a coordinate.
现在我们要创建一个函数 to_coord ,它将接受一个 i32 的游戏坐标,然后我们想要返回一个 f64。所以我们用这个辅助函数所做的就是获取坐标。
pub fn to_coord(game_coord: i32) -> f64 {
    (game_coord as f64) * BLOCK_SIZE
}
We’re going to cast it to an f64 and then multiply it by our block size. Also we’re using the pub keyword, which allows us to export this function and make it public to our entire program.
我们将把它转换为 f64,然后将其乘以我们的块大小。此外,我们还使用 pub 关键字,它允许我们导出此函数并将其公开给我们的整个程序。
Alright so now let’s look at our first major public helper function (we want to draw a block):
好吧,现在让我们看看我们的第一个主要公共辅助函数(我们想要画一个块):
pub fn draw_block(color: Color, x: i32, y: i32, con: &Context, g: &mut G2d) {
    let gui_x = to_coord(x);
    let gui_y = to_coord(y);

    rectangle(
        color,
        [gui_x, gui_y, BLOCK_SIZE, BLOCK_SIZE],
        con.transform,
        g,
    );
}
We’re passing a color, and an X and a Y, both are i32. We also need to pass in the context and a G2d . Then we call our rectangle and pass in a color and the actual parameters for the rectangle and then the width and the height. Finally, we need to pass in the context transform and our g.
我们传递一个 color 、一个 X 和一个 Y ,两者都是 i32 。我们还需要传入 context 和 G2d 。然后我们调用矩形并传入矩形的颜色和实际参数,然后是宽度和高度。最后,我们需要传入 context transform 和 g 。
Next we want to create a public function called draw_rectangle. This will be a slight modification on the draw_block function. We're still passing in a color and the X and the Y, but next we're also passing in the width and the height (this will allow us to draw rectangles). The only real difference is that we take the block size and we multiply it by the width, cast it as an f64 and the height casts it as an f64. This way we can control the size of our rectangle. (We're going to mainly use this for the size of our board).
接下来我们要创建一个名为 draw_rectangle 的公共函数。这将是对 draw_block 函数的轻微修改。我们仍然传递 color 和 X 和 Y ,但接下来我们还要传递 width 和 height (这将允许我们绘制矩形)。唯一真正的区别是,我们将块大小乘以宽度,将其转换为 f64 ,将高度转换为 f64 。这样我们就可以控制矩形的大小。 (我们将主要将其用于我们电路板的尺寸)。
pub fn draw_rectangle(
    color: Color,
    x: i32,
    y: i32,
    width: i32,
    height: i32,
    con: &Context,
    g: &mut G2d,
) {
    let x = to_coord(x);
    let y = to_coord(y);

    rectangle(
        color,
        [
            x,
            y,
            BLOCK_SIZE * (width as f64),
            BLOCK_SIZE * (height as f64),
        ],
        con.transform,
        g,
    );
}
These are our helper functions in draw.js. We'll need one more later but for now we are OK!
这些是 draw.js 中的辅助函数。稍后我们还需要一份,但现在我们还好!
snake.rs
Let’s move to the snake.rs file. In this file we're going to tie most of the logic that we need to actually create our snake.
让我们转到 snake.rs 文件。在这个文件中,我们将绑定实际创建蛇所需的大部分逻辑。
Imports: First we’re importing from the standard library collections a type called LinkedList. A linked list allows pushing and popping elements from either end. Next, we're bringing in our context and our graphical buffer again. We're also bringing in the color type.
导入:首先,我们从标准库集合中导入一个名为 LinkedList 的类型。链表允许从任一端推送和弹出元素。接下来,我们再次引入 context 和 graphical buffer 。我们还引入了 color 类型。
use std::collections::LinkedList;
use piston_window::{Context, G2d};
use piston_window::types::Color;
Let’s also bring the draw_block function from the draw.rs file.
我们还从 draw.rs 文件中引入 draw_block 函数。
use crate::draw::draw_block;
At this point, don’t forget to add the snake.rs to the main.rs file.
此时,不要忘记将 snake.rs 添加到 main.rs 文件中。
mod snake;Next, we want to create a constant for our snake color. It’s an array of four elements. Each element corresponds with a part of the color spectrum. The first item is our red element. The second item is our green element. The third item is our blue element. And then the fourth element is our opacity. We want to have a green snake hence I’ll have this as 0.80 and we want it to have 1.0 opacity.
接下来,我们要为蛇的颜色创建一个常量。它是一个由四个元素组成的数组。每个元素对应于色谱的一部分。第一项是我们的红色元素。第二项是我们的绿色元素。第三项是我们的蓝色元素。第四个元素是我们的不透明度。我们想要一条绿色的蛇,因此我将其设置为 0.80 并且我们希望它具有 1.0 的不透明度。
const SNAKE_COLOR: Color = [0.00, 0.80, 0.00, 1.0];
The next thing we want to do is create an enum for the direction. The enum will handle the direction of the snake as well as how our keyboard inputs interact with the snake. We want the snake to be able to go up, down, left, and right on our screen.
我们要做的下一件事是为方向创建一个 enum 。 enum 将处理蛇的方向以及我们的键盘输入如何与蛇交互。我们希望蛇能够在屏幕上向上、向下、向左、向右移动。
pub enum Direction {
    Up,
    Down,
    Left,
    Right,
}
I want to do one more thing: If the snake is going up and I try to hit down, the snake shouldn’t be able to go down. Let’s see how to implement this:
我还想做一件事:如果蛇正在上升,而我尝试向下击打,那么蛇应该无法下降。让我们看看如何实现:
impl Direction {
    pub fn opposite(&self) -> Direction {
        match *self {
            Direction::Up => Direction::Down,
            Direction::Down => Direction::Up,
            Direction::Left => Direction::Right,
            Direction::Right => Direction::Left,
        }
    }
}
As you can see above, we have a new public function opposite that takes in a reference to &self and outputs a Direction. Then we match with *self.
正如您在上面看到的,我们有一个新的公共函数 opposite ,它接受对 &self 的引用并输出 Direction 。然后我们 match 和 *self 。
- If the direction is up, then pass back direction down.
如果方向向上,则返回向下方向。 - If the direction is down, pass back direction up.
如果方向向下,则返回向上方向。 - Etc…
Next, we want to create a struct for our block type. We want to have an X and a Y, both of i32.
接下来,我们要为块类型创建一个 struct 。我们想要一个 X 和一个 Y ,两者都是 i32 。
struct Block {
    x: i32,
    y: i32,
}
And inside of Snake, we want to have the following states:
在 Snake 内部,我们希望具有以下状态:
pub struct Snake {
    direction: Direction,
    body: LinkedList<Block>,
    tail: Option<Block>,
}- The direction that the snake is currently traveling in.
蛇当前行进的方向。 - The body of the snake, which will be a
LinkedListof blocks.
蛇的身体,将是一个LinkedList块。 - The tail, which will be an
Option<Block>. (This is important because we want to have our tail be an actual value when we eat an apple.)
尾部,将是Option<Block>。 (这很重要,因为当我们吃苹果时,我们希望尾巴是一个实际值。)
Now we want to create an implementation block for our Snake so that we can create methods. We’re going to create a function called new , it will take in an X and a Y value and output our Snake.
现在我们想为 Snake 创建一个实现块,以便我们可以创建方法。我们将创建一个名为 new 的函数,它将接受 X 和 Y 值并输出 Snake 。
impl Snake {
    pub fn new(x: i32, y: i32) -> Snake {
        let mut body: LinkedList<Block> = LinkedList::new();
        body.push_back(Block {
            x: x + 2,
            y,
        });
        body.push_back(Block {
            x: x + 1,
            y,
        });
        body.push_back(Block {
            x,
            y,
        });

        Snake {
            direction: Direction::Right,
            body,
            tail: None,
        }
    }
.
.
}
We will create a mutable body, which will be a linked list of blocks. Then we'll use the push_back method (it appends an element to the back of a list). Essentially, what we're doing here is we're setting up the default Snake.
我们将创建一个可变的 body ,它将是块的链接列表。然后我们将使用 push_back 方法(它将一个元素附加到列表的后面)。本质上,我们在这里所做的是设置默认的 Snake。
- Our first block is
XandY.
我们的第一个块是X和Y。 - Our second block is an
`x+1`.
我们的第二个块是`x+1`。 - Our third block is
Yand thenX+2.
我们的第三个块是Y,然后是X+2。
So our Snake will be horizontal with the X and Y coordinate. It will also start out moving in the direction of right and the tail will be none. It will be exactly three blocks long.
所以我们的 Snake 将与 X 和 Y 坐标水平。它也将开始朝右方向移动,并且尾巴将消失。它正好是三个街区长。
Functions: draw , head_position , move_forward
函数: draw 、 head_position 、 move_forward
We want to create a function called draw. It will take in a reference to &self, the context, and our graphical buffer. Then we will iterate through our list.
我们要创建一个名为 draw 的函数。它将引用 &self 、 context 和我们的 graphical buffer 。然后我们将迭代我们的列表。
pub fn draw(&self, con: &Context, g: &mut G2d) {
   for block in &self.body {
        draw_block(SNAKE_COLOR, block.x, block.y, con, g);
   }
}
We’ll call our draw_block function on each of the blocks of the Snake with our SNAKE_COLOR inside of it. (This will render out a green snake.)
我们将在 Snake 的每个块上调用 draw_block 函数,并将 SNAKE_COLOR 放入其中。 (这将渲染出一条绿色的蛇。)
Now we want to create a head_position function. It will take a mutable &self variable and then it will output a tuple of i32. We'll find the head of our Snake by using the self.body.front() method. Our return will be head_block.x and head_block.y.
现在我们要创建一个 head_position 函数。它将采用可变的 &self 变量,然后输出 tuple 的 i32 。我们将使用 self.body.front() 方法找到蛇的头部。我们的回报将是 head_block.x 和 head_block.y 。
pub fn head_position(&self) -> (i32, i32) {
        let head_block = self.body.front().unwrap();
        (head_block.x, head_block.y)
    }
Then, we’re going to create a move_forward function. It will take in a mutable Snake reference and a dir which will be an Option with a Direction inside of it. First, we'll match on dir to get the option away from it.
然后,我们将创建一个 move_forward 函数。它将接受一个可变的 Snake 引用和一个 dir ,它是一个 Option ,里面有一个 Direction 。首先,我们将 match 放在 dir 上以获取该选项。
pub fn move_forward(&mut self, dir: Option<Direction>) {
   match dir {
       Some(d) => self.direction = d,
       None => (),
   }

    let (last_x, last_y): (i32, i32) = self.head_position();
.
.
}
Now let’s work on the direction.
现在我们就朝着这个方向努力吧。
If we’re going in Direction::Up then we're going to create a new Block (this is going to end up on the head of our snake).
如果我们要进入 Direction::Up ,那么我们将创建一个新的 Block (这将最终出现在蛇的头上)。
let new_block = match self.direction {
            Direction::Up => Block {
                x: last_x,
                y: last_y - 1,
            },
            Direction::Down => Block {
                x: last_x,
                y: last_y + 1,
            },
            Direction::Left => Block {
                x: last_x - 1,
                y: last_y,
            },
            Direction::Right => Block {
                x: last_x + 1,
                y: last_y,
            },
};
Note: 🎶Hello Math my old friend…! As we go down this is actually the positive Y axis. For actually moving downwards we’re moving up the Y axis. Now left and right are as you would actually imagine them. For left we’re subtracting 1 and then for right we’re adding 1.
注意:🎶数学你好,我的老朋友……!当我们向下走时,这实际上是正 Y 轴。为了实际向下移动,我们正在 Y 轴上移动。现在左和右就像你实际想象的那样。对于左边我们减 1,然后对于右边我们加 1。
To recap, we’re removing the last block and adding a new one in front.
回顾一下,我们删除了最后一个块并在前面添加了一个新块。
Let’s push this into the front of our list:
让我们把它放到列表的前面:
self.body.push_front(new_block);
let removed_block = self.body.pop_back().unwrap();
self.tail = Some(removed_block);
We call self.body.pop_back(), this will pop off the back part of our linked list. And then we use that unwrapmethod again. Finally, we set self.tail equal to Some(removed_block).
我们调用 self.body.pop_back() ,这将从链接列表的后面部分弹出。然后我们再次使用该 unwrap 方法。最后,我们将 self.tail 设置为等于 Some(removed_block) 。
Alright folks, since this article is getting too long and a bit hard to manage, and quite frankly we have some more steps and concepts to cover, I’ll create a part 2 where we’ll finish the snake.rs file, and also continue with the rest of the files we created at the beginning of this tutorial.
好吧,各位,由于本文太长并且有点难以管理,而且坦率地说,我们还有更多步骤和概念要介绍,我将创建第 2 部分,我们将在其中完成 snake.rs 文件,并继续处理我们在本教程开始时创建的其余文件。
In this tutorial, we explored how to create a Snake game in Rust, focusing on setting up the game environment and initializing key components such as the snake, apple, walls, and game board. We discussed adding necessary dependencies via Cargo.toml, and started coding the main.rs, draw.rs, and snake.rs, where we defined functions and structures essential for the game’s functionality. We also introduced drawing functions and snake movement logic, setting the stage for further development in a subsequent part of the tutorial.
在本教程中,我们探索了如何使用 Rust 创建贪吃蛇游戏,重点介绍了游戏环境的设置以及蛇、苹果、墙壁和游戏板等关键组件的初始化。我们讨论了通过 Cargo.toml 添加必要的依赖项,并开始对 main.rs、draw.rs 和 Snake.rs 进行编码,我们在其中定义了游戏功能所必需的函数和结构。我们还介绍了绘图函数和蛇运动逻辑,为本教程后续部分的进一步开发奠定了基础。
You can already find all the code here.
您可以在此处找到所有代码。
本文第二部分:
Happy Rust Coding! 🤞🦀 Rust 编码快乐! 🤞🦀