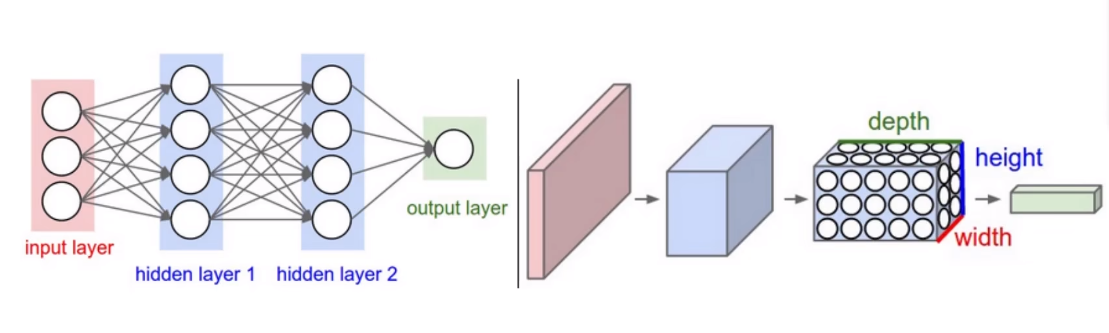
是在BP实战猫狗分类的基础上修改的
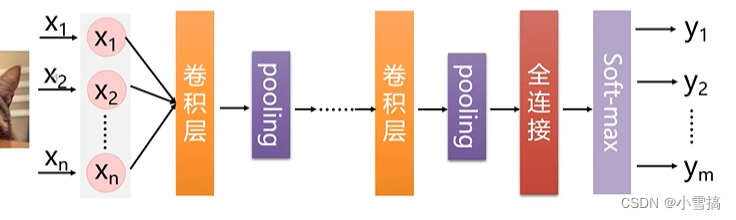
卷积层->relu->池化层->全连接
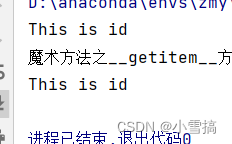
魔术方法__getitem__与__len__
__len__:返回容器中元素的个数;
# __ len__():返回元素的数量
class Test_len(object):
    def __init__(self, *args):
        self.names = args
    def __len__(self):
        print("魔术方法之__len__方法")
        return len(self.names)
res02 = Test_len('Bob', 'Alice', 'Tom')
print(len(res02)) 
__getitem__:如果在类中定义了这个__getitem__ 方法,那么它的实例对象(假定为p),可以像这样p[key] 取值。当实例对象做p[key] 运算时,会调用类中的方法__getitem__。
class Test_getitem:
    def __init__(self, id):
        self.id = id

    # ,它的实例对象P,可以以P[key]形式取值
    def __getitem__(self, item):  # 当实例对象做P[key]运算时,就会调用类中的__getitem__()方法
        print("魔术方法之__getitem__方法")
        return self.id


res = Test_getitem('This is id')
print(res.id)
print(res[0])  # 当实例对象做P[key]运算时,就会调用类中的__getitem__()方法
使用类创建自己的猫狗分类数据集
import matplotlib.pyplot as plt
print('猫狗分类')
import torch
from torch.utils.data import DataLoader, Dataset
import torchvision
from torchvision import transforms
from PIL import Image
import os
这里使用__init__构造方法:初始化实例,用于获取路径
torch.utils.data 是PyTorch提供的一个模块,用于处理和加载数据。该模块提供了一系列工具类和函数,用于创建、操作和批量加载数据集。 Dataset: 定义了抽象的数据集类,用户可以通过继承该类来构建自己的数据集。Dataset 类提供了两个必须实现的方法:__getitem__ 用于访问单个样本,__len__ 用于返回数据集的大小
torchivision是pytorch的一个图形库,主要用来构建视觉模型。
torchivision.transforms是pythorch中的图像预处理包用于常见的一些图形变换。torchivision.Compose用于组合多个图像转换操作。
# 使用类创建自己的猫狗分类数据集
class mydataset(Dataset): #继承torch.utils.data模块的dataset
    def __init__(self, rootpath, label_dir):
        self.rootpath = rootpath
        self.label_dir = label_dir
        self.path = os.path.join(rootpath, label_dir) #os.path.join是拼接作用,把rootpath和label_dir拼接起来
        self.imge_all = os.listdir(self.path) # list类型 os.listdir是用于获取指定目录下所有文件和子目录的函数
        self.transform = transforms.Compose([transforms.Resize((224, 224)), transforms.ToTensor()]) #转换尺寸;由图片转换为tensor类型将图像转换成张量
    def __getitem__(self, item):
        imge_name = self.imge_all[item] #取出图像的名字
        imge = Image.open(os.path.join(self.path, imge_name)) #找到图像路径与图像名字拼接 并用open把图像读出来
        imge = self.transform(imge) #将imge变成tensor类型
        if self.label_dir == 'cat':
            target = 0
        else:
            target = 1
        return imge, target

    def __len__(self):
        return len(self.imge_all) #返回数据集大小
rootpath = './data/dataset/train'
cat = 'cat'  # 标签对应0
dog = 'dog'  # 标签对应1
catdatasets = mydataset(rootpath, cat)  # 猫的数据集
dogdatasets = mydataset(rootpath, dog)  # 狗的数据集

traindata = catdatasets + dogdatasets
利用DataLoader加载数据集
trainload = DataLoader(dataset=traindata, shuffle=True, batch_size=10)搭建CNN神经网络
# 搭建CNN神经网络
class BPNetwork(torch.nn.Module):
    def __init__(self):
        super(BPNetwork, self).__init__()# 调用父类(基类)的__init__方法,子类继承父类的方法和属性
        # 我们的每张图片都是224*224*3个像素点
        # 第一个隐藏层
        self.linear1 = torch.nn.Linear(224 * 224 * 3, 128)
        # 激活函数,这里选择Relu
        self.relu1 = torch.nn.ReLU()
        # 第二个隐藏层
        self.linear2 = torch.nn.Linear(128, 64)
        # 激活函数
        self.relu2 = torch.nn.ReLU()
        # 第三个隐藏层:
        self.linear3 = torch.nn.Linear(64, 2)

    # 前向传播
    def forward(self, x):
        #x:图片数据,shape为(2,3,224,224)
        # 修改每一个批次的样本集尺寸,修改为(2,3*224*224),因为我们的图片是3*224*224
        x = x.reshape(x.shape[0], -1)
        # 前向传播
        x = self.linear1(x)  # 224*224*3*128
        x = self.relu1(x)
        x = self.linear2(x)  # 128*64
        x = self.relu2(x)
        x = self.linear3(x)  # 64*2
        return x

class CNNNetwork(torch.nn.Module):
    def __init__(self):
        super(CNNNetwork, self).__init__()
        # 我们的每张图片都是224*224*3个像素点
        # 第一个隐藏层
        self.cnn1 = torch.nn.Conv2d(in_channels=3,out_channels=3,kernel_size=3)#卷积层 输入通道;输出通道;卷积核大小3*3
        # 激活函数,这里选择Relu
        self.relu1 = torch.nn.ReLU()#relu

        self.maxpl = torch.nn.MaxPool2d(kernel_size=2)#池化 卷积核2*2

        self.linear1 = torch.nn.Linear(3*111*111, 2)#全连接
    # 前向传播
    def forward(self, x):
        x = self.cnn1(x)
        x = self.relu1(x)
        x = self.maxpl(x)
        # print("--")
        # print(x.shape) #得到全连接维度 3*111*111

        x = x.view(x.shape[0],-1) #二位拉成一维进行全连接
        x = self.linear1(x)#全连接
        return x
建立神经网络对象求损失值
optimizer = torch.optim.SGD(model.parameters(), lr=0.001, momentum=0.9)这个是定义梯度下降的优化器,对model对象进行优化 model.parameters()返回迭器、 momentum是用于解决SGD曲线摆动问题
交叉熵损失函数
交叉熵损失函数torch.nn.CrossEntropyLoss()。是深度学习中常用的一种损失函数,通常用于分类问题。它衡量了模型预测结果与实际结果之间的差距,是优化模型参数的关键指标之一。
![]()
xi表示真实标签的第i个元素,yi表示模型预测x属于第i个类别的概率。yi接近1时候损失接近0.
转载自这位博主,可以看这个博主
http://t.csdnimg.cn/B5Jg5![]() http://t.csdnimg.cn/B5Jg5
http://t.csdnimg.cn/B5Jg5
# 建立我们的神经网络对象
model = CNNNetwork()
# #定义损失函数
critimizer = torch.nn.CrossEntropyLoss() #交叉熵损失函数默认带softmax函数
# 定义优化器 梯度下降法的优化器 对model对象进行优化 model.parameters()返回迭代器
optimizer = torch.optim.SGD(model.parameters(), lr=0.001, momentum=0.9)
#momentum是用于解决SGD曲线摆动问题
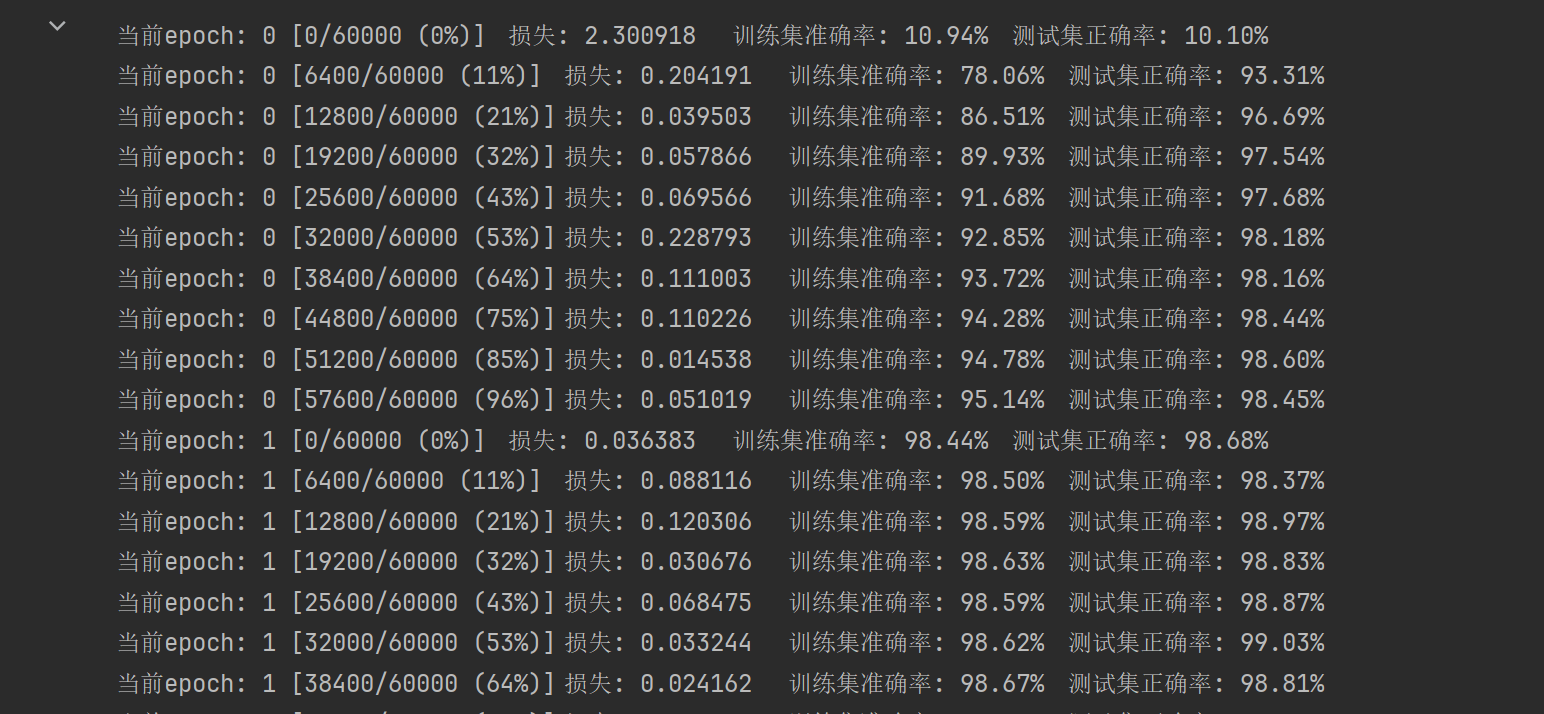
epochs = 10 #训练轮数
for i in range(epochs):
# 损失值参数 总loss值
sumloss = 0
for imges, labels in trainload: #imges是x labels是y
# 前向传播
output = model(imges)
# 反向传播
loss = critimizer(output, labels) #预测值和标签值(真实值)求损失函数,越接近越好
loss.backward() #反向传播求梯度
# 参数更新
optimizer.step()
# 梯度清零
optimizer.zero_grad()
# 损失累加
sumloss += loss.item()
print(f"第{i + 1}轮的损失:{sumloss/len(trainload)}")图像展示
独热编码
独热编码的思想,我们取最大的数,也就是最高的概率对应得下标,就相当于这个最高概率对应得独热编码里面的1,其他是0 例如0-9里面的2就是[0,0,1,0,0,0,0,0,0,0]表示2;[0,1,0,0,0,0,0,0,0,0]表示1
matlab绘图subplot函数使用方法
subplot(m,n,p)将当前图形划分为m*n网格,并在p指定位置创建坐标轴,matlab按照行号对子图位置进行编号。第一个是第一行第一列。如果指定位置已经存在坐标轴,那么该命令会把该坐标轴设置为当前坐标轴。
# #开始预测
example = enumerate(trainload)  # 从测试集里面随机抽10份并且记录下来里面的内容和下标
batch_index, (imagess, labelss) = next(example) #读出来一个批次有图像标签
fig = plt.figure() ##创建自定义图像
for i in range(10):
    a = torch.unsqueeze(imagess[i], dim=0)  # 升维度加1
    print(a.shape)
    pre = model(a)  # 预测
    # 接下来我们要用到独热编码的思想,我们取最大的数,也就是最高的概率对应得下标,就相当于这个最高概率对应得独热编码里面的1,其他是0
    pro = list(pre.detach().numpy()[0])
    pre_label = pro.index(max(pro))
    print(pre_label)
    dict = {0:'猫',1:'狗'}
    # 图像显示
    img = torch.squeeze(a)  # 去掉维度中的一个‘1’,大小变成3*224*224 需要转换
    img_ = img.permute(2, 1, 0)  # 224*224*3这个我们的图像才可以显示
    imge = img_.numpy()
    plt.subplot(5, 5, i + 1)  #将当前图形划分为5*5网格,并i+1指定位置创建坐标轴
    plt.tight_layout()#自动调整子图参数,避免子图之间间距不合理或元素与子图重叠现象。
    plt.imshow(imge, cmap='gray', interpolation='none') #cmap 颜色 inte插值方法。
    plt.rcParams['font.sans-serif'] = ['SimHei']  # 解决 “预测值” 这三个中文出现乱码现象
    plt.rcParams['axes.unicode_minus'] = False  ##解决 “预测值” 这三个中文出现乱码现象 加上这两行就不会乱码
    plt.title(f"预测值:{dict[pre_label]}")
    plt.xticks([])
    plt.yticks([])
plt.show()
完整代码
import matplotlib.pyplot as plt
print('猫狗分类')
import torch
from torch.utils.data import DataLoader, Dataset
import torchvision
from torchvision import transforms
from PIL import Image
import os
# 使用类创建自己的猫狗分类数据集
class mydataset(Dataset): #继承torch.utils.data模块的dataset
    def __init__(self, rootpath, label_dir):
        self.rootpath = rootpath
        self.label_dir = label_dir
        self.path = os.path.join(rootpath, label_dir) #os.path.join是拼接作用,把rootpath和label_dir拼接起来
        self.imge_all = os.listdir(self.path) # list类型 os.listdir是用于获取指定目录下所有文件和子目录的函数
        self.transform = transforms.Compose([transforms.Resize((224, 224)), transforms.ToTensor()]) #转换尺寸;将图片转换为tensor类型将图像转换成张量
    def __getitem__(self, item):
        imge_name = self.imge_all[item] #取出图像的名字
        imge = Image.open(os.path.join(self.path, imge_name)) #找到图像路径与图像名字拼接 并用open把图像读出来
        imge = self.transform(imge) #将imge变成tensor类型
        if self.label_dir == 'cat':
            target = 0
        else:
            target = 1
        return imge, target

    def __len__(self):
        return len(self.imge_all) #返回数据集大小
rootpath = './data/dataset/train'
cat = 'cat'  # 标签对应0
dog = 'dog'  # 标签对应1
catdatasets = mydataset(rootpath, cat)  # 猫的数据集
dogdatasets = mydataset(rootpath, dog)  # 狗的数据集

traindata = catdatasets + dogdatasets

# 利用DataLoader加载数据集
trainload = DataLoader(dataset=traindata, shuffle=True, batch_size=10)

# 搭建CNN神经网络
class BPNetwork(torch.nn.Module):
    def __init__(self):
        super(BPNetwork, self).__init__()# 调用父类(基类)的__init__方法,子类继承父类的方法和属性
        # 我们的每张图片都是224*224*3个像素点
        # 第一个隐藏层
        self.linear1 = torch.nn.Linear(224 * 224 * 3, 128)
        # 激活函数,这里选择Relu
        self.relu1 = torch.nn.ReLU()
        # 第二个隐藏层
        self.linear2 = torch.nn.Linear(128, 64)
        # 激活函数
        self.relu2 = torch.nn.ReLU()
        # 第三个隐藏层:
        self.linear3 = torch.nn.Linear(64, 2)

    # 前向传播
    def forward(self, x):
        #x:图片数据,shape为(2,3,224,224)
        # 修改每一个批次的样本集尺寸,修改为(2,3*224*224),因为我们的图片是3*224*224
        x = x.reshape(x.shape[0], -1)
        # 前向传播
        x = self.linear1(x)  # 224*224*3*128
        x = self.relu1(x)
        x = self.linear2(x)  # 128*64
        x = self.relu2(x)
        x = self.linear3(x)  # 64*2
        return x

class CNNNetwork(torch.nn.Module):
    def __init__(self):
        super(CNNNetwork, self).__init__()
        # 我们的每张图片都是224*224*3个像素点
        # 第一个隐藏层
        self.cnn1 = torch.nn.Conv2d(in_channels=3,out_channels=3,kernel_size=3)#卷积层 输入通道;输出通道;卷积核大小3*3
        # 激活函数,这里选择Relu
        self.relu1 = torch.nn.ReLU()#relu

        self.maxpl = torch.nn.MaxPool2d(kernel_size=2)#池化 卷积核2*2

        self.linear1 = torch.nn.Linear(3*111*111, 2)#全连接
    # 前向传播
    def forward(self, x):
        x = self.cnn1(x)
        x = self.relu1(x)
        x = self.maxpl(x)
        # print("--")
        # print(x.shape) #得到全连接维度 3*111*111

        x = x.view(x.shape[0],-1) #二位拉成一维进行全连接
        x = self.linear1(x)#全连接
        return x
# 建立我们的神经网络对象
model = CNNNetwork()
# #定义损失函数
critimizer = torch.nn.CrossEntropyLoss() #交叉熵损失函数默认带softmax函数
# 定义优化器  梯度下降法的优化器 对model对象进行优化 model.parameters()返回迭代器
optimizer = torch.optim.SGD(model.parameters(), lr=0.001, momentum=0.9)
#momentum是用于解决SGD曲线摆动问题
epochs = 10  #训练轮数
for i in range(epochs):
    # 损失值参数 总loss值
    sumloss = 0
    for imges, labels in trainload: #imges是x labels是y
        # 前向传播
        output = model(imges)
        # 反向传播
        loss = critimizer(output, labels) #预测值和标签值(真实值)求损失函数,越接近越好
        loss.backward() #反向传播求梯度
        # 参数更新
        optimizer.step()
        # 梯度清零
        optimizer.zero_grad()
        # 损失累加
        sumloss += loss.item()
    print(f"第{i + 1}轮的损失:{sumloss/len(trainload)}")
# #开始预测
example = enumerate(trainload)  # 从测试集里面随机抽10份并且记录下来里面的内容和下标
batch_index, (imagess, labelss) = next(example) #读出来一个批次有图像标签
fig = plt.figure() ##创建自定义图像
for i in range(10):
    a = torch.unsqueeze(imagess[i], dim=0)  # 升维度加1
    print(a.shape)
    pre = model(a)  # 预测
    # 接下来我们要用到独热编码的思想,我们取最大的数,也就是最高的概率对应得下标,就相当于这个最高概率对应得独热编码里面的1,其他是0
    pro = list(pre.detach().numpy()[0])
    pre_label = pro.index(max(pro))
    print(pre_label)
    dict = {0:'猫',1:'狗'}
    # 图像显示
    img = torch.squeeze(a)  # 去掉维度中的一个‘1’,大小变成3*224*224 需要转换
    img_ = img.permute(2, 1, 0)  # 224*224*3这个我们的图像才可以显示
    imge = img_.numpy()
    plt.subplot(5, 5, i + 1)  #将当前图形划分为5*5网格,并i+1指定位置创建坐标轴
    plt.tight_layout()#自动调整子图参数,避免子图之间间距不合理或元素与子图重叠现象。
    plt.imshow(imge, cmap='gray', interpolation='none') #cmap 颜色 inte插值方法。
    plt.rcParams['font.sans-serif'] = ['SimHei']  # 解决 “预测值” 这三个中文出现乱码现象
    plt.rcParams['axes.unicode_minus'] = False  ##解决 “预测值” 这三个中文出现乱码现象 加上这两行就不会乱码
    plt.title(f"预测值:{dict[pre_label]}")
    plt.xticks([])
    plt.yticks([])
plt.show()


![[Kubernetes] KubeKey 部署 K8s v1.28.8](https://img-blog.csdnimg.cn/direct/d49b73bd22a247579b961a15946df2f7.png)