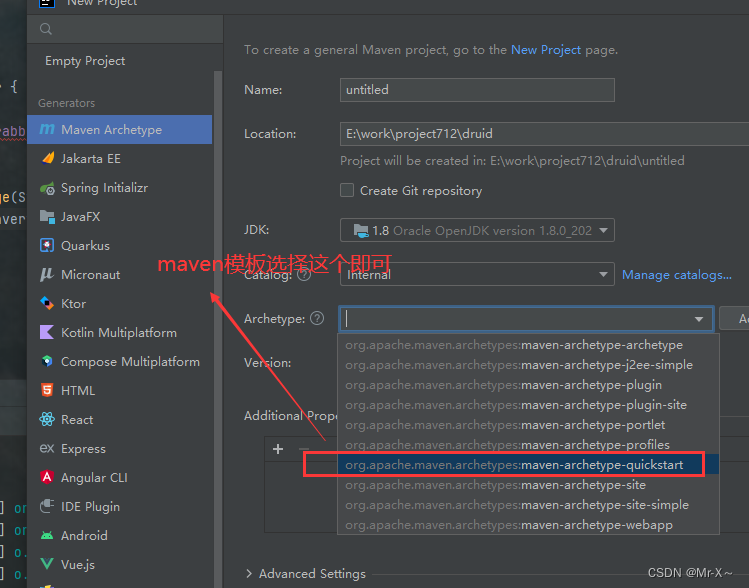
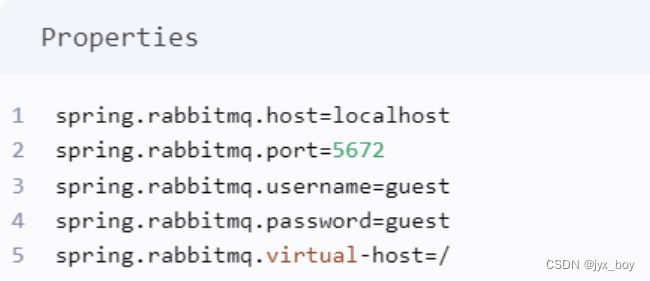
前提是已经安装并启动了rabbitmq,并且项目已经引入rabbitmq,完成了配置。
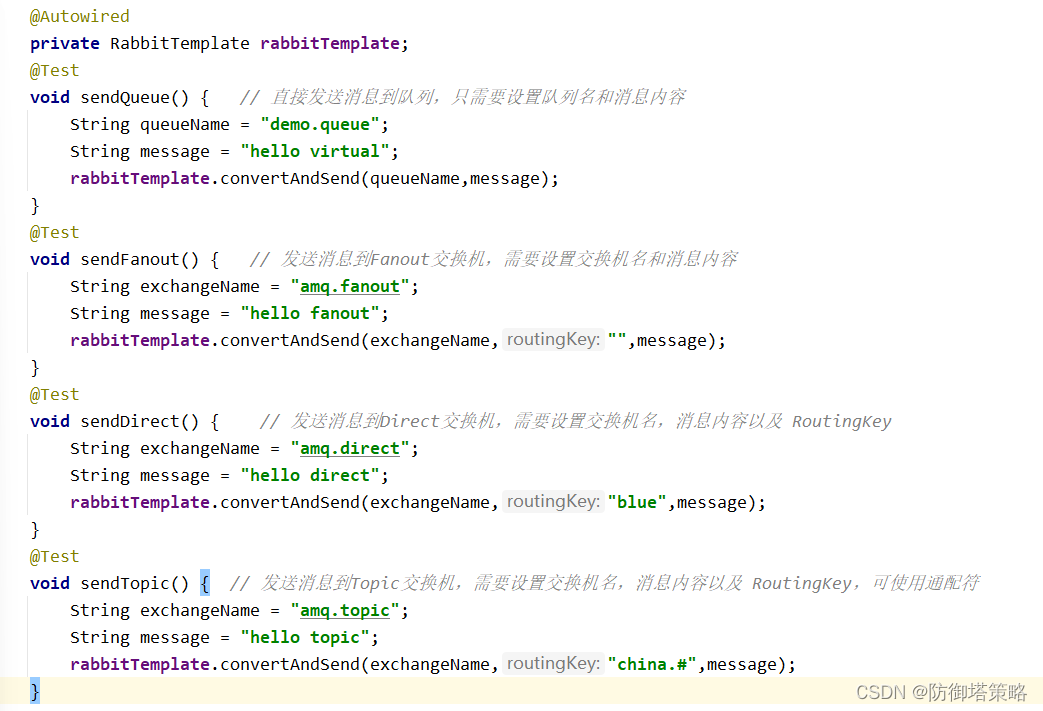
不同模式所需参数不同,生产者可以根据参数不同使用重载的convertAndSend方法。而消费者均是直接监听某个队列。
不同的交换机是实现不同工作模式的关键组件.每种交换机类型都有其特定的路由和分发策略。
一、Simple(简单模式)
一些概念:queue:队列
这是最基本的模式,包含一个生产者和一个消费者和一个队列bean。生产者发送消息到指定队列,消费者从该队列中接收消息。
如下图:
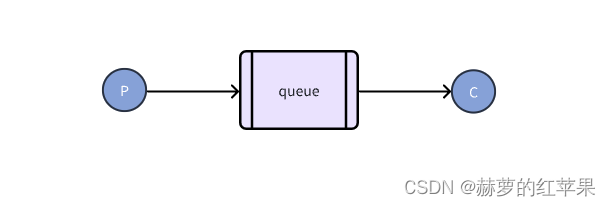
生产者P往queue发送消息,消费者C消费queue里的消息。
上述关系配置
@Configuration
public class RabbitMqConfig {
    //生产者往队列名为hello的队列发送消息,消费者监听名为hello的队列
   @Bean
    public Queue hello() {
        return new Queue("hello");
    }
}
二、WorkQueue(工作队列模式)
一些概念:queue:队列
这种模式也包含一个生产者,但是消费者有多个。生产者发送的消息会依次被消费者接收,这种模式常用于处理消息较多的情况。
如下图:
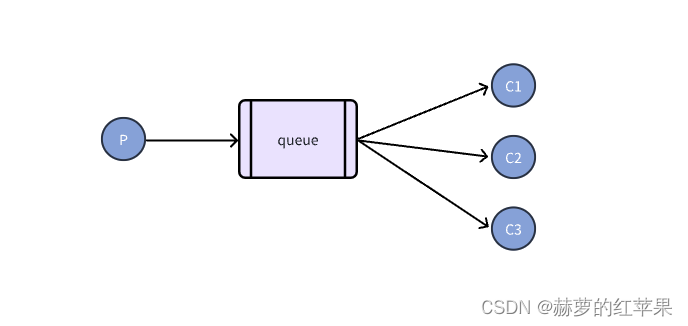
生产者P往queue发送消息,消费者C1、C2、C3均消费queue里的消息。
RabbitMQ的消息分发机制会确保消息在队列中的顺序性,并根据消费者的消费能力和策略来进行分发。也就是说一条消息一般情况下只会发送给一个消费者,不会出现三个消费者都消费了同一条消息的情况。
上述关系配置
@Configuration
public class RabbitMqConfig {
    //生产者往队列名为hello的队列发送消息,多个消费者均监听名为hello的队列
   @Bean
    public Queue hello() {
        return new Queue("hello");
    }
}
三、Publish/Subscribe(发布/订阅模式)
一些概念:exchange:交换机,queue:队列
在该模式下,交换机一般使用FanoutExchange。不过也可以使用Topic交换机来实现更加复杂的路由策略.
交换机和队列是两个独立的个体,他们的关系是通过配置绑定来完成的,也就意味着他们的关系可以任意搭配,可以一个交换机绑定多个队列,一个队列也可以绑定多个交换机。
在该模式下,生产者发送的消息会被广播到所有与Fanout交换机绑定的队列中。每个队列中的消费者都会从它们自己的队列中拉取并消费消息,但不同的消费者(即使它们连接到同一个队列)也会独立地处理消息,即每个消息只会被一个消费者处理一次(除非设置了手动确认并且消费者没有确认消息,或者连接断开等情况导致消息被重新排队)。
多个队列绑定一个交换机
生产者生产消息,发送到交换机,交换机会将消息转发给绑定的全部队列。也就是广播。
如下图:
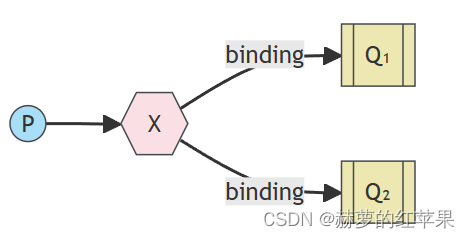
X是交换机,Q1、Q2是队列。通过配置将队列绑定到交换机X上。
上述关系配置
@Configuration
public class RabbitMqConfig {

    //生产者发送消息到该交换机,交换机填test.fanout
    @Bean
	public FanoutExchange fanout() {
		return new FanoutExchange("test.fanout");
	}

    //消费者订阅该队列,队列填test.queue1
    @Bean
    public Queue autoDeleteQueue1() {
        return new Queue("test.queue1");
    }

    @Bean
    public Queue autoDeleteQueue2() {
        return new Queue("test.queue2");
    }

    //将Q1绑定到fanout交换机上
    @Bean
	public Binding binding1(FanoutExchange fanout,Queue autoDeleteQueue1) {
	    return BindingBuilder.bind(autoDeleteQueue1).to(fanout);
	}

    //将Q2绑定到fanout交换机上
	@Bean
	public Binding binding2(FanoutExchange fanout,Queue autoDeleteQueue2) {
		return BindingBuilder.bind(autoDeleteQueue2).to(fanout);
	}

}
一个队列绑定多个交换机
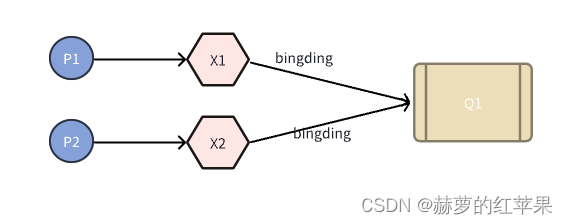
Q1绑定了X1交换机,同时也绑定了X2交换机。P1生产的消息会转发给Q1,P2生产的消息也会转发给Q1。
上述关系配置
@Configuration
public class RabbitMqConfig {

    //生产者发送消息到该交换机,交换机填test.fanout1
    @Bean
	public FanoutExchange fanout1() {
		return new FanoutExchange("test.fanout1");
	}

     //生产者发送消息到该交换机,交换机填test.fanout2
    @Bean
	public FanoutExchange fanout2() {
		return new FanoutExchange("test.fanout2");
	}

    //消费者订阅该队列,队列填test.queue1
    @Bean
    public Queue autoDeleteQueue1() {
        return new Queue("test.queue1");
    }

    //将Q1绑定到fanout1交换机上
    @Bean
	public Binding binding1(FanoutExchange fanout1,Queue autoDeleteQueue1) {
	    return BindingBuilder.bind(autoDeleteQueue1).to(fanout1);
	}

    //将Q1绑定到fanout2交换机上
	@Bean
	public Binding binding2(FanoutExchange fanout2,Queue autoDeleteQueue1) {
		return BindingBuilder.bind(autoDeleteQueue1).to(fanout2);
	}

}
四、Routing(路由模式)
一些概念:exchange:交换机,routing key:路由键,queue:队列
该模式下使用的交换机是直连交换机。在这种模式下,生产者发送消息到交换机时,需要指定一个路由键.
在路由模式下,可以通过绑定将路由键、交换机和队列绑定起来。生产者生产的消息会传入交换机参数和路由键参数,通过交换机参数和路由键参数查找存在的绑定关系(可能存在多个)就可以找到队列并将消息发送到对应的队列。消费者监听队列完成消费。
多个路由键绑定一个队列
如下图:

direct是交换机,orange、black、green是路由键,Q1、Q2是队列。
路由键为orange的消息会被交换机转发到Q1,路由键为black或green的消息会被交换机转发到Q2。
上述关系所需配置
@Configuration
public class RabbitMqConfig {

    //生产者发送消息到该交换机,交换机填test.direct
    @Bean
	public DirectExchange direct() {
		return new DirectExchange("test.direct");
	}

    //消费者订阅该队列,队列填test.queue1
    @Bean
    public Queue autoDeleteQueue1() {
        return new Queue("test.queue1");
    }

    @Bean
    public Queue autoDeleteQueue2() {
        return new Queue("test.queue2");
    }

    //利用路由键orange将Q1绑定到dirct交换机上
    @Bean
    public Binding binding1a(DirectExchange direct,Queue autoDeleteQueue1) {
        return BindingBuilder.bind(autoDeleteQueue1)
                .to(direct)
                .with("orange");
    }

    //利用路由键black将Q2绑定到dirct交换机上
    @Bean
    public Binding binding1b(DirectExchange direct,Queue autoDeleteQueue2) {
        return BindingBuilder.bind(autoDeleteQueue2)
                .to(direct)
                .with("black");
    }

    //利用路由键green将Q2绑定到dirct交换机上
    @Bean
    public Binding binding2a(DirectExchange direct,Queue autoDeleteQueue2) {
        return BindingBuilder.bind(autoDeleteQueue2)
                .to(direct)
                .with("green");
    }

}
一个路由键绑定多个队列
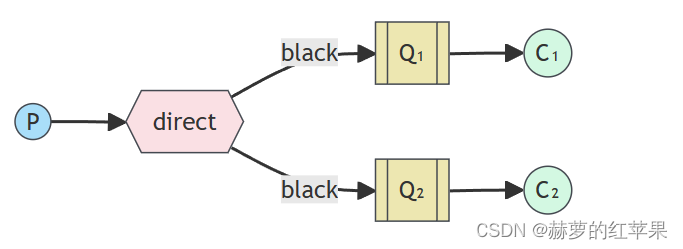
路由键为black的消息会被交换机转发到Q1和Q2
上述关系所需配置
@Configuration
public class RabbitMqConfig {

    @Bean
	public DirectExchange direct() {
		return new DirectExchange("test.direct");
	}

    @Bean
    public Queue autoDeleteQueue1() {
        return new Queue("test.quque1");
    }

    @Bean
    public Queue autoDeleteQueue2() {
        return new Queue("test.quque2");
    }

    //利用路由键black将Q1绑定到dirct交换机上
    @Bean
    public Binding binding1b(DirectExchange direct,Queue autoDeleteQueue1) {
        return BindingBuilder.bind(autoDeleteQueue1)
                .to(direct)
                .with("black");
    }

    //利用路由键black将Q2绑定到dirct交换机上
    @Bean
    public Binding binding2a(DirectExchange direct,Queue autoDeleteQueue2) {
        return BindingBuilder.bind(autoDeleteQueue2)
                .to(direct)
                .with("black");
    }

}
五、Topic(通配符模式)
这种模式与路由模式类似,但是路由键支持通配符匹配。生产者发送消息时指定一个带有通配符的路由键,交换机根据路由键和通配符规则将消息路由到对应的队列。消费者将队列绑定到交换机时也需要指定带有通配符的路由键。
该工作模式一般使用Topic Exchange.
六、RPC(远程调用模式)
RabbitMQ还支持RPC(远程过程调用)模式,这种模式允许一个客户端发送请求消息到一个队列,并等待从另一个队列返回响应消息。这种模式常用于实现分布式系统中的远程服务调用。
多消费者监听一个队列是否会导致重复消费
实际开发中可以创建多个消费者监听一个队列,多个消费者都可以消费队列里的消息,不过在同一时间下,一条消息只会被一个消费者消费。
因为RabbitMQ的消息分发机制会确保消息在队列中的顺序性,并根据消费者的消费能力和策略来进行分发。
还可以在消费者里面做幂等、消息去重、记录消费的消息等操作来防止重复消费。
更多细节查看官方文档
RabbitMQ 教程 - “Hello World!” |兔子MQ --- RabbitMQ tutorial - "Hello World!" | RabbitMQ