Centos7中更改IP为静态地址
文章目录
1. 查看当前ip信息
- 可以看到当前的IP为
192.168.31.20- 这里网卡名称为
ens33,具体以自己机器实际查到的为主
[root@dev ~]# ifconfig
ens33: flags=4163<UP,BROADCAST,RUNNING,MULTICAST>  mtu 1500
        inet 192.168.31.20  netmask 255.255.255.0  broadcast 192.168.31.255
        inet6 fe80::946b:95a9:8723:fc8b  prefixlen 64  scopeid 0x20<link>
        ether 00:0c:29:be:f2:72  txqueuelen 1000  (Ethernet)
        RX packets 4045  bytes 414510 (404.7 KiB)
        RX errors 0  dropped 0  overruns 0  frame 0
        TX packets 769  bytes 107460 (104.9 KiB)
        TX errors 0  dropped 0 overruns 0  carrier 0  collisions 0

lo: flags=73<UP,LOOPBACK,RUNNING>  mtu 65536
        inet 127.0.0.1  netmask 255.0.0.0
        inet6 ::1  prefixlen 128  scopeid 0x10<host>
        loop  txqueuelen 1000  (Local Loopback)
        RX packets 32  bytes 2592 (2.5 KiB)
        RX errors 0  dropped 0  overruns 0  frame 0
        TX packets 32  bytes 2592 (2.5 KiB)
        TX errors 0  dropped 0 overruns 0  carrier 0  collisions 0

[root@dev ~]#
2. 查找ens33文件位置
- 查找网络配置文件
一般网络配置文件的名称以
ifcfg-开头,所以我们查找名称为ifcfg-ens33的文件,就可以查到具体地址
[root@dev dev]# find / -name 'ifcfg-ens33'
/etc/sysconfig/network-scripts/ifcfg-ens33
[root@dev dev]#
- 跟进查找出的网络配置文件,进入到其根目录
进入
/etc/sysconfig/network-scripts目录,然后查看此目录下的所以文件
# 进入  /etc/sysconfig/network-scripts 目录
[root@dev ~]# cd /etc/sysconfig/network-scripts
# 查看目录下的所有文件,可以看到第一个就是 ifcfg-ens33 文件
[root@dev network-scripts]# ll
总用量 232
-rw-r--r--. 1 root root   310 11月 20 14:40 ifcfg-ens33
-rw-r--r--. 1 root root   254 5月  22 2020 ifcfg-lo
lrwxrwxrwx. 1 root root    24 11月 20 14:35 ifdown -> ../../../usr/sbin/ifdown
-rwxr-xr-x. 1 root root   654 5月  22 2020 ifdown-bnep
-rwxr-xr-x. 1 root root  6532 5月  22 2020 ifdown-eth
-rwxr-xr-x. 1 root root   781 5月  22 2020 ifdown-ippp
-rwxr-xr-x. 1 root root  4540 5月  22 2020 ifdown-ipv6
lrwxrwxrwx. 1 root root    11 11月 20 14:35 ifdown-isdn -> ifdown-ippp
-rwxr-xr-x. 1 root root  2130 5月  22 2020 ifdown-post
-rwxr-xr-x. 1 root root  1068 5月  22 2020 ifdown-ppp
-rwxr-xr-x. 1 root root   870 5月  22 2020 ifdown-routes
-rwxr-xr-x. 1 root root  1456 5月  22 2020 ifdown-sit
-rwxr-xr-x. 1 root root  1621 12月  9 2018 ifdown-Team
-rwxr-xr-x. 1 root root  1556 12月  9 2018 ifdown-TeamPort
-rwxr-xr-x. 1 root root  1462 5月  22 2020 ifdown-tunnel
lrwxrwxrwx. 1 root root    22 11月 20 14:35 ifup -> ../../../usr/sbin/ifup
-rwxr-xr-x. 1 root root 12415 5月  22 2020 ifup-aliases
-rwxr-xr-x. 1 root root   910 5月  22 2020 ifup-bnep
-rwxr-xr-x. 1 root root 13758 5月  22 2020 ifup-eth
-rwxr-xr-x. 1 root root 12075 5月  22 2020 ifup-ippp
-rwxr-xr-x. 1 root root 11893 5月  22 2020 ifup-ipv6
lrwxrwxrwx. 1 root root     9 11月 20 14:35 ifup-isdn -> ifup-ippp
-rwxr-xr-x. 1 root root   650 5月  22 2020 ifup-plip
-rwxr-xr-x. 1 root root  1064 5月  22 2020 ifup-plusb
-rwxr-xr-x. 1 root root  4997 5月  22 2020 ifup-post
-rwxr-xr-x. 1 root root  4154 5月  22 2020 ifup-ppp
-rwxr-xr-x. 1 root root  2001 5月  22 2020 ifup-routes
-rwxr-xr-x. 1 root root  3303 5月  22 2020 ifup-sit
-rwxr-xr-x. 1 root root  1755 12月  9 2018 ifup-Team
-rwxr-xr-x. 1 root root  1876 12月  9 2018 ifup-TeamPort
-rwxr-xr-x. 1 root root  2780 5月  22 2020 ifup-tunnel
-rwxr-xr-x. 1 root root  1836 5月  22 2020 ifup-wireless
-rwxr-xr-x. 1 root root  5419 5月  22 2020 init.ipv6-global
-rw-r--r--. 1 root root 20678 5月  22 2020 network-functions
-rw-r--r--. 1 root root 30988 5月  22 2020 network-functions-ipv6
[root@dev network-scripts]#
3. 查看ifcfg-ens33网络配置
[root@dev network-scripts]# cat ifcfg-ens33
TYPE="Ethernet"
PROXY_METHOD="none"
BROWSER_ONLY="no"
BOOTPROTO="dhcp"
DEFROUTE="yes"
IPV4_FAILURE_FATAL="no"
IPV6INIT="yes"
IPV6_AUTOCONF="yes"
IPV6_DEFROUTE="yes"
IPV6_FAILURE_FATAL="no"
IPV6_ADDR_GEN_MODE="stable-privacy"
NAME="ens33"
UUID="fd81f97a-8c9d-410c-a08f-8e12a945cb05"
DEVICE="ens33"
ONBOOT="yes"
4. 修改为静态IP地址
这里将IP改为
192.168.31.100编辑
/etc/sysconfig/network-scripts/ifcfg-ens33网络配置文件并改相关配置即可
# 编辑 ifcfg-ens33
[root@dev]# vim /etc/sysconfig/network-scripts/ifcfg-ens33

# 打开编辑器后,按下面的说进行修改或添加内容
TYPE="Ethernet"
PROXY_METHOD="none"
BROWSER_ONLY="no"
BOOTPROTO="static" # 这里将 dhcp(自动获取) 改为 static
DEFROUTE="yes"
IPV4_FAILURE_FATAL="no"
IPV6INIT="yes"
IPV6_AUTOCONF="yes"
IPV6_DEFROUTE="yes"
IPV6_FAILURE_FATAL="no"
IPV6_ADDR_GEN_MODE="stable-privacy"
NAME="ens33"
UUID="fd81f97a-8c9d-410c-a08f-8e12a945cb05"
DEVICE="ens33"
ONBOOT="yes" # 这里如果为no的话,就改为yes
# 2.新增下面内容
IPADDR=192.168.31.100 #静态IP
GATEWAY=192.168.31.1 #默认网关
NETMASK=255.255.255.0 #子网掩码
DNS1=192.168.31.1 #DNS 配置
DNS2=114.114.114.114   # 国内DNS地址,国内用户推荐使用,速度较快
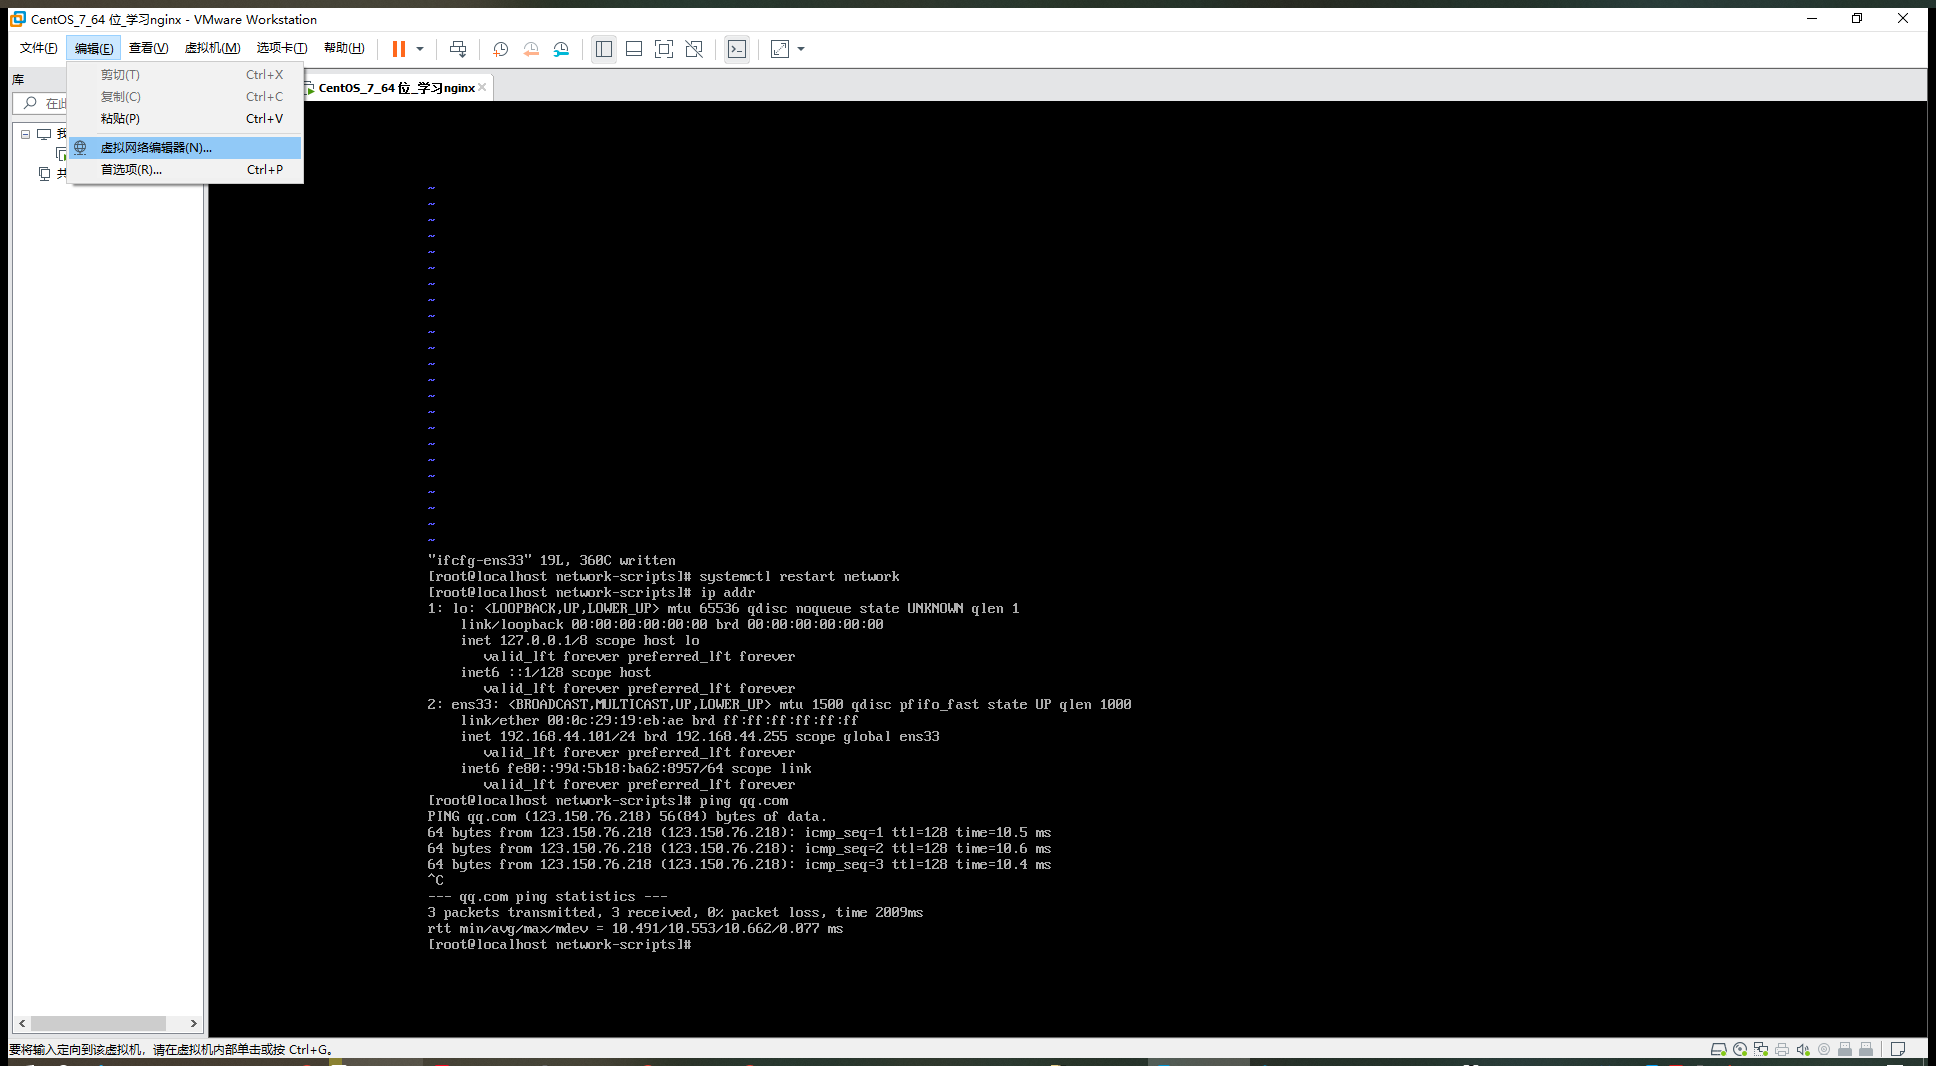
5. 重启网卡
[root@dev]# systemctl restart network
6. 查看改后的IP
[root@dev ~]# ifconfig
ens33: flags=4163<UP,BROADCAST,RUNNING,MULTICAST>  mtu 1500
        inet 192.168.31.100  netmask 255.255.255.0  broadcast 192.168.31.255
        inet6 fe80::946b:95a9:8723:fc8b  prefixlen 64  scopeid 0x20<link>
        ether 00:0c:29:be:f2:72  txqueuelen 1000  (Ethernet)
        RX packets 6555  bytes 640304 (625.2 KiB)
        RX errors 0  dropped 24  overruns 0  frame 0
        TX packets 1635  bytes 285875 (279.1 KiB)
        TX errors 0  dropped 0 overruns 0  carrier 0  collisions 0

lo: flags=73<UP,LOOPBACK,RUNNING>  mtu 65536
        inet 127.0.0.1  netmask 255.0.0.0
        inet6 ::1  prefixlen 128  scopeid 0x10<host>
        loop  txqueuelen 1000  (Local Loopback)
        RX packets 32  bytes 2592 (2.5 KiB)
        RX errors 0  dropped 0  overruns 0  frame 0
        TX packets 32  bytes 2592 (2.5 KiB)
        TX errors 0  dropped 0 overruns 0  carrier 0  collisions 0

[root@dev ~]#
重启网卡后可看到IP已经被更改为192.168.31.100了。至此,静态IP修改完成。


![[SpringBoot] JWT令牌——登录校验](https://img-blog.csdnimg.cn/direct/453f99968abb4a8291bf3433fd9cdb5e.png)