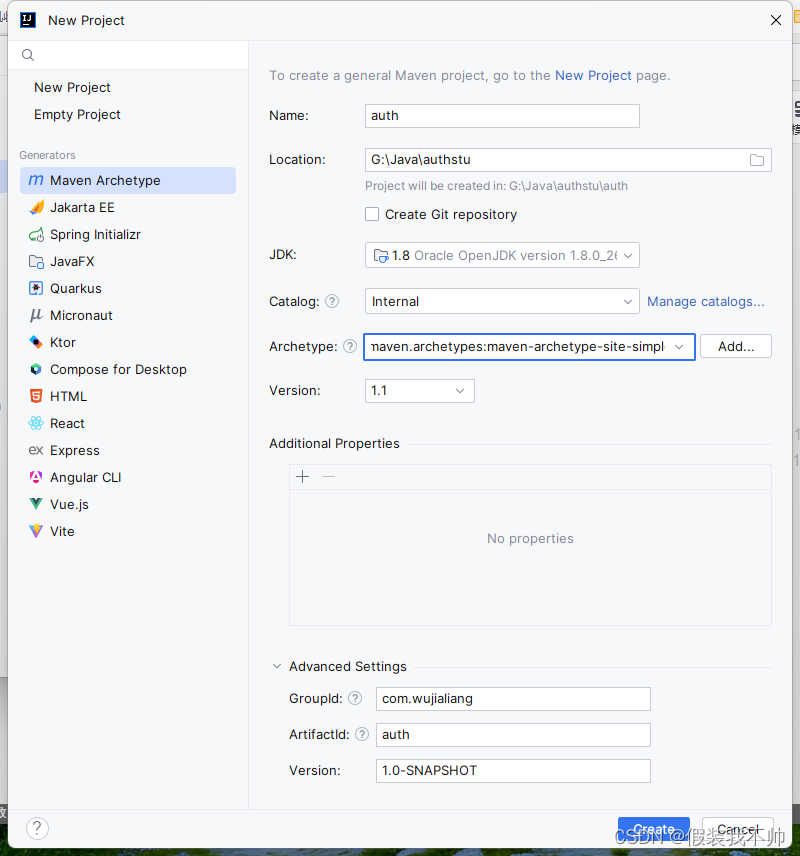
上篇讲了rbac对于菜单的权限,下面准备完成按钮权限以及行数据和列数据权限
权限控制(按钮权限)
权限控制
操作权限就是将操作视为资源,比如删除操作,有些人可以有些人不行。于后端来说,操作就是一个接口。于前端来说,操作往往是一个按钮,所以操作权限也被称为按钮权限,是一种细颗粒权限。
在页面上比较直观的体现就是没有这个删除权限的人就不会显示该按钮,或者该按钮被禁用
前端实现按钮权限还是和之前导航菜单渲染一样的,拿当前用户的权限资源id和权限资源字典对比,有权限就渲染出来,无权限就不渲染。
前端关于权限的逻辑和之前一样,那操作权限怎么就比页面权限安全了呢?这个安全主要体现在后端上,页面渲染不走后端,但接口可必须得走后端,那只要走后端那就好办了,我们只需要对每个接口进行一个权限判断就OK了嘛。
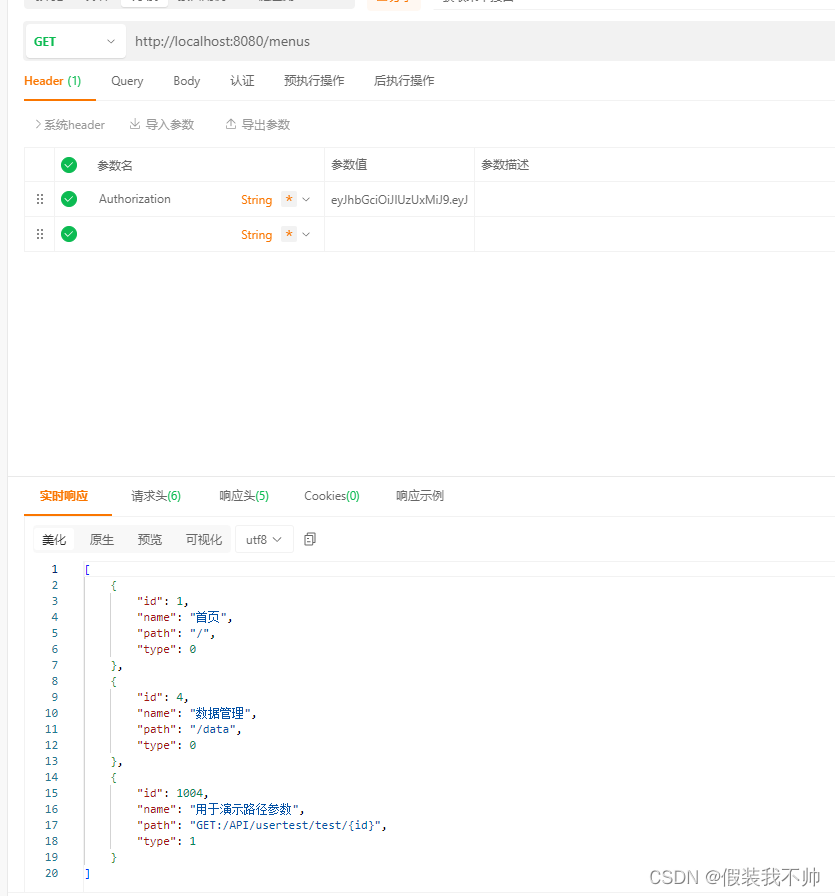
资源表增加type类型,0表示页面权限,1表示操作权限
表扩展完毕,我们接下来就要添加操作权限类型的数据。刚才也说了,于后端而言操作就是一个接口,那么我们就要将 接口路径 作为我们的权限资源,看一下数据就清楚了。
alter table resource add type int comment '资源类型';
update resource set type=0;
insert into resource (path,name,type) value('DELETE:/api/user','删除用户',1);
-- 超级管理员添加权限
insert into role_resource (roleId,resourceId) value(1,5);
修改resource
@Data
public class Resource {
    private int id;
    private String name;
    private String path;
    private int type;
}
修改resourcemapper.xml
<?xml version="1.0" encoding="UTF-8"?>
<!DOCTYPE mapper PUBLIC "-//mybatis.org//DTD Mapper 3.0//EN" "http://mybatis.org/dtd/mybatis-3-mapper.dtd">
<mapper namespace="com.wujialiang.auth.mapper.ResouceMapper">
    <select id="getCurrentUserMenus" parameterType="java.lang.String" resultType="com.wujialiang.auth.entity.Resource">
        select t2.id,t2.name,t2.path,t2.type from role_resource t1
            left join resource t2 on t2.id=t1.resourceId
        where t1.roleId =
              (select t3.roleId from user_role t3 where t3.userId=
                                                        (select t4.id from user t4 where t4.UserName=#{userName} limit 1)
            limit 1)
    </select>
</mapper>
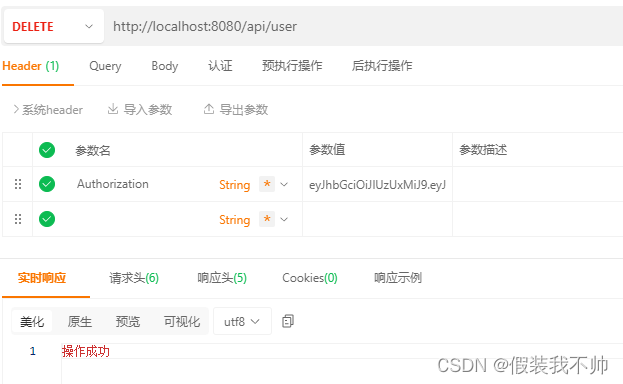
超级管理员权限
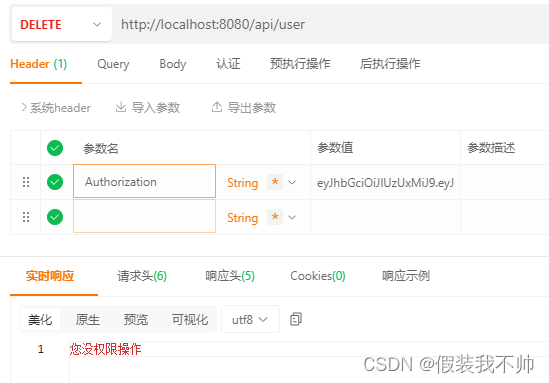
数据管理员就没有
DELETE:/API/user分为两个部分组成,DELETE:表示该接口的请求方式,比如GET、POST等,/API/user则是接口路径了,两者组合起来就能确定一个接口请求!
数据有了,我们接着在代码中进行权限安全判断,因为只有前端基本和裸奔一样!!
修改userservice接口
/**
 * 获取全部的菜单
 * @return
 */
public List<Resource> getAllMenus(){
    return resouceMapper.getAllMenus();
}
修改ResouceMapper
    /**
     * 获取全部的菜单
     * @return
     */
    List<Resource> getAllMenus();
修改ResouceMapper.xml
    <select id="getAllMenus" resultType="com.wujialiang.auth.entity.Resource">
        select t2.id,t2.name,t2.path,t2.type from resource t2
    </select>
修改userController
/**
 * 删除用户测试接口
 * @return
 */
@DeleteMapping("/api/user")
public String deleteUser() {
    // 拿到所有权限路径 和 当前用户拥有的权限路径
    List<Resource> allMenuss = userService.getAllMenus();
    List<Resource> userMenus = userService.getCurrentUserMenus();
    List<String> userPaths = userMenus.stream()
            .map(Resource::getPath)
            .collect(Collectors.toList());
    List<String> allPaths = allMenuss.stream()
            .map(Resource::getPath)
            .collect(Collectors.toList());
    // 第一个判断:所有权限路径中包含该接口,才代表该接口需要权限处理,所以这是先决条件,如果权限路径中没有则放行
    // 第二个判断:判断该接口是不是属于当前用户的权限范围,如果不是,则代表该接口用户没有权限
    if (allPaths.contains("DELETE:/api/user") && !userPaths.contains("DELETE:/api/user")) {
        return "您没权限操作";
    }
    return "操作成功";
}
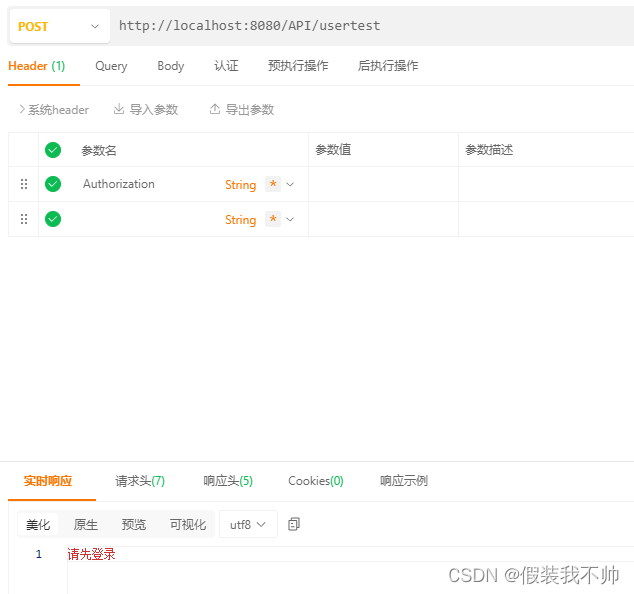
没有登陆
用户1超级管理员登录
用户2数据管理员
这样即使知道接口也没权限,保证了接口安全
接口扫描
pringMVC提供了一个非常方便的类RequestMappingInfoHandlerMapping,这个类可以拿到所有你声明的web接口信息,这个拿到后剩下的事不就非常简单了,就是通过代码将接口信息批量添加到数据库呗!不过我们也不是要真的将所有接口都添加到权限资源中去,我们要的是那些需要权限处理的接口生成权限资源,有些接口不需要权限处理那自然就不生成了。所以我们得想一个办法来标记一下该接口是否需要被权限管理!
定义一个注解Auth
package com.wujialiang.auth.annotation;

import java.lang.annotation.ElementType;
import java.lang.annotation.Retention;
import java.lang.annotation.RetentionPolicy;
import java.lang.annotation.Target;

@Retention(RetentionPolicy.RUNTIME)
@Target({ElementType.METHOD, ElementType.TYPE}) // 表明该注解可以加在类或方法上
public @interface Auth {
    /**
     * 权限id,需要唯一
     */
    int id();

    /**
     * 权限名称
     */
    String name();
}
新建UserTestConroller
package com.wujialiang.auth.controller;

import com.wujialiang.auth.annotation.Auth;
import org.springframework.web.bind.annotation.*;

@RestController
@RequestMapping("/API/usertest")
@Auth(id = 1000, name = "用户管理")
public class UserTestConroller {

    @PostMapping
    @Auth(id = 1, name = "新增用户")
    public String createUser() {
       return "操作成功";
    }

    @DeleteMapping
    @Auth(id = 2, name = "删除用户")
    public String deleteUser() {
        return "操作成功";
    }

    @PutMapping
    @Auth(id = 3, name = "编辑用户")
    public String updateRoles() {
        return "操作成功";
    }

    @GetMapping("/test/{id}")
    @Auth(id = 4,name = "用于演示路径参数")
    public String testInterface() {
        return "操作成功";
    }
}
可以看到,上面代码中我在类和方法上都加上了我们自定义的Auth注解,并在注解中设置了id和name的值,这个name好理解,就是资源数据中的资源名称嘛。可注解里为啥要设计id呢,数据库主键id不是一般都是用自增嘛。这是因为我们人为控制资源的主键id有很多好处。
首先是id和接口路径的映射特别稳定,如果要用自增的话,我一个接口一开始的权限id是4,一大堆角色绑定在这个资源4上面了,然后我业务需求有一段时间不需要该接口做权限管理,于是我将这个资源4删除一段时间,后续再加回来,可数据再加回来的时候id就变成5,之前与其绑定的角色又得重新设置资源,非常麻烦!如果这个id是固定的话,我将这个接口权限一加回来,之前所有设置好的权限都可以无感知地生效,非常非常方便。所以,id和接口路径的映射从一开始就要稳定下来,不要轻易变更!
至于类上加上Auth注解是方便模块化管理接口权限,一个Controller类咱们就视为一套接口模块,最终接口权限的id就是模块id + 方法id。大家想一想如果不这么做的话,我要保证每一个接口权限id唯一,我就得记得各个类中所有方法的id,一个一个累加地去设置新id。比如上一个方法我设置到了101,接着我就要设置102、103…,只要一没注意就设置重了。可如果按照Controller类分好组后就特别方便管理了,这个类是1000、下一个类是2000,然后类中所有方法就可以独立地按照1、2、3来设置,极大避免了心智负担!
介绍了这么久注解的设计,我们再讲解接口扫描的具体实现方式!这个扫描肯定是发生在我新接口写完了,重新编译打包重启程序的时候!并且就只在程序启动的时候做一次扫描,后续运行期间是不可能再重复扫描的,重复扫描没有任何意义嘛!既然是在程序启动时进行的逻辑操作,那么我们就可以使用SpringBoot提供的ApplicationRunner接口来进行处理,重写该接口的方法会在程序启动时被执行。(程序启动时执行指定逻辑有很多种办法,并不局限于这一个,具体使用根据需求来)
我们现在就来创建一个类实现该接口,并重写其中的run方法,在其中写上我们的接口扫描逻辑。注意,下面代码逻辑现在不用每一行都去理解,大概知道这么个写法就行,重点是看注释理解其大概意思,将来再慢慢研究:
package com.wujialiang.auth.component;

import com.wujialiang.auth.annotation.Auth;
import com.wujialiang.auth.entity.Resource;
import com.wujialiang.auth.service.UserService;
import io.jsonwebtoken.lang.Collections;
import org.springframework.beans.factory.annotation.Autowired;
import org.springframework.boot.ApplicationArguments;
import org.springframework.boot.ApplicationRunner;
import org.springframework.stereotype.Component;
import org.springframework.web.bind.annotation.RequestMethod;
import org.springframework.web.method.HandlerMethod;
import org.springframework.web.servlet.mvc.method.RequestMappingInfo;
import org.springframework.web.servlet.mvc.method.RequestMappingInfoHandlerMapping;

import java.util.LinkedList;
import java.util.List;
import java.util.Map;
import java.util.Set;

@Component
public class ApplicationStartup implements ApplicationRunner {
    @Autowired
    private RequestMappingInfoHandlerMapping requestMappingInfoHandlerMapping;

//    @Autowired
//    private UserService userService;

    @Override
    public void run(ApplicationArguments args) throws Exception {
        // 扫描并获取所有需要权限处理的接口资源(该方法逻辑写在下面)
        List<Resource> list = getAuthResources();
        // 先删除所有操作权限类型的权限资源,待会再新增资源,以实现全量更新(注意哦,数据库中不要设置外键,否则会删除失败)
        //resourceService.deleteResourceByType(1);
        // 如果权限资源为空,就不用走后续数据插入步骤
        if (Collections.isEmpty(list)) {
            return;
        }
        for (Resource resource : list) {
            System.out.print("\tid:"+resource.getId());
            System.out.print("\tpath:"+resource.getPath());
            System.out.print("\tname:"+resource.getName());
            System.out.print("\ttype:"+resource.getType());
            System.out.print("\n");
        }
        // 将资源数据批量添加到数据库
        //resourceService.insertResources(list);
        System.out.println("将资源数据批量添加到数据库成功!!!");
    }

    /**
     * 扫描并返回所有需要权限处理的接口资源
     */
    private List<Resource> getAuthResources() {
        // 接下来要添加到数据库的资源
        List<Resource> list = new LinkedList<>();
        // 拿到所有接口信息,并开始遍历
        Map<RequestMappingInfo, HandlerMethod> handlerMethods = requestMappingInfoHandlerMapping.getHandlerMethods();
        handlerMethods.forEach((info, handlerMethod) -> {
            // 拿到类(模块)上的权限注解
            Auth moduleAuth = handlerMethod.getBeanType().getAnnotation(Auth.class);
            // 拿到接口方法上的权限注解
            Auth methodAuth = handlerMethod.getMethod().getAnnotation(Auth.class);
            // 模块注解和方法注解缺一个都代表不进行权限处理
            if (moduleAuth == null || methodAuth == null) {
                return;
            }

            // 拿到该接口方法的请求方式(GET、POST等)
            Set<RequestMethod> methods = info.getMethodsCondition().getMethods();
            // 如果一个接口方法标记了多个请求方式,权限id是无法识别的,不进行处理
            if (methods.size() != 1) {
                return;
            }
            // 将请求方式和路径用`:`拼接起来,以区分接口。比如:GET:/user/{id}、POST:/user/{id}
            String path = methods.toArray()[0] + ":" + info.getPatternsCondition().getPatterns().toArray()[0];
            // 将权限名、资源路径、资源类型组装成资源对象,并添加集合中
            Resource resource = new Resource();
            resource.setPath(path);
            resource.setType(1);
            resource.setName(methodAuth.name());
            resource.setId(moduleAuth.id() + methodAuth.id());
            list.add(resource);
        });
        return list;
    }
}

现在是核心逻辑 + 接口扫描,不过还不够。现在我们每一个权限安全判断都是写在方法内,且这个逻辑判断代码都是一样的,我有多少个接口需要权限处理我就得写多少重复代码,这太恶心了。
拦截器
拦截器中的代码和之前接口方法中写的逻辑判断大致一样,还是一样,看注释理解大概思路即可:
package com.wujialiang.auth.interceptor;

import com.wujialiang.auth.entity.Resource;
import com.wujialiang.auth.service.UserService;
import org.springframework.beans.factory.annotation.Autowired;
import org.springframework.stereotype.Component;
import org.springframework.web.method.HandlerMethod;
import org.springframework.web.servlet.HandlerMapping;
import org.springframework.web.servlet.handler.HandlerInterceptorAdapter;

import javax.servlet.http.HttpServletRequest;
import javax.servlet.http.HttpServletResponse;
import java.util.List;
import java.util.stream.Collectors;

@Component
public class AuthInterceptor extends HandlerInterceptorAdapter {
    @Autowired
    private UserService resourceService;

    @Override
    public boolean preHandle(HttpServletRequest request, HttpServletResponse response, Object handler) throws Exception {
        // 如果是静态资源,直接放行
        if (!(handler instanceof HandlerMethod)) {
            return true;
        }

        // 获取请求的最佳匹配路径,这里的意思就是我之前数据演示的/API/user/test/{id}路径参数
        // 如果用uri判断的话就是/API/user/test/100,就和路径参数匹配不上了,所以要用这种方式获得
        String pattern = (String)request.getAttribute(
                HandlerMapping.BEST_MATCHING_PATTERN_ATTRIBUTE);
        // 将请求方式(GET、POST等)和请求路径用 : 拼接起来,等下好进行判断。最终拼成字符串的就像这样:DELETE:/API/user
        String path = request.getMethod() + ":" + pattern;

        // 拿到所有权限路径 和 当前用户拥有的权限路径
        // 拿到所有权限路径 和 当前用户拥有的权限路径
        List<Resource> allMenuss = resourceService.getAllMenus();
        List<Resource> userMenus = resourceService.getCurrentUserMenus();
        List<String> userPaths = userMenus.stream()
                .map(Resource::getPath)
                .collect(Collectors.toList());
        List<String> allPaths = allMenuss.stream()
                .map(Resource::getPath)
                .collect(Collectors.toList());
        // 第一个判断:所有权限路径中包含该接口,才代表该接口需要权限处理,所以这是先决条件,
        // 第二个判断:判断该接口是不是属于当前用户的权限范围,如果不是,则代表该接口用户没有权限
        if (allPaths.contains(path) && !userPaths.contains(path)) {
            System.out.println("您没有权限访问");
            return false;
        }
        // 有权限就放行
        return true;
    }
}
截器类写好之后,别忘了要使其生效,这里我们直接让SpringBoot启动类实现WevMvcConfigurer接口来做
package com.wujialiang.auth;

import com.wujialiang.auth.interceptor.AuthInterceptor;
import com.wujialiang.auth.interceptor.LoginInterceptor;
import org.springframework.boot.SpringApplication;
import org.springframework.boot.autoconfigure.SpringBootApplication;
import org.springframework.context.annotation.Bean;
import org.springframework.web.servlet.config.annotation.InterceptorRegistry;
import org.springframework.web.servlet.config.annotation.WebMvcConfigurer;

/**
 * 网站入口
 *
 */
@SpringBootApplication
public class App implements WebMvcConfigurer {
    public static void main(String[] args)  {
        // 第一个参数是该类的名字.class 第二个参数是main方法中的参数
        SpringApplication.run(App.class, args);
    }

    @Override
    public void addInterceptors(InterceptorRegistry registry) {
        // 登录拦截器使拦截器生效
        registry.addInterceptor(new LoginInterceptor());
        // 添加权限拦截器,并排除登录接口(如果有登录拦截器,权限拦截器记得放在登录拦截器后面)
        registry.addInterceptor(authInterceptor()).excludePathPatterns("/login");
    }

    // 这里一定要用如此方式创建拦截器,否则拦截器中的自动注入不会生效
    @Bean
    public AuthInterceptor authInterceptor() {return new AuthInterceptor();};
}
注意,拦截器中获取权限数据现在是直接查的数据库,实际开发中一定一定要将权限数据存在缓存里(如Redis),否则每个接口都要访问一遍数据库,压力太大了!这里为了减少心智负担,就不整合Redis了。
插入测试数据
insert into resource (id,path,name,type) value(1001,'POST:/API/usertest','新增用户',1);
insert into resource (id,path,name,type) value(1002,'DELETE:/API/usertest','删除用户',1);
insert into resource (id,path,name,type) value(1003,'PUT:/API/usertest','编辑用户',1);
insert into resource (id,path,name,type) value(1004,'GET:/API/usertest/test/{id}','用于演示路径参数',1);

-- 超级管理员添加权限
insert into role_resource (roleId,resourceId) value(1,1001);
insert into role_resource (roleId,resourceId) value(1,1002);
insert into role_resource (roleId,resourceId) value(1,1003);
insert into role_resource (roleId,resourceId) value(1,1004);
-- 数据管理员添加权限
insert into role_resource (roleId,resourceId) value(2,1004);
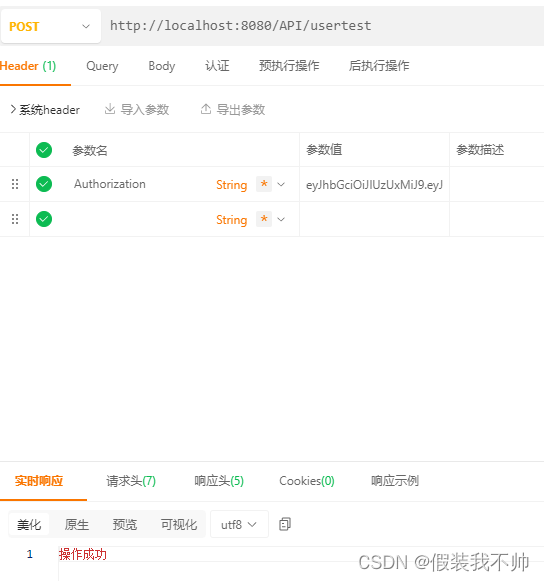
用户1超级管理员

用户2数据管理员
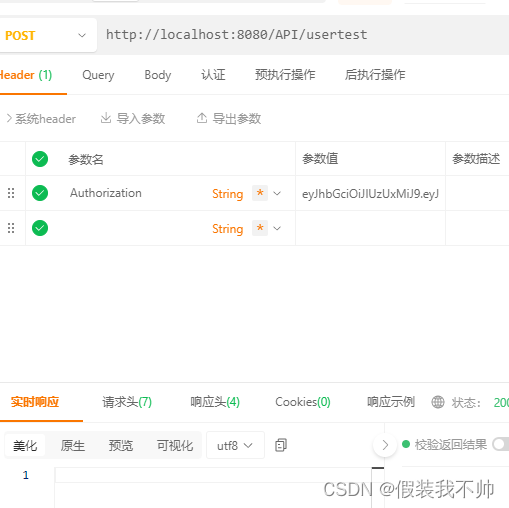
用户1超级管理员
用户2数据管理员

这样按钮级别权限也轻松实现了
数据权限
前面所介绍的页面权限和操作权限都属于功能权限,我们接下来要讲的就是截然不同的数据权限。
功能权限和数据权限最大的不同就在于,前者是判断有没有某权限,后者是判断有多少权限。功能权限对资源的安全判断只有YES和NO两种结果,要么你就有这个权限要么你就没有。而资源权限所要求的是,在同一个数据请求中,根据不同的权限范围返回不同的数据集。
举一个最简单的数据权限例子就是:现在列表里本身有十条数据,其中有四条我没有权限,那么我就只能查询出六条数据。接下来我就带大家来实现这个功能!
硬编码
前面所介绍的页面权限和操作权限都属于功能权限,我们接下来要讲的就是截然不同的数据权限。
功能权限和数据权限最大的不同就在于,前者是判断有没有某权限,后者是判断有多少权限。功能权限对资源的安全判断只有YES和NO两种结果,要么你就有这个权限要么你就没有。而资源权限所要求的是,在同一个数据请求中,根据不同的权限范围返回不同的数据集。
举一个最简单的数据权限例子就是:现在列表里本身有十条数据,其中有四条我没有权限,那么我就只能查询出六条数据。接下来我就带大家来实现这个功能!
公司表
create table company(
    id int primary key AUTO_INCREMENT comment '唯一表示',
    name varchar(255) comment '公司名称'
);

insert into company (name) value('总公司');
insert into company (name) value('北京分公司');
insert into company (name) value('上海分公司');
insert into company (name) value('广州分公司');
insert into company (name) value('深圳分公司');
数据表
create table data(
id int primary key AUTO_INCREMENT comment '唯一表示',
customerName varchar(255) comment '客户姓名',
customerPhone varchar(255) comment '客户手机号',
companyId int comment '所属公司'
);
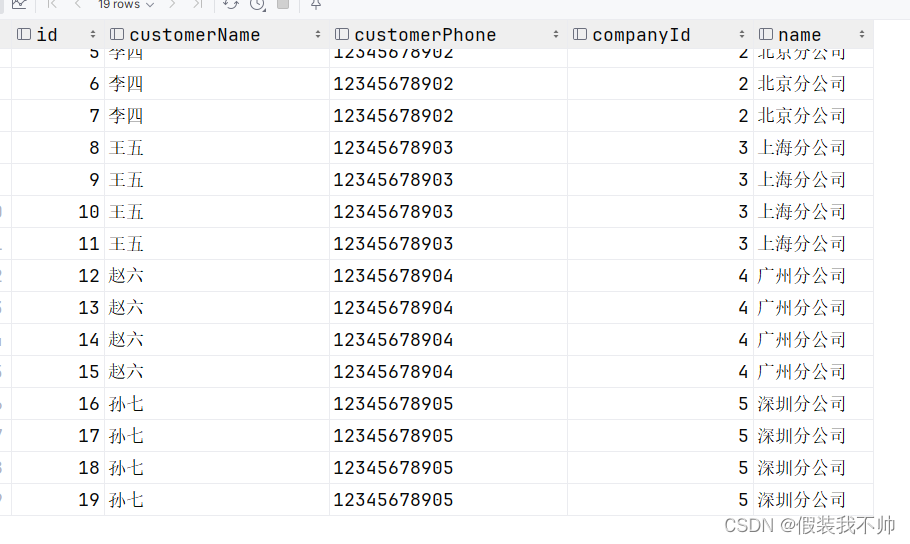
insert into data (customerName, customerPhone, companyId) value ('张三','12345678901',1);
insert into data (customerName, customerPhone, companyId) value ('张三','12345678901',1);
insert into data (customerName, customerPhone, companyId) value ('张三','12345678901',1);
insert into data (customerName, customerPhone, companyId) value ('李四','12345678902',2);
insert into data (customerName, customerPhone, companyId) value ('李四','12345678902',2);
insert into data (customerName, customerPhone, companyId) value ('李四','12345678902',2);
insert into data (customerName, customerPhone, companyId) value ('李四','12345678902',2);
insert into data (customerName, customerPhone, companyId) value ('王五','12345678903',3);
insert into data (customerName, customerPhone, companyId) value ('王五','12345678903',3);
insert into data (customerName, customerPhone, companyId) value ('王五','12345678903',3);
insert into data (customerName, customerPhone, companyId) value ('王五','12345678903',3);
insert into data (customerName, customerPhone, companyId) value ('赵六','12345678904',4);
insert into data (customerName, customerPhone, companyId) value ('赵六','12345678904',4);
insert into data (customerName, customerPhone, companyId) value ('赵六','12345678904',4);
insert into data (customerName, customerPhone, companyId) value ('赵六','12345678904',4);
insert into data (customerName, customerPhone, companyId) value ('孙七','12345678905',5);
insert into data (customerName, customerPhone, companyId) value ('孙七','12345678905',5);
insert into data (customerName, customerPhone, companyId) value ('孙七','12345678905',5);
insert into data (customerName, customerPhone, companyId) value ('孙七','12345678905',5);
我们权限划分也很简单,就和之前一样的,建一个中间表即可。这里为了演示,就直接将用户和公司直接挂钩了,建一个user_company表来表示用户拥有哪些公司数据权限
create table user_company(
    userId int comment '用户id',
    companyId int comment '公司id'
);
-- 超级管理员
insert into user_company(userId, companyId) value (1,1);
insert into user_company(userId, companyId) value (1,2);
insert into user_company(userId, companyId) value (1,3);
insert into user_company(userId, companyId) value (1,4);
insert into user_company(userId, companyId) value (1,5);
-- 数据管理员
insert into user_company(userId, companyId) value (2,5);
使用如下sql就可以实现,代码就不写了和之前的处理逻辑是一样的
select t1.* from data t1
left join user_company t2 on t1.companyId=t2.companyId
where t2.userId=
      (select t3.id from user t3 where t3.UserName='admin' limit 1);

select t1.* from data t1
left join user_company t2 on t1.companyId=t2.companyId
where t2.userId=
      (select t3.id from user t3 where t3.UserName='wjl' limit 1);
Mybatis拦截插件
@lombok.Data
public class Data {
    private String customerName;
    private String customerPhone;
    private Integer companyId;
}
接口
package com.wujialiang.auth.mapper;

import com.baomidou.mybatisplus.core.mapper.BaseMapper;
import com.wujialiang.auth.entity.Data;
import org.apache.ibatis.annotations.Mapper;
import org.springframework.stereotype.Repository;

import java.util.List;

@Repository
@Mapper
public interface DataMapper extends BaseMapper<Data> {
    /**
     * 获取全部的数据
     * @return
     */
    List<Data> getAllDatas();
}
xml配置
<?xml version="1.0" encoding="UTF-8"?>
<!DOCTYPE mapper PUBLIC "-//mybatis.org//DTD Mapper 3.0//EN" "http://mybatis.org/dtd/mybatis-3-mapper.dtd">
<mapper namespace="com.wujialiang.auth.mapper.DataMapper">
    <select id="getAllDatas" resultType="com.wujialiang.auth.entity.Data">
        select * from data
    </select>
</mapper>
修改service
package com.wujialiang.auth.service;

import com.wujialiang.auth.context.UserContext;
import com.wujialiang.auth.entity.Data;
import com.wujialiang.auth.entity.Resource;
import com.wujialiang.auth.mapper.DataMapper;
import com.wujialiang.auth.mapper.ResouceMapper;
import com.wujialiang.auth.mapper.UserMapper;
import org.springframework.beans.factory.annotation.Autowired;
import org.springframework.stereotype.Service;

import java.util.List;

@Service
public class UserService {
    @Autowired
    private UserMapper userMapper;

    @Autowired
    private ResouceMapper resouceMapper;

    @Autowired
    private DataMapper dataMapper;

    public Boolean userLogin(String userName,String password){
        boolean isLogin = userMapper.userLogin(userName, password);
        return isLogin;
    }

    public void doSomething() {
        String currentUserName = UserContext.getCurrentUserName();
        System.out.println("Service层---当前用户登录名:" + currentUserName);
    }

    /**
     * 获取当前用户的菜单
     * @return
     */
    public List<Resource> getCurrentUserMenus(){
        String currentUserName = UserContext.getCurrentUserName();
        return resouceMapper.getCurrentUserMenus(currentUserName);
    }

    /**
     * 获取全部的菜单
     * @return
     */
    public List<Resource> getAllMenus(){
        return resouceMapper.getAllMenus();
    }

    /**
     * 获取全部的数据
     * @return
     */
    public List<Data> getAllDatas(){
        return dataMapper.getAllDatas();
    }
}
修改controller
package com.wujialiang.auth.controller;
import com.wujialiang.auth.entity.Data;
import com.wujialiang.auth.entity.Resource;
import com.wujialiang.auth.entity.User;
import com.wujialiang.auth.service.UserService;
import com.wujialiang.auth.util.JwtUtil;
import org.springframework.beans.factory.annotation.Autowired;
import org.springframework.web.bind.annotation.*;
import java.util.List;
import java.util.stream.Collectors;
@RestController
public class UserController {
@Autowired
private UserService userService;
/**
* 登录接口
* @param user
* @return
*/
@PostMapping("/login")
public String login(@RequestBody User user) {
boolean isLogin = userService.userLogin(user.getUsername(), user.getPassword());
if (isLogin) {
// 如果正确的话就返回生成的token(注意哦,这里服务端是没有存储任何东西的)
return JwtUtil.generate(user.getUsername());
}
return "账号密码错误";
}
@GetMapping("/jwttest")
public String api() {
userService.doSomething();
return "api成功返回数据";
}
/**
* 获取当前用户的菜单
* @return
*/
@GetMapping("/menus")
public List<Resource> getMenus() {
return userService.getCurrentUserMenus();
}
/**
* 删除用户测试接口
* @return
*/
@DeleteMapping("/api/user")
public String deleteUser() {
// 拿到所有权限路径 和 当前用户拥有的权限路径
List<Resource> allMenuss = userService.getAllMenus();
List<Resource> userMenus = userService.getCurrentUserMenus();
List<String> userPaths = userMenus.stream()
.map(Resource::getPath)
.collect(Collectors.toList());
List<String> allPaths = allMenuss.stream()
.map(Resource::getPath)
.collect(Collectors.toList());
// 第一个判断:所有权限路径中包含该接口,才代表该接口需要权限处理,所以这是先决条件,如果权限路径中没有则放行
// 第二个判断:判断该接口是不是属于当前用户的权限范围,如果不是,则代表该接口用户没有权限
if (allPaths.contains("DELETE:/api/user") && !userPaths.contains("DELETE:/api/user")) {
return "您没权限操作";
}
return "操作成功";
}
/**
* 获取当前用户的菜单
* @return
*/
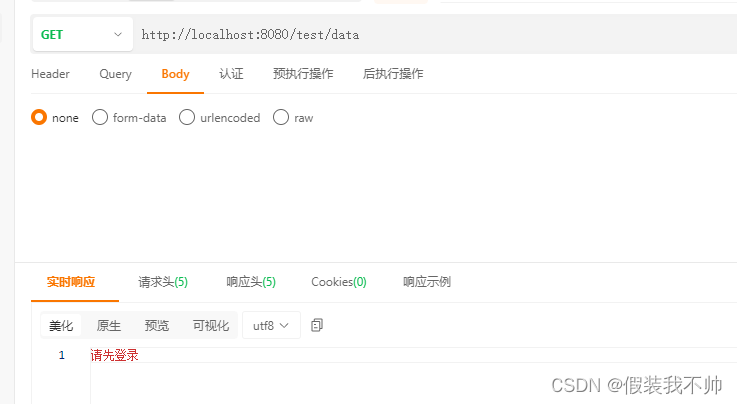
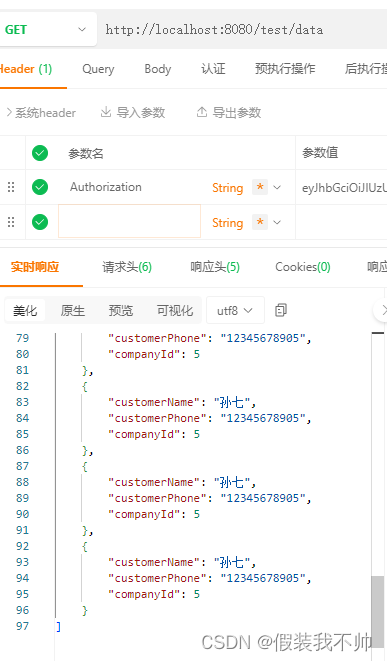
@GetMapping("/test/data")
public List<Data> getDatas() {
return userService.getAllDatas();
}
}
拦截器方法
package com.wujialiang.auth.interceptor;

import com.baomidou.mybatisplus.extension.plugins.inner.InnerInterceptor;
import lombok.extern.slf4j.Slf4j;
import net.sf.jsqlparser.JSQLParserException;
import net.sf.jsqlparser.expression.LongValue;
import net.sf.jsqlparser.expression.operators.conditional.AndExpression;
import net.sf.jsqlparser.expression.operators.relational.EqualsTo;
import net.sf.jsqlparser.parser.CCJSqlParserUtil;
import net.sf.jsqlparser.schema.Column;
import net.sf.jsqlparser.schema.Table;
import net.sf.jsqlparser.statement.Statement;
import net.sf.jsqlparser.statement.select.*;
import org.apache.ibatis.executor.statement.StatementHandler;
import org.apache.ibatis.mapping.MappedStatement;
import org.apache.ibatis.reflection.MetaObject;
import org.apache.ibatis.reflection.SystemMetaObject;

import java.sql.Connection;
import java.util.ArrayList;
import java.util.List;

/**
 * 这里是专门针对Mybatis-plus3.4.0分页拦截器做的SQL拦截插件
 *
 * @author RudeCrab
 */
@Slf4j
public class MyPaginationInterceptor implements InnerInterceptor {
    @Override
    public void beforePrepare(StatementHandler statementHandler, Connection connection, Integer transactionTimeout) {
        MetaObject metaObject = SystemMetaObject.forObject(statementHandler);
        MappedStatement mappedStatement = (MappedStatement) metaObject.getValue("delegate.mappedStatement");

        // id为执行的mapper方法的全路径名,如com.rudecrab.mapper.UserMapper.insertUser
        String id = mappedStatement.getId();
        log.info("mapper: ==> {}", id);
        // 如果不是指定的方法,直接结束拦截
        // 如果方法多可以存到一个集合里,然后判断当前拦截的是否存在集合中
        if (!id.startsWith("com.wujialiang.auth.mapper.DataMapper.getAllDatas")) {
            return;
        }

        // 获取到原始sql语句
        String sql = statementHandler.getBoundSql().getSql();
        log.info("原始SQL语句: ==> {}", sql);
        sql = getSql(sql);
        // 修改sql
        metaObject.setValue("delegate.boundSql.sql", sql);
        log.info("拦截后SQL语句:==>{}", sql);
    }

    /**
     * 解析SQL语句,并返回新的SQL语句
     *
     * @param sql 原SQL
     * @return 新SQL
     */
    private String getSql(String sql) {
        try {
            // 解析语句
            Statement stmt = CCJSqlParserUtil.parse(sql);
            Select selectStatement = (Select) stmt;
            PlainSelect ps = (PlainSelect) selectStatement.getSelectBody();
            // 拿到表信息
            FromItem fromItem = ps.getFromItem();
            Table table = (Table) fromItem;
            String mainTable = table.getAlias() == null ? table.getName() : table.getAlias().getName();

            List<Join> joins = ps.getJoins();
            if (joins == null) {
                joins = new ArrayList<>(1);
            }

            // 创建连表join条件
            Join join = new Join();
            join.setInner(true);
            join.setRightItem(new Table("user_company uc"));
            // 第一个:两表通过company_id连接
            EqualsTo joinExpression = new EqualsTo();
            joinExpression.setLeftExpression(new Column(mainTable + ".companyId"));
            joinExpression.setRightExpression(new Column("uc.companyId"));
            // 第二个条件:和当前登录用户id匹配
            EqualsTo userIdExpression = new EqualsTo();
            userIdExpression.setLeftExpression(new Column("uc.userId"));
            userIdExpression.setRightExpression(new LongValue("1"));
            // 将两个条件拼接起来
            join.setOnExpression(new AndExpression(joinExpression, userIdExpression));
            joins.add(join);
            ps.setJoins(joins);

            // 修改原语句
            sql = ps.toString();
        } catch (JSQLParserException e) {
            e.printStackTrace();
        }
        return sql;
    }
}
新建config
package com.wujialiang.auth.config;

import com.baomidou.mybatisplus.autoconfigure.ConfigurationCustomizer;
import com.baomidou.mybatisplus.extension.plugins.MybatisPlusInterceptor;
import com.wujialiang.auth.interceptor.MyPaginationInterceptor;
import org.springframework.context.annotation.Bean;
import org.springframework.context.annotation.Configuration;

/**
 * @author Mybatisplus配置
 */
@Configuration
public class MybatisPlusConfig {
    /**
     * 新的分页插件,一缓和二缓遵循mybatis的规则,
     * 需要设置 MybatisConfiguration#useDeprecatedExecutor = false
     * 避免缓存出现问题(该属性会在旧插件移除后一同移除)
     */
    @Bean
    public MybatisPlusInterceptor mybatisPlusInterceptor() {
        MybatisPlusInterceptor interceptor = new MybatisPlusInterceptor();
        interceptor.addInnerInterceptor(new MyPaginationInterceptor());
        return interceptor;
    }

    @Bean
    public ConfigurationCustomizer configurationCustomizer() {
        return configuration -> configuration.setUseDeprecatedExecutor(false);
    }
}

至此完成行数据修改


参考
https://www.cnblogs.com/RudeCrab/p/14251274.html
https://www.cnblogs.com/RudeCrab/p/14251154.html
https://blog.csdn.net/qq1910506668/article/details/136608184