补档
上一次我们在使用哈希函数时说,利用仿函数可以解决不知道哈希表内存的数据类型时对哈希函数也可以进行计算,但是当时只给了一个框架,一种是可以直接强制类型转换为整型的,另一种是字符串类型
对于字符串的哈希函数有很多研究,一种比较方便的做法是使用字符串的第一个字符的ASCII码值进行简单的数学运算,或者把所有的ASCII码值相加再运算,因为如果直接作为哈希地址会导致很多重复的冲突
template<>
struct HashFunc<string> {
	size_t operator()(const string& key) {
		size_t hash = 0;
		for (auto e : key) {
			hash = hash * 31 + e;
		}
		return hash;
	}
};
HashTable迭代器
开放定址法比较简单,这里我们主要实现连定址法
和之前一样,我们封装需要增加迭代器、和他的基本操作,还有KeyOfT,然后再遇到什么问题我们详细说
首先第一个问题是,我们要把数据类型从原来的key、value模式转化为模板,变成这种形式
	template<class T>
	struct HashNode {
		HashNode* _next;
		T _data;

		HashNode(const T& data)
			:_data(data)
			,_next(nullptr)
		{}
	};
然后我们就要实现哈希表的迭代器了
基本框架
	template<class K, class T, class KeyOfT, class Hash>
	class HashTable;

	template<class K, class T, class Ref, class Ptr, class KeyOfT, class Hash>
	struct __HTIterator {
		typedef HashNode<T> Node;
		typedef __HTIterator<K, T, Ref, Ptr, KeyOfT, Hash> Self;

		Node* _node;
		const HashTable<K, T, KeyOfT, Hash>* _pht;
		size_t _hashi;

		__HTIerator(Node* node, HashTable<K, T, KeyOfT, Hash>* pht, size_t hashi)
			:_node(node)
			, _pht(pht)
			, _hashi(hashi) {}

		__HTIerator(Node* node, const HashTable<K, T, KeyOfT, Hash>* pht, size_t hashi)
			:_node(node)
			, _pht(pht)
			, _hashi(hashi) {}

		Self& operator++() {}
		Ref operator*() {}
		Ptr operator->() {}

		bool operator!=(const Self& s) {}

	};
这里的迭代器因为要访问哈希表,所以需要前置声明,访问哈希表的话,我们给一个pht指向他的节点的指针,然后给一个对应的哈希地址
具体实现
		Self& operator++() {
			if (_node->_next != nullptr) {
				_node = _node->_next;
			}
			else {
				_hashi++;
				while (_hashi < _pht->_tables.size()) {
					if (_pht->_tables[_hashi]!=nullptr);
					{
						_node = _pht->_tables[_hashi];
						break;
					}
					_hashi++;
				}

				if (_hashi == _pht->_tables.size()) {
					_node = nullptr;
				}
			}
			return *this;
		}

		Ref operator*() {
			return _node->_data;
		}
		Ptr operator->() {
			return &_node->_data;
		}

		bool operator!=(const Self& s) {
			return _node != s._node;
		}
这里实现++主要有一个难点,就是当一个哈希桶走完的时候,我们如何找到下一个有效的哈希桶,一种思路是当场直接计算,取到下一个表中的值,计算出对应的哈希地址,第二种是直接现场推演,只要没有走出整个表,当我们找到一个不为空的节点时,这就是++的下一个位置,如果一直走出了表,就说明到了结尾,赋值为空即可
指针,引用,不等于,这里很简单
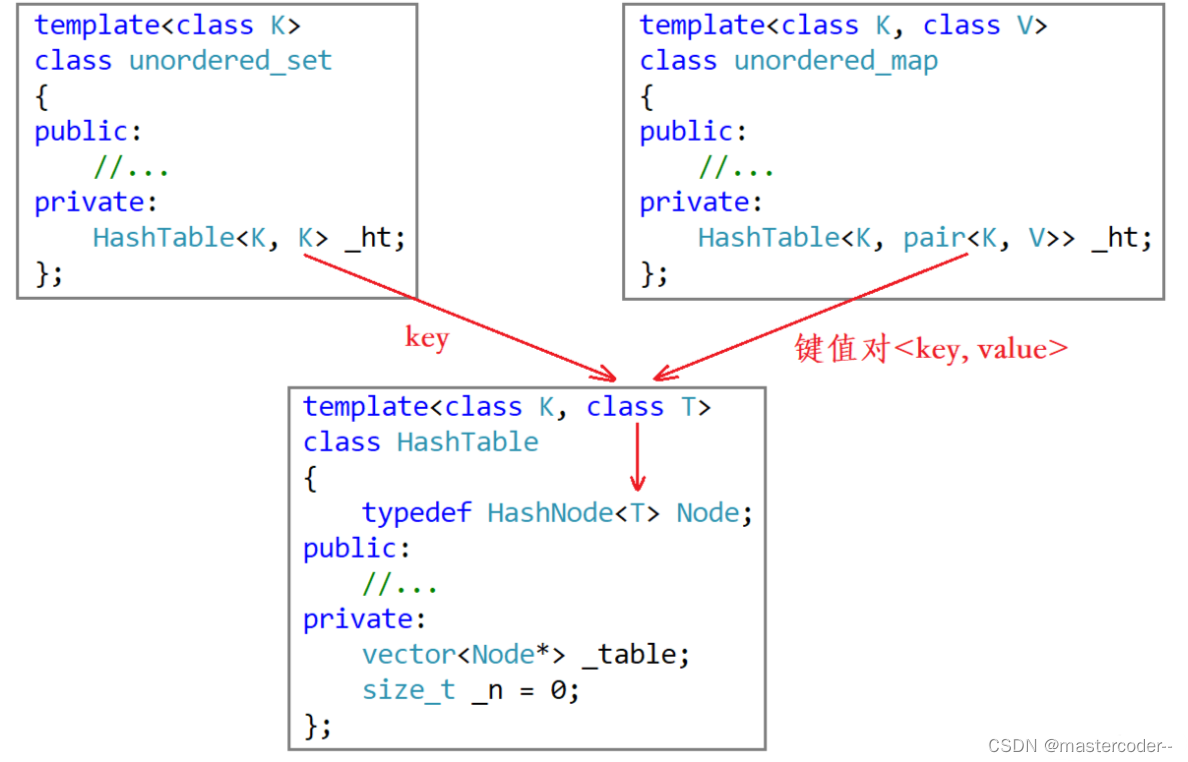
HashTable模板化
同样的,我们实现了迭代器之后,哈希表就也需要模板化了,由于迭代器内部使用了哈希表中的数据,我们还需要给哈希表中添加迭代器友元
具体实现
	template<class K, class T, class KeyOfT, class Hash>
	class HashTable {
		typedef HashNode<T> Node;

		template<class K, class T, class Ref, class KeyOfT, class Hash>
		friend struct __HTIterator;
	public:
		typedef __HTIterator<K, T, T&, T*, KeyOfT, Hash> iterator;
		typedef __HTIterator<K, T, const T&, const T*, KeyOfT, Hash> const_iterator;

		iterator begin() {
			for (size_t i = 0; i < _tables.size(); i++) {
				if (_tables[i]) {
					return iterator(_tables[i], this, i);
				}
			}

			return end();
		}

		iterator end() {
			return iterator(nullptr, this, -1);
		}

		iterator begin() const {
			for (size_t i = 0; i < _tables.size(); i++) {
				if (_tables[i]) {
					return const_iterator(_tables[i], this, i);
				}
			}

			return end();
		}

		iterator end() const {
			return const_iterator(nullptr, this, -1);
		}


		HashTable() {
			_tables.resize(10);
		}

		~HashTable() {
			for (size_t i = 0; i < _tables.size(); i++) {
				Node* cur = _tables[i];
				while (cur) {
					Node* next = cur->_next;
					delete cur;
					cur = next;
				}
				_tables[i] = nullptr;
			}
		}

		 pair<iterator, bool> Insert(const T& data) {
			Hash hf;
			KeyOfT kot;

			iterator it = Find(kot(data));
			if (it != end())
				return make_pair(it, false);

			if (_n == _tables.size()) {
				vector<Node*> newTables;
				newTables.resize(_tables.size() * 2, nullptr);

				for (size_t i = 0; i < _tables.size(); i++) {
					Node* cur = _tables[i];
					while (cur) {
						Node* next = cur->_next;

						size_t hashi = hf(kot(cur->_data)) % newTables.size();
						cur->_next = newTables[i];
						newTables[hashi] = cur;
						cur = next;
					}
					_tables[i] = nullptr;
				}
				_tables.swap(newTables);
			}

			size_t hashi = hf(kot(data)) % _tables.size();
			Node* newnode = new Node(data);

			newnode->_next = _tables[hashi];
			_tables[hashi] = newnode;
			++_n;

			return make_pair(iterator(newnode, this, hashi), true);
		}
		iterator Find(const K& key) {
			Hash hf;
			KeyOfT kot;
			size_t hashi = hf(kot(key)) % _tables.size();
			Node* cur = _tables[hashi];

			while (cur) {
				if (kot(cur->_data) == key) {
					return iterator(cur, this, hashi);
				}
				cur = cur->_next;
			}
			return end();
		}

		bool Erase(cosnt K& key) {
			Hash hf;
			KeyOfT kot;
			size_t hashi = hf(key) % _tables.size();
			Node* prev = nullptr;
			Node* cur = _tables[hashi];
			while (cur) {
				if (kot(cur->_data) == key) {
					if (prev == nullptr)
						_tables[hashi] = cur->_next;
					else
						prev->_next = cur->_next;
					delete cur;
					return true;
				}
				prev = cur;
				cur = cur->_next;
			}
			return false;
		}
	private:
		vector<Node*> _tables;
		size_t _n = 0;
	};
在迭代器部分我们有两个构造函数,其实是为了两个迭代器做准备,因为如果构造函数只有普通版本,在传入const迭代器时,会有权限的放大,会报错,因此我们要实现两套迭代器
然后还需要更改的是每一个T都要用KeyOfT取值才可以进行运算,稍后我们封装成map和set的时候会把哈希函数分别封装进去
UnorderedSet封装
具体实现
namespace xu {
	template<class K, class Hash = HashFunc<K>>
	class unordered_set {
		struct SetKeyOfT {
			const K& operator(const K& key) {
				return key;
			}
		};
	public:
		typedef typename hash_bucket::HashTable<K, K, SetKeyOfT, Hash>::const_iterator iterator;
		typedef typename hash_bucket::HashTable<K, K, SetKeyOfT, Hash>::const_iterator const_iterator;

		const_iterator begin() const {
			return _ht.begin();
		}

		const_iterator end() const {
			return _ht.end();
		}

		pair<const_iterator, bool> insert(const K& key)
		{
			auto ret = _ht.Insert(key);
			return pair<const_iterator, bool>(const_iterator(ret.first._node, ret.first._pht, ret.first._hashi), ret.second);
		}

		iterator find(const K& key) {
			return _ht.Find(key);
		}

		bool erase(const K& key) {
			return _ht.Erase(key);
		}
	private:
		hash_bucket::HashTable<K, K, SetKeyOfT, Hash> _ht;
	};
}
这里封装倒没有什么难理解的,因为Set不能被更改,所以他的const迭代器是const迭代器,普通迭代器也是const迭代器,因此我们只需要实现const迭代器的部分,即便是普通迭代器,转换到const迭代器也只是权限的缩小,这里是支持的
比较难理解的是插入的这个返回值是什么意思,为什么不能直接返回哈希表里面的插入值呢
因为哈希表本身是支持普通迭代器和const迭代器的,而当set或者map插入时,是完全能成功的,但是在返回时,pair内部只有const迭代器,本质原因是因为普通迭代器不能用于构造const迭代器(因为编译器不认识),注意这里不是简单的类型转换,而是构造
那我们为什么不能直接像之前的红黑树一样直接改成Node*,主要还是因为哈希表的迭代器模板参数更多更加复杂,如果只是Node*是不够用的
我们知道了这个错误的产生原因,就有思路可以解决了,就是不让他自动构造,我们手动构造一个迭代器给她返回就没问题了,也就是使用auto接收插入的返回值,然后再手动构造一个const迭代器,返回,就解决了这里的报错
UnorderMap封装
namespace xu {
	template<class K, class V, class Hash = HashFunc<K>>
	class unordered_map {
		struct MapKeyOfT {
			const K& operator(const pair<K, V>& kv) {
				return kv.first;
			}
		};
	public:
		typedef typename hash_bucket::HashTable<K, pair<const K, V>, MapKeyOfT, Hash>::iterator iterator;

		iterator begin() {
			return _ht.begin();
		}
		iterator end() {
			return _ht.end();
		}
		pair<iterator, bool> insert(const pair<K, V>& kv) {
			return _ht.Insert(kv);
		}
		const V& operator[](const K& key) const {
			pair<iterator, bool> ret = _ht.Insert(make_pair(key, V()));
			return ret.first->second;
		}
		V& operator[](const K& key) {
			pair<iterator, bool> ret = _ht.Insert(make_pair(key, V()));
			return ret.first->second;
		}

		iterator find(const K& key) {
			return _ht.Find(key);
		}
		bool erase(const K& key) {
			return _ht.Erase(key);
		}
	private:
		hash_bucket::HashTable<K, pair<const K, V>, MapKeyOfT, Hash> _ht;
	};
}
map封装比set封装要简单一些,需要注意的是map支持方括号访问,支持方括号修改,具体原因见介绍map和set那一部分