目录
1. 当TableLayout下面写控件、则控件占据一行的大小。(自适应一行,不留空白)
前言
前面已经学习了平时实际开发中用得较多的线性布局(LinearLayout)与相对布局(RelativeLayout), 其实学完这两个基本就够用了,小编在实际开发中用得比较多的也是这两个,虽说用得不多,但是还是有必要学习一下基本的用法的,说不定哪一天能用得上呢! 你说是吧,学多点东西没什么的,又不吃亏!好了,就扯到这里,开始这一节的学习吧,这一节我们会学习 Android中的第三个局:TableLayout(表格布局)
一、Tablelayout(表格布局)
(一)Tablelayout的相关简介
学过HTML的朋友都知道,可以通过< table >< tr >< td >就可以生成一个HTML的表格, 而Android中也允许使用表格的方式来排列组件,就是行与列的方式,就说这节的TableLayout 。
(二)TableLayout使用方法
1. 当TableLayout下面写控件、则控件占据一行的大小。(自适应一行,不留空白)
如下设置三个button,其宽度为match_parent、按道应该不占据一行,而却一个button占了一整行
<TableLayout
        android:layout_width="match_parent"
        android:layout_height="match_parent">

        <Button
            android:layout_width="match_parent"/>

        <Button
            android:layout_width="match_parent"/>

        <Button
            android:layout_width="match_parent"/>

</TableLayout>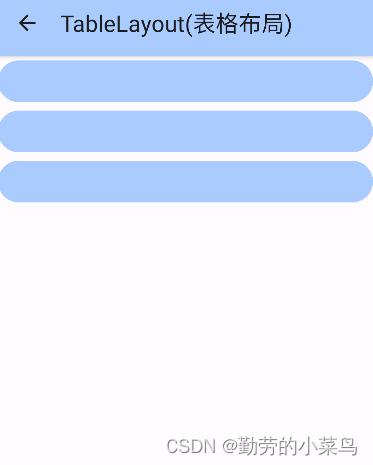
2.多个组件占据一行,则配合TableRow实现
添加TableRow,使其成表格状
一个TableRow代表一行
 <TableLayout
        android:layout_width="match_parent"
        android:layout_height="match_parent">

        <TableRow>
            <TextView
                android:background="#E0E0E0"
                android:padding="8dp"
                android:text="Cell 1" />

            <TextView
                android:background="#E0E0E0"
                android:padding="8dp"
                android:text="Cell 2" />

            <TextView
                android:background="#E0E0E0"
                android:padding="8dp"
                android:text="Cell 3" />
        </TableRow>

        <TableRow>
            <Button
                android:layout_width="match_parent"
                android:text="第一列" />

            <Button
                android:layout_width="match_parent"
                android:text="第二列" />

            <Button
                android:layout_width="match_parent"
                android:text="第三列" />

            <TextView
                android:background="#E0E0E0"
                android:padding="8dp"
                android:text="第四列" /> <TextView
                android:background="#E0E0E0"
                android:padding="8dp"
                android:text="第五列" />
        </TableRow>
        <TableRow>
            <Button
                android:layout_width="match_parent"
                android:text="第一列"/>
        </TableRow>

    </TableLayout>
(三)三个常用属性
1.collapseColumns(隐藏列)
在TableRow中定义5个按钮后,接着在最外层的TableLayout中添加以下属性: android:collapseColumns = "0,2",就是隐藏第一与第三列,代码如下:
 <TableLayout
        android:id="@+id/TableLayout2"
        android:layout_width="fill_parent"
        android:layout_height="wrap_content"
        android:collapseColumns="0,2"
        tools:ignore="MissingConstraints">
        <TableRow>
            <Button
                android:layout_width="wrap_content"
                android:layout_height="wrap_content"
                android:text="one" />

            <Button
                android:layout_width="wrap_content"
                android:layout_height="wrap_content"
                android:text="two" />

            <Button
                android:layout_width="wrap_content"
                android:layout_height="wrap_content"
                android:text="three" />

            <Button
                android:layout_width="wrap_content"
                android:layout_height="wrap_content"
                android:text="four" />

            <Button
                android:layout_width="wrap_content"
                android:layout_height="wrap_content"
                android:text="five" />
        </TableRow>
    </TableLayout>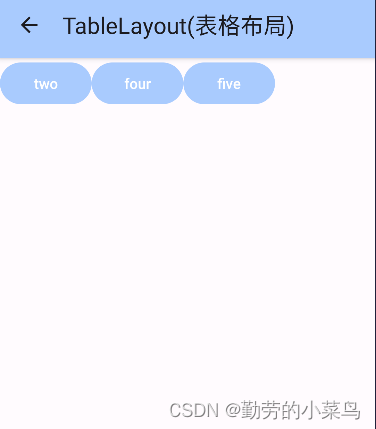
2.stretchColumns(拉伸列)
在TableLayout中设置了四个文本框,在最外层的TableLayout中添加以下属性: android:stretchColumns = "1"
设置第二列为可拉伸列,让该列填满这一行所有的剩余空间,代码如下:
<TableLayout
        android:id="@+id/TableLayout2"
        android:layout_width="fill_parent"
        android:layout_height="wrap_content"
        android:stretchColumns="1">
        <TableRow>
            <TextView
                android:background="#E0E0E0"
                android:padding="8dp"
                android:text="one" />

            <TextView
                android:background="#E0E0E0"
                android:padding="8dp"
                android:text="two" />

            <TextView
                android:background="#E0E0E0"
                android:padding="8dp"
                android:text="three" />

            <TextView
                android:background="#E0E0E0"
                android:padding="8dp"
                android:text="four" />

        </TableRow>
    </TableLayout>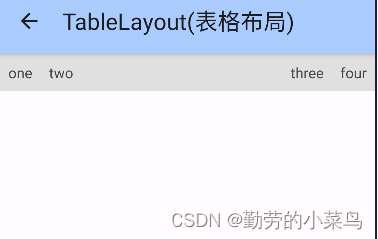
3.shrinkColumns(收缩列)
设置4个文本框和一个按钮,在最外层的TableLayout中添加以下属性: android:shrinkColumns = "1"
设置第二个列为可收缩列,代码如下:
<TableLayout
        android:id="@+id/TableLayout2"
        android:layout_width="fill_parent"
        android:layout_height="wrap_content"
        android:shrinkColumns="1">

        <TableRow>

            <TextView
                android:background="#E0E0E0"
                android:padding="8dp"
                android:text="one" />

            <TextView
                android:background="#E0E0E0"
                android:padding="8dp"
                android:text="two" />

            <TextView
                android:background="#E0E0E0"
                android:padding="8dp"
                android:text="three" />

            <TextView
                android:background="#E0E0E0"
                android:padding="8dp"
                android:text="four" />

            <Button
                android:layout_width="wrap_content"
                android:layout_height="wrap_content"
                android:text="----------- one--------------- " />

        </TableRow>
    </TableLayout>
(四)总结

二、FrameLayout(帧布局)
(一)FrameLayout的相关简介
这个布局直接在屏幕上开辟出一块空白的区域,往里面添加控件的时候,会默认把他们放到这块区域的左上角,而这种布局方式却没有任何的定位方式,所以它应用的场景并不多;帧布局的大小由控件中最大的子控件决定,如果控件的大小一样大的话,那么同一时刻就只能看到最上面的那个组件,后续添加的控件会覆盖前一个,虽然默认会将控件放置在左上角,但是可以通过layout_gravity属性,指定到其他的位置。
(二)常用属性
FrameLayout的属性很少就两个,但是在说之前先介绍一个东西:
前景图像:永远处于帧布局最上面,直接面对用户的图像,就是不会被覆盖的图片。
两个属性:
1.android:foreground:设置改帧布局容器的前景图像
2.android:foregroundGravity:设置前景图像显示的位置
(三)实例演示
简单的例子
<?xml version="1.0" encoding="utf-8"?>
<FrameLayout xmlns:android="http://schemas.android.com/apk/res/android"
    xmlns:app="http://schemas.android.com/apk/res-auto"
    xmlns:tools="http://schemas.android.com/tools"
    android:id="@+id/main"
    android:layout_width="match_parent"
    android:layout_height="match_parent"
    tools:context=".SixthActivity"
    android:foreground="@mipmap/knowledge"
    android:foregroundGravity="right|bottom"
    >
    <TextView
        android:layout_width="200dp"
        android:layout_height="200dp"
        android:background="#2eaa0f" />
    <TextView
        android:layout_width="150dp"
        android:layout_height="150dp"
        android:background="#bdaccc" />
    <TextView
        android:layout_width="100dp"
        android:layout_height="100dp"
        android:background="#77b8ff" />
</FrameLayout>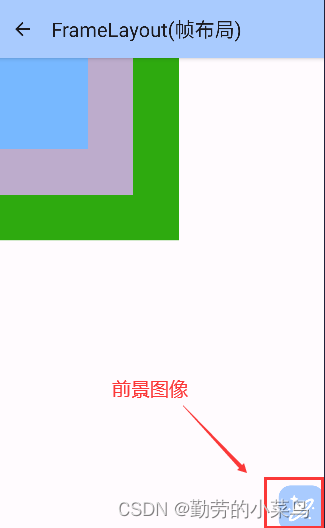


![[RK3399 Linux] 使用busybox 1.36.1制作rootfs](https://img-blog.csdnimg.cn/direct/151ca3e9356c493bac89725b6b18354c.png#pic_center)