转到定义 和 查看定义
在使用Django或任何其他库的过程中,我们可能需要检查这些库中的代码。VS Code提供了两个方便的命令,可以直接导航到任何代码中的类和其他对象的定义:
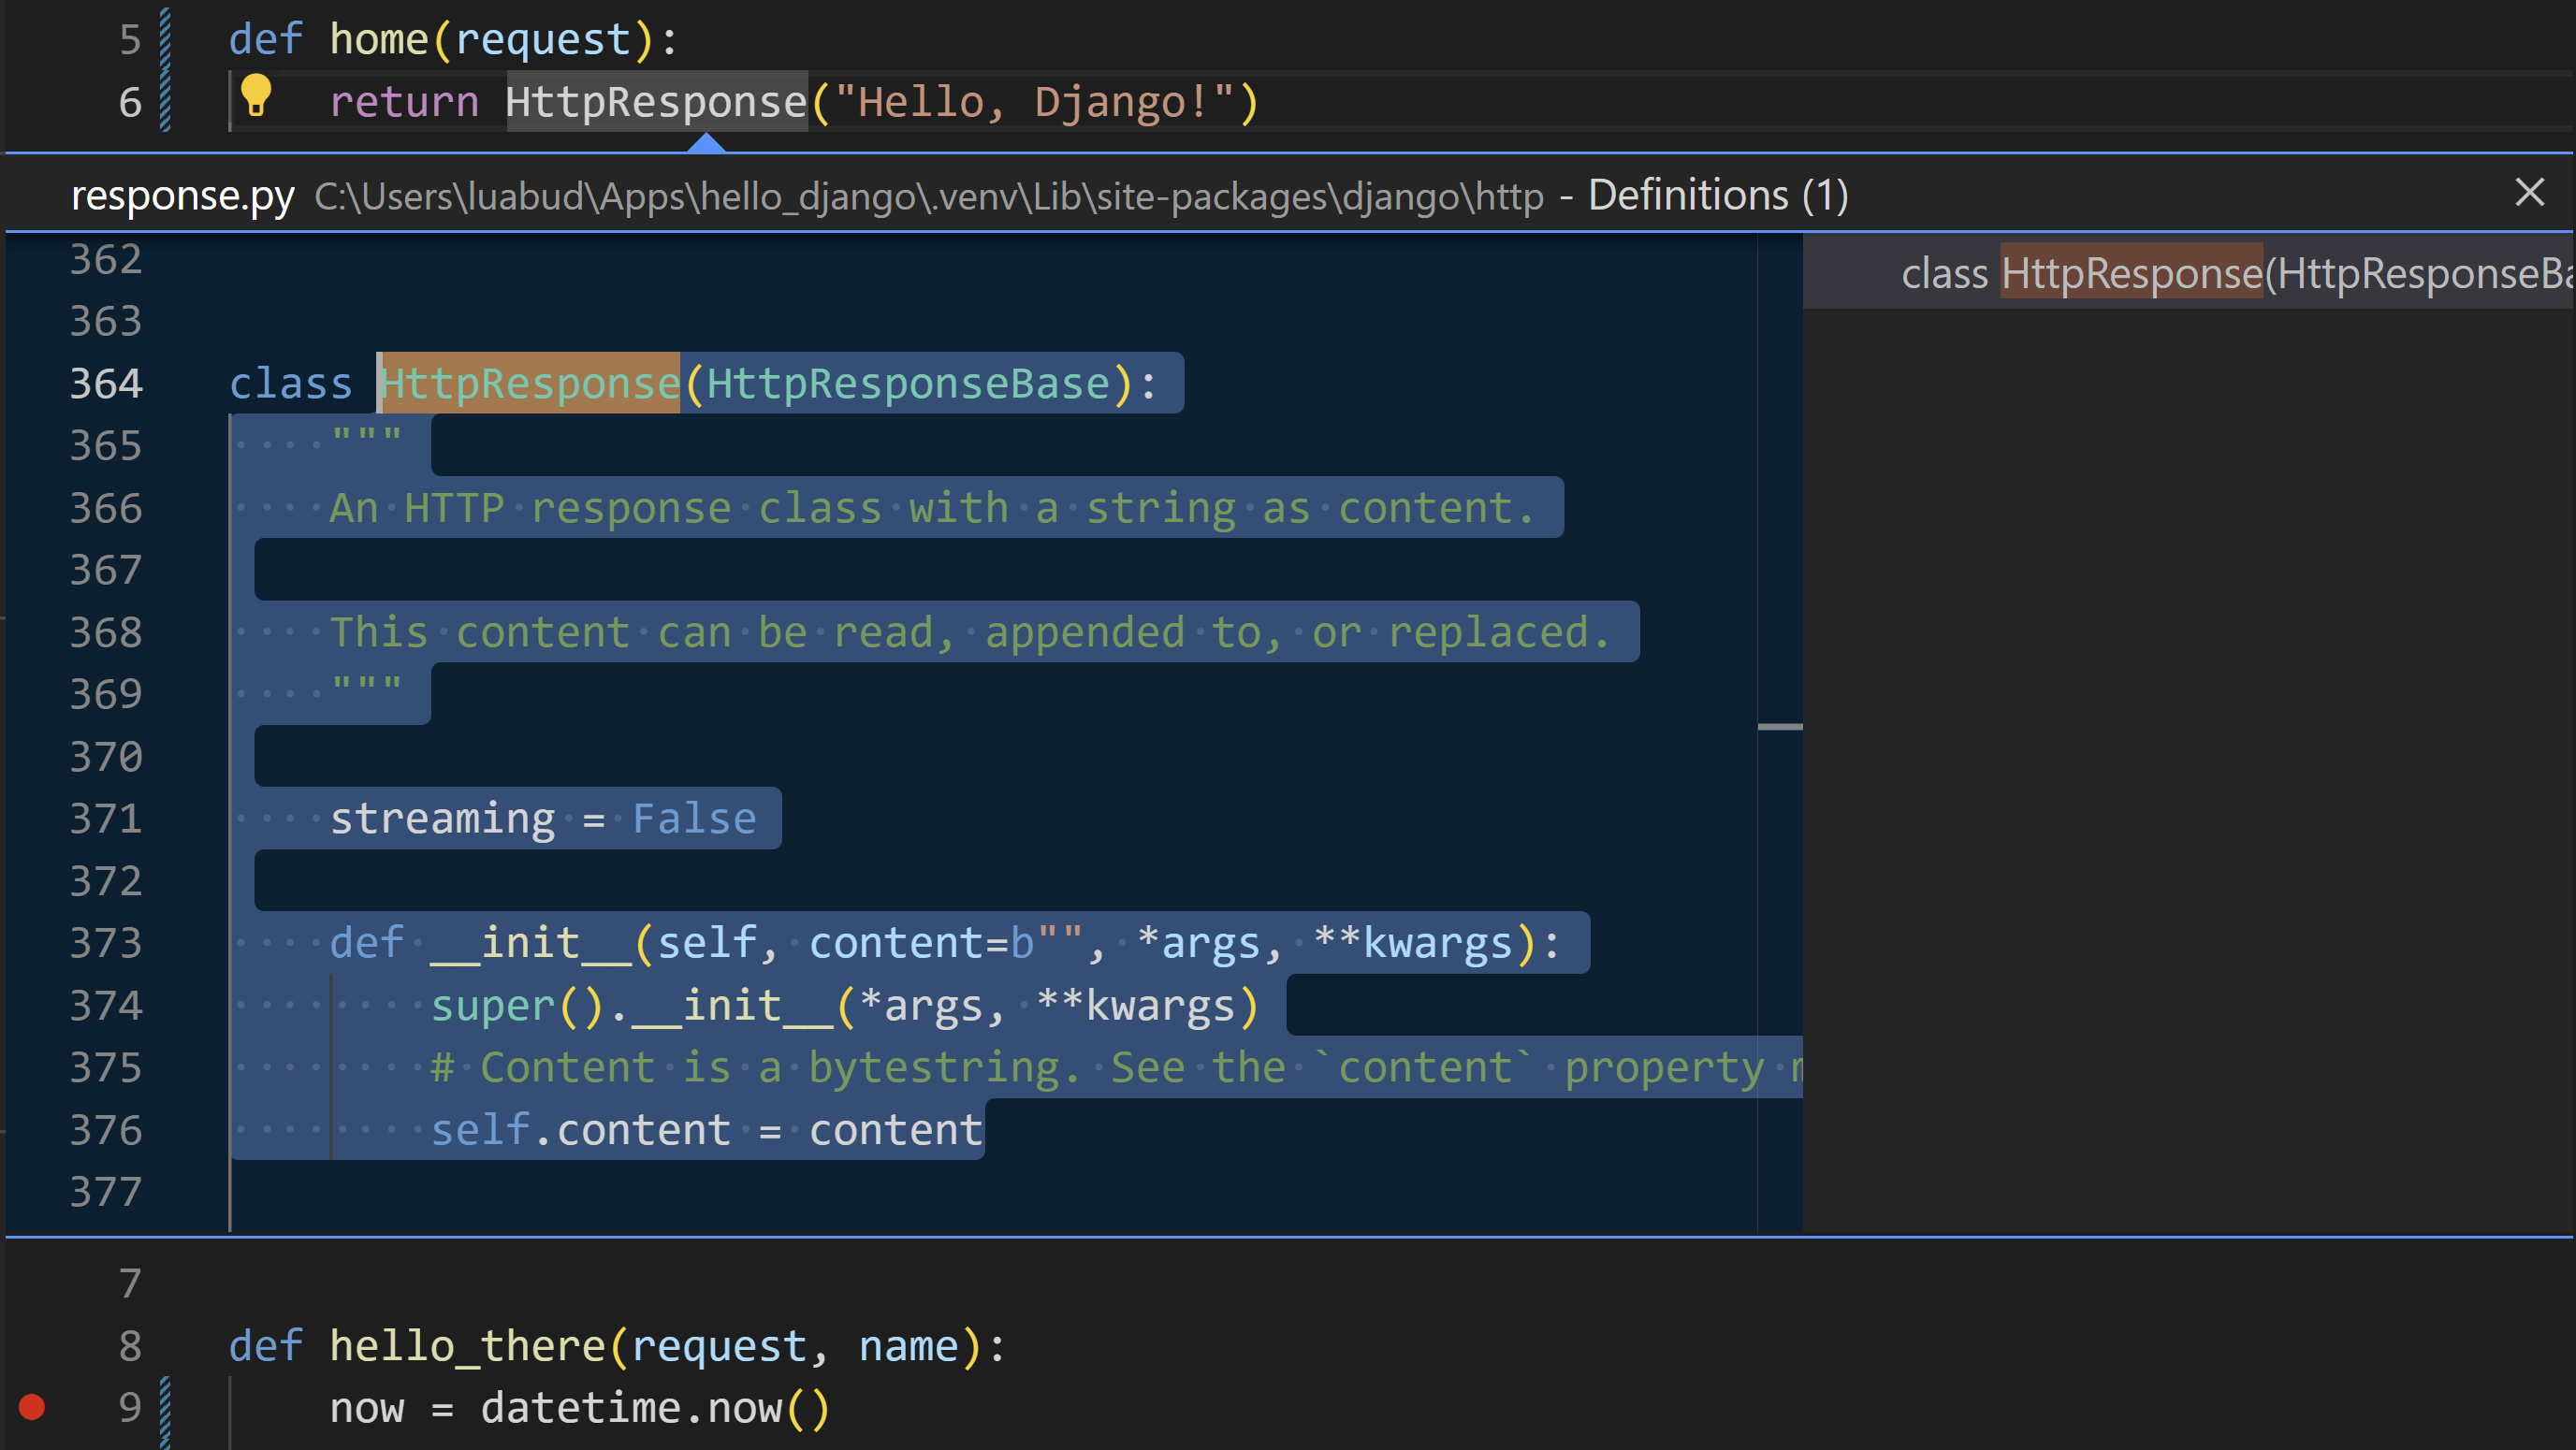
转到定义 在Python开发环境中,我们可以轻松地对函数、类或者其他导入模块中的成员使用“Go to Definition”,以便深入研究其内部实现。这一功能对于调试、重构代码以及学习他人代码库特别有用。 当点击或使用快捷键激活此功能时,Code会直接跳转到源代码中该符号被首次声明或定义的位置,这有助于程序员理解代码的工作原理以及如何被实现。例如,在文件
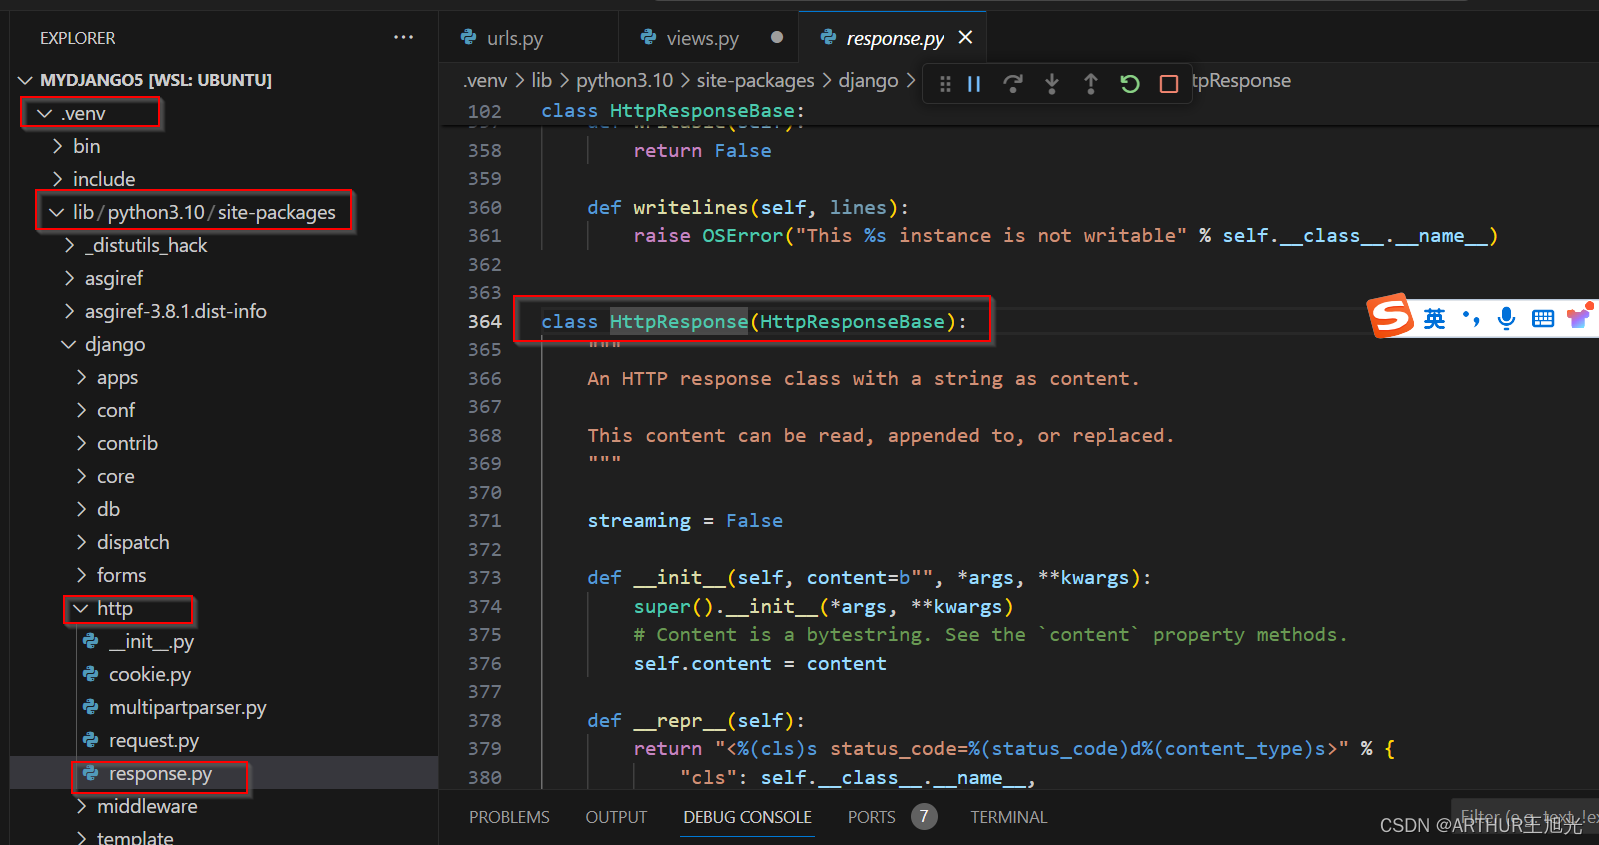
views.py中, 右击 home 函数中的HttpResponse选择 Go to Definition (快捷键F12), Code打开Django的库,显示HttpResponse的定义。如截屏
查看定义 (Alt+F12和右键菜单), “Peek Definition”可以帮助我们快速查看某个函数或类的定义,同时保持对当前代码编辑位置的关注,这样就可以在不离开当前工作区的情况下了解相关代码结构和实现细节。相关定义的代码直接在当前文件内显示,并不单独单开文件,退出方式: ESC键,右上角的关闭按钮。
使用模板生成网页
上个例子中我们仅仅创建了简单的文字网页. 我们还需要构建更复杂的网页,虽然可以通过代码直接生成HTML,但是开发人员一般不会如此操作,从而可以避免网站受到XSS攻击(cross-site scripting (XSS) attacks.)
一个更好是使用实践是,在编程过程中不使用HTML文件,用templates来代替。这样的话在程序中只需要考虑数据而不需要考虑格式。
Django中的模版是包含数据占位符的HTML文件。程序运行时,Django模板引擎负责在呈现页面时进行数据和占位符之间的替换,并提供自动转义以防止XSS攻击(也就是说,如果您尝试在数据值中使用HTML,则会看到HTML仅以纯文本形式呈现)。这样的设计下,代码只关心数据值,而模板只关心标记(占位符)。Django模板提供了灵活的选项,如模板继承,它允许我们定义一个带有公共标记的基础页,然后在该基础页上添加特定的页面内容。
本章节中,我们先采用模版创建一个单页。然后通过CSS文件进行相关的格式配置,和含有公共标记的多页模版。Django模版还支持 Controll flow(控制流,编程)和iteration(迭代)
修改
web_project/settings.py文件, 在INSTALLED_APPS表中增加下面的输入。该输入的作用是确保项目知道hello这个app的存在。'hello',hello文件夹内创建templates文件夹, 在templates中创建子目录hello与app名字保持一致 (两级目录结构是经典的Django结构convention).在
templates/hello目录中, 创建文件hello_there.html内容如下. 该模版包含两个数据占位符名字为“name”和“date”。占位符用两个花括号表示{{and}}. 其他内容为标砖的HTML文件格式。 模版占位符也可以在管道(pipe)符号"|"后包含格式 。在本利中使用Django内置的 date filter 和 time filter,在代码中可以仅传递datetime的数值,不需要考虑格式。<!DOCTYPE html> <html> <head> <meta charset="utf-8" /> <title>Hello, Django</title> </head> <body> <strong>Hello there, {{ name }}!</strong> It's {{ date | date:"l, d F, Y" }} at {{ date | time:"H:i:s" }} </body> </html>在
views.py文件的头部,增加下面的程序行:from django.shortcuts import render在
views.py文件中,修改hello_there函数,使用django.shortcuts.render方法来加载模版 template 并提供模版上下文。这里的上下文是指在template中占位符所规定的参数集。Render函数包含三个参数, request, templates的路径和文件,上下文内容。 (开发者通常对让模版和使用它们的函数保持相同的命名。相同的名字在Django中不是必须的。)def hello_there(request, name): print(request.build_absolute_uri()) #optional return render( request, 'hello/hello_there.html', { 'name': name, 'date': datetime.now() } )上述的代码比较简单,仅仅关注数据,相关的的格式在template中定义。#前后端分离 #解耦
启动程序(可以使用debug,或者不使用debugger Ctrl+F5)浏览器进入 /hello/name , 检查结果。

Also try navigating to a /hello/name URL using a name like
<a%20value%20that%20could%20be%20HTML>to see Django's automatic escaping at work. The "name" value shows up as plain text in the browser rather than as rendering an actual element. // 这个功能并没有效果
回顾:
- 项目中的settings.py文件增加 installed app
- 建立对应的templates目录结构和html模版文件,为数据准备占位符
- 修改app的view.py文件中对应函数(原则上与html文件保持一致),采用Render函数给对应的html文件占位符提供数据。
CSS文件的使用
静态文件是web应用程序为某些请求(如CSS文件)原样返回的内容片段。提供静态文件要求settings.py中的INSTALLED_APPS列表包含django.contrib.staticfiles,默认情况下会包含该列表。
在Django中提供静态文件是一门艺术,尤其是在部署到生产环境中时。这里展示的是一种简单的方法,它适用于Django开发服务器和像Gunicorn这样的生产服务器。然而,静态文件的完整处理超出了本教程的范围,更多信息,请参阅Django文档中的管理静态文件Managing static files
切换到生产时,导航到settings.py,设置DEBUG=False,然后更改ALLOWED_HOSTS=['*']以允许特定主机。在使用容器时,这可能会导致额外的工作。有关详细信息,请参阅 Issue 13.
为APP准备静态文件
项目文件
web_project/urls.py, 增加下面的导入信息:from django.contrib.staticfiles.urls import staticfiles_urlpatterns相同文件内的底部增加下面的语句。目的,CSS文件的URL增加到项目可识别的URL列表中:
urlpatterns += staticfiles_urlpatterns()
在模版中引用CSS
hello目录中, 创建目录static.static目录总, 创建子目录hello, matching the app name.The reason for this extra subfolder is that when you deploy the Django project to a production server, you collect all the static files into a single folder that's then served by a dedicated static file server. The
static/hellosubfolder ensures that when the app's static files are collected, they're in an app-specific subfolder and won't collide with file from other apps in the same project.In the
static/hellofolder, create a file namedsite.csswith the following contents. After entering this code, also observe the syntax highlighting that VS Code provides for CSS files, including a color preview..message { font-weight: 600; color: blue; }In
templates/hello/hello_there.html, add the following lines after the<title>element. The{% load static %}tag is a custom Django template tag set, which allows you to use{% static %}to refer to a file like the stylesheet.{% load static %} <link rel="stylesheet" type="text/css" href="{% static 'hello/site.css' %}" />Also in
templates/hello/hello_there.html, replace the contents<body>element with the following markup that uses themessagestyle instead of a<strong>tag:<span class="message">Hello, there {{ name }}!</span> It's {{ date | date:'l, d F, Y' }} at {{ date | time:'H:i:s' }}.Run the app, navigate to a /hello/name URL, and observe that the message renders in blue. Stop the app when you're done.
Use the collectstatic command
For production deployments, you typically collect all the static files from your apps into a single folder using the python manage.py collectstatic command. You can then use a dedicated static file server to serve those files, which typically results in better overall performance. The following steps show how this collection is made, although you don't use the collection when running with the Django development server.
In
web_project/settings.py, add the following line that defines a location where static files are collected when you use thecollectstaticcommand:STATIC_ROOT = BASE_DIR / 'static_collected'In the Terminal, run the command
python manage.py collectstaticand observe thathello/site.cssis copied into the top levelstatic_collectedfolder alongsidemanage.py.In practice, run
collectstaticany time you change static files and before deploying into production.
Create multiple templates that extend a base template
Because most web apps have more than one page, and because those pages typically share many common elements, developers separate those common elements into a base page template that other page templates then extend. (This is also called template inheritance, meaning the extended pages inherit elements from the base page.)
Also, because you'll likely create many pages that extend the same template, it's helpful to create a code snippet in VS Code with which you can quickly initialize new page templates. A snippet helps you avoid tedious and error-prone copy-paste operations.
The following sections walk through different parts of this process.
Create a base page template and styles
A base page template in Django contains all the shared parts of a set of pages, including references to CSS files, script files, and so forth. Base templates also define one or more block tags with content that extended templates are expected to override. A block tag is delineated by {% block <name> %} and {% endblock %} in both the base template and extended templates.
The following steps demonstrate creating a base template.
In the
templates/hellofolder, create a file namedlayout.htmlwith the contents below, which contains blocks named "title" and "content". As you can see, the markup defines a simple nav bar structure with links to Home, About, and Contact pages, which you create in a later section. Notice the use of Django's{% url %}tag to refer to other pages through the names of the corresponding URL patterns rather than by relative path.<!DOCTYPE html> <html> <head> <meta charset="utf-8"/> <title>{% block title %}{% endblock %}</title> {% load static %} <link rel="stylesheet" type="text/css" href="{% static 'hello/site.css' %}"/> </head> <body> <div class="navbar"> <a href="{% url 'home' %}" class="navbar-brand">Home</a> <a href="{% url 'about' %}" class="navbar-item">About</a> <a href="{% url 'contact' %}" class="navbar-item">Contact</a> </div> <div class="body-content"> {% block content %} {% endblock %} <hr/> <footer> <p>© 2018</p> </footer> </div> </body> </html>Add the following styles to
static/hello/site.cssbelow the existing "message" style, and save the file. (This walkthrough doesn't attempt to demonstrate responsive design; these styles simply generate a reasonably interesting result.).navbar { background-color: lightslategray; font-size: 1em; font-family: 'Trebuchet MS', 'Lucida Sans Unicode', 'Lucida Grande', 'Lucida Sans', Arial, sans-serif; color: white; padding: 8px 5px 8px 5px; } .navbar a { text-decoration: none; color: inherit; } .navbar-brand { font-size: 1.2em; font-weight: 600; } .navbar-item { font-variant: small-caps; margin-left: 30px; } .body-content { padding: 5px; font-family:'Segoe UI', Tahoma, Geneva, Verdana, sans-serif; }
You can run the app at this point, but because you haven't made use of the base template anywhere and haven't changed any code files, the result is the same as the previous step. Complete the remaining sections to see the final effect.
Create a code snippet
Because the three pages you create in the next section extend layout.html, it saves time to create a code snippet to initialize a new template file with the appropriate reference to the base template. A code snippet provides a consistent piece of code from a single source, which avoids errors that can creep in when using copy-paste from existing code.
In VS Code, select the File (Windows/Linux) or Code (macOS), menu, then select Preferences > User snippets.
In the list that appears, select html. (The option may appear as "html.json" in the Existing Snippets section of the list if you've created snippets previously.)
After VS code opens
html.json, add the code below within the existing curly braces. (The explanatory comments, not shown here, describe details such as how the$0line indicates where VS Code places the cursor after inserting a snippet):"Django Tutorial: template extending layout.html": { "prefix": "djextlayout", "body": [ "{% extends \"hello/layout.html\" %}", "{% block title %}", "$0", "{% endblock %}", "{% block content %}", "{% endblock %}" ], "description": "Boilerplate template that extends layout.html" },Save the
html.jsonfile (Ctrl+S).Now, whenever you start typing the snippet's prefix, such as
djext, VS Code provides the snippet as an autocomplete option, as shown in the next section. You can also use the Insert Snippet command to choose a snippet from a menu.
For more information on code snippets in general, refer to Creating snippets.
Use the code snippet to add pages
With the code snippet in place, you can quickly create templates for the Home, About, and Contact pages.
In the
templates/hellofolder, create a new file namedhome.html, Then start typingdjextto see the snippet appear as a completion:
When you select the completion, the snippet's code appears with the cursor on the snippet's insertion point:
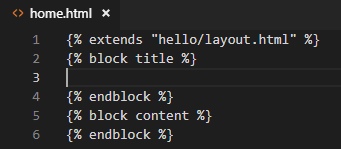
At the insertion point in the "title" block, write
Home, and in the "content" block, write<p>Home page for the Visual Studio Code Django tutorial.</p>, then save the file. These lines are the only unique parts of the extended page template:In the
templates/hellofolder, createabout.html, use the snippet to insert the boilerplate markup, insertAbout usand<p>About page for the Visual Studio Code Django tutorial.</p>in the "title" and "content" blocks, respectively, then save the file.Repeat the previous step to create
templates/hello/contact.htmlusingContact usand<p>Contact page for the Visual Studio Code Django tutorial.</p>.In the app's
urls.py, add routes for the /about and /contact pages. Be mindful that thenameargument to thepathfunction defines the name with which you refer to the page in the{% url %}tags in the templates.path("about/", views.about, name="about"), path("contact/", views.contact, name="contact"),In
views.py, add functions for the /about and /contact routes that refer to their respective page templates. Also modify thehomefunction to use thehome.htmltemplate.# Replace the existing home function with the one below def home(request): return render(request, "hello/home.html") def about(request): return render(request, "hello/about.html") def contact(request): return render(request, "hello/contact.html")
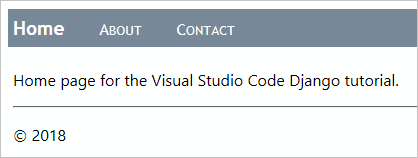
Run the app
With all the page templates in place, save views.py, run the app, and open a browser to the home page to see the results. Navigate between the pages to verify that the page templates are properly extending the base template.
![[0-1<span style='color:red;'>Django</span>] <span style='color:red;'>Core</span>.Management <span style='color:red;'>模块</span>](https://img-blog.csdnimg.cn/direct/f80b00ca2eff4a9ab1f8f8551da3429f.png)