pytest是一个专业的测试框架,可以帮助我们对python项目进行测试,提高测试的效率。
pytest官网手册:pytest: helps you write better programs — pytest documentation
中文手册:Pytest 教程

入门学习
安装pytest
pip install pytest写例子test_sample.py
def inc(x):
    return x + 1


def test_answer():
    assert inc(3) == 5


def test_answer2():
    assert inc(3) == 4
注意里面的测试函数都是test_开头,按照pytest的规范,需要以“test”4个字母开头的函数才会被测试。
执行测试
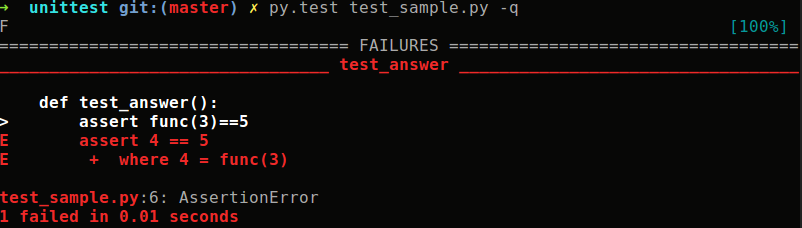
pytest test_sample.py显示:
==================================== FAILURES =====================================
___________________________________ test_answer ___________________________________

    def test_answer():
>       assert inc(3) == 5
E       assert 4 == 5
E        +  where 4 = inc(3)

test_sample.py:9: AssertionError
============================= short test summary info =============================
FAILED test_sample.py::test_answer - assert 4 == 5
=========================== 1 failed, 1 passed in 0.20s ===========================
可以看到,两个测试函数,assert inc(3) == 5的这个没有测试通过。
pytest提高篇
多文件测试
当前目录和子目录的所有类似test_*.py 或 *_test.py 的文件,都会自动参与测试。
比如我们在当前目录下,再写一个文件test_sysexit.py:
# content of test_sysexit.py
import pytest


def f():
    raise SystemExit(1)


def test_mytest():
    with pytest.raises(SystemExit):
        f()
然后在当前目录直接执行pytest命令,则会自动测试test_sample.py test_sysexit.py这两个文件,并给出测试结果:
collected 3 items

test_sample.py F.                                                           [ 66%]
test_sysexit.py .                                                           [100%]

==================================== FAILURES =====================================
___________________________________ test_answer ___________________________________

    def test_answer():
>       assert inc(3) == 5
E       assert 4 == 5
E        +  where 4 = inc(3)

test_sample.py:9: AssertionError
============================= short test summary info =============================
FAILED test_sample.py::test_answer - assert 4 == 5
=========================== 1 failed, 2 passed in 0.46s ===========================
使用“raises helper”来引起异常
前面的例子中,如果f()函数没有抛出SystemExit异常,那么这个测试将会失败。如果抛出SystemExit异常,那么这个测试通过。
功能测试需求唯一的目录
为功能测试请求唯一目录
# content of test_tmp_path.py
def test_needsfiles(tmp_path):
    print(tmp_path)
    assert 0
输出信息如下:
/tmp/pytest-of-skywalk/pytest-2/test_needsfiles0
============================= short test summary info =============================
FAILED test_tmp.py::test_needsfiles - assert 0
1 failed in 0.17s
可以看到创建了一个临时文件目录:/tmp/pytest-of-skywalk/pytest-2/test_needsfiles0
在kotti项目里集成测试
在Kotti项目中进行pytest测试可以参考这个文档:以Kotti项目为例使用pytest测试项目-CSDN博客
下载安装Kotti库
pip install https://atomgit.com/skywalk/Kotti
cd Kotti
pip install -r requirements.txt
python3 setup.py develop --user
安装好pytest和其需要的库
pip install pytest
pip install mock
pip install pytest-flake8 pytest-cov
执行测试
~/github/Kotti]$ pytest有很多报错,主要是 Unittest-style tests are deprecated as of Kotti 0.7.因此需要按照Kotti的文档和pytest的最佳实践,将unittest风格的测试迁移到pytest风格。
将unittest风格的测试迁移到pytes
这恐怕是一个比较大的工程了,但是肯定要先迁移过去,因为现在的测试已经不能用了。先订好这个目标。
在Kotti目录执行 pytest ./kotti/tests/test_app.py ,输出:
-- Docs: https://docs.pytest.org/en/stable/how-to/capture-warnings.html
-------- coverage: platform freebsd13, python 3.10.13-final-0 --------
Name Stmts Miss Cover Missing
-----------------------------------------------------------------
kotti/__init__.py 109 39 64% 1-30, 40-46, 50, 59-163, 167, 171, 186, 198, 249, 258
kotti/events.py 209 51 76% 100-101, 105, 110-114, 117, 120, 123-125, 128, 270-278, 320, 332-340, 350-352, 356-366, 397, 412, 415, 423-424, 440, 444, 451, 458, 464, 510-511, 515-518, 522-524
kotti/fanstatic.py 46 3 93% 66, 69, 90
kotti/filedepot.py 284 142 50% 99-106, 114-127, 134, 140, 146, 152, 169-174, 182, 191, 210-211, 220-222, 242-245, 269-281, 313-327, 335-337, 346-348, 352, 356-358, 363-394, 455-492, 498-509, 513, 522, 528-538, 566, 587-619, 638-640
kotti/interfaces.py 8 0 100%
kotti/message.py 54 35 35% 22-23, 28-32, 59-68, 94-108, 117-128
kotti/migrate.py 123 55 55% 66, 121-122, 140-164, 168-169, 173-190, 194-259
kotti/populate.py 33 0 100%
kotti/workflow.py 51 11 78% 24-32, 71-94
-----------------------------------------------------------------
TOTAL 3975 1893 52%
============================= short test summary info =============================
FAILED kotti/tests/test_app.py::flake-8::FLAKE8 - AttributeError: 'Application' object has no attribute 'parse_preliminary_options'
==================== 1 failed, 16 passed, 1 warning in 14.36s =====================
说实话不太明白这个输出的意思,也就是只有一个测试文件是失败的,16个都是通过的。没看到说哪个文件失败啊? 还是说这个文件里面一共17个函数,失败了一个,通过了16个?应该是文件数目。
为什么用python -Wd setup.py test -q测试pytest显示: Ran 0 tests in 0.000s
看到有文章说要加入main函数
但是加入之后还是ran 0
最后在ubuntu下重新下载了kotti源码,进行了一系列修改,主要是加入了个库:
pip install pytest-flake8 pytest-cov然后使用pytest进行测试,总算跑起来了,跑的结果是:
TOTAL 3975 335 92%
但是还有一些报错,如:FAILED kotti/tests/test_httpexceptions.py::flake-8::FLAKE8 - AttributeError: 'Application' object has no attribute 'parse_preliminary_options',另外能看到tests目录里面的文件都没有执行测试,这也不太正常。
又安装了flake8-pytest ,现在最后的输出是:
FAILED kotti/views/edit/upload.py::flake-8::FLAKE8 - AttributeError: 'Application' object has no attribute 'parse_preliminary_options'
============= 75 failed, 379 passed, 7 warnings in 186.68s (0:03:06) ==============
一系列修改是这些
 1756  vi /home/linuxskywalk/github/Kotti/kotti/tests/conftest.py
 1757  pip install -e .
 1761  pip install pytest-flake8 pytest-cov
 1760  pytest kotti/tests
也就是主要是安装了两个库:pip install pytest-flake8 pytest-cov
kotti成功测试了,后面就可以进行维护或修改代码工作了!
调试
直接运行pytest kotti/tests 目录报错
(py310) [skywalk@x250 ~/github/Kotti/kotti]$ pytest tests
ERROR: usage: pytest [options] [file_or_dir] [file_or_dir] [...]
pytest: error: unrecognized arguments: --flake8 --cov=kotti --cov-report=term-missing
inifile: /usr/home/skywalk/github/Kotti/pytest.ini
rootdir: /usr/home/skywalk/github/Kotti
安装缺少的库
pip install pytest-flake8 pytest-cov运行kotti测试报错
FAILED kotti/tests/test_app.py::flake-8::FLAKE8 - AttributeError: 'Application' object has no attribute 'parse_preliminary_options'
不知道该怎么办.....
报错Unittest-style tests are deprecated as of Kotti 0.7.
/usr/local/lib/python3.10/unittest/loader.py:122: DeprecationWarning: _init_testing_db: Unittest-style tests are deprecated as of Kotti 0.7. Please use pytest function arguments instead. obj = getattr(module, name)
这是文心一言的回答:这个报错信息实际上是一个DeprecationWarning,而不是一个错误(error)。它告诉你关于Kotti框架中某个功能或方法的弃用警告。具体来说,_init_testing_db这个可能是用于初始化测试数据库的函数或方法,在Kotti 0.7版本及以后的版本中已经被弃用了。
警告信息中建议,你应该使用pytest的函数参数来替代旧的unittest风格的测试。这意味着如果你正在编写或维护针对Kotti的测试,你需要将你的测试从unittest风格迁移到pytest风格。
在pytest中,你通常会使用装饰器(如@pytest.mark.parametrize)和函数参数来组织和管理你的测试,而不是继承unittest的TestCase类并编写setUp、tearDown等方法。
例如,假设你有一个旧的unittest风格的测试:
import unittest
from kotti import _init_testing_db

class MyTest(unittest.TestCase):
    def setUp(self):
        _init_testing_db()

    def test_something(self):
        # 测试代码
你应该将其转换为pytest风格的测试,可能看起来像这样:
import pytest
from kotti import create_app

@pytest.fixture
def app_with_testing_db():
    # 这里是初始化测试数据库的代码
    app = create_app(testing=True)
    with app.app_context():
        # 这里是初始化数据库的代码
        # ...
    yield app
    # 这里是清理数据库的代码(如果需要)
    # ...

def test_something(app_with_testing_db):
# 测试代码,使用传入的app_with_testing_db作为应用上下文在上面的pytest示例中,我们使用了@pytest.fixture装饰器来定义一个测试夹具(fixture),这个夹具会在每个测试函数执行之前创建并初始化测试环境(包括数据库)。test_something函数接受这个夹具作为参数,从而可以在测试函数内部使用已经设置好的测试环境。
请注意,上述代码只是示例,你需要根据你的具体情况和Kotti的API来调整代码。
要修复这个警告,你需要检查你的测试代码,并按照Kotti的文档和pytest的最佳实践,将unittest风格的测试迁移到pytest风格。这通常涉及到重构测试类和测试方法,以使用pytest的装饰器和夹具。
实际工作太多,作为一个初学者,我并没有按照文心的建议去修改代码。
使用pytest的时候,输出一个F后面跟很多绿色的点,是什么意思?
在使用pytest进行测试时,输出中的“F”代表一个失败的测试(Failed),而绿色的点(.)代表一个通过的测试(Passed)
输出中的“F”后面跟着很多绿色的点,意味着在测试套件中,有一个测试失败了,而其他的测试都通过了。应该查看失败的测试详情,了解为什么测试会失败,并据此修复代码或测试。
原来是flake8那里测试没通过,具体见这里:pytest的时候输出一个F后面跟很多绿色的点解读-CSDN博客
kotti/alembic/versions/9398ccf41c2_add_content_state_fo.py::flake-8::FLAKE8 FAILED
kotti/tests/__init__.py::flake-8::FLAKE8 FAILED
kotti/tests/conftest.py::flake-8::FLAKE8 FAILED
kotti/tests/test_app.py::flake-8::FLAKE8 FAILED
kotti/tests/test_app.py::testing_db_url PASSED
kotti/tests/test_app.py::TestApp::test_override_settings PASSED
kotti/tests/test_app.py::TestApp::test_auth_policies_no_override PASSED
kotti/tests/test_app.py::TestApp::test_auth_policies_override PASSED
kotti/tests/test_app.py::TestApp::test_asset_overrides PASSED
kotti/tests/test_app.py::TestApp::test_pyramid_includes_overrides_base_includes PASSED
pytest输出是什么意思? Stmts Miss Cover Missing
这些统计数据更可能是由 pytest 结合代码覆盖率工具(如 coverage)生成的。这些统计数据提供了关于测试套件覆盖了多少源代码行的信息。
- Stmts: 表示总的源代码行数(statements)。
- Miss: 表示没有被测试覆盖的源代码行数。
- Cover: 表示代码覆盖率,通常以百分比表示。
- Missing: 列出了没有被测试覆盖的具体源代码行或代码块。
提示@pytest.yield_fixture is deprecated.
/home/linuxskywalk/github/Kotti/kotti/tests/__init__.py:71: PytestDeprecationWarning: @pytest.yield_fixture is deprecated.
顺手改了init文件:
/home/linuxskywalk/github/Kotti/kotti/tests/__init__.py 将其中的yield_fixture全部改成fixture
搞定!
在有的版本的系统中,这个代码没有改也没有报错。但是有的有报错,可能跟pip版本不一样有关吧。
pyramid使用pytest报错:ImportError
pytest
ImportError while loading conftest '/home/linuxskywalk/github/Kotti/kotti/tests/conftest.py'.
_pytest.pathlib.ImportPathMismatchError: ('kotti.tests.conftest', '/home/linuxskywalk/py310/lib/python3.10/site-packages/kotti/tests/conftest.py', PosixPath('/home/linuxskywalk/github/Kotti/kotti/tests/conftest.py'))
执行pip install -e .之后,报错变成:
报错:ERROR: usage: pytest [options] [file_or_dir] [file_or_dir] [...]
ERROR: usage: pytest [options] [file_or_dir] [file_or_dir] [...]
pytest: error: unrecognized arguments: --flake8 --cov=kotti --cov-report=term-missing
inifile: /home/linuxskywalk/github/Kotti/pytest.ini
rootdir: /home/linuxskywalk/github/Kotti
使用这条命令试试:pip install pytest-flake8 pytest-cov
好了,报错没有了,可以pytest执行下去了
执行结果显示:
TOTAL 3975 335 92%
但是还有很多错误,如下:
报错 AttributeError: 'Application' object has no attribute 'parse_preliminary_options'
FAILED kotti/__init__.py::flake-8::FLAKE8 - AttributeError: 'Application' object has no attribute 'parse_preliminary_options'
安装flake8-pytest试试
pip install flake8-pytest
还是不行,照旧。不过输出好看一点了:
FAILED kotti/views/edit/upload.py::flake-8::FLAKE8 - AttributeError: 'Application' object has no attribute 'parse_preliminary_options'
============= 75 failed, 379 passed, 7 warnings in 186.68s (0:03:06) ==============
pytest最开始是ran 0 ?
看网上自己在testing.py文件里加了这句:
if __name__ == '__main__':
unittest.main()
但是这个并没有影响。
真正的解决方法是安装需要的库
pip install pytest-flake8 pytest-cov


![[StartingPoint][Tier1]Funnel](https://img-blog.csdnimg.cn/img_convert/3884cfda7c3f4d1718e0e706dd24fc36.jpeg)