Host Interceptor
主机拦截器,本质上不是拦截数据,而是在数据的headers中添加一个host字段,可以用于标记数据来源(被收集)的主机。
Host Interceptor可以配置的选项有:
表-22 配置选项
选项 |
备注 |
解释 |
type |
required |
拦截器类型,此处必须是host |
preserveExisting |
optional |
如果host字段已经存在,是否替换。默认是false |
useIP |
optional |
是否使用IP。如果为true,则显示为IP;如果为false,则显示为主机名。默认为true |
hostHeader |
optional |
显示的字段,默认是host |
案例:
a1.sources = s1

a1.channels = c1

a1.sinks = k1


a1.sources.s1.type = netcat

a1.sources.s1.bind = 0.0.0.0

a1.sources.s1.port = 8090

a1.sources.s1.interceptors = i1

# 配置Host Interceptor

a1.sources.s1.interceptors.i1.type = host

# 是否使用IP

a1.sources.s1.interceptors.i1.useIP = false


a1.channels.c1.type = memory


a1.sinks.k1.type = logger


a1.sources.s1.channels = c1

a1.sinks.k1.channel = c1
Static Interceptor
静态拦截器,本质上不是拦截器,而是在数据的headers中添加一个指定的字段。
Static Interceptor可以配置的选项有:
表-23 配置选项
选项 |
备注 |
解释 |
type |
required |
拦截器类型,此处必须是static |
preserveExisting |
optional |
如果指定字段已经存在,是否替换。默认是false |
key |
optional |
指定的键。默认是key |
value |
optional |
指定的值,默认是value |
案例:
a1.sources = s1

a1.channels = c1

a1.sinks = k1


a1.sources.s1.type = netcat

a1.sources.s1.bind = 0.0.0.0

a1.sources.s1.port = 8090

a1.sources.s1.interceptors = i1

# 配置Static Interceptor

a1.sources.s1.interceptors.i1.type = static

# 指定键

a1.sources.s1.interceptors.i1.key = kind

# 指定值

a1.sources.s1.interceptors.i1.value = test


a1.channels.c1.type = memory


a1.sinks.k1.type = logger


a1.sources.s1.channels = c1

a1.sinks.k1.channel = c1UUID Interceptor
UUID拦截器,本质上也不是一个拦截器,而是在数据的headers中添加一个id字段,可以用于标记数据的唯一性。
UUID Interceptor可以配置的选项包含:
表-24 配置选项
选项 |
备注 |
解释 |
type |
required |
拦截器类型,此处必须是org.apache.flume.sink.solr.morphline.UUIDInterceptor$Builder |
headerName |
optional |
headers中添加的字段名,默认是id |
preserveExisting |
optional |
如果headers中已经存在id字段,是否替换。默认是true |
prefix |
optional |
在生成的id之前添加前缀 |
案例:
a1.sources = s1

a1.channels = c1

a1.sinks = k1


a1.sources.s1.type = netcat

a1.sources.s1.bind = 0.0.0.0

a1.sources.s1.port = 8090

a1.sources.s1.interceptors = i1

# 配置UUID Interceptor

a1.sources.s1.interceptors.i1.type = org.apache.flume.sink.solr.morphline.UUIDInterceptor$Builder


a1.channels.c1.type = memory


a1.sinks.k1.type = logger


a1.sources.s1.channels = c1

a1.sinks.k1.channel = c1Search And Replace Interceptor
搜索和替换拦截器,在使用的时候需要指定正则表达式,会根据正则表达式指定的规则,对Event中body部分的数据进行替换。注意,只替换body部分的数据,而不会影响headers中的数据。正则表达式的使用规则和Java中正则表达式的规则是一致的。
Search And Replace Interceptor中可以配置的选项包含:
表-25 配置选项
选项 |
备注 |
解释 |
type |
required |
拦截器类型,此处必须是search_replace |
searchPattern |
optional |
搜索的正则表达式形式 |
replaceString |
optional |
替换的形式 |
charset |
optional |
body部分的字符集编码,默认是UTF-8 |
案例:
a1.sources = s1

a1.channels = c1

a1.sinks = k1


a1.sources.s1.type = netcat

a1.sources.s1.bind = 0.0.0.0

a1.sources.s1.port = 8090

a1.sources.s1.interceptors = i1

# 配置Search And Replace Interceptor

a1.sources.s1.interceptors.i1.type = search_replace

# 指定正则表达式

a1.sources.s1.interceptors.i1.searchPattern = [a-z]

# 指定替换后的形式

a1.sources.s1.interceptors.i1.replaceString = *


a1.channels.c1.type = memory


a1.sinks.k1.type = logger


a1.sources.s1.channels = c1

a1.sinks.k1.channel = c1Regex Filtering Interceptor
正则过滤拦截器,在使用的时候需要指定一个正则表达式,然后根据属性excludeEvents的值来确定过滤方式。如果excludeEvents的值为true,则表示过滤掉符合正则表达式形式的数据,其他数据留下来;如果excludeEvents的值为false,则表示过滤掉不合符正则表达式形式的数据,符合形式的数据留下来。默认情况下,excludeEvents的值为false。
Regex Filtering Interceptor中可以配置的选项包含:
表-26 配置选项
选项 |
备注 |
解释 |
type |
required |
拦截器类型,此处必须是regex_filter |
regex |
optional |
正则表达式 |
excludeEvents |
optional |
替换规则,默认为false |
案例:
a1.sources = s1

a1.channels = c1

a1.sinks = k1


a1.sources.s1.type = netcat

a1.sources.s1.bind = 0.0.0.0

a1.sources.s1.port = 8090

a1.sources.s1.interceptors = i1

# 配置Regex Filtering Interceptor

a1.sources.s1.interceptors.i1.type = regex_filter

# 指定正则表达式

a1.sources.s1.interceptors.i1.regex = .*[0-9].*

# 指定替换规则

a1.sources.s1.interceptors.i1.excludeEvents = true


a1.channels.c1.type = memory


a1.sinks.k1.type = logger


a1.sources.s1.channels = c1

a1.sinks.k1.channel = c1
Custom Interceptor
在实际开发过程中,如果Flume提供的拦截器无法满足业务需求,那么Flume同样支持自定义拦截器。但是不同于其他组件的地方在于,Flume中的拦截器在启动的时候,是通过内部类Builder来启动,所以拦截器中需要覆盖其内部类。
步骤:
1)定义类实现Interceptor接口,覆盖其中的intercept方法,其他方法可以忽略掉;同时需要定义内部类实现Interceptor.Builder接口,覆盖其中的build方法;如果需要获取配置,那么可以配置configure方法。
package com.flume.interceptor;


import org.apache.flume.Context;

import org.apache.flume.Event;

import org.apache.flume.interceptor.Interceptor;


import java.util.ArrayList;

import java.util.List;

import java.util.Map;


public class AuthInterceptor implements Interceptor {

    @Override

    public void initialize() {

    }


    @Override

    public Event intercept(Event event) {

        // 获取headers部分

        Map<String, String> headers = event.getHeaders();

        // 判断headers是否包含time或者timestamp字段

        if (headers.containsKey("time") || headers.containsKey("timestamp")) return event;

        // 如果没有,则添加当前的时间戳

        headers.put("timestamp", String.valueOf(System.currentTimeMillis()));

        return event;

    }


    @Override

    public List<Event> intercept(List<Event> events) {

        // 定义新的集合

        List<Event> es = new ArrayList<>();

        // 遍历

        for (Event event : events) {

            es.add(intercept(event));

        }

        return es;

    }


    @Override

    public void close() {

    }


    public static class Builder implements Interceptor.Builder {


        @Override

        public Interceptor build() {

            return new AuthInterceptor();

        }


        @Override

        public void configure(Context context) {

        }

    }

}
2)将定义好的Interceptor打成jar包。
3)将jar包上传到Flume安装目录的lib目录下:
# 进入Flume的lib目录
cd /opt/software/flume-1.11.0/lib/
# 选择jar包,上传
rz
4)回到数据目录,编辑文件:
# 回到数据目录
cd ../data
# 编辑文件
vim authin.properties
在文件中添加:
a1.sources = s1

a1.channels = c1

a1.sinks = k1


a1.sources.s1.type = netcat

a1.sources.s1.bind = 0.0.0.0

a1.sources.s1.port = 8090

a1.sources.s1.interceptors = i1

# 配置Custom Interceptor

a1.sources.s1.interceptors.i1.type = com.flume.interceptor.AuthInterceptor$Builder


a1.channels.c1.type = memory


a1.sinks.k1.type = logger


a1.sources.s1.channels = c1

a1.sinks.k1.channel = c1
5)启动Flume:
flume-ng agent -n a1 -c $FLUME_HOME/conf -f authin.properties -Dflume.root.logger=INFO,console
其他
事务
在Flume中,也存在事务的问题: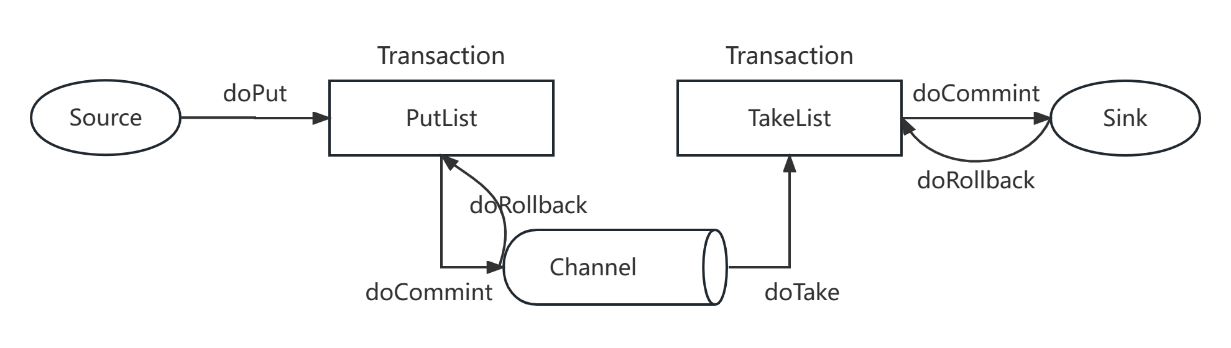
图-7 Flume事务
流程如下:
1)Source进行doPut将数据写到临时的缓冲区PutList中;
2)PutList会推送数据给Channel,如果Channel中有足够的位置,则数据推送成功(doCommit),如果Channel中没有位置,则推送失败,进行回滚(doRollback);
3)Channel进行doTake操作将数据写到临时缓冲区TakeList中;
4)将TakeList中的数据通过Sink批量写往目的地;
5)如果写成功了,则执行doCommit操作;如果写失败了,则执行doRollback操作。
执行流程
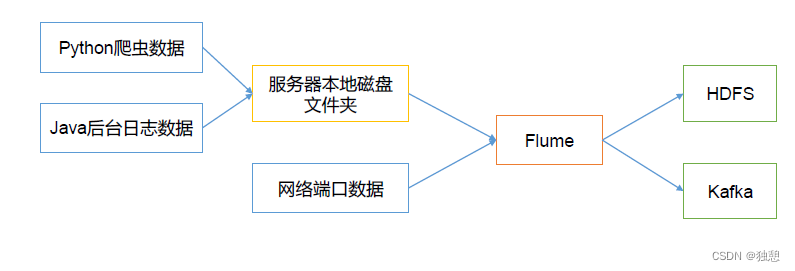
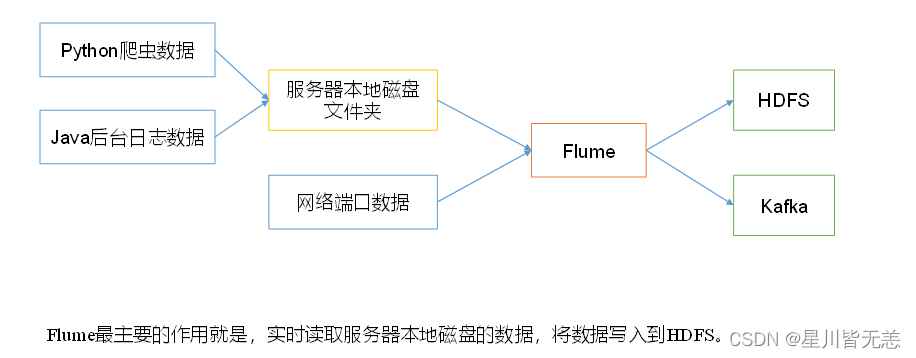
Flume执行流程如下图所示: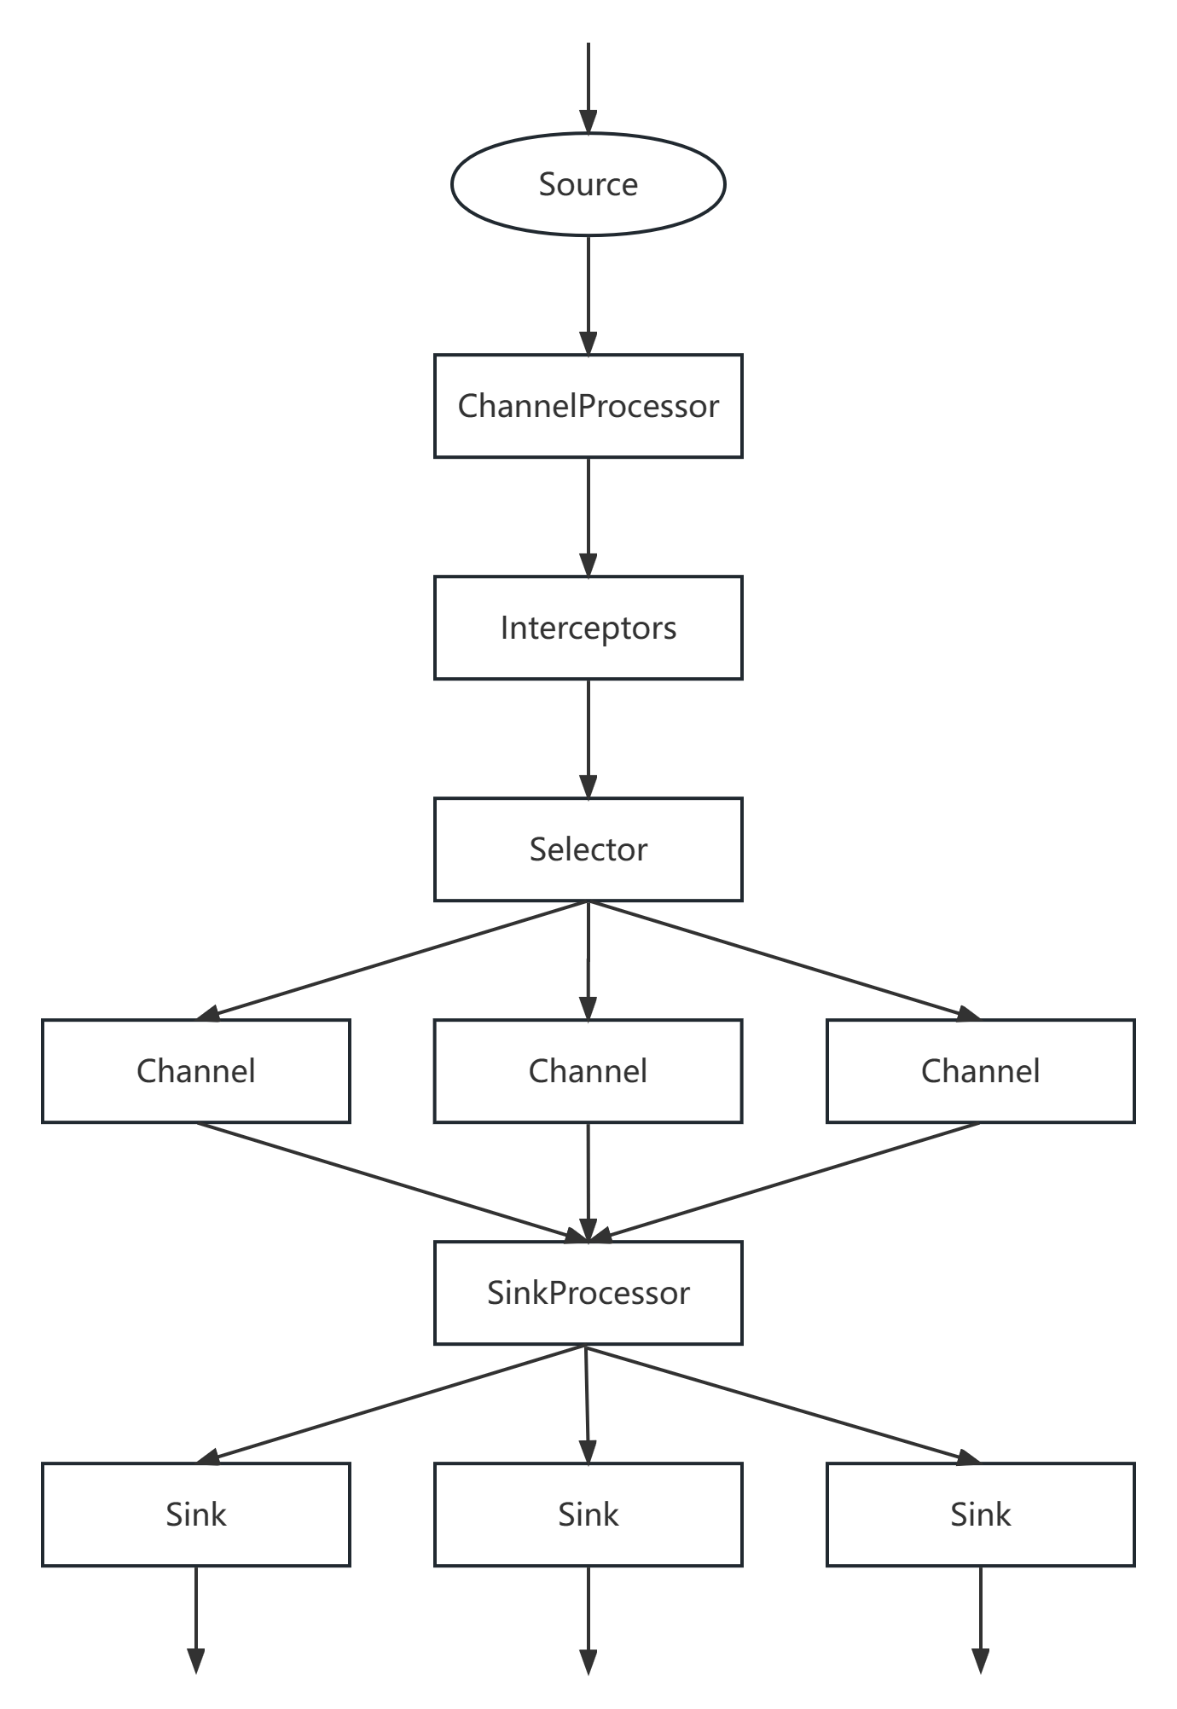
图-8 Flume执行流程
流程如下:
1)Source会先采集数据,然后将数据发送给ChannelProcessor进行处理;
2)ChannelProcessor收到数据处理之后,会将数据交给Interceptor来处理,注意,在Flume允许存在多个Interceptor来构成拦截器链;
3)Interceptor处理完成之后,会交给Channel Selector处理,Selector存在三种模式:replicating、multiplexing和load_balancing。Selector收到数据之后会根据对应的模式将数据交给对应的Channel来处理;
4)Channel处理之后会交给SinkProcessor。SinkProcessor本质上是一个Sinkgroup,包含了三种方式:default,failover和load_balance。SinkProcessor收到数据之后会根据对应的方式将数据交给Sink来处理;
5)Sink收到数据之后,会将数据写到指定的目的地。
扩展:Flume监控
Ganglia概述
Flume的数据流可以通过Ganglia来进行监控。Ganglia是UC Berkeley发起的一个开源的集群监控项目,可以用于监测数以千计的节点性能。
Ganglia的核心主要包含了三个模块:
1)gmond(Ganglia Monitoring Daemon):轻量级的服务,需要安装在每一个需要收集指标数据的主机上。gmond可以用于收集系统指标数据,包含CPU、内存、磁盘、网络以及活跃的进程数量等。
2)gmetad(Ganglia Meta Daemon):用于整合所有的信息,并将这些信息以RRD格式来存储到磁盘上。
3)gweb(Ganglia Web):Ganglia提供的一个可视化工具,本身是使用PHP开发的,提供了WEB页面,在WEB界面中以图标形式来显示集群的运行状态,以及所收集到的不同的指标数据。
Ganglia安装
1)所有节点安装httpd和php服务:
yum -y install httpd php
2)所有节点安装关联依赖:
yum -y install rrdtool perl-rrdtool rrdtool-devel apr-devel
3)安装Epel:
yum -y install epel-release
4)在第一个节点上安装gmetad,gmond和gweb:
yum -y install ganglia-gmetad
yum -y install ganglia-gmond
yum -y install ganglia-web
5)在其他节点上安装gmond:
yum -y install ganglia-gmond
6)第一个节点上修改ganglia.conf:
# 编辑文件
vim /etc/httpd/conf.d/ganglia.conf
# 修改内容如下
<Location /ganglia>

  # Require local

  # Require ip 10.1.2.3

  # Require host example.org

  Require all granted

</Location>
7)第一个节点上修改gmetad.conf:
# 编辑文件
vim /etc/ganglia/gmetad.conf
# 修改data_source属性
data_source "flume_cluster" hadoop01
8)所有节点修改gmond.conf文件:
# 编辑文件
vim /etc/ganglia/gmond.conf
# 修改cluster中的属性值
cluster {

  name = "flume_cluster"

  owner = "unspecified"

  latlong = "unspecified"

  url = "unspecified"

}
# 修改udp_send_channel中的属性值
udp_send_channel {

  #bind_hostname = yes # Highly recommended, soon to be default.

                       # This option tells gmond to use a source address

                       # that resolves to the machine's hostname.  Without

                       # this, the metrics may appear to come from any

                       # interface and the DNS names associated with

                       # those IPs will be used to create the RRDs.

  #mcast_join = 239.2.11.71
# 监控数据发送给hadoop01
host = hadoop01
port = 8649
ttl = 1
}
# 修改udp_recv_channel中的属性值
udp_recv_channel {
# mcast_join = 239.2.11.71
port = 8649
# 接收来自任意连接的数据
bind = 0.0.0.0
retry_bind = true
# Size of the UDP buffer. If you are handling lots of metrics you really
# should bump it up to e.g. 10MB or even higher.
# buffer = 10485760
}
9)所有节点关闭selinux:
# 编辑文件
vim /etc/selinux/config
# 修改SELINUX属性的值为disabled
SELINUX=disabled
# 保存退出,重启服务器
reboot
10)所有节点启动gmond:
systemctl start gmond
11)在第一个节点上启动gmetad和httpd:
systemctl start gmetad
systemctl start httpd
12)在浏览器输入http://IP/ganglia,查看Ganglia页面。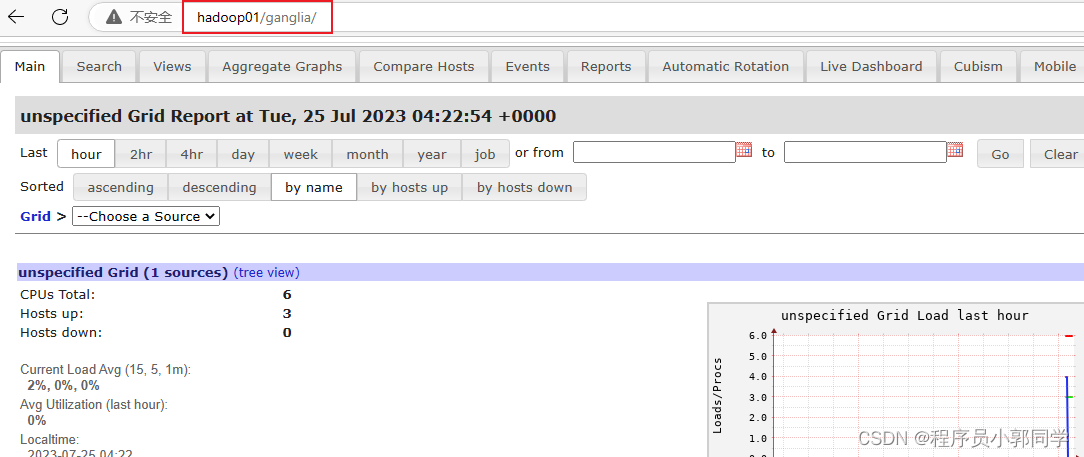
图-9 Ganglia界面
监控Flume
1)修改Flume的配置文件:
# 进入Flume的配置目录
cd /opt/software/flume-1.11.0/conf/
# 复制文件
cp flume-env.sh.template flume-env.sh
# 编辑文件
vim flume-env.sh
# 在文件尾部添加
export JAVA_HOME=/opt/software/jdk1.8
export JAVA_OPTS="-Dflume.monitoring.type=ganglia -Dflume.root.monitoring.hosts=hadoop01:8649 -Xms100m -Xmx200m"
# 保存退出,生效
source flume-env.sh
2)启动Flume:
# 回到数据目录
cd ../data
# 启动Flume
flume-ng agent -n a1 -c $FLUME_HOME/conf -f basic.properties -Dflume.root.logger=INFO,console -Dflume.monitoring.type=ganglia -Dflume.monitoring.hosts=hadoop01:8649
3)属性解释:
表-27 属性解释
属性 |
解释 |
ChannelCapacity |
Channel的容量 |
ChannelFillPercentage |
Channel的利用率 |
ChannelSize |
Channel的大小 |
EventPutAttemptCount |
Source试图放入Channel的次数 |
EventPutSuccessCount |
Source向Channel成功放入数据的次数 |
EventTakeAttemptCount |
Channel试图向Sink发送数据的次数 |
EventTakeSuccessCount |
Channel向Sink成功发送数据的次数 |
startTime |
起始时间 |
stopTime |
结束时间 |