目录
一、linux集群安装pulsar
二、创建应用程序对消息的生产和消费进行测试
总结
一、linux集群安装pulsar 详情可查看这里 》》
注:也采用docker进行安装后期会补充, 并挂载链接 》》
注:按照教程我的部署策略是对一台系统部署后,再对此台系统进行克隆,后修改其他两台系统的配置即可
- 搭建vmware虚拟环境, 并进行克隆(在虚拟系统进行安装)。
搭建环境访问此篇文章即可》》
注意事项
注:跟着做完全没有问题,下面我会说一下安装时的注意事项
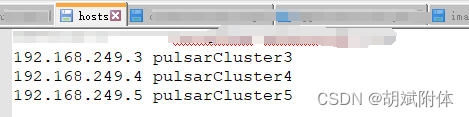
1. 编辑 /etc/hostname与/etc/hosts
注:这里编辑的两处文件 hostname 是编辑主机名称, hosts是编辑主机名称与ip地址的映射
2. 执行初始化命令
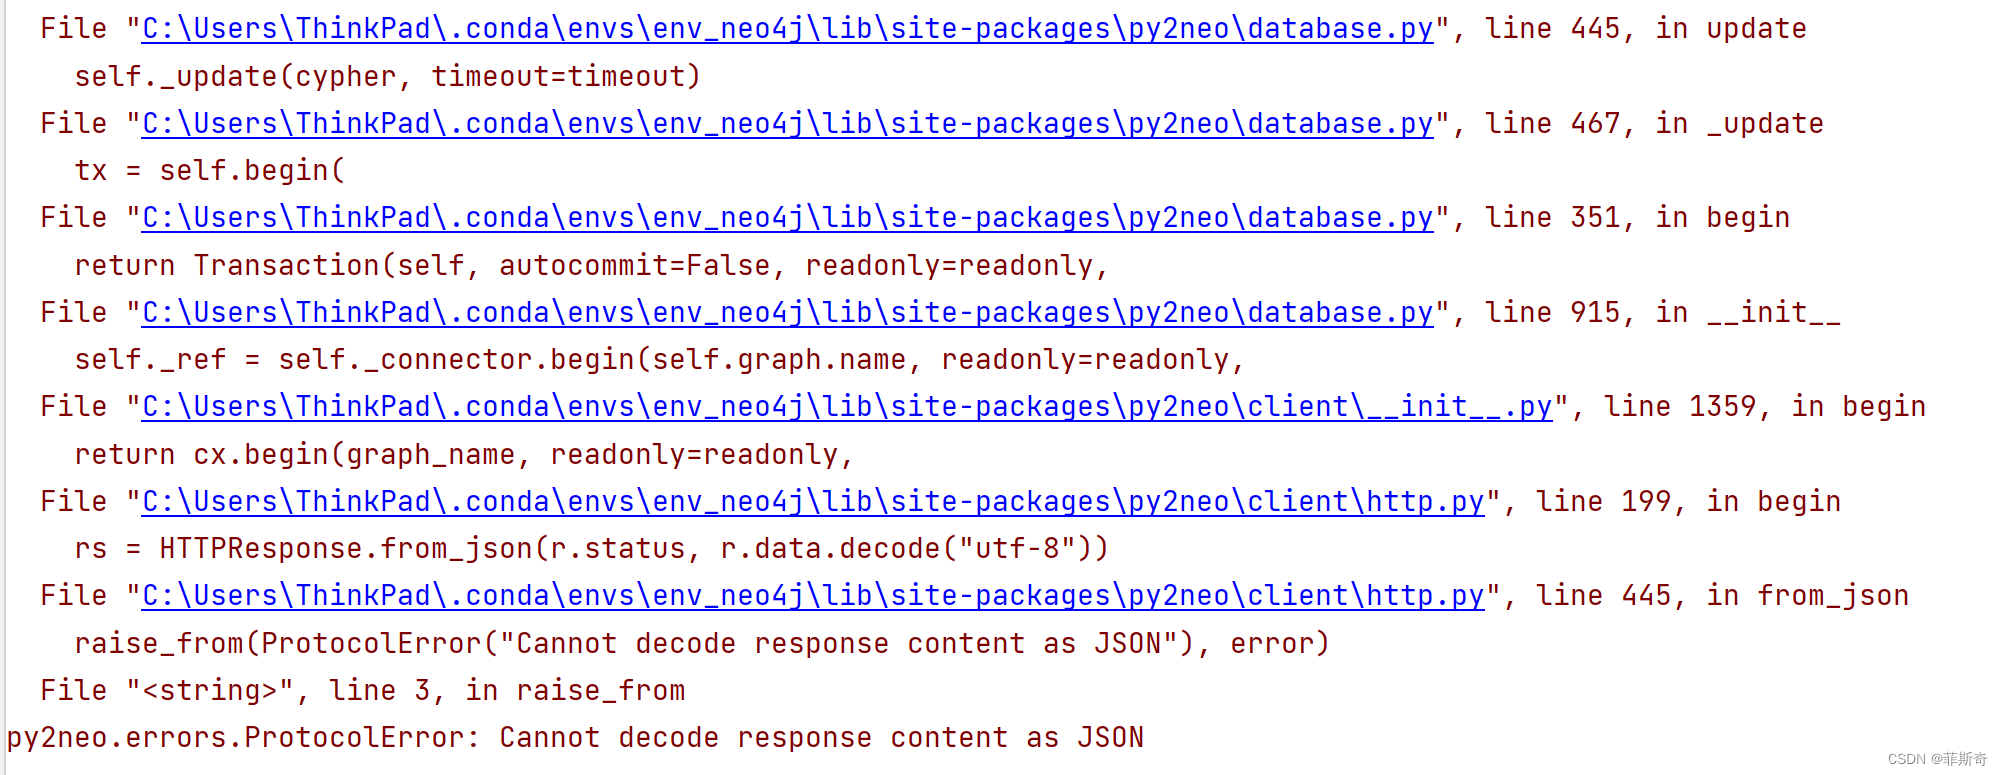
注:执行下方命令会出现如下错误,但是,,,可以继续往下部署,不会影像pulsar的集群安装使用
注:具体为什么会出现还需再进行研究,若发现解决方法,会在这里挂链接 》》
Unable to read additional data from server sessionid 0x0, likely server has closed socket
./pulsar initialize-cluster-metadata \
--cluster pulsar-cluster \
--zookeeper pulsarCluster3:2181 \
--configuration-store pulsarCluster3:2181 \
--web-service-url http://pulsarCluster3:8080,pulsarCluster4:8080,pulsarCluster5:8080 \
--web-service-url-tls https://pulsarCluster3:8443,pulsarCluster4:8443,pulsarCluster5:8443 \
--broker-service-url pulsar://pulsarCluster3:6650,pulsarCluster4:6650,pulsarCluster5:6650 \
--broker-service-url-tls pulsar+ssl://pulsarCluster3:6651,pulsarCluster4:6651,pulsarCluster5:6651
二、创建应用程序对消息的生产和消费进行测试(物理主机建立应用程序运行)
1. 物理主机启动应用发送消息时报错处理。
注:按照教程中集群部署后,物理主机建立应用启动程序会报错

注:解决方法就是在hosts中进行ip地址映射
2. 程序的搭建及说明。
注:主类是这样的, 启用了pulsar注解和定时任务注解
package comp;
import org.springframework.boot.SpringApplication;
import org.springframework.boot.autoconfigure.SpringBootApplication;
import org.springframework.pulsar.annotation.EnablePulsar;
import org.springframework.scheduling.annotation.EnableScheduling;

@SpringBootApplication
@EnablePulsar
@EnableScheduling
public class PulsarApplication {
	public static void main(String[] args) {
		SpringApplication.run(PulsarApplication.class, args);
	}
}
注:使用的application.yml是这样的,其中mongo可以不用
server:
  port: 8200
  servlet:
    context-path: /
spring:
  pulsar:
    client:
      service-url: pulsar://192.168.249.3:6650,192.168.249.4:6650,192.168.249.5:6650
3. 使用到的pom依赖
注:此次测试使用的springboot版本:3.2.2
注:此次测试使用的open jdk版本:17.0.9
<project xmlns="http://maven.apache.org/POM/4.0.0" xmlns:xsi="http://www.w3.org/2001/XMLSchema-instance"
         xsi:schemaLocation="http://maven.apache.org/POM/4.0.0 http://maven.apache.org/xsd/maven-4.0.0.xsd">
    <modelVersion>4.0.0</modelVersion>
    <parent>
        <groupId>org.springframework.boot</groupId>
        <artifactId>spring-boot-starter-parent</artifactId>
        <version>3.2.2</version>
        <relativePath/> <!-- lookup parent from repository -->
    </parent>

    <artifactId>pulsar</artifactId>
    <packaging>jar</packaging>

    <name>pulsar</name>
    <url>http://maven.apache.org</url>

    <properties>
        <project.build.sourceEncoding>UTF-8</project.build.sourceEncoding>
    </properties>

    <dependencies>
        <dependency>
            <groupId>org.springframework.boot</groupId>
            <artifactId>spring-boot-starter-pulsar</artifactId>
        </dependency>
        <!--mq 消费-->
        <dependency>
            <groupId>io.github.majusko</groupId>
            <artifactId>pulsar-java-spring-boot-starter</artifactId>
            <version>1.1.2</version>
            <exclusions>
                <exclusion>
                    <groupId>org.apache.pulsar</groupId>
                    <artifactId>pulsar-client-original</artifactId>
                </exclusion>
            </exclusions>
        </dependency>
        <dependency>
            <groupId>org.projectlombok</groupId>
            <artifactId>lombok</artifactId>
            <optional>true</optional>
        </dependency>
        <dependency>
            <groupId>com.alibaba</groupId>
            <artifactId>fastjson</artifactId>
            <version>2.0.32</version>
        </dependency>
    </dependencies>
</project>
4. springboot中pulsar配置
import jakarta.annotation.PostConstruct;
import lombok.extern.slf4j.Slf4j;
import org.springframework.beans.factory.annotation.Autowired;
import org.springframework.pulsar.core.PulsarTemplate;
import org.springframework.stereotype.Component;
import org.springframework.stereotype.Service;

@Slf4j
@Component
public class PulsarComponent {

    private PulsarTemplate<byte[]> template;

    @Autowired
    private void setTemplate(PulsarTemplate<byte[]> template) {
        this.template = template;
    }

    /**
     * 根据topicName发送消息
     * @param topic
     * @param message
     */
    public void sendMessage(String topic, String message) {
        try {
            template.sendAsync(topic, message.getBytes("utf-8"));
        } catch (Exception e) {
            log.error("发送信息出错{}", e.getMessage());
            e.printStackTrace();
        }
    }

}
5. 接收消息
注:使用注解@PulsarListener
@Service
@Slf4j
public class ConsumeServiceImpl {
    @PulsarListener(
            subscriptionName = "hell",
            topics = "zf",
            subscriptionType = SubscriptionType.Shared,
            schemaType = SchemaType.STRING
    )
    public void saveOperation(String operationLogStr) {
        log.info(operationLogStr);
    }
}
6. 模拟发送消息
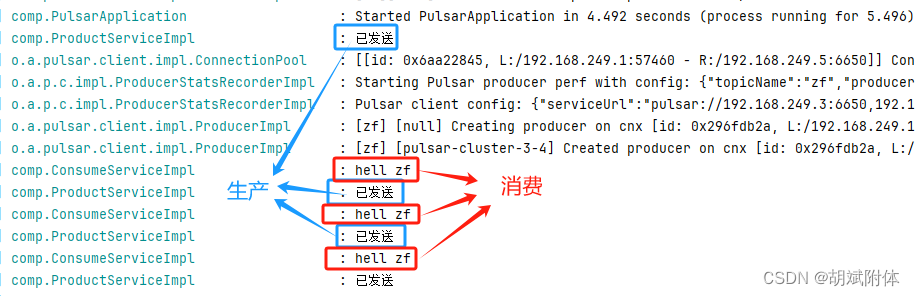
注:使用定时任务模拟发送消息,3s一次
注:生产内容 hell zf
注:topic为 zf
import jakarta.annotation.Resource;
import lombok.extern.slf4j.Slf4j;
import org.springframework.scheduling.annotation.Scheduled;
import org.springframework.stereotype.Service;

@Service
@Slf4j
public class ProductServiceImpl {

    @Resource
    private PulsarComponent pulsarComponent;

    @Scheduled(cron = "0/3 * * * * ?")
    public void spell() {
        log.info("已发送");
        pulsarComponent.sendMessage("zf", "hell zf");
    }

}
7. 发送与接收消息打印输出
总结
- docker容器的部署效率会更高。
若使用docker容器搭建效率应该会更高。后面会使用容器进行搭建发布出来。》》
docker容器的官网使用docker compose插件方式部署,可以尝试一下》》 - 错误问题继续排查。
那个[错误](#err)虽然不影响使用, 但是挺纠结,在尝试使用docker部署时关注这一点,进行纠错, 并在这个文章里进行更新.
pulsar集群安装的文章中提到了如何解决这个问题,但是不起作用 - pulsar的部署需要搭配的内容真不少。
注:bookeeper,主要用于持久化存储等
注:zookeeper,任务的协调,元数据存储
注:broker,负责处理生产和消费的请求 - websocket与pulsar还可以进行搭配
后期还会发布websocket与pulsar消息队列配合的技术文章 》》