文章目录
Ansible自动化运维工具
1、介绍
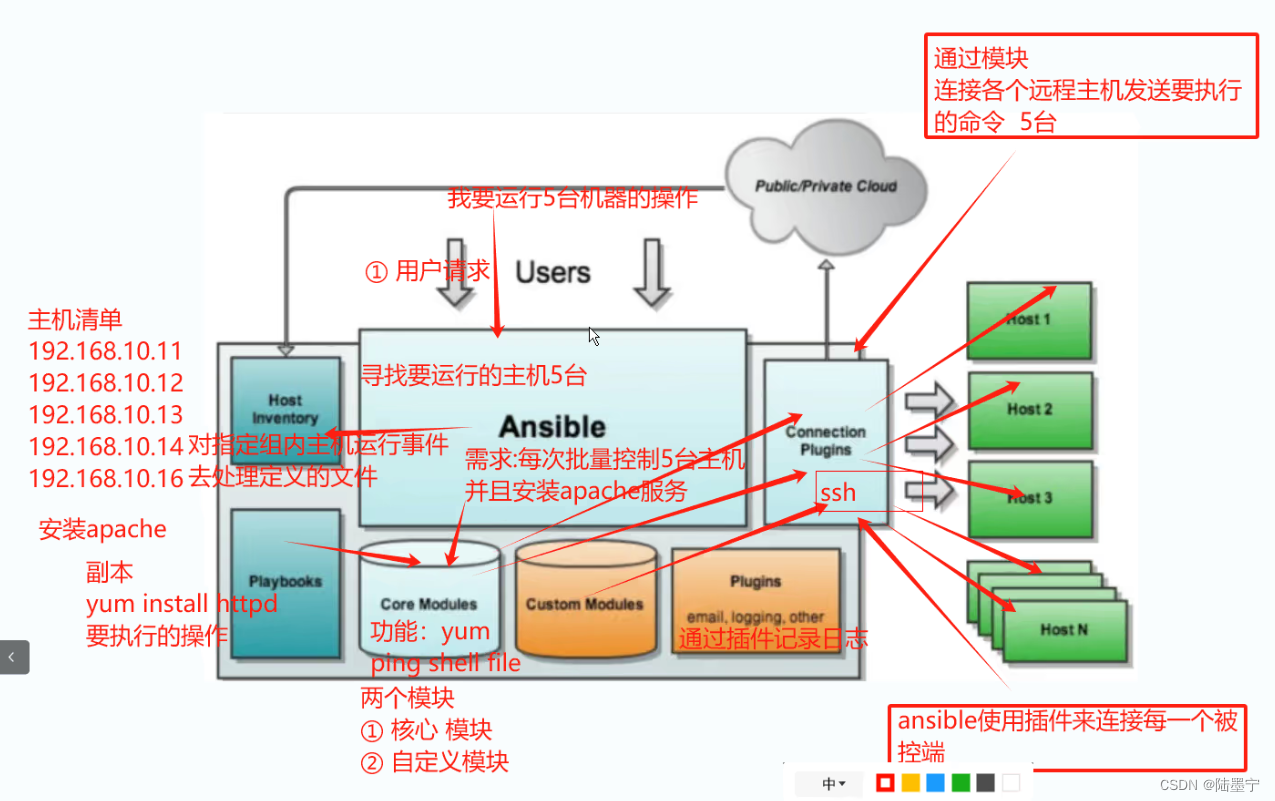
ansible是新出现的自动化运维工具,由python开发,集合了众多自动化运维工具的优点,实现了批量系统部署、批量程序部署,批量运行命令等功能。ansible是基于模块工作的,本身没有批量部署的能力,真正具有批量部署能力的是ansible运行的模块,ansible只是提供一个框架。
1.1 核心组件

- ansbile:核心程序
- modules:包括ansible自带的核心模块以及自定义模块
- plugins:完成模块功能的补充,包括连接插件,邮箱插件
- palybooks:剧本,定义ansbile多任务配置文件,由ansible自动执行
- inventory:定义ansbile管理的主机清单
- connection plugins:负责和被监控端实现通信
1.2 特点
- 不需要在被监控端上安装任何服务程序
- 无服务器端,使用时直接运行命令即可
- 基于模块工作,可以使用任意语言开发
- 使用yaml语言编写playbook
- 基于ssh工作
- 可实现多级指挥
- 具有幂等性,一种操作重复多次执行结果相同
- 执行过程
- 加载自己的配置文件,默认为/etc/ansible/ansible.cfg
- 加载自己对应的模块文件
- 通过ansible将模块或命令生成对应的临时py文件,并将该文件传输至远程服务器
- 对应执行用户的家目录的.ansible/tmp/xx.py文件
- 给文件+x执行
- 执行并将返回结果,删除临时py文件,sleep 0 退出
2、安装部署ansible
- 安装ansible
[root@localhost ~]# yum install epel-release.noarch -y
[root@localhost ~]# yum install -y ansible
- 免密登录
# 三台机器设置hosts解析,方便之后用域名管理
[root@server1 ~]# vim /etc/hosts
192.168.175.10 server1
192.168.175.20 server2
192.168.175.30 server3
# 生成密钥对
[root@server1 ~]# ssh-keygen -P "" -t rsa
# 将公钥发送给需要被管理端,需要输入对方的免密
[root@server1 .ssh]# ssh-copy-id -i /root/.ssh/id_rsa.pub root@server2
[root@server1 .ssh]# ssh-copy-id -i /root/.ssh/id_rsa.pub root@server3
常用命令
- ansible:临时命令执行工具,常用于执行临时命令
- ansible-doc:常用于模块功能的查询
- ansible-playbook:用于执行剧本
常见配置文件
- /etc/ansible/ansible.cfg:主配置文件
- /etc/ansible/hosts:主机清单文件
- /etc/ansible/roles:角色目录
#ansible host配置文件
[root@localhost ~]# cat /etc/ansible/hosts
# This is the default ansible 'hosts' file.
#
# It should live in /etc/ansible/hosts
#
# - Comments begin with the '#' character
# - Blank lines are ignored
# - Groups of hosts are delimited by [header] elements
# - You can enter hostnames or ip addresses
# - A hostname/ip can be a member of multiple groups

# Ex 1: Ungrouped hosts, specify before any group headers.

## green.example.com
## blue.example.com
## 192.168.100.1
## 192.168.100.10

# Ex 2: A collection of hosts belonging to the 'webservers' group

## [webservers] #中括号代表一个组,下面的域名或者ip表示组里的成员
## alpha.example.org
## beta.example.org
## 192.168.1.100
## 192.168.1.110

# If you have multiple hosts following a pattern you can specify
# them like this:

## www[001:006].example.com

# Ex 3: A collection of database servers in the 'dbservers' group

## [dbservers]
##
## db01.intranet.mydomain.net
## db02.intranet.mydomain.net
## 10.25.1.56
## 10.25.1.57

# Here's another example of host ranges, this time there are no
# leading 0s:

## db-[99:101]-node.example.com
#定义自己的组
[all-servers]
server1
server2
server3
[node1]
server2
[node2]
server3


#ansible.cfg文件,默认可以不用改
[root@localhost ~]# vim /etc/ansible/ansible.cfg
[defaults]
# some basic default values...
#inventory = /etc/ansible/hosts
# 定义主机清单文件
#library = /usr/share/my_modules/ # 库
文件的存放位置
#module_utils = /usr/share/my_module_utils/
#remote_tmp = ~/.ansible/tmp
# 生成的临时py文件在远程主机的目录
#local_tmp = ~/.ansible/tmp
# 生成的临时py文件在本地主机的目录
#plugin_filters_cfg = /etc/ansible/plugin_filters.yml #
#forks = 5 # 默认的并发数
#poll_interval = 15 # 默认的线程池
#sudo_user = root # 默认的sudo用户
#ask_sudo_pass = True
#ask_pass = True
#transport = smart
#remote_port = 22
#module_lang = C
#module_set_locale = False
ansible参数说明
-a MODULE_ARGS:指定模块的参数
-m MODULE_NAME:指定模块
-C:检查执行结果
-e EXTRA_VARS:指明变量名
-f FORKS:指定并发进程数
-i INVENTORY:指定主机清单文件
--syntax-check:检查执行命令是否存在语法错误
常用模块
ansible的执行状态
- 绿色:执行成功并且不需要做改变的操作
- 黄色:执行成功并且对目标主机做变更
- 红色:执行失败
- 粉色:警告信息
- 蓝色:显示ansible命令执行的过程
ping 模块:主机连通性测试
[root@server1 ~]# ansible -m ping node1
user 模块
[root@localhost ~]# ansible-doc -l|wc -l
3387 #共有3387个模块
[root@node1 ~]# ansible‐doc ‐s user #查看模块的参数
comment 	# 用户的描述信息
createhom 	# 是否创建家目录
force 		# 在使用`state=absent'是, 行为与`userdel ‐‐force'一致.
group 		# 指定基本组
groups 		# 指定附加组,如果指定为('groups=')表示删除所有组
home 		# 指定用户家目录
name 		# 指定用户名
password 	# 指定用户密码
remove 		# 在使用 `state=absent'时, 行为是与 `userdel ‐‐remove'一致.
shell 		# 指定默认shell
state 		#设置帐号状态,不指定为创建,指定值为absent表示删除
system 		# 当创建一个用户,设置这个用户是系统用户。这个设置不能更改现有用户
uid 		#指定用户的uid
update_password # 更新用户密码
expires 	#指明密码的过期时间

1.添加系统用户,指定uid、家目录、主组及注释
ansible -m user -a "system=yes name=zhangsan home=/home/zhangsan uid=111 group=zhangsan comment='hello zhangsan'" node1
2.删除用户及家目录
ansible -m user -a "name=zhangsan state=absent remove=yes" node1
group
[root@node1 ~]# ansible-doc -s group
‐ name: 添加或删除组
action: group
gid 		# 设置组的GID号
name= 		# 管理组的名称
state 		# 指定组状态,默认为创建,设置值为absent为删除
system 		# 设置值为yes,表示为创建系统组
ansible -m group -a "name=eagles gid=111 system=yes" node1
ansible -m group -a "name=eagles gid=111 state=absent" node1
command
1.默认使用的模块
2.不支持管道,变量及重定向等
[root@node1 ~]# ansible-doc -s command
- name: Execute commands on targets
command:
argv: # Passes the command as a list rather than a string. Use `argv' to
		avoid quoting values that would
		otherwise be interpreted incorrectly
		(for example "user name"). Only the
		string or the list form can be
		provided, not both. One or the other
		must be provided.
	chdir: # Change into this directory before running the command.
	cmd: # The command to run.
	creates: # A filename or (since 2.0) glob pattern. If it already exists, this
		step *won't* be run.
	free_form: # The command module takes a free form command to run. There is no
		actual parameter named 'free form'.
	removes: # A filename or (since 2.0) glob pattern. If it already exists, this
		step *will* be run.
	stdin: # Set the stdin of the command directly to the specified value.
	stdin_add_newline: # If set to `yes', append a newline to stdin data.
	strip_empty_ends: # Strip empty lines from the end of stdout/stderr in result.
	warn: # Enable or disable task warnings.
[root@node1 ~]# ansible -a "touch /root/ansible.txt" all-servers
[root@node1 ~]# ansible -a "find / -name ansible.txt" all-servers
shell
1.调用bash执行命令
2.但是某些复杂的操作即使使用shell也可能会失败
解决方法:将操作写到脚本中,通过script模块
[root@node1 ~]# ansible -m shell -a "find / -name ansible.txt" all-servers
script
free_form参数: 必须参数,指定需要执行的脚本,脚本位于 ansible 管理主机本地,并没有具体2的一个参数名叫 free_form,具体解释请参考 command 模块。
chdir参数: 此参数的作用就是指定一个远程主机中的目录,在执行对应的脚本之前,会先进入到chdir 参数指定的目录中。
creates参数: 使用此参数指定一个远程主机中的文件,当指定的文件存在时,就不执行对应脚本,可参考 command 模块中的解释。
removes参数: 使用此参数指定一个远程主机中的文件,当指定的文件不存在时,就不执行对应脚本,可参考 command 模块中的解释。
[root@server1 ~]# vim test.sh
#!/bin/bash
for i in `seq 5`
do
mkdir -v /root/test_${i}.txt
rmdir -v /root/test_${i}.txt
done
[root@server1 ~]# ansible -m script -a '/root/test.sh chdir=/tmp creates=test2' node2
copy
[root@node1 ~]# ansible-doc -s copy
backup:在覆盖之前,将源文件备份,备份文件包含时间信息。
content:用于替代“src”,可以直接设定指定文件的值
dest:必选项。要将源文件复制到的远程主机的绝对路径
directory_mode:递归设定目录的权限,默认为系统默认权限
force:强制覆盖目的文件内容,默认为yes
others:所有的file模块里的选项都可以在这里使用
src:被复制到远程主机的本地文件,可以是绝对路径,也可以是相对路径。如果路径是一个目录,它将递归复制
ansible -m copy -a "src=/本地文件 dest=/远程文件" nodes
- 在创建文件时修改文件的属主和属组信息
[root@server1 ~]# ansible -m copy -a "src=/root/test.sh dest=/root/test1 owner=zhangsan group=eagles" node1
- 在传输文件时修改文件的权限信息,并且备份远程主机文件
[root@server1 ~]# ansible -m copy -a "src=/root/test.sh dest=/root/test1 backup=yes mode=777" node1
- 创建一个文件并直接编辑文件
[root@server1 ~]# ansible -m copy -a "content='hello eagles\n' dest=/root/test1" node1
file
[root@node1 ~]# ansible‐doc ‐s file
‐ name: Sets attributes of files
	force:需要在两种情况下强制创建软链接,一种是源文件不存在,但之后会建立的情况下;另一种是目标软链接已存在,需要先取消之前的软链,然后创建新的软链,有两个选项:yes|no
	group:定义文件/目录的属组
	mode:定义文件/目录的权限
	owner:定义文件/目录的属主
	path:必选项,定义文件/目录的路径
	recurse:递归设置文件的属性,只对目录有效
	src:被链接的源文件路径,只应用于state=link的情况
	dest:被链接到的路径,只应用于state=link的情况
  state:
	absent: 删除文件
	directory:如果目录不存在,就创建目录
	file:验证文件是否存在,即使文件不存在,也不会被创建

	link:创建软链接
	hard:创建硬链接
	touch:如果文件不存在,则会创建一个新的文件,如果文件或目录已存在,则更新其后修改时间
- 创建目录
[root@server1 ~]# ansible -m file -a "name=test1 owner=root group=root mode=644 state=directory " node1
- 创建文件
[root@server1 ~]# ansible -m file -a "path=/root/test2 owner=root group=root mode=644 state=touch" node1
- 删除文件/目录
[root@server1 ~]# ansible -m file -a "path=/root/test2 state=absent" node1
- 创建软链接文件
[root@server1 ~]# ansible -m file -a "src=/root/test1 dest=/root/test2 state=link" node2
- 创建硬链接文件
[root@server1 ~]# ansible -m file -a "src=/root/test.txt dest=/root/test2 state=hard" node2
yum
[root@node1 ~]# ansible‐doc ‐s yum
	conf_file 			#设定远程yum安装时所依赖的配置文件。如配置文件没有在默认的位置。
	disable_gpg_check 	#是否禁止GPG checking,只用于`present' or `latest'。
	disablerepo 		#临时禁止使用yum库。 只用于安装或更新时。
	enablerepo 			#临时使用的yum库。只用于安装或更新时。
	name= 				#所安装的包的名称
	state 				#present安装, latest安装新的, absent 卸载软件。
	update_cache 		#强制更新yum的缓存
[root@node1 ~]# ansible -m yum -a "name=httpd state=latest" node1
service
[root@server1 ~]# ansible-doc -s service
> SERVICE (/usr/lib/python2.7/site‐packages/ansible/modules/system/service.py)
		Controls services on remote hosts. Supported init systems include BSD init, OpenRC, SysV, Solaris
		SMF, systemd, upstart. For Windows targets, use the [win_service] module instead.
  * note: This module has a corresponding action plugin.
  arguments 	#命令行提供额外的参数
  enabled 		#设置开机启动,可以设置为yes或者no。
  name= 		#服务名称
  runlevel 		#开机启动的级别,一般不用指定。
  sleep 		#在重启服务的过程中,是否等待。如在服务关闭以后等待2秒再启动。
  state 		#started启动服务, stopped停止服务, restarted重启服务, reloaded重载33配置
[root@node1 ~]# ansible -m service -a "name=httpd state=started" node1
selinux
[root@node1 ~]# ansible-doc -s selinux
# selinux模块针对selinux的修改操作是针对配置文件进行修改的
‐ name: Change policy and state of SELinux
selinux:
	configfile: # path to the SELinux configuration file, if non‐standard
	policy: # name of the SELinux policy to use
	state: # (required) The SELinux mode
[root@node1 ~]# ansible -m selinux -a "state=enforcing policy=targeted" node1
- setup
ansible -m setup node1 #获取远程主机的详细信息
ansible-doc -l # 可以查询ansible具有的所有模块
https://docs.ansible.com/ansible/latest/index.html # 官方文档
3、Playbook
简介
playbook是由一个或者多个play组成的列表,可以让这些列表按事先编排的机制执行;所谓task是调用ansible的具体模块,在模块参数中可以使用变量。模块执行是幂等性的,意味着多次执行结果相同。使用yaml语言编写playbook,后缀名一般为.yml
特点
yaml语言的参考博客http://www.ruanyifeng.com/blog/2016/07/yaml.html
- yaml的可读性好
- yaml和脚本语言的交互性好
- yaml使用实现语言的数据类型
- yaml有一个一致性的信息模型
- yaml易于实现
- yaml可以基于流来处理
核心字段
- hosts:执行的远程主机列表
- tasks:任务,由模块定义操作列表
- variables:内置变量或者自定义变量
- templates:模板,定义模板文件,模板文件一般是由jinja2语言编写的
- handlers:和nogity结合使用,为条件触发操作,满足条件则执行
- roles:角色
官方示例
在线检测工具:http://www.yamllint.com/
[root@localhost ~]# mkdir playbook
[root@localhost ~]# vim playbook/test1.yaml
- name: update web servers
	hosts: node1
	remote_user: root

	tasks:
	- name: ensure apache is at the latest version
	  yum:
		name: httpd
		state: latest
	- name: write the apache config file
	  template:
		src: /srv/httpd.j2
		dest: /etc/httpd.conf
	- name: ensure that htppd is started
	  service:
		name: httpd
		state: started
- name: update db servers
  hosts: node1
  remote_user: root

  tasks:
  - name: ensure mariadb is at the latest version
	yum:
	  name: mariadb-server
	  state: latest
  - name: ensure that mariadb is started
	service:
	  name: mariadb
	  state: started
[root@localhost ~]# ansible-playbook playbook/test1.yaml
案例, apache虚拟主机
- 准备配置文件
[root@server1 playbook]# cat /root/playbook/file/site2.conf
Listen 8080
Listen 9090

<Directory "/data/">
Require all granted
</Directory>

<VirtualHost *:8080>
DocumentRoot "/data/site1/"
</VirtualHost>

<VirtualHost *:9090>
DocumentRoot "/data/site2/"
</VirtualHost>
- 准备剧本文件
[root@server1 playbook]# vim apache-virtualhost-port.yaml
- name: Update web servers
  hosts: node1
  remote_user: root

  tasks:
  - name: ensure apache is the latest version
	yum:
	  name: httpd
	  state: latest

  - name: copy site2.conf to apache web server
	copy:
	  src: /root/playbook/file/site2.conf
	  dest: /etc/httpd/conf.d/site2.conf

  - name: create directory1 for apache web server
	file:
	  name: /data/site1/
	  state: directory

  - name: create directory2 for apache web server
	file:
	  name: /data/site2/
	  state: directory

  - name: write index.html
	shell: echo "site1" > /data/site1/index.html && echo "site2" > /data/site2/index.html

  - name: start apache web server
	service:
	  name: httpd
	  state: restarted

  - name: test virtual hosts
	shell: curl 192.168.175.20:8080 && curl 192.168.175.20:9090
- 执行
[root@server1 playbook]# ansible-playbook apache-virtualhost-port.yaml --syntax-check
[root@server1 playbook]# ansible-playbook apache-virtualhost-port.yaml
- 测试
[root@server1 playbook]# curl 192.168.175.20:8080
site1
[root@server1 playbook]# curl 192.168.175.20:9090
site2


![练习11 Web [极客大挑战 2019]Http](https://img-blog.csdnimg.cn/direct/0f14ec3179d94102982986509f8b29af.png)